You can attach elastic cloud disks to a CVM instance in the same availability zone as a data disk. Up to 20 data disks can be attached to a CVM instance.
This document describes how to attach cloud disks to a CVM instance in the console and by using an API.
Note:
Some Linux CVMs may not recognize an elastic cloud disk. You must first enable the disk hot swapping feature in the CVM. For more information, see Enabling the disk hot swapping feature.
You can use the AttachDisks API to attach cloud disks. For more information, see AttachDisks.
Related Operations
Enabling the disk hot swapping feature
All existing images already support attaching and detaching elastic cloud disks. To detach a cloud disk, you must first run the umount command in Linux CVM or perform offline operations in Windows CVM. Otherwise, the reattached elastic cloud disk may not be recognized.
Note:
Hot swapping is only recommended for CVMs with the following operating systems.
If you still need to load the acpiphp module after shutting down or re-starting the CVM, we recommend you run Step 3 to set the acpiphp module to autoload.
3. (Optional) If you need to load the acpiphp module automatically after shutting down or re-starting the CVM, run the following command according to the operating system.
CentOS 5 Series
Debian 6 Series, Ubuntu 10.04 Series
openSUSE 12.3 Series
1. Run the following command to create and open the acpiphp.modules file.
vi /etc/sysconfig/modules/acpiphp.modules
2. Add the following content to the file, and save it.
#!/bin/bash
modprobe acpiphp >& /dev/null
3. Run the following command to grant execute permissions on the file.
chmod a+x /etc/sysconfig/modules/acpiphp.modules
1. Run the following command to modify the file.
vi /etc/modules
2. Add the following content to the file, and save it.
acpiphp
1. Run the following command to modify the file.
vi /etc/sysconfig/kernel
2. Add the following content to the file, and save it.
MODULES_LOADED_ON_BOOT="acpiphp"
Attaching data disks automatically upon instance creation
If you specify a custom image and data disk snapshot while creating a CVM instance, the cloud disk created at the same time is automatically attached to the CVM and can be read and written without being initialized by partitioning, formatting and other operations. However, the specified custom images and data disk snapshots must meet the following requirements.
Windows instances
Linux instances
If you use a custom image to create a Windows CVM instance, the cloud disk created from the corresponding data disk snapshot will be automatically attached. The custom image and the data disk snapshot must meet the following requirements:
The data disk must be formatted to ntfs or fat32 before you create a snapshot.
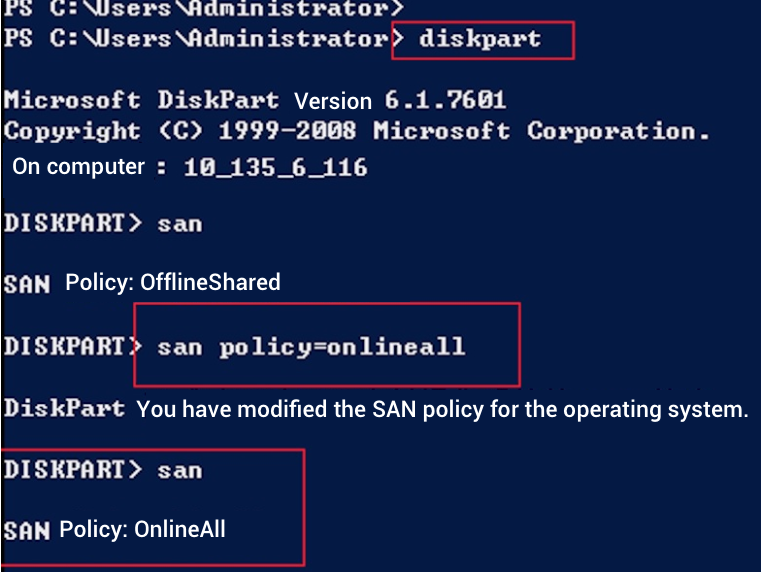
The SAN policy in the custom image is onlineAll.
Checking configurations
Tencent Cloud provides pre-configured public images for Windows by default, but we still recommend that you perform the following steps to check configurations before creating a custom image. Run the following commands in order and check the returned results.
diskpart
san
See below:
If you use a custom image to create a Linux CVM instance, the cloud disk created from the corresponding data disk snapshot will be automatically attached. The custom image and the data disk snapshot must meet the following requirements:
The data disk must be formatted and attached to the source CVM.
Add the following commands to the /etc/rc.local file to configure the mount point of the data disk before creating a system disk on the system disk.
mkdir -p <mount-point>
mount<device-id><mount-point>
Note:
Replace <mount-point> with the mount point of the file system, such as /mydata.
Replace <device-id> with the partition path of the file system. For example, enter /dev/vdb if the file system has no partition, and /dev/vdb1 if the file system has partitions.

 Yes
Yes
 No
No
Was this page helpful?