Getting Started
Download
Mode fokus
Ukuran font
You can easily access the Internet through a NAT gateway by completing the following steps.
Step 1: Ceate a NAT Gateway
Note:
A rental fee for one hour will be frozen upon creation of the NAT gateway.
1. Log in to the NAT Gateway console.
2. Click +New in the top-left corner to access the Create NAT gateway page. Enter or confirm the following parameters:
Parameter | Description |
Gateway name | Enter the NAT gateway name with up to 60 characters. |
Region | Select a region for the NAT gateway. |
VPC | Select a VPC for the NAT gateway. |
Gateway type | The types include: Small (a maximum of 1,000,000 connections) Medium (a maximum of 3,000,000 connections) large (a maximum of 10,000,000 connections) |
Outbound bandwidth cap | The maximum outbound bandwidth cap of the NAT gateway. Valid values: 10, 20, 50, 100, 200, 500, 1000, 2000 and 5000. Unit: Mbps. |
EIP configuration | You can configure the EIPs associated with the NAT gateway using existing EIPs or by creating EIPs. If you select an existing EIP, you must make sure that there are idle EIPs in the same region with the NAT gateway under the account. You can select an EIP in the drop-down list and configure its bandwidth cap as needed. If you choose to create an EIP, a bill-by-traffic general BGP IP is created automatically. You can configure the EIP quantity and the bandwidth cap as needed. |
Note:
When the public network is accessed through the EIP bound to a NAT gateway, the public network traffic is limited by the lower of the NAT gateway’s or EIP’s bandwidth cap. To ensure that the traffic peak is within the NAT gateway’s bandwidth cap and avoid packet loss, we recommend:
When you create a NAT gateway, the outbound bandwidth cap needs to be smaller or equal to the total bandwidth caps of EIPs to be bound.
For an existing NAT gateway that already bound with an EIP, you can modify the outbound bandwidth cap of the NAT gateway or EIP, or bind multiple EIPs, ensuring that the outbound bandwidth cap of the NAT gateway is smaller or equal tothe total bandwidth caps of bound EIPs.
3. Purchase as prompted after the parameters are configured.
Step 2: Configure a Route Table Associated with the Subnet
After the NAT gateway is created, you need to configure routing policies to direct the subnet traffic to the NAT gateway.
1. In the NAT gateway list, click the VPC ID of the target NAT gateway.
2. Click Subnets in the VPC details page.
3. In the Subnets list, find the subnet that needs to access the internet and click the route table ID.
4. Click +New routing policies on the Basic information page.
5. In the Add route box, enter the destination (public IP range), select NAT gateway in Next hop type and choose an existing NAT gateway.
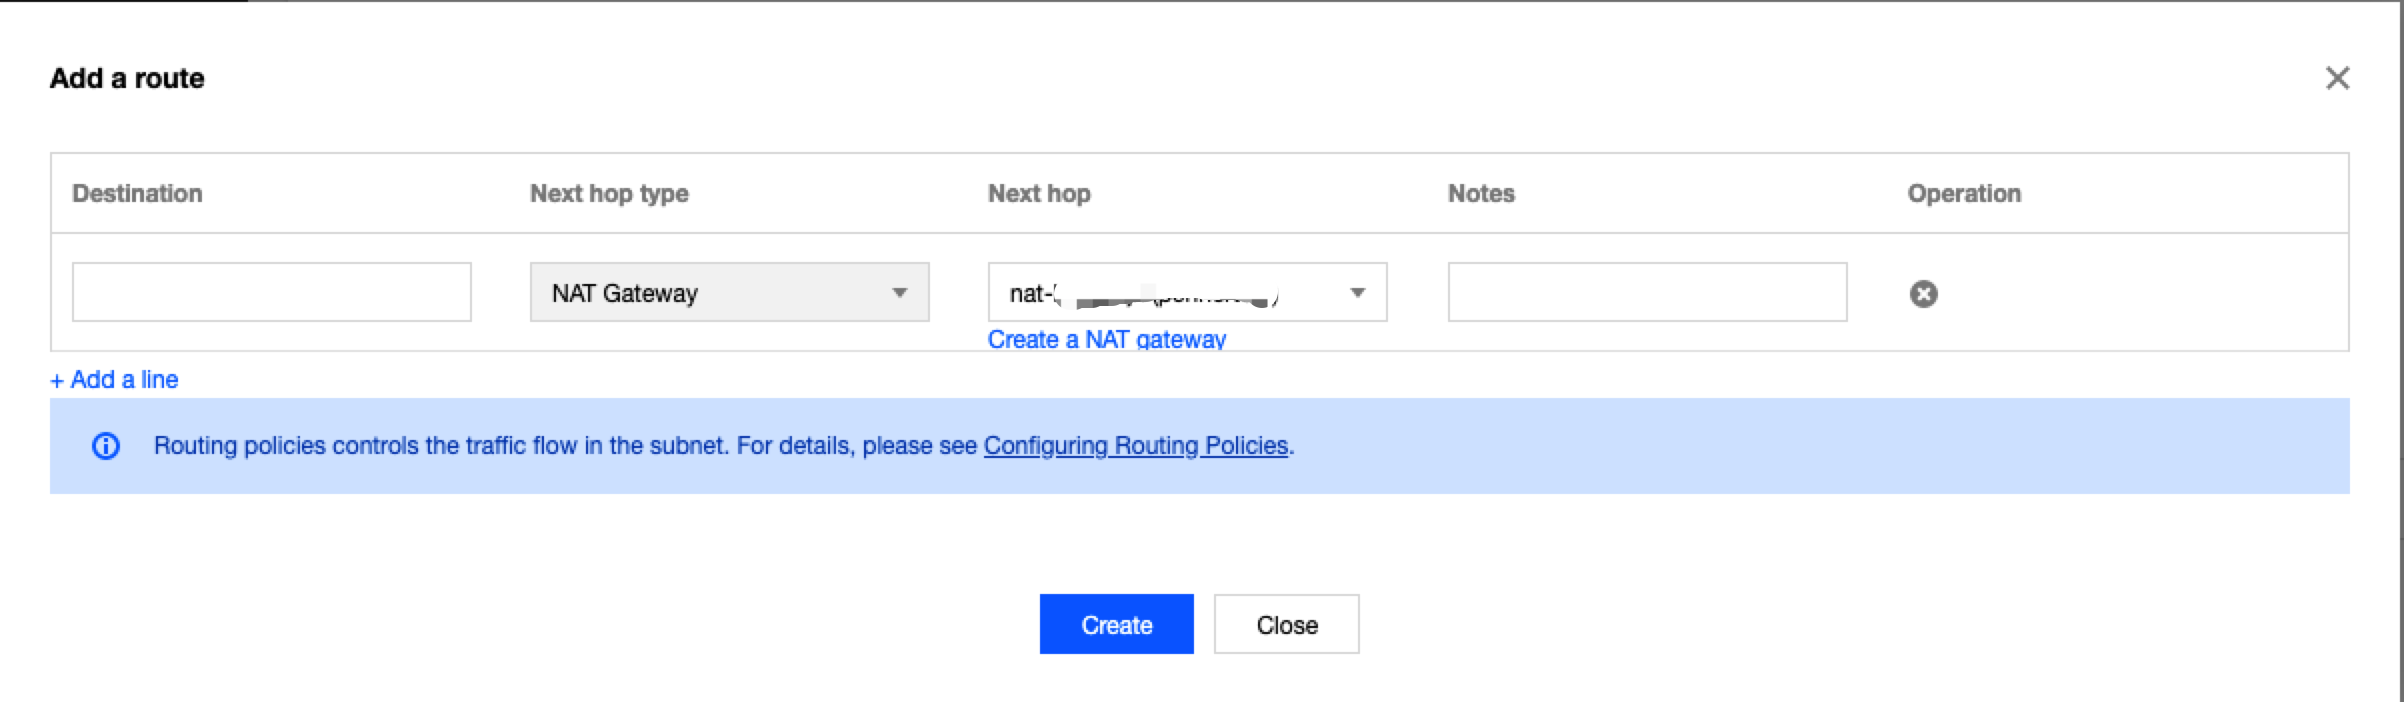
6. Click Create to complete the configuration.
Step 3: Enable the Gateway Traffic Monitoring Details (optional)
If Gateway Traffic Monitoring Details is enabled, you can view the metrics of IP traffic flowing through a NAT gateway over the last 7 days, and set an outbound bandwidth of the specified NAT gateway for traffic from an IP address.
1. Log in to the NAT Gateway console.
2. Locate the NAT gateway for which you want to enable the gateway traffic monitoring feature, and click the ID/Name to enter its details page.
3. Open the Monitoring tab, and enable Gateway Traffic Monitoring Details in the upper-right corner.
It will take 5 to 6 minutes to collect and publish data before you can view detailed monitoring graphs.

Bantuan dan Dukungan
Apakah halaman ini membantu?
Anda juga dapat Menghubungi Penjualan atau Mengirimkan Tiket untuk meminta bantuan.
masukan