- Introduction
- Purchase Guide
- Getting Started
- Advanced Guide
- Serverless Framework Component
- Operation Guide
- Components Usage Examples
- FAQs
- Framework Support
- Deploying Framework on Command Line
- Quickly Deploying Egg Framework
- Quickly Deploying Koa Framework
- Quickly Deploying Express Framework
- Quickly Deploying Next.js Framework
- Quickly Deploying Nuxt.js Framework
- Quickly Deploying Flask Framework
- Quickly Deploying Laravel Framework
- Quickly Deploying Nest.js Framework
- Quickly Deploying Django Framework
- Quickly Deploying Native WordPress Application
- Contact Us
Quickly Deploying Native WordPress Application
Last updated: 2021-08-20 16:21:27
Tencent Cloud Serverless Framework provides a new deployment method for WordPress based on the serverless architecture. By using the Serverless Framework WordPress component, you can quickly deploy a WordPress project in just a few steps.
Architecture Overview
This component mainly creates the following resources for you:
| Module | Description |
|---|---|
| SCF | It implements the access layer of Serverless WordPress to run WordPress |
| API Gateway | It is the ingress of WordPress and implements RESTful APIs |
| CFS | It is the serverless storage warehouse for WordPress |
| You can create a TDSQL-C for MySQL serverless database to implement a pay-as-you-go and automatically scalable database service | |
| VPC | It is used to connect SCF, CFS, and TDSQL-C Serverless over the private network to ensure network isolation |
Features
- Support for native WordPress framework
With the Serverless WordPress component, you can directly deploy native WordPress projects without having to make any modifications, which is non-intrusive to the framework and supports subsequent version upgrade. - Reduced costs
From the access layer to compute layer to storage layer, everything uses serverless resources to truly implement pay-as-you-go billing and auto scaling, greatly reducing the costs. - Easy deployment
With the Serverless WordPress component, you can quickly complete WordPress application deployment by using just a few lines of configuration in a YAML file, greatly lowering the deployment threshold.Deployment Steps
You can deploy Serverless WordPress on the command line or in the console in the following steps:
Prerequisites
Deployment in console
Note:Currently, only four regions are supported: Beijing, Guangzhou, Nanjing, and Shanghai.
- Log in to the SAC console and click Create Application.
- Enter the application name as prompted, select Application Template > WordPress Application, and click Create to create an application.
- On the serverless application page, click Access Application to access your WordPress project. You can also configure a custom domain name on the application details page.
Deployment on command line
Note:Currently, only four AZs are supported:
ap-guangzhou-4,ap-shanghai-2,ap-beijing-3, andap-nanjing-1.
- Create the
wordpress-demofolder locally and download the application from the WordPress official website into it. - In the folder, create the
serverless.ymlconfiguration file and complete application configuration as follows (for more information on the configuration, please see the configuration document):After you complete the above configuration, your project structure will be as follows:app: wordpress
stage: dev
component: wordpress
name: wordpressDemo
inputs:
region: ap-shanghai # Project region
zone: ap-shanghai-2
src: # Project path, which should be your WordPress path
src: ./wordpress
exclude:
- .env
apigw: # API Gateway configuration
customDomains: # (Optional) Bind a custom domain name
- domain: abc.com # The custom domain name to be bound
certId: abcdefg # Unique certificate ID of the custom domain name to be bound
customMap: true # Whether the path is custom
pathMap:
- path: /
environment: release
protocols: # Type of the protocol of the custom domain name to be bound, which is the same as that of the frontend service protocol
- http
- https.wordpress-demo
├── wordpress # WordPress source file
├── serverless.yml # Configuration file
└── .env # Environment variable file - In the root directory, run
sls deployto complete the deployment. Below is an example:$ sls deploy
serverless ⚡framework
Action: "deploy" - Stage: "dev" - App: "appDemo" - Instance: "wordpressDemo"
region: ap-shanghai
zone: ap-shanghai-2
vpc:
...
cfs:
...
db:
...
apigw:
created: true
url: https://service-xxxxx.sh.apigw.tencentcs.com/release/
...
layer:
...
wpInitFaas:
...
wpServerFaas:
... - After the deployment succeeds, click the URL output in the
apigwpart, configure the account and password as prompted, and you can start using your WordPress application.
FAQs
What should I do if deployment failed due to permission problems?
- Check whether the root account/sub-account has the following permissions:
- Check roles: SCF_QcsRole, SLS_QcsRole, and CODING_QcsRole
- Check permissions:
SCF_QcsRolemust have the CFSFullAccess permissionCODING_QCSRolemust have the QcloudSLSFullAccess, QcloudSSLFullAccess, and QcloudAccessForCODINGRole permissions
- For a sub-account, you also need to check the following permissions:
The account should have permissions to use SLS, SCF, CFS, TDSQL-C, and CODING.
After a custom domain name was bound, the error message {"message":"There is no api match env_mapping '\/'"} was reported. What should I do?
Modify the custom mapping in the API Gateway console as shown below: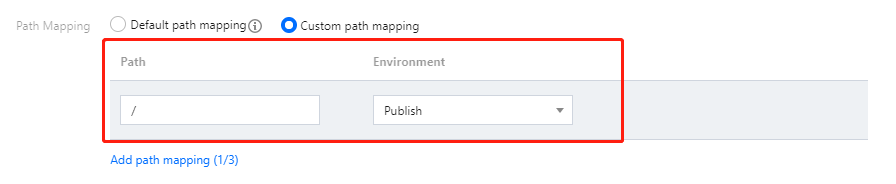
How do I modify php.ini to change the limit on the size of uploaded files?
- Modify the layer code. Move the
php.inifile in theetcfolder to theetc/php.dfolder. You can also directly use the package provided by Tencent Cloud.
When packaging and uploading the layer again, pay attention to the hierarchy in the package and compress only files in the parent directory; otherwise, function initialization will fail:
- Modify the bootstrap code of the
wp-server-xxxfunction as follows:#!/bin/bash export PATH="/opt/bin:$PATH" export LD_LIBRARY_PATH=/opt/lib/:$LD_LIBRARY_PATH export PHP_INI_SCAN_DIR=/opt/etc/php.d php -d extension_dir=/opt/lib/php/modules/ sl_handler.php 1>&2
How do I troubleshoot the "event too large" error?
Currently, you can only upload an event of up to 6 MB in size for a function. Larger files cannot be uploaded.
Currently, Base64 encoding by API Gateway will increase your code size by 1.5 times. Therefore, we recommend you upload a file below 3.5 MB in size.
How do I modify files in the WordPress root directory?
Currently, such files are mounted to CFS and cannot be modified directly. We recommend you install the File Manager plugin to manage files in the root directory.

 Yes
Yes
 No
No
Was this page helpful?