Feature Overview
If the system preset templates cannot meet your needs, you can choose custom templates. Currently, there are four types: Media Processing, Intelligent Speech, Image Processing, and CR. Under each type, you can create custom templates with different features.
|
Media Processing | Audio/Video Transcoding, TSC, Picture Quality Enhancement, Highlights, Video Frame Capture, Video to GIF, Smart Cover, Video Watermarking, Audio/Video Splicing, Broadcasting TV Professional Format Transcoding |
Intelligent Voice | ASR, Voice Separation, TTS, Audio Noise Reduction |
Image Processing | Image Processing Template |
CR | General OCR, Video Object Detection |
Media Processing
Audio/Video transcoding
Audio/Video Transcoding provides transcoding capabilities for media files such as audio and video, which is the process of converting one bitstream into another. Through transcoding, parameters like encoding format, resolution, and bitrate of the original bitstream can be modified to adapt to playback on different terminals and network environments. Custom audio/video transcoding templates allow for custom settings of template parameters.
Operation Steps
2. In the left sidebar, click Bucket Management to go to the Bucket Management page.
3. Click the Bucket Name or Manage in the right operation bar to go to the corresponding Bucket page.
4. In the left sidebar, click Task & Workflow > Template Configuration to go to the Template Configuration page.
5. Select Media Processing > Audio/Video Transcoding, and click Create Audio/Video Transcoding Template.
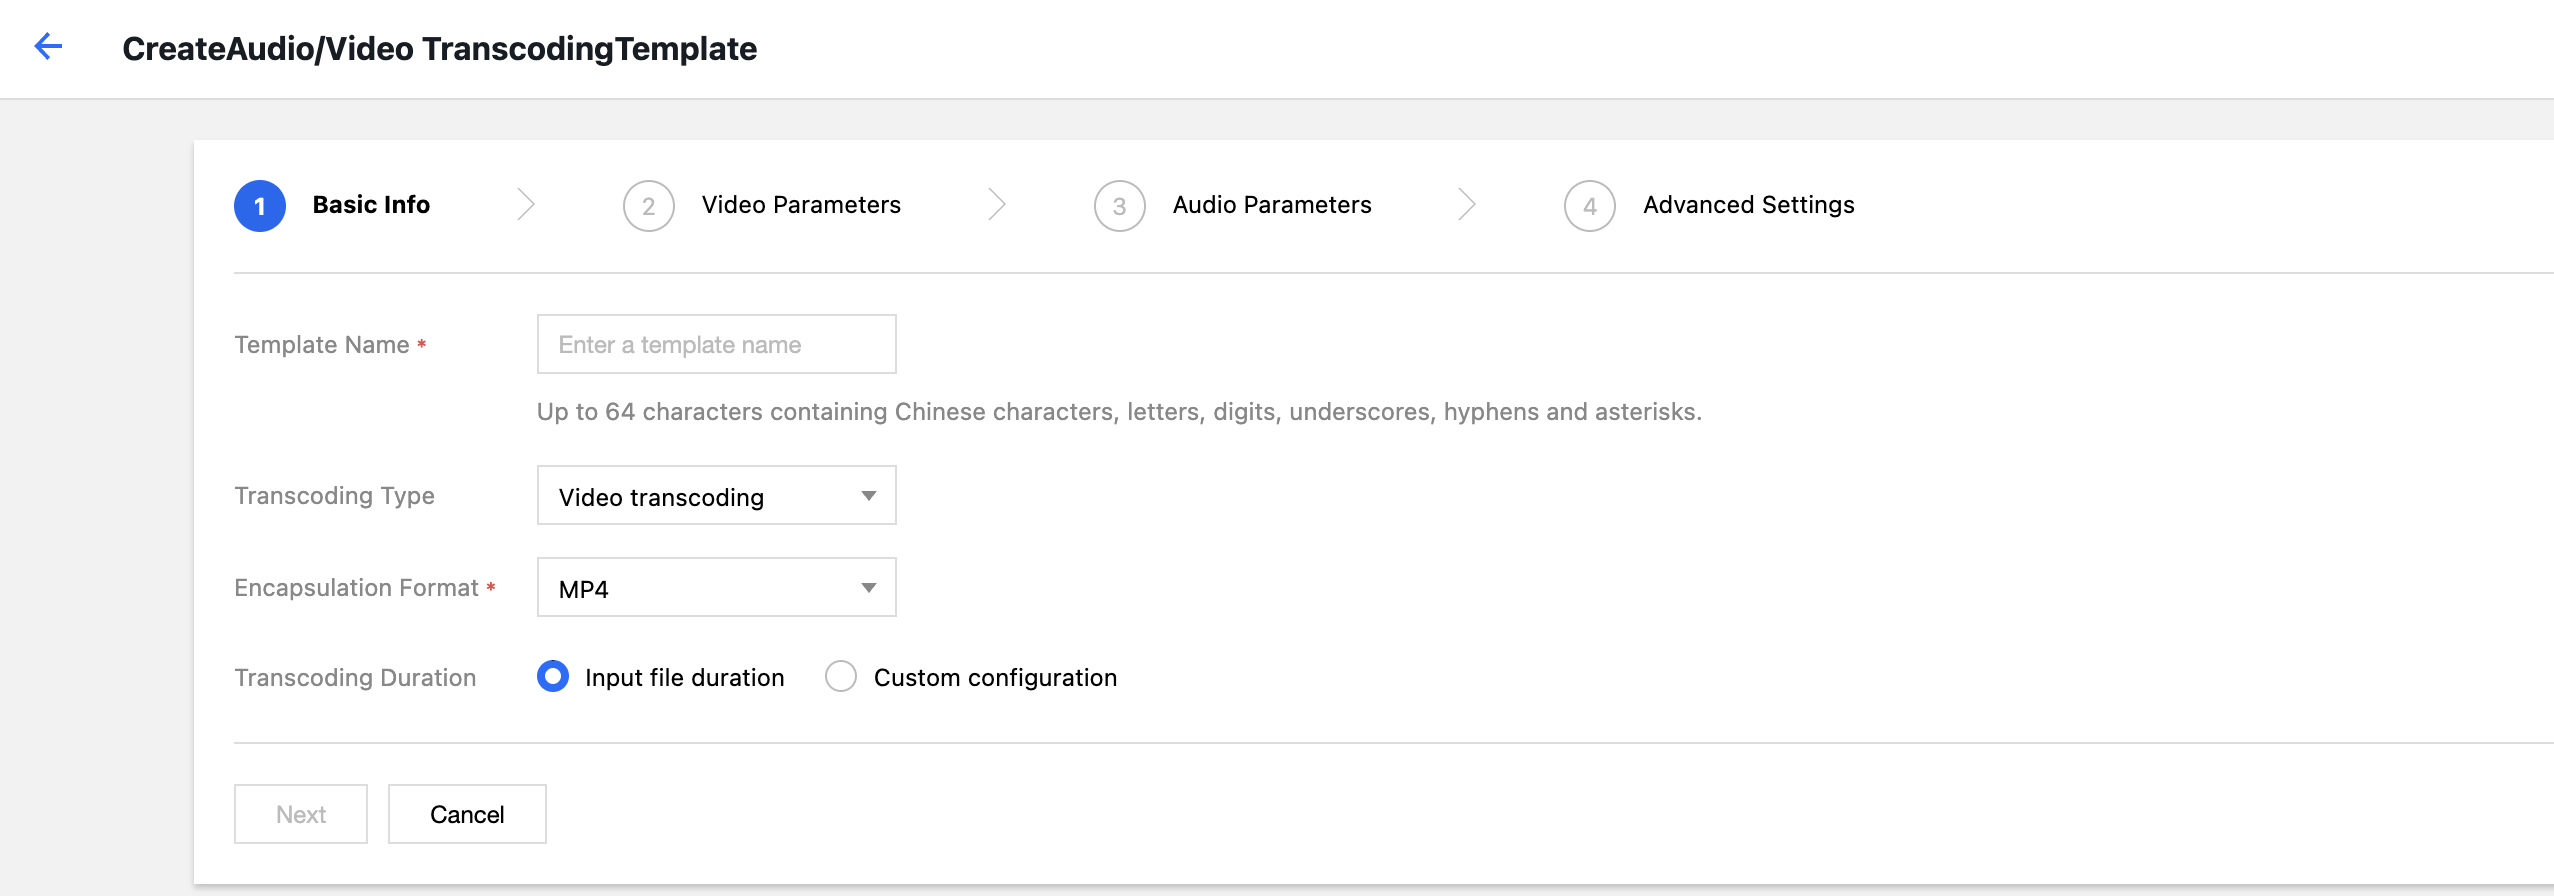
6. In the pop-up Create Audio/Video Transcoding Template window, configure the settings step by step.
The configuration items are described as follows:
Basic information
Template Name: Up to 64 characters. Only Chinese, English, digits, underscore (_), hyphen (-), and asterisk (*) are supported.
Transcoding Type: Available options: Video Transcoding, Audio Transcoding.
Encapsulation Format: Formats such as MP4, FLV, and HLS can be selected.
Transcoding Duration: Can be selected as source video duration or custom configured duration.
Video Parameters
Remove Video Stream: You can choose to remove the video stream and keep only the audio stream.
Encoding Format: Converts files from the original video format to the selected encoding format.
Bitrate: You can choose adaptive bitrate, custom bitrate, or adjust the bitrate using the bitrate control factor. When adaptive bitrate is selected, the system will automatically analyze the video content and allocate the optimal bitrate.
Peak Bitrate: Limits the maximum instantaneous bitrate of the video.
Resolution: Controls the frame size of the output video.
Video Frame Rate: The frequency at which bitmap images appear consecutively on the display, measured in frames.
Encoding Level: Controls the video compression ratio.
Rotation Angle: Controls the orientation of the video content.
Video Color Format: Controls the encoding rules for color data.
Audio Parameters: Audio parameters can be customized according to user requirements.
Advanced Settings: Advanced setting parameters can be customized according to user requirements.
7. Click Complete to finish creating the template.
After creation, you can view, edit, clone, and delete the newly created template in the custom template list.
Note:
You can use Cloud Infinite to create tasks or workflows to apply audio/video transcoding templates. Top Speed Codec Transcoding
TSC transcoding can enhance the subjective video quality at lower bitrates compared to standard transcoding. It delivers smaller file sizes and clearer visuals while consuming fewer network resources, providing users with a superior viewing experience. You can customize parameters such as encoding format, resolution, and bitrate using TSC transcoding templates.
Operation Steps
2. In the left sidebar, click Bucket Management to go to the Bucket Management page.
3. Click the Bucket Name or Manage in the right operation bar to go to the corresponding Bucket page.
4. In the left sidebar, click Tasks & Workflows > Template Configuration to go to the Template Configuration page.
5. Select Media Processing > Top Speed Codec Transcoding, and click Create Top Speed Codec Transcoding Template.
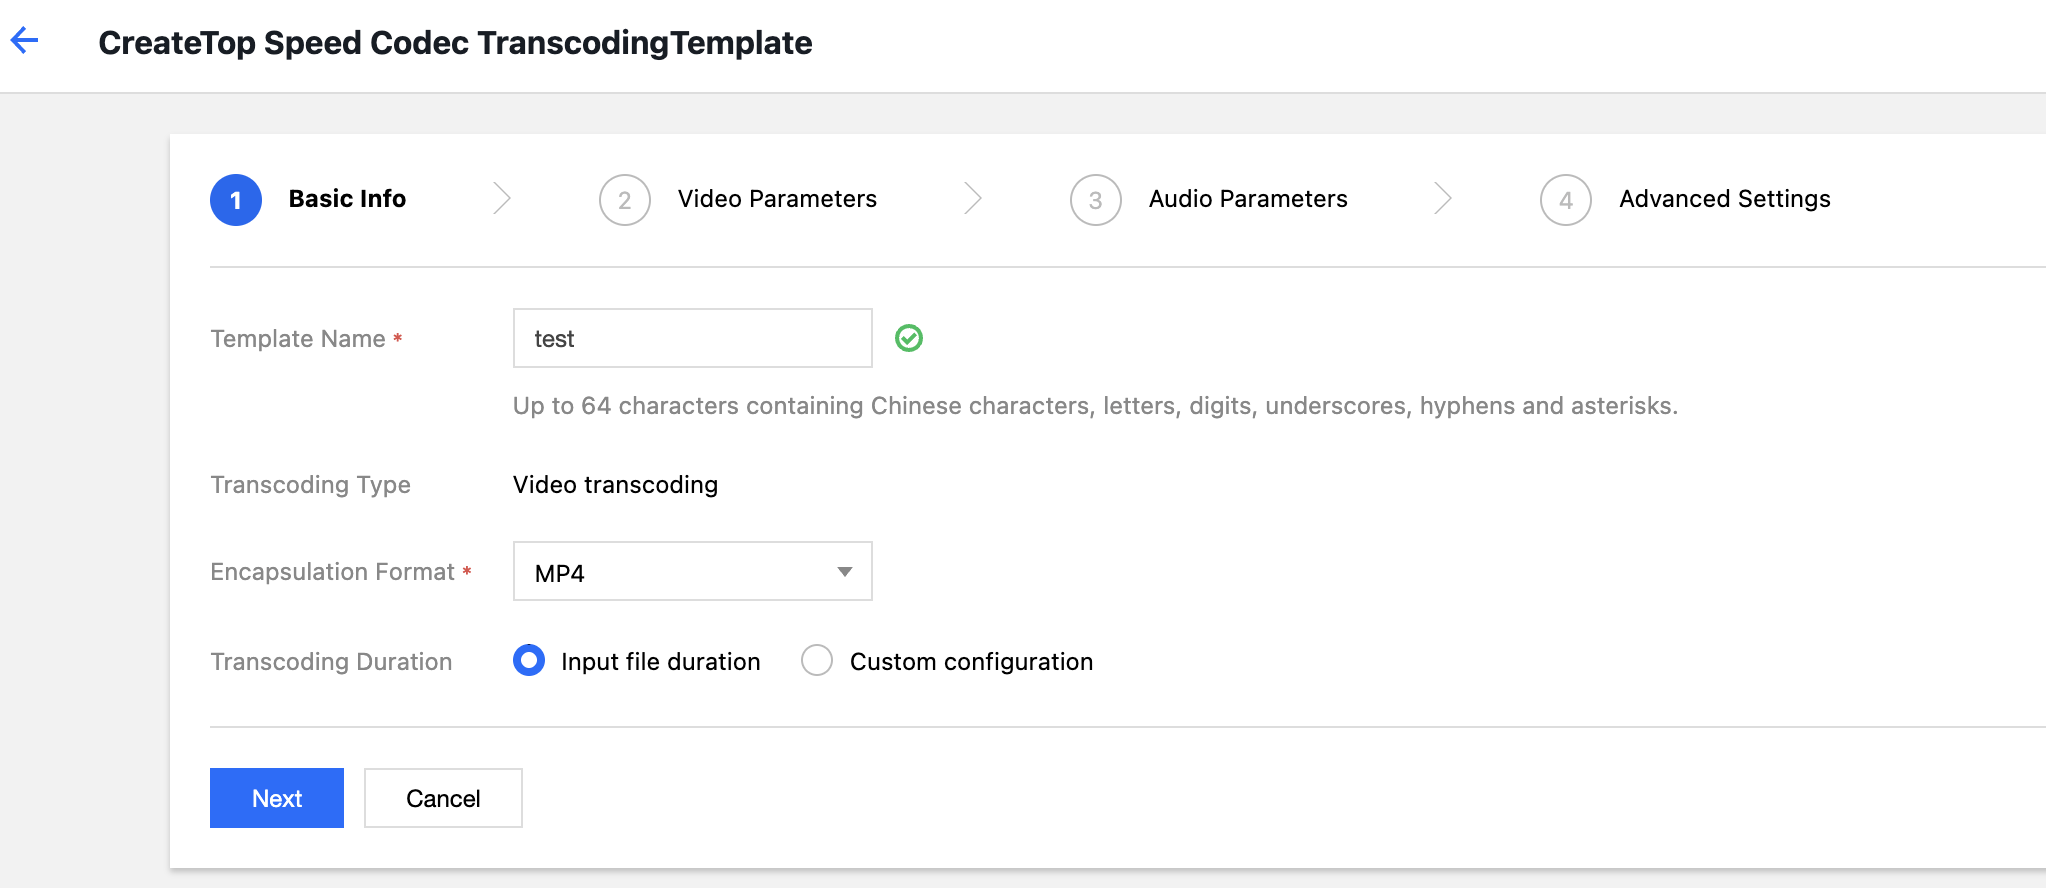
6. In the pop-up Create TSC Transcoding Template dialog, configure the settings step by step.
The configuration items are described as follows:
Basic information
Template Name: Up to 64 characters. Only Chinese, English, digits, underscore (_), hyphen (-), and asterisk (*) are supported.
Encapsulation Format: Formats such as MP4, MKV, and HLS can be selected.
Transcoding Type: Limited to Video Transcoding.
Transcoding Duration: Can be selected as source video duration or custom configured duration.
Video Parameters
Encoding Format: Converts files from the original video format to the selected encoding format.
Bitrate: You can choose a custom bitrate or adjust the bitrate via the bitrate control factor.
Peak Bitrate: Limits the maximum instantaneous bitrate of the video.
Resolution: Controls the frame size of the output video.
Video Frame Rate: The frequency at which bitmap images appear consecutively on the display, measured in frames.
Rotation Angle: Controls the orientation of the video content.
Video Color Format: Controls the encoding rules for color data.
Audio Parameters: Audio parameters can be customized according to user requirements.
Advanced Settings: Advanced setting parameters can be customized according to user requirements.
7. Click Complete to complete template creation.
After creation, you can perform View, Edit, Clone, and Delete operations on the new template in the custom template list. Note:
You can use Cloud Infinite to create tasks or workflows to apply TSC transcoding templates. Video Quality Enhancement
Video Enhancement comprehensively analyzes video content and uses AI to improve video quality, including features such as super-resolution, color enhancement, and frame interpolation, which visually enhance color reproduction and image details.
Operation Steps
2. In the left sidebar, click Bucket Management to go to the Bucket Management page.
3. Click the Bucket Name or Manage in the right operation bar to go to the corresponding Bucket page.
4. In the left sidebar, click Tasks & Workflows > Template Configuration to go to the Template Configuration page.
5. Select Media Processing > Video Enhancement, and click Create Video Enhancement Template.
6. In the pop-up Create Video Enhancement Template window, configure the settings step by step.
Note:
Currently, Video Enhancement supports super-resolution, color enhancement, detail enhancement, and SDRtoHDR. Other features are being gradually rolled out.
The input video duration for Video Enhancement must be less than 30 minutes.
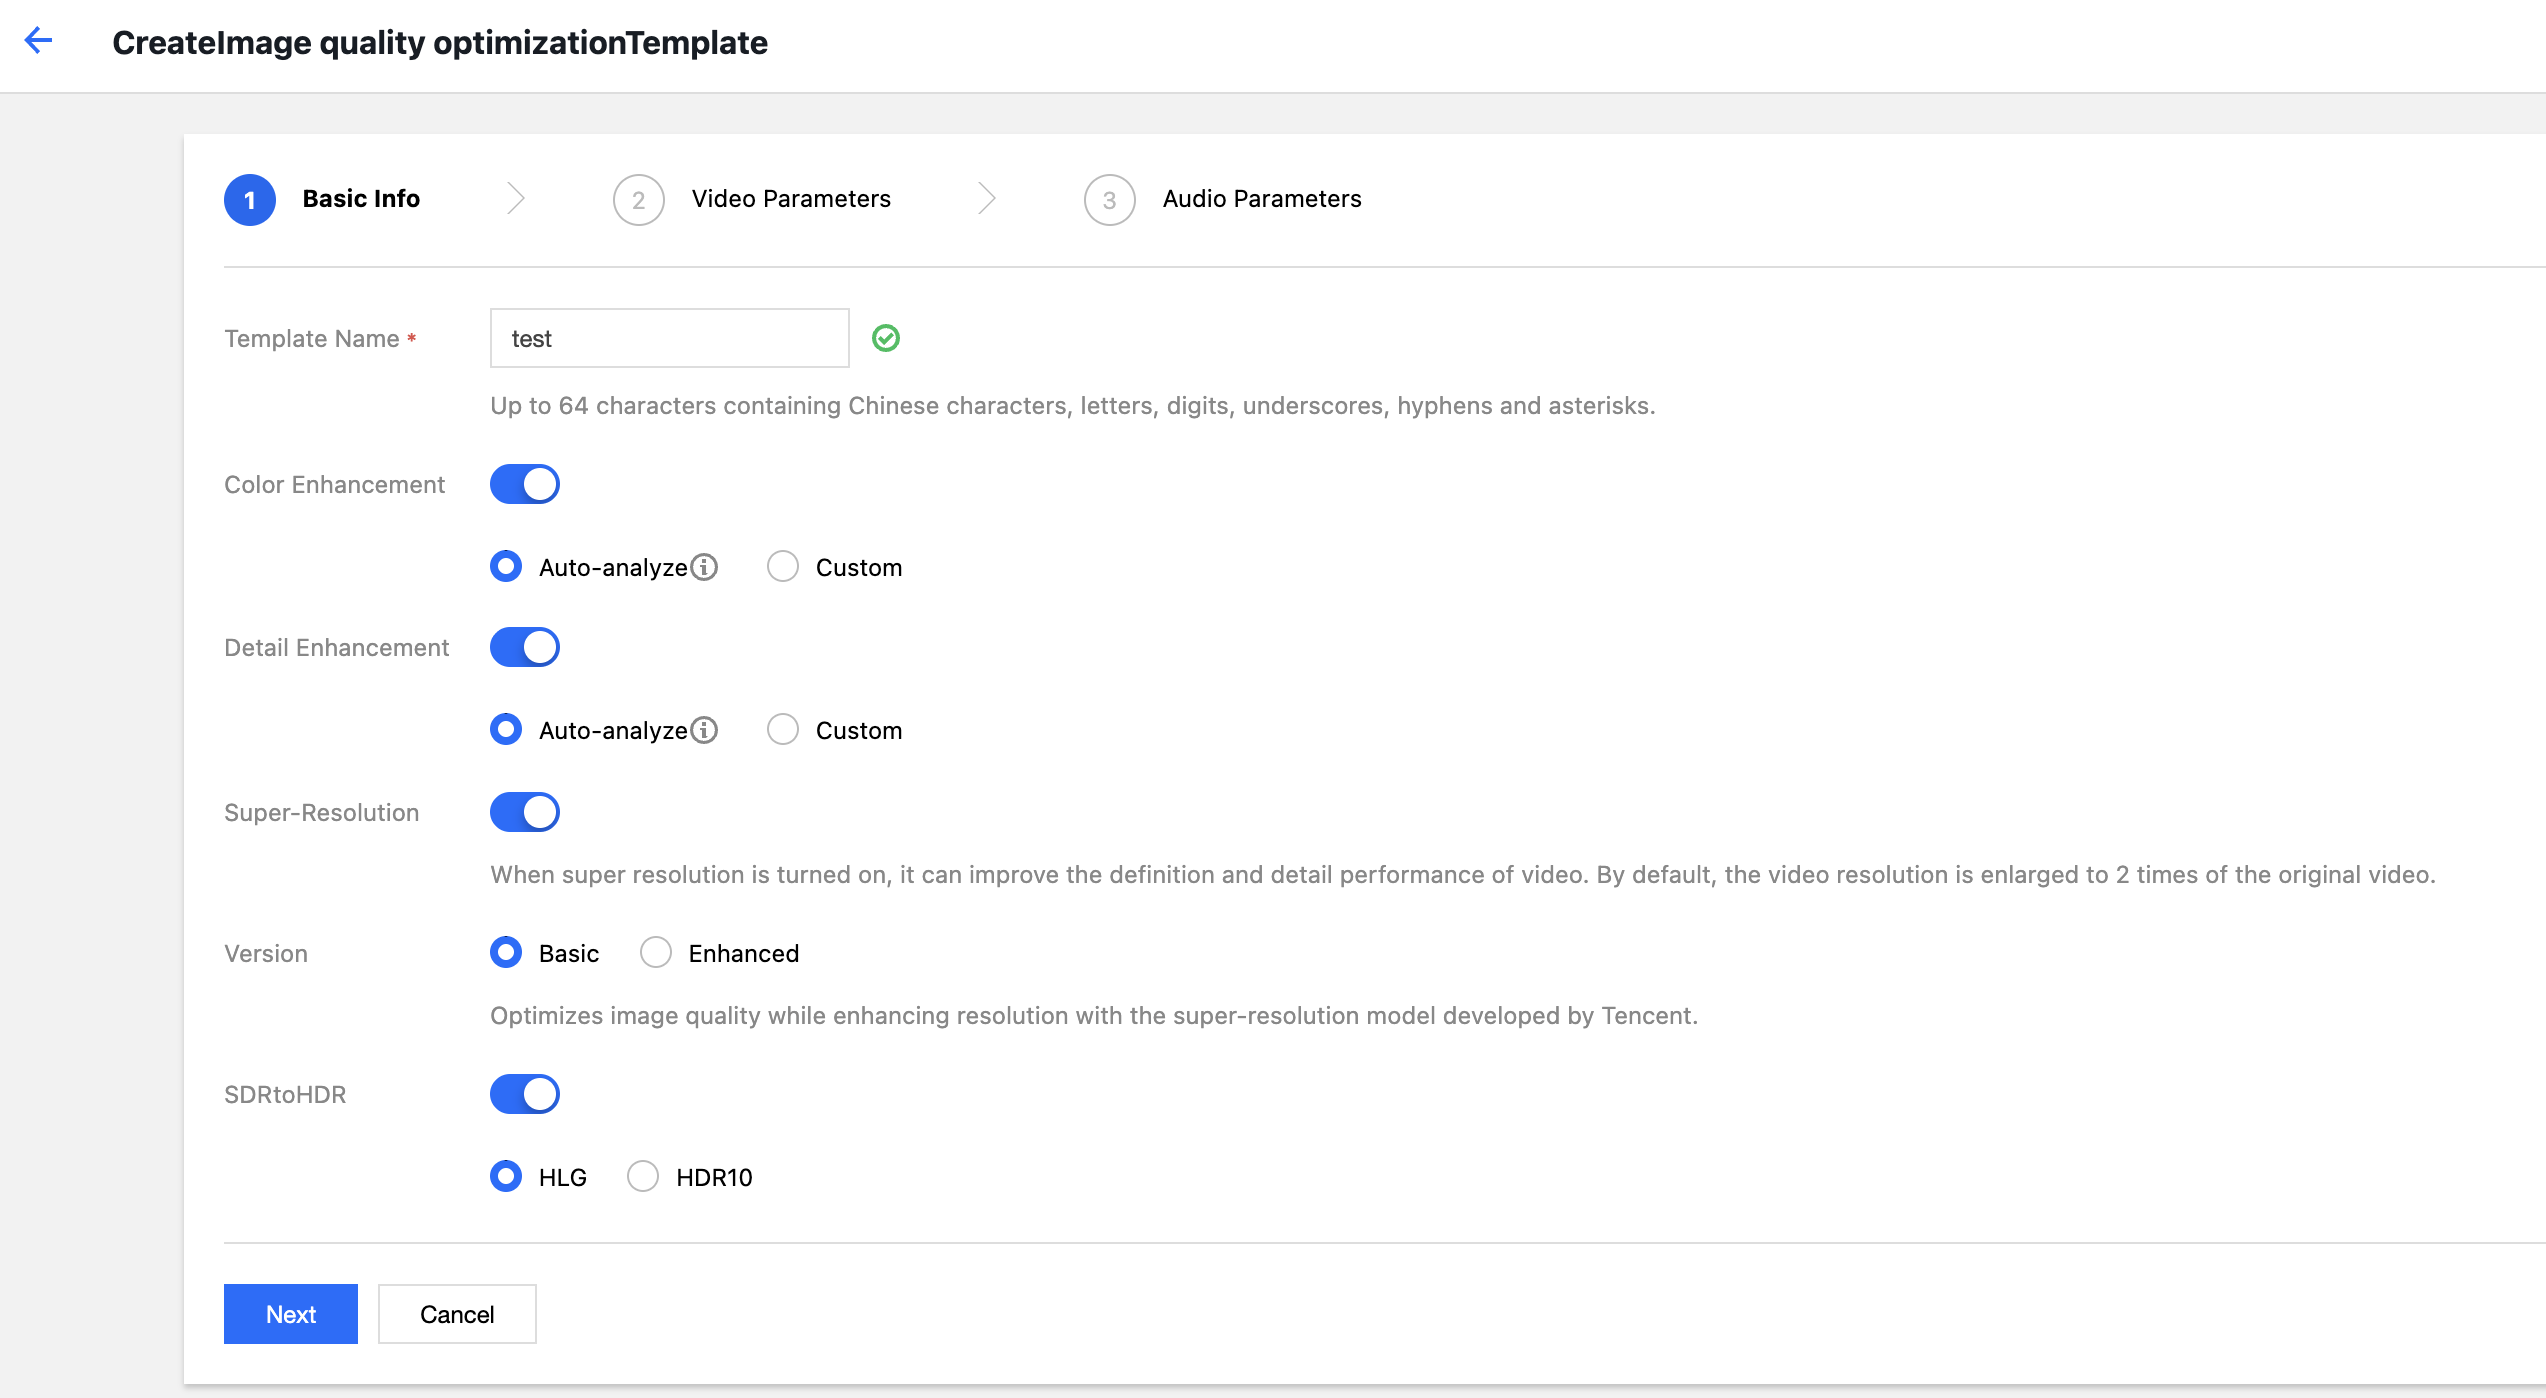
The configuration items are described as follows:
Basic information
Template Name: Up to 64 characters. Only Chinese, English, digits, underscore (_), hyphen (-), and asterisk (*) are supported.
Color Enhancement: Users can customize color enhancement parameters or have them automatically optimized by the system.
Detail Enhancement: Users can customize detail enhancement parameters or have them automatically optimized by the system.
Super-Resolution: Upscales the video resolution when enabled.
SDRtoHDR: Optimizes videos to HDR effect when enabled.
Video Parameters
Container Format: You can select the MP4 format.
Encoding Format: Converts files from the original video format to the selected encoding format.
Resolution: Controls the frame size of the output video. If super-resolution is selected, the video resolution will be doubled and then scaled to the specified resolution.
Frame Rate: The frequency at which bitmap images, measured in frames, appear continuously on the display.
Audio Parameters: Audio parameters can be customized according to user requirements.
6.Click Complete to finish template creation.
After creation is successful, you can perform operations such as view, edit, clone, and delete on the newly created template in the custom template list.
Note:
You can use Cloud Infinite to create tasks or workflows to apply to quality enhancement templates. Intelligent highlights
Highlights can automatically extract highlight moments from videos. You can set the highlights template name, specify the maximum output duration, output resolution, and output format through custom templates.
Operation Steps
2. In the left sidebar, click Bucket Management to go to the Bucket Management page.
3. Click the Bucket Name or Manage in the right operation bar to go to the corresponding Bucket page.
4. In the left sidebar, click Tasks & Workflows > Template Configuration to go to the Template Configuration page.
5. Select Media Processing > Highlights, and click create a highlights template.
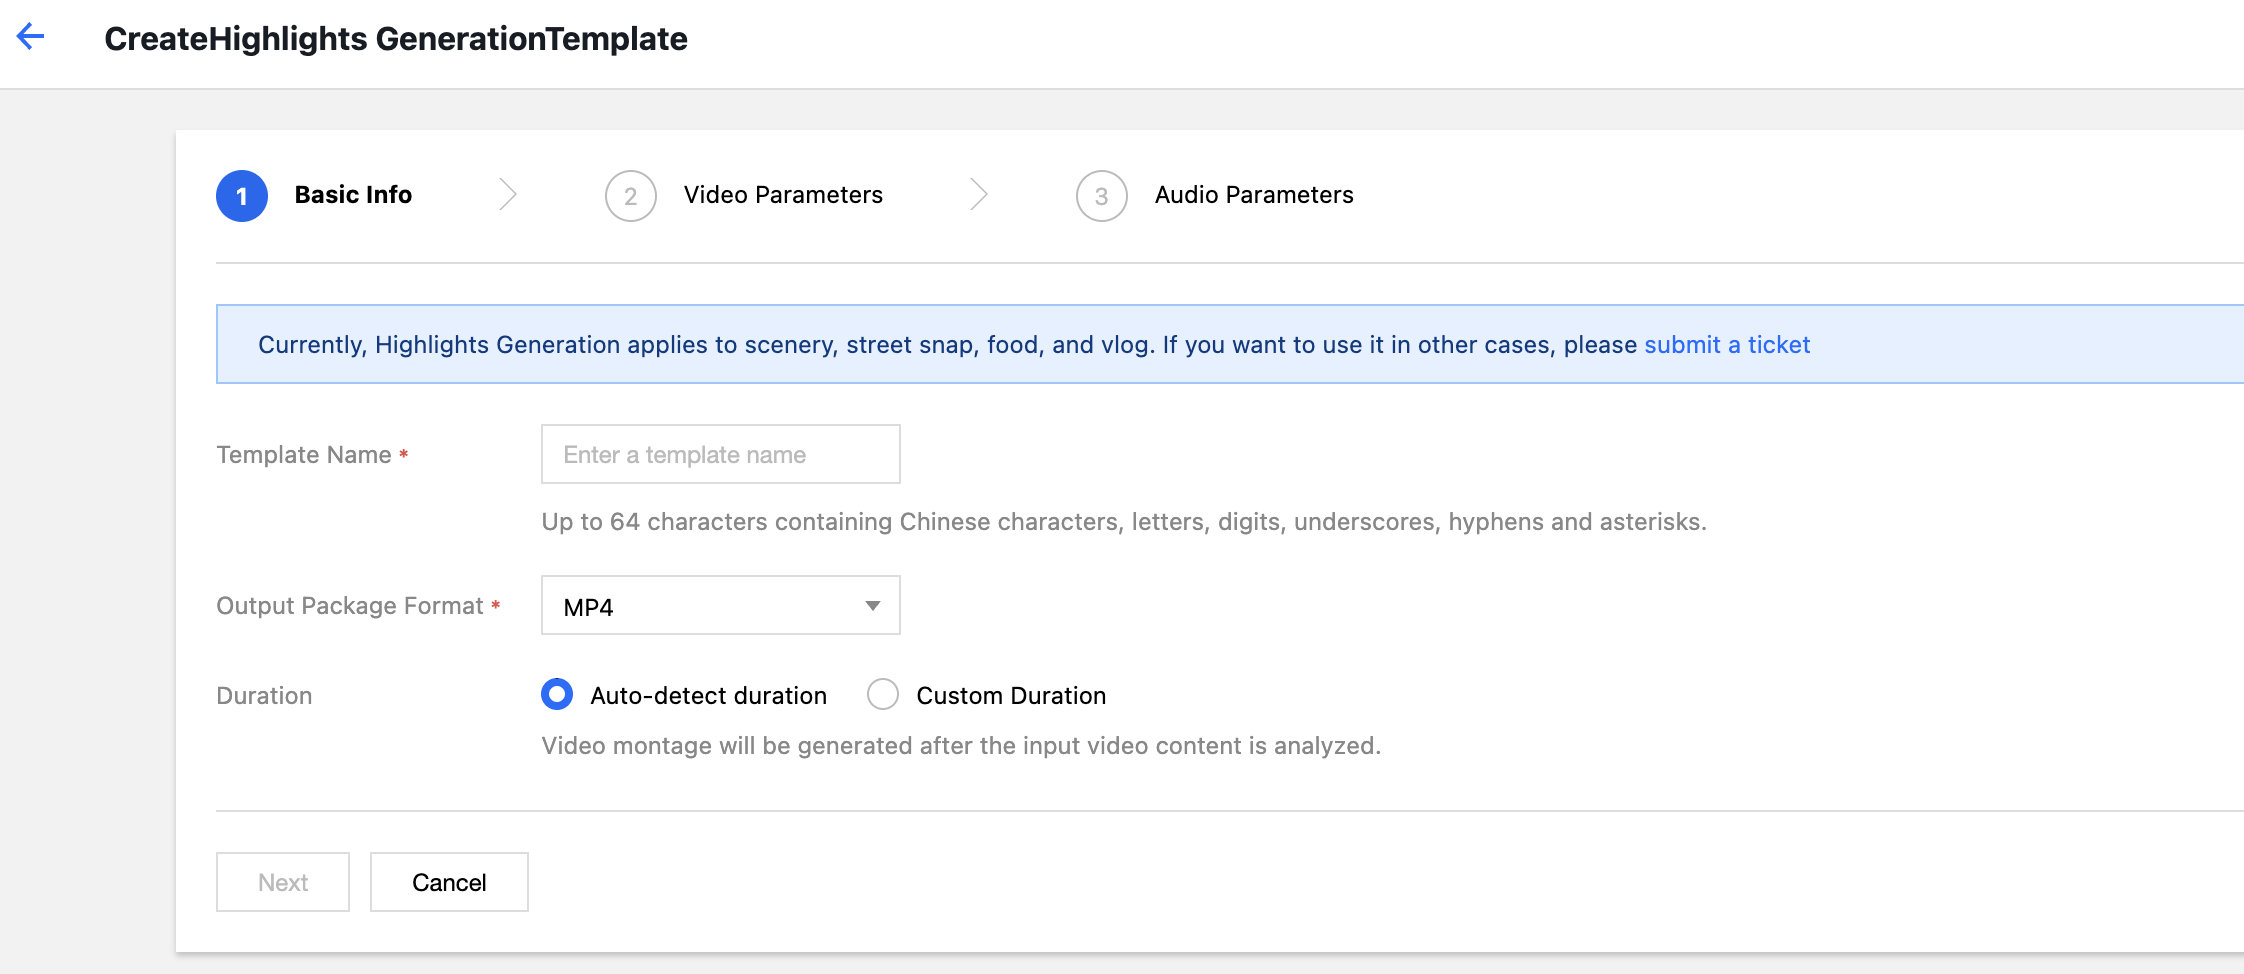
6. In the pop-up Create Highlights Template window, configure step by step.
Note:
Currently, highlights are only applicable to scenery, food, street photography, and Vlog scenarios. Capabilities for other scenarios are being gradually rolled out. For customization needs, please Contact Us for consultation. The configuration items are described as follows:
Basic information
Template Name: Up to 64 characters. Only Chinese, English, digits, underscore (_), hyphen (-), and asterisk (*) are supported.
Container Format: including MP4, FLV, HLS, and other formats.
Highlight Duration: The output duration can be specified as the full duration after automatic analysis or a custom output duration.
Video Parameters
Encoding Format: Converts files from the original video format to the selected encoding format.
Bitrate: You can choose a custom bitrate or adjust the bitrate via the bitrate control factor.
Resolution: Controls the frame size of the output video.
Video Frame Rate: The frequency at which bitmap images appear consecutively on the display, measured in frames.
Audio Parameters: Audio parameters can be customized according to user requirements.
7. Click Complete to complete template creation.
After creation is successful, you can perform operations such as view, edit, clone, and delete on the newly created template in the custom template list.
Note:
You can use Cloud Infinite to create tasks or workflows to apply the highlight template. Video Frame Capture
Video frame capture is a feature provided by Cloud Infinite to capture screenshots at specific time points in videos. Output screenshots are uniformly in jpeg format. Custom video frame capture templates support personalized settings including template name, frame capture start time point, capture interval, number of frames, output image dimensions, and output format.
Operation Steps
2. In the left sidebar, click Bucket Management to go to the Bucket Management page.
3. Click the Bucket Name or Manage in the right operation bar to go to the corresponding Bucket page.
4. In the left sidebar, click Task & Workflow > Template Configuration to go to the template configuration page.
5. Select Media Processing > Video Frame Capture, and click Create Video Frame Capture Template.
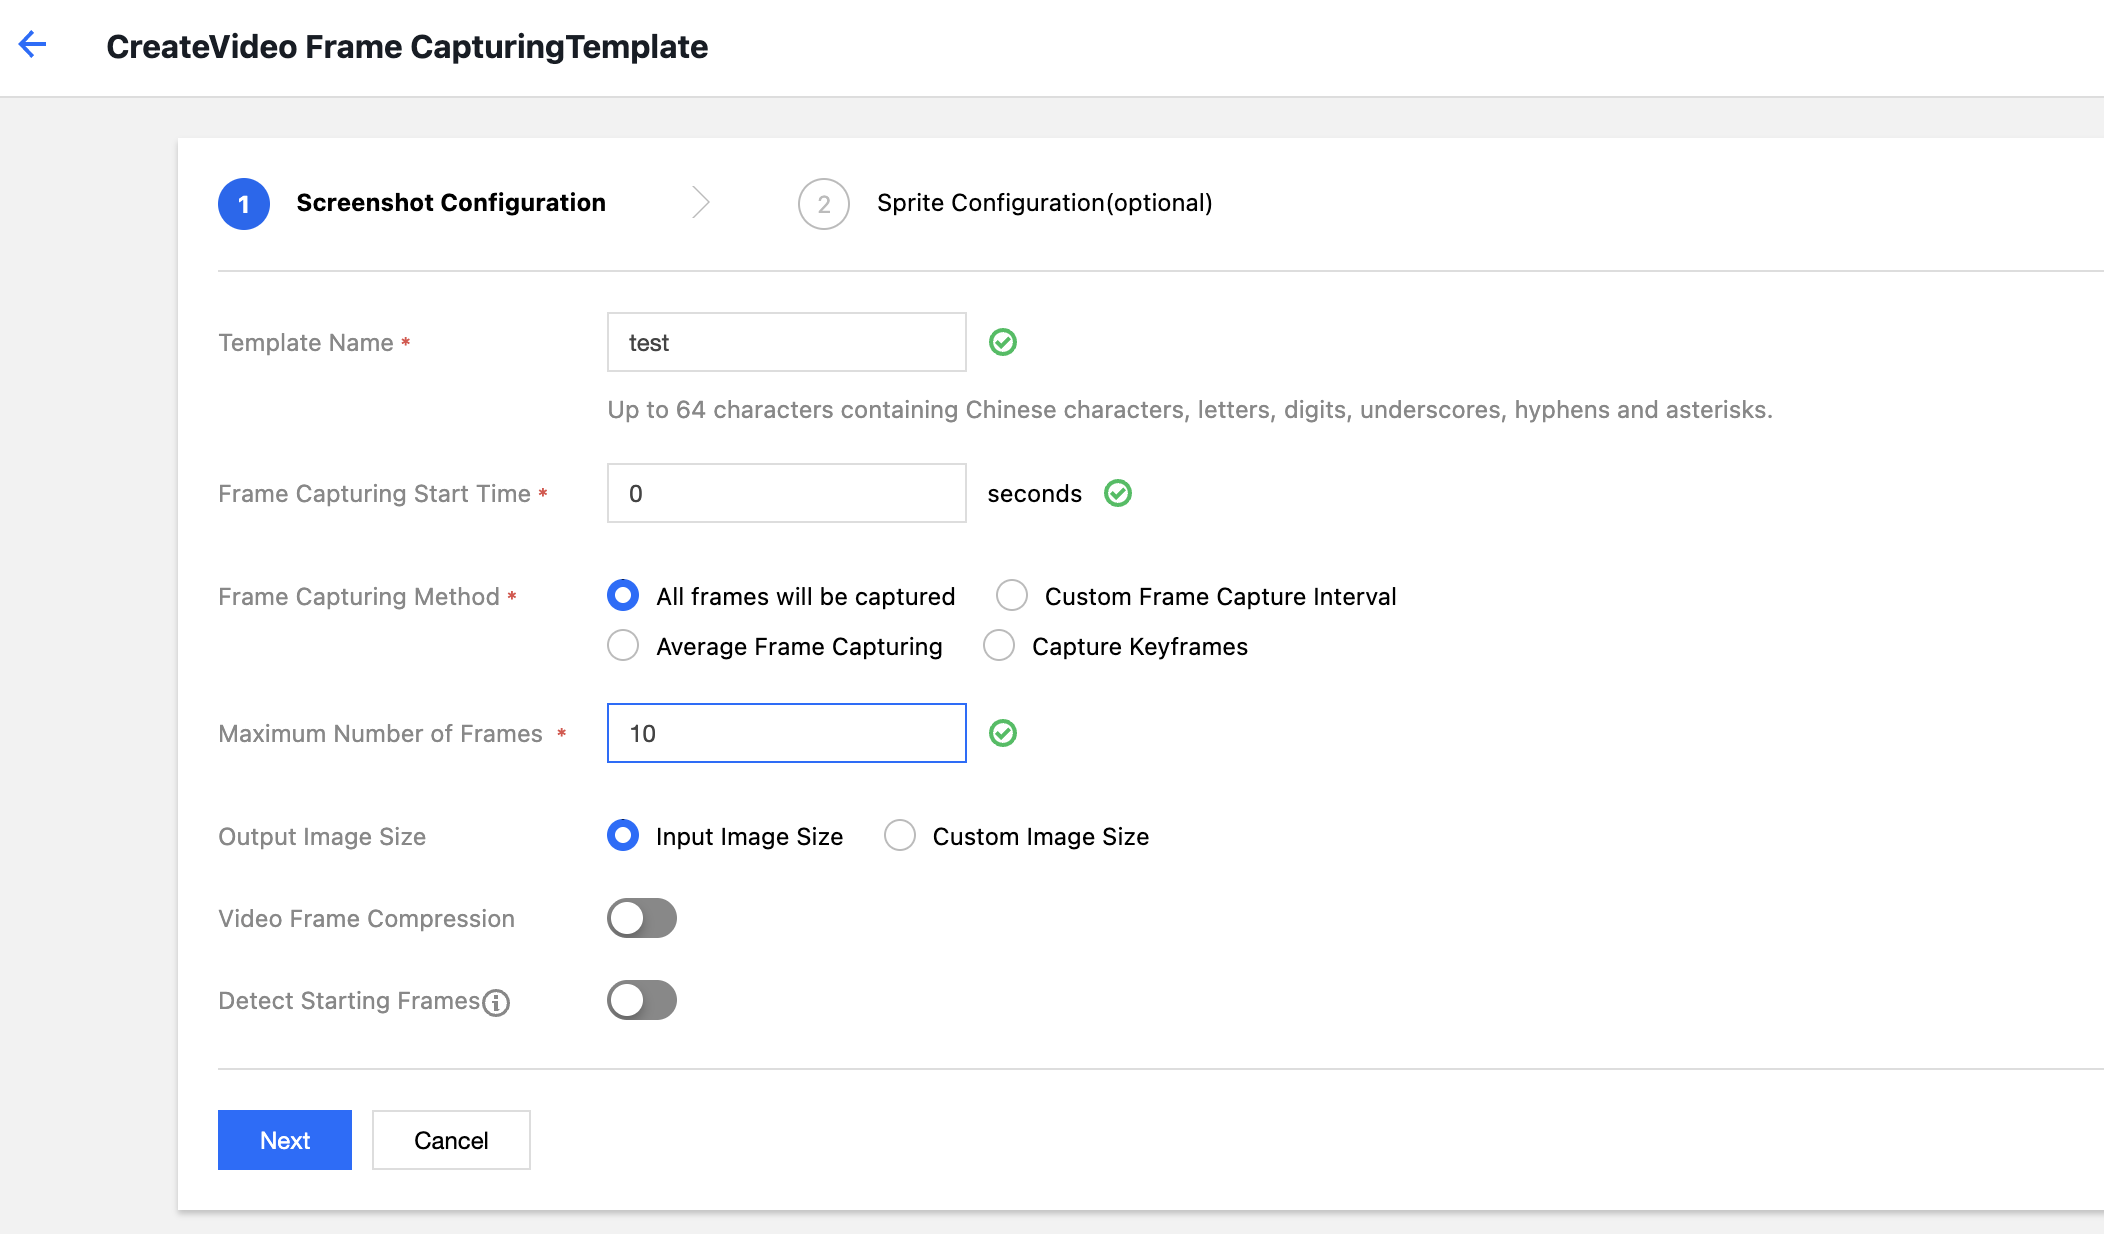
6. In the pop-up Create Frame Capture Template window, configure custom settings step by step.
The configuration items are described as follows:
Frame Capture Configuration
Template Name: Up to 64 characters. Only Chinese, English, digits, underscore (_), hyphen (-), and asterisk (*) are supported.
Start time point for frame capture: You can select any point within the total duration of the video as the start time point for frame capture.
Frame Capture Mode
Default capture every frame: It captures every frame in the video.
Customized Frame Capture Interval: From the start time point for frame capture to the end of the video, output one frame capture image at regular intervals based on the set time interval.
Average Frame Capture: Based on the number of frame captures you set, images are captured at equal intervals from the start time point for frame capture to the end of the video.
Key Frame Capture: Based on the number of frame captures you set, key frames in the video are captured from the start time point for frame capture to the end of the video.
Maximum Number of Frame Captures per Video: When you select the frame capture mode as Default capture every frame, Customized frame capture interval, or Key frame capture, you need to set the maximum number of frame captures per video.
Number of Frame Captures: When you select the frame capture mode as Average Frame Capture, you need to set the number of frame captures. Average Frame Capture captures images at equal intervals from the start time point for frame capture to the end of the video based on the number of frame captures you set.
Output Image Dimensions: By default, the output screenshot dimensions match the source video's image dimensions. If you choose to customize the image size, please note that the width and height must be integers in the range 128-4096.
Frame Capture Compression: Optional. Custom compression is supported for captured images.
Opening Black Screen Detection: Optional. Supports detecting whether there is a black screen in the first 5 seconds of the video. If a black screen is present, it starts capturing from the first non-black frame within the first 5 seconds.
Sprite Sheet Configuration (Optional): Optional. Supports using frame capture images as small images for a sprite sheet, that is, merging the small images with a specified background color onto a single image for output.
7. Click Complete to finish creating the template.
After creation is successful, you can perform operations such as View, Edit, Clone, and Delete on the newly created template in the custom template list. Note:
You can use Cloud Infinite to create tasks or workflows to apply the video frame capture template. Converting Video to Animated Images
You can use the video to animated GIF feature to convert video formats into animated GIF formats. Custom video to animated GIF templates support custom settings for template name, start transcoding time, transcoding duration, frame extraction method, output animated GIF frame rate (FPS), output dimensions, and output format.
Operation Steps
2. In the left sidebar, click Bucket Management to go to the Bucket Management page.
3. Click the Bucket Name or Manage in the right operation bar to go to the corresponding Bucket page.
4. In the left sidebar, click Tasks & Workflows > Template Configuration to go to the Template Configuration page.
5. Select Media Processing > Video to Animated GIF, and click Create Video to Animated GIF Template.
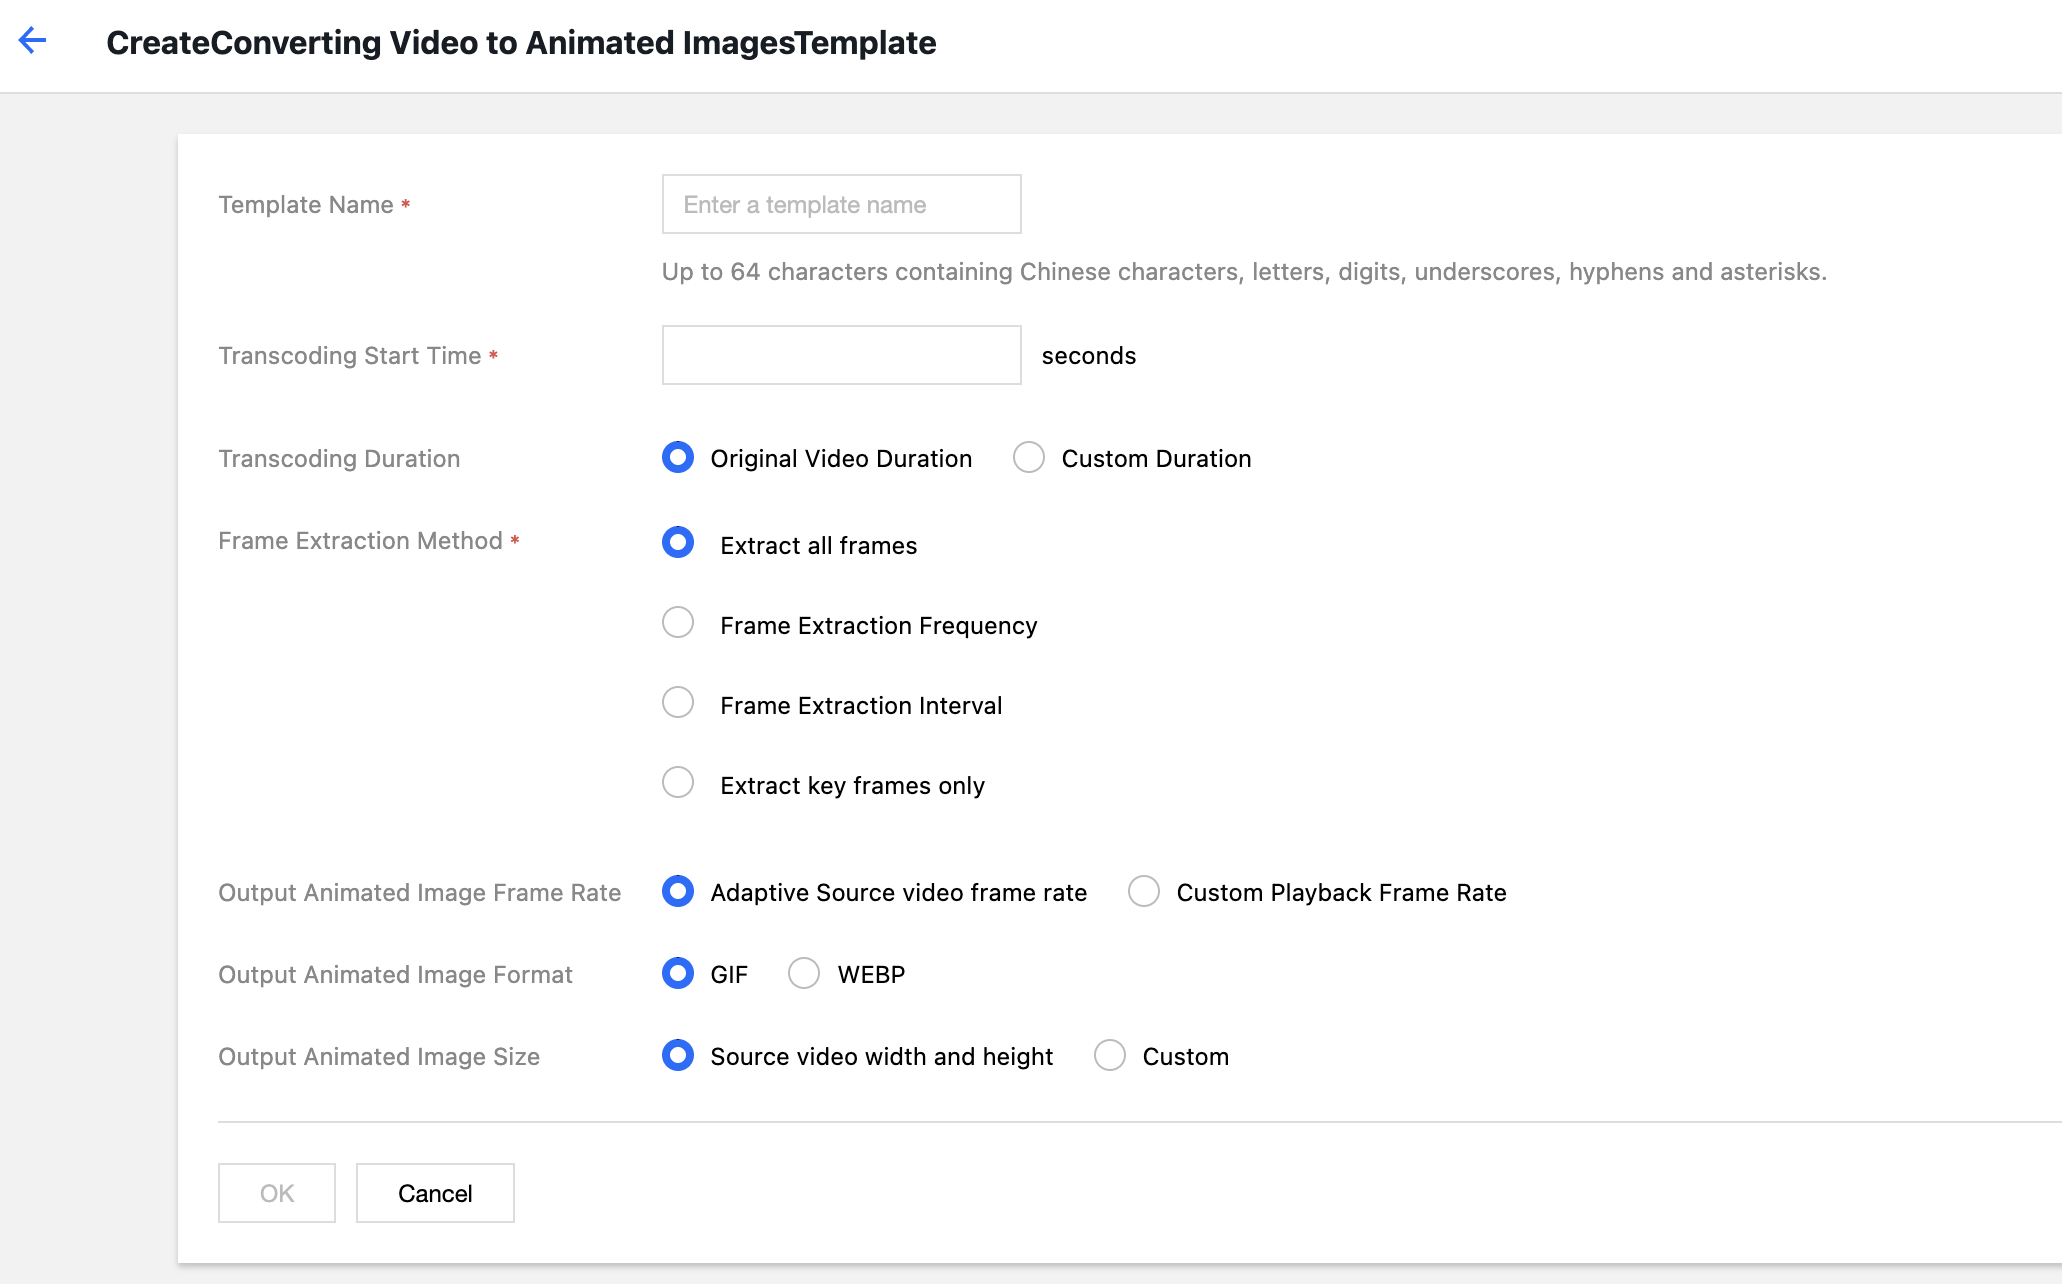
6. In the pop-up Create Animated GIF Template window, configure the settings as needed.
The configuration items are described as follows:
Template Name: Up to 64 characters. Only Chinese, English, digits, underscore (_), hyphen (-), and asterisk (*) are supported.
Start Time for Transcoding: You can select any point within the total duration of the video as the start time for transcoding.
Transcoding Duration: Refers to the duration of transcoding after the Start Time for Transcoding. It offers two options: Source Video Duration and Custom.
Frame Extraction Method
Extract All Frames: Extracts every frame of the video.
Frame Extraction Frequency: You can set the number of frames extracted per second. Enter an integer in the range 1-50.
Frame Extraction Interval: Extract one frame at specified intervals.
Extract Key Frames Only: By understanding the video content, AI II extracts the optimal frame combination and outputs it as an animated GIF.
Output Animated GIF Frame Rate: Adaptive means the system automatically selects an appropriate frame rate based on the parameters you selected above; you can also customize the playback frame rate, which is limited to 1-60 frames per second.
Output Animated Image Format: The default output format is GIF. If you choose WEBP as the output format, you need to specify the quality (1-99, default is 75).
Output Animated Image Dimensions: The default output dimensions are the source video dimensions. If you choose a custom width and height, note that the input values must be integers between 128 - 4096.
7. Click OK to complete template creation.
After creation, you can perform View, Edit, Clone, and Delete operations on the new template in the custom template list. Note:
You can use Cloud Infinite to create tasks or workflows to apply the video-to-animated-image template. Intelligent Thumbnail
Intelligent Cover feature intelligently analyzes video frames for quality, highlights, and relevance to extract optimal frames as covers, enhancing content appeal.
Operation Steps
2. In the left sidebar, click Bucket Management to go to the Bucket Management page.
3. Click the Bucket Name or Manage in the right operation bar to go to the corresponding Bucket page.
4. In the left sidebar, click Tasks & Workflows > Template Configuration to go to the Template Configuration page.
5. Select Media Processing > Intelligent Cover, Click Create Intelligent Cover Template.
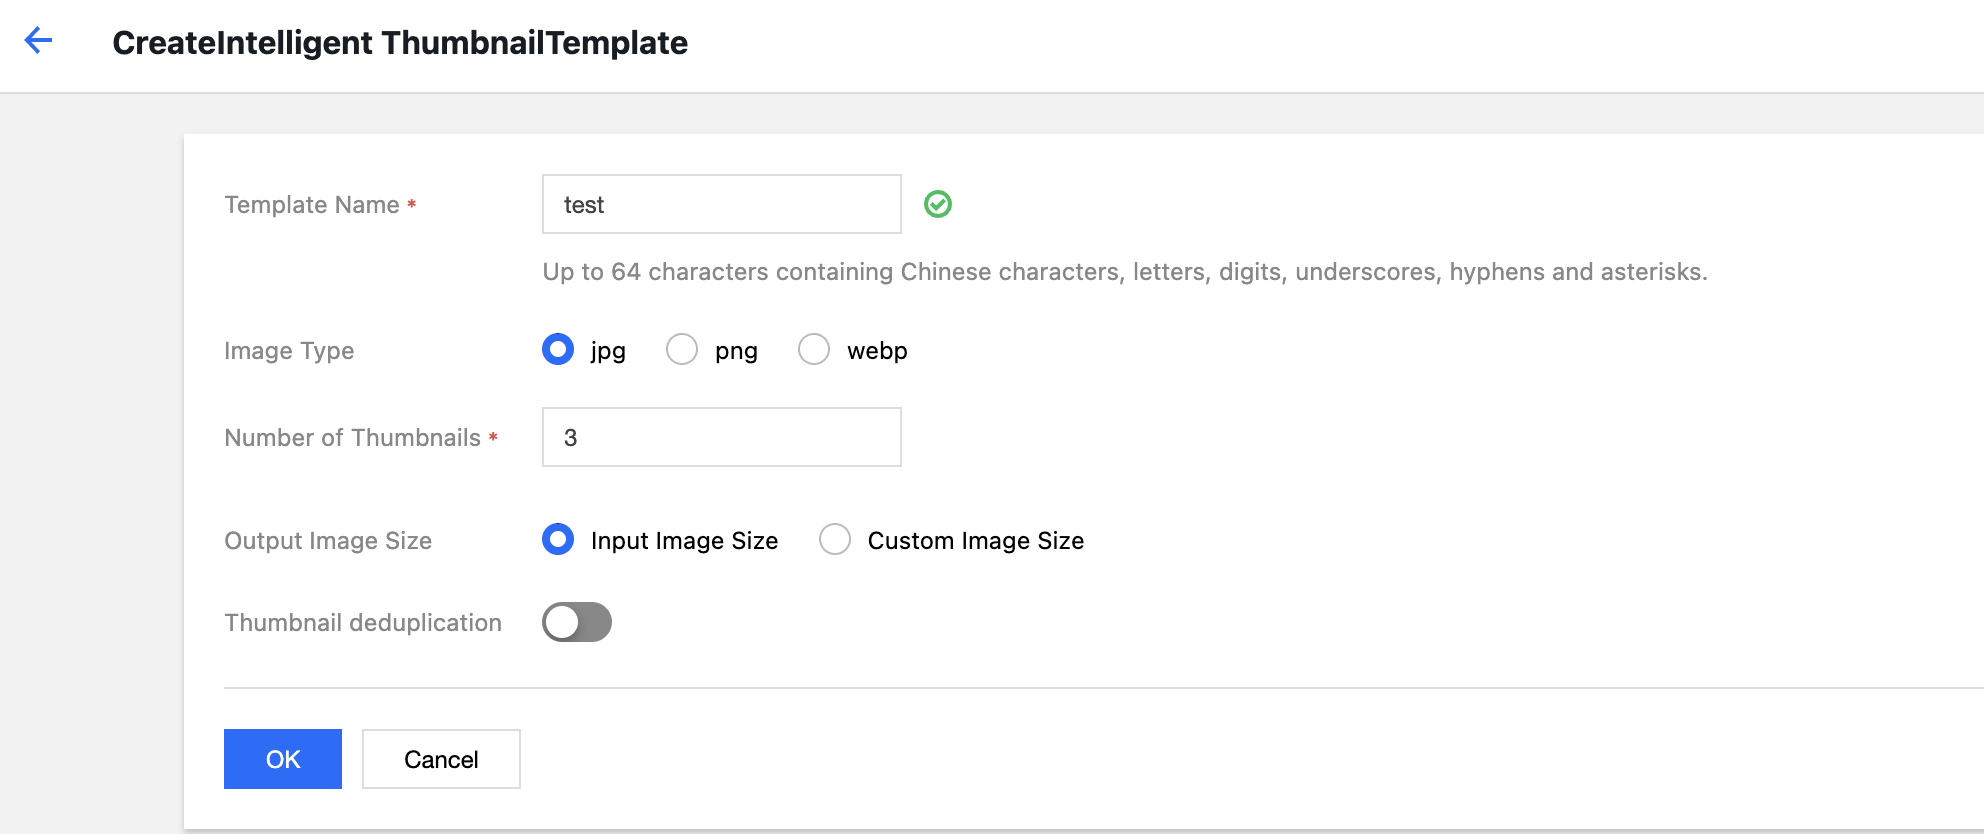
6. In the pop-up Create Intelligent Cover Template window, configure custom settings.
The configuration items are described as follows:
Template Name: Up to 64 characters. Only Chinese, English, digits, underscore (_), hyphen (-), and asterisk (*) are supported.
Image Format: Selectable options include jpg, png, webp.
Number of Covers: You can set the quantity of generated covers.
Output Image Size: You can choose between the original size or a custom size.
Cover Deduplication: Optional. Automatically deduplicate generated covers.
7. Click OK to complete template creation.
After creation is successful, you can perform operations such as view, edit, clone, and delete on the newly created template in the custom template list.
Note:
You can use Cloud Infinite to create tasks or workflows to apply the intelligent cover template. Video Watermark
The video watermarking feature builds upon the audio/video transcoding capability, allowing synchronized addition of image or text overlays to videos during transcoding.
Note:
Currently, multiple watermarks can be added simultaneously during a single transcoding operation. The console supports adding up to three watermarks at once, while the API supports adding up to five watermarks at once. If you need to add more watermarks, please contact us to obtain support. Operation Steps
2. In the left sidebar, click Bucket Management to go to the Bucket Management page.
3. Click the Bucket Name or Manage in the right operation bar to go to the corresponding Bucket page.
4. In the left sidebar, click Task & Workflow > Template Configuration to go to the template configuration page.
5. Select Media Processing > Video Watermarking, and click Create Video Watermark Template.
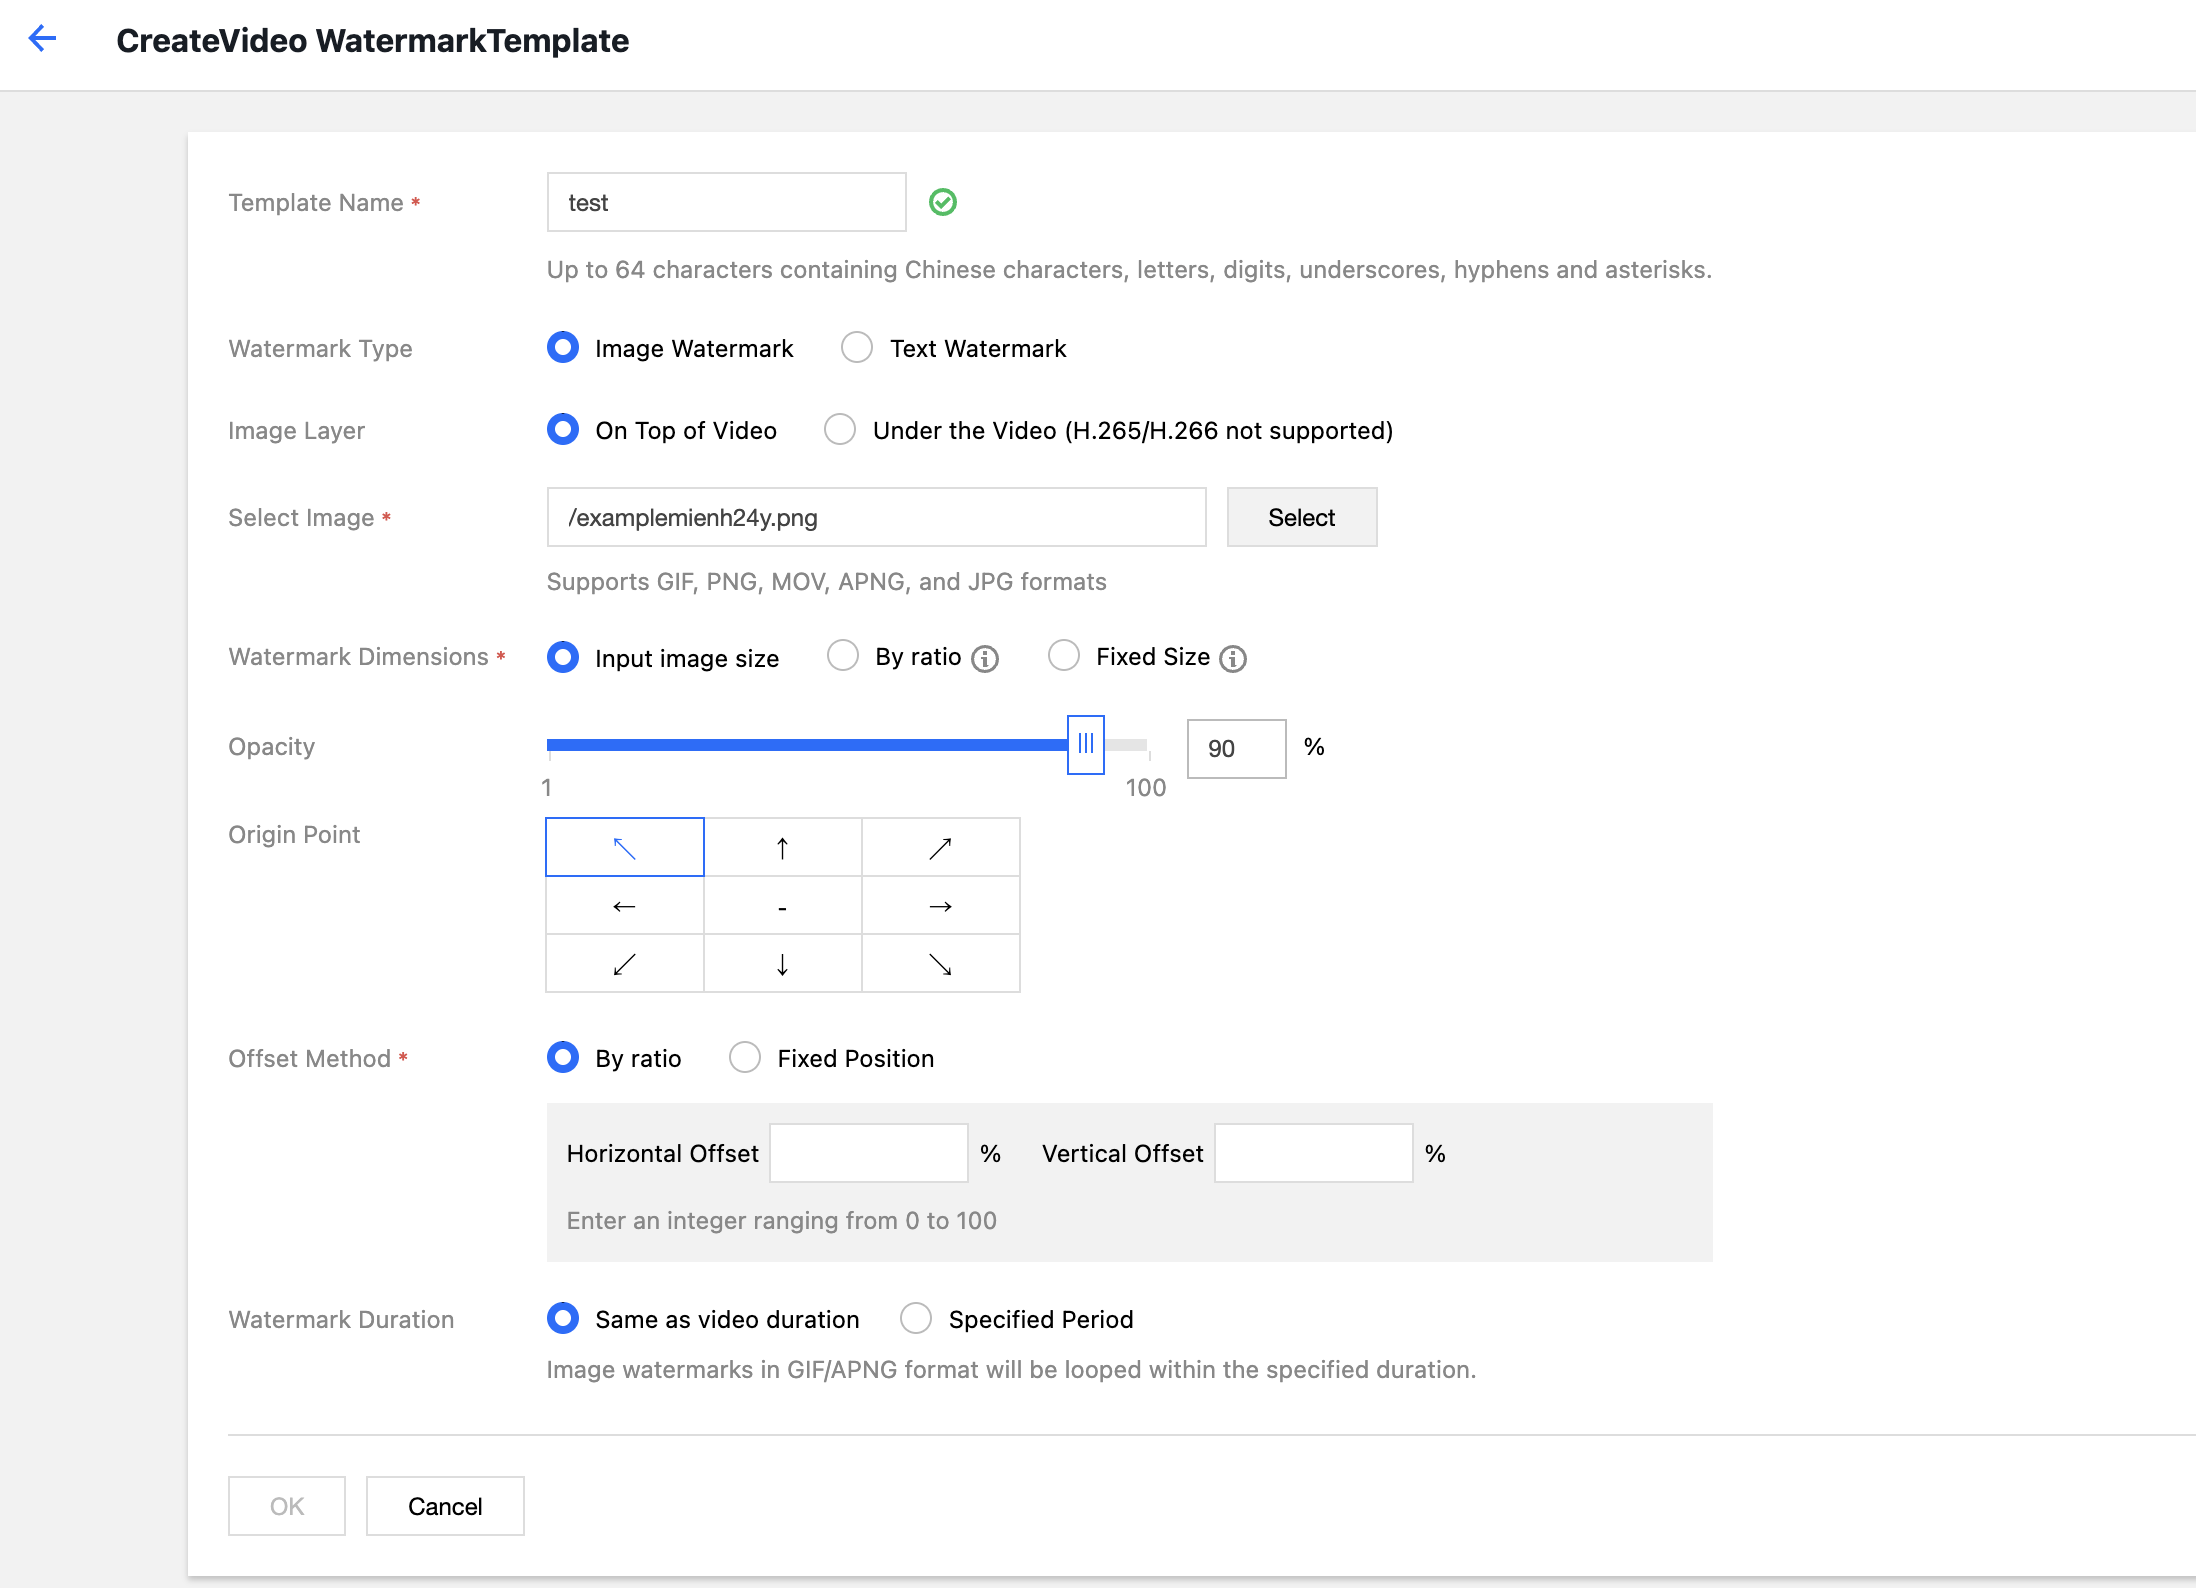
6. In the Create Video Watermark Template window, configure custom settings:
The configuration items are described as follows:
Template Name: Length should not exceed 64 characters. Only Chinese, English, numbers, _, -, and * are supported.
Watermark Type: You can select an image watermark or text watermark.
Image Watermark
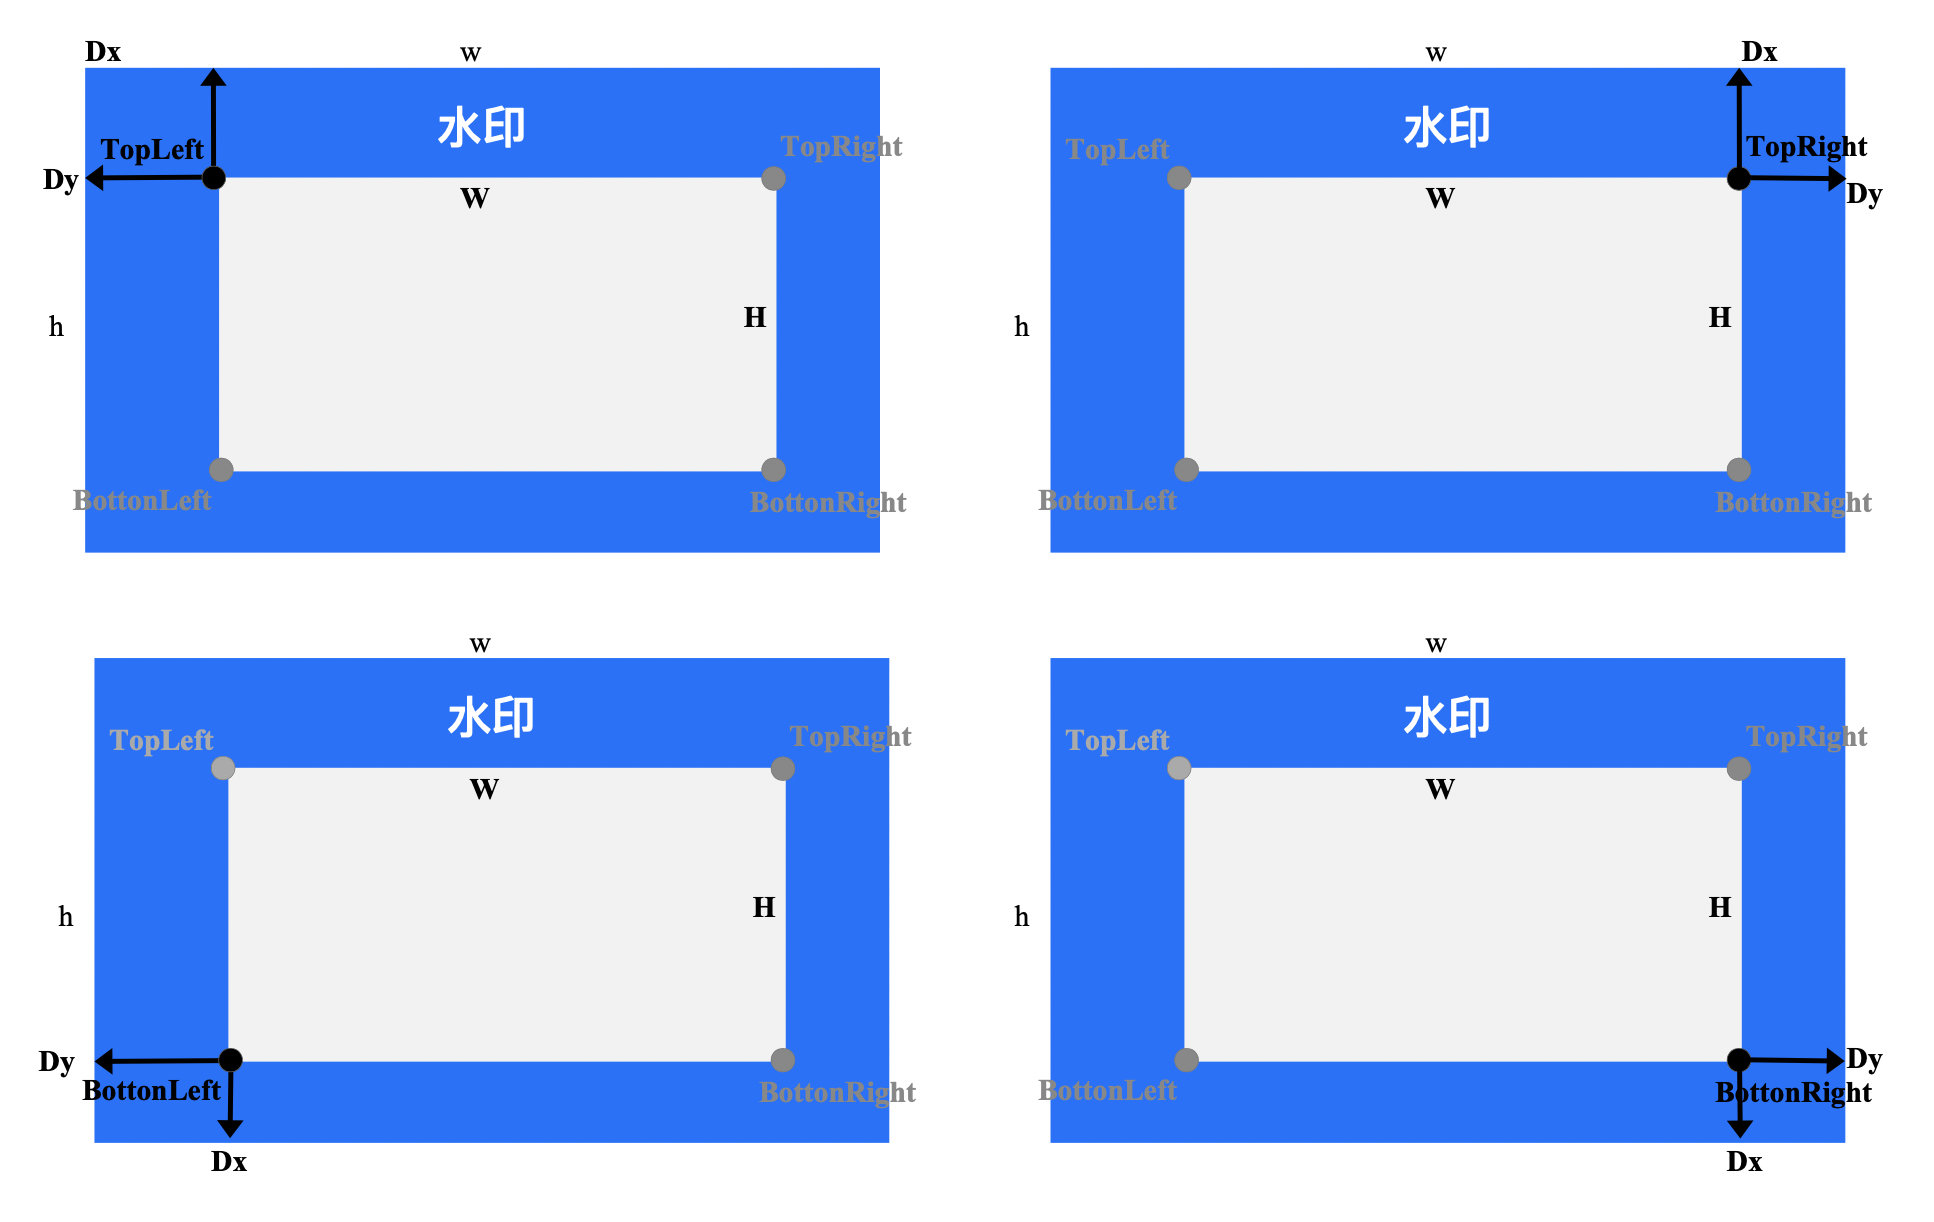
Image Layer: You can choose to place the image above the video or below the video.
The image is placed above the video, as shown in the figure below:
The image is placed below the video (as the video background), as shown in the figure below:
Image Selection: If you select an image watermark, you need to choose the source of the watermark image. Currently, you can select watermark images from the same Bucket. If none exists, you need to upload a new image.
Watermark Size: You can choose from original size, proportional scaling, or fixed dimensions.
Original size: Maintain the original dimensions of the watermark image without processing. Note that if the watermark image is larger than the video frame, the watermark may not be fully displayed.
Proportional scaling: You can set the percentage by width or height, with the value range [1, 100]. You may set only one dimension (width or height). The dimension not set will be scaled proportionally. If you set the width ratio as 'a' and height ratio as 'b', the watermark width w = W * a and watermark height h = H * b, where W and H represent the video's width and height respectively.
Fixed size: You can specify the width and height of the watermark. The value range is [8, 4096], in px.
Text Watermark
Text Watermark Content: Up to 64 characters. Only Chinese, English, digits, _, -, and * are supported.
Text Size: Value range [5 100], in px.
Font Type: Currently, mixed Chinese-English watermarks support FangSong, HeiTi, KaiTi, SongTi, HuaWenHeiTi, HuaWenHeiTi Medium, and YouYuan; English-only watermarks support ariblk, arial, ahronbd, Helvetica, and HelveticaNeue. Note that English-only fonts only support English input. Watermarks containing Chinese characters will display garbled text if applied with English-only fonts.
Font Color: Format: #RRGGBB.
Opacity: Value range [1, 100], in %.
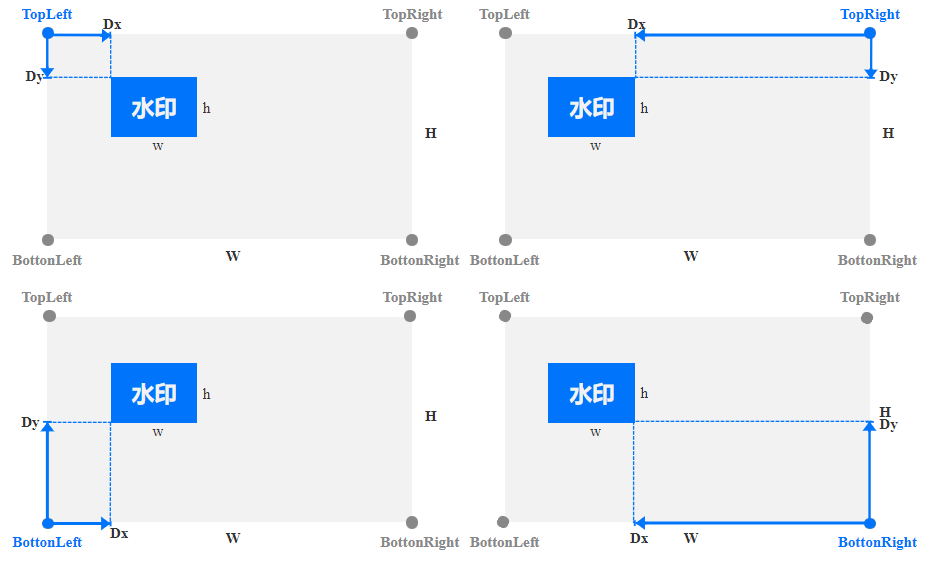
Reference Position: You can choose TopLeft, TopRight, BottomLeft, or BottomRight, corresponding to the top-left corner, top-right corner, bottom-left corner, and bottom-right corner of the video.
Offset Method: The watermark offset setting is based on the reference position. You can choose proportional scaling or fixed position.
Proportional Scaling: You can set the percentage by width or height, with the value range [0, 100]. As shown below, assume the horizontal offset ratio is set as a and the vertical offset ratio as b, then the horizontal offset Dx = W * a and the vertical offset Dy = H * b, where W and H represent the width and height of the video, respectively.
Fixed Position: Value range [0, 4096], in px. As shown in the figure, the horizontal offset corresponds to Dx, and the vertical offset corresponds to Dy.
Watermark Duration: You can choose to align the watermark duration with the video duration or specify a custom duration. When specifying a custom duration, you can set both the watermark start time and end time. If only the start time is set, the watermark will default to cover until the end of the video.
7. Click OK to complete template creation.
After successful creation, you can view, edit, clone, or delete the newly created template in the custom template list.
Note:
You can use Cloud Infinite to create audio/video transcoding tasks or workflows to apply video watermark templates. Audio and Video Splicing
Audio and video stitching allows specified audio segments to be stitched at the beginning or end of an audio file to generate a new audio file, or specified video segments to be stitched at the beginning or end of a video file to generate a new video file.
Operation Steps
2. In the left sidebar, click Bucket Management to go to the Bucket Management page.
3. Click the Bucket Name or Manage in the right operation bar to go to the corresponding Bucket page.
4. In the left sidebar, click Task & Workflow > Template Configuration to go to the template configuration page.
5. Select Media Processing > Audio and Video Stitching, and click Create Audio and Video Stitching Template.
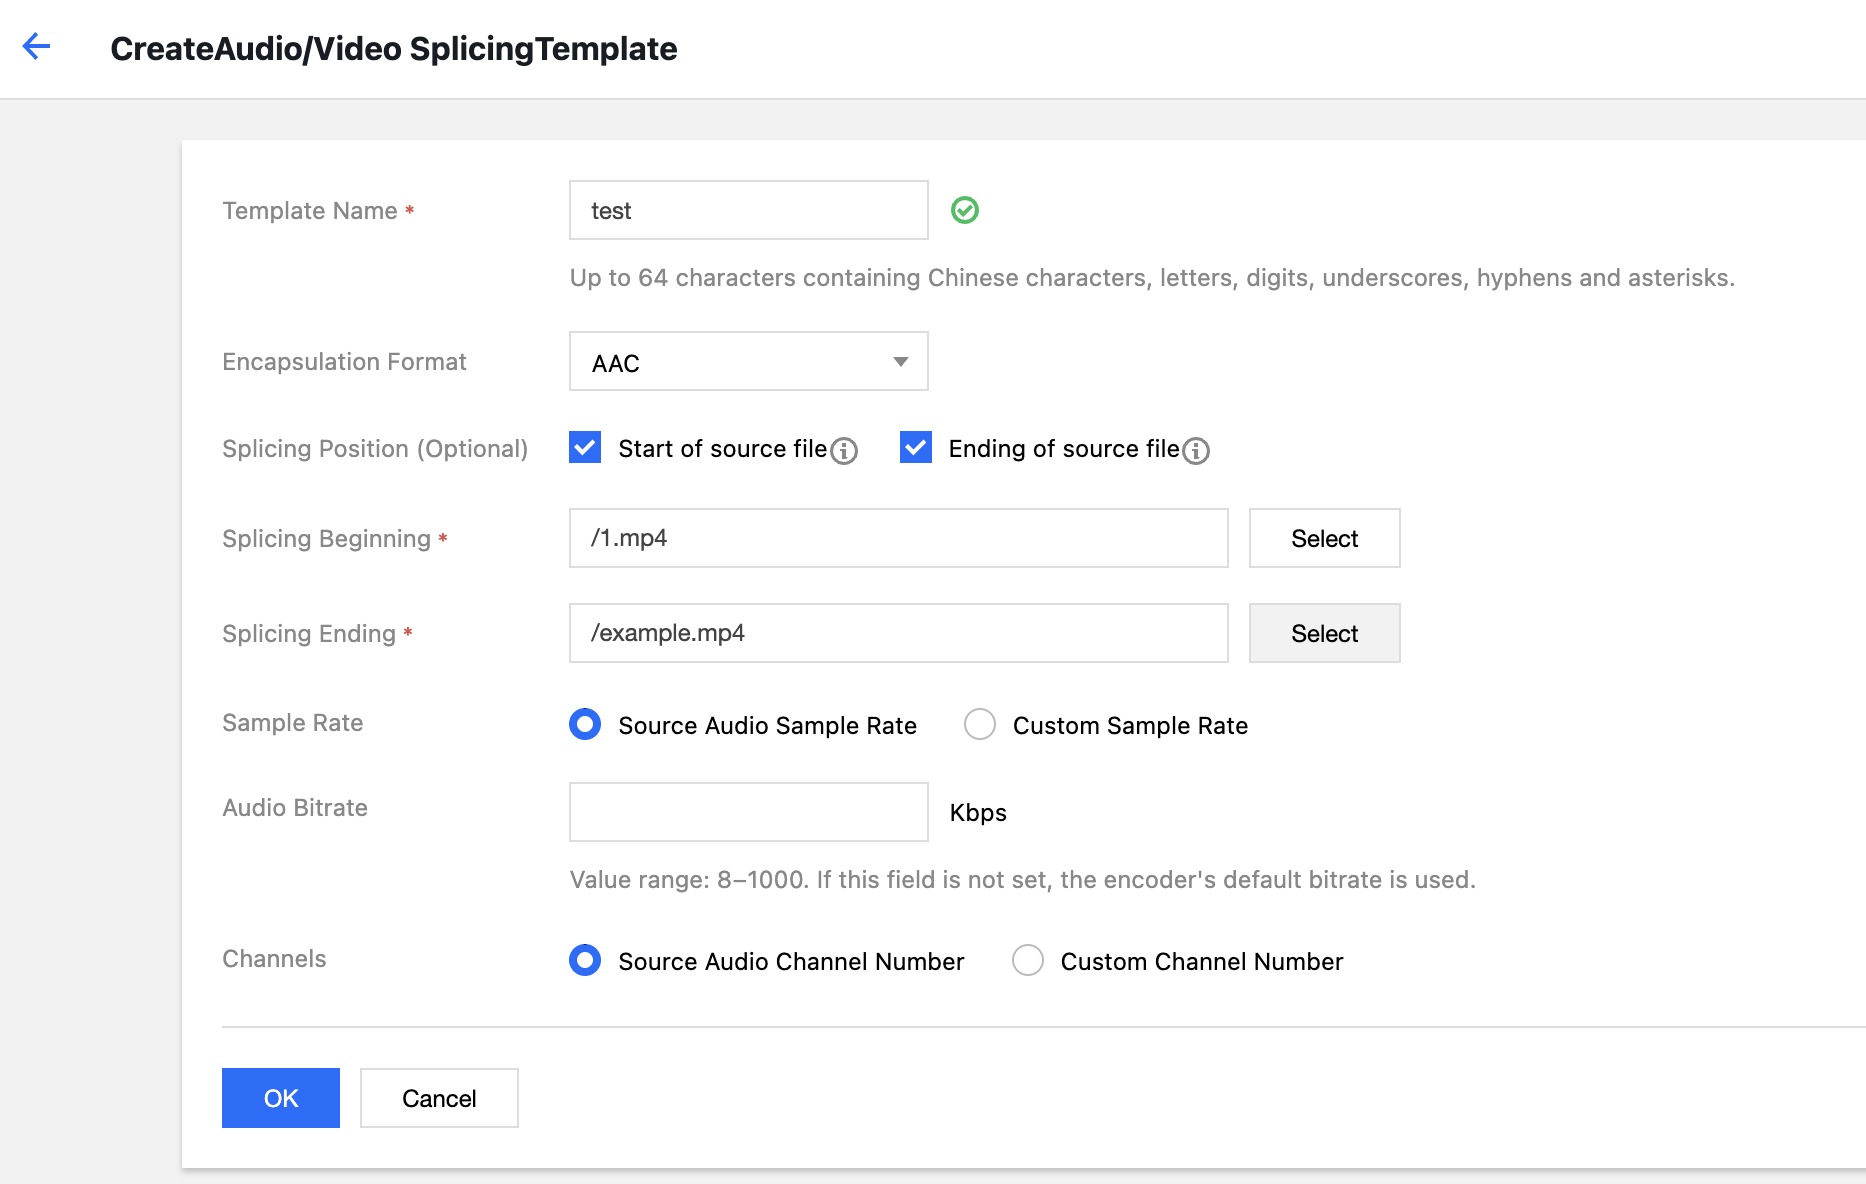
6. In the pop-up Create Audio/Video Stitching Template window, configure settings.
The configuration items are described as follows:
Template Name: Up to 64 characters. Only Chinese, English, digits, underscore (_), hyphen (-), and asterisk (*) are supported.
Container Format: You can select AAC, MP3, MP4, or other formats.
Stitching Position: You can choose to stitch at the beginning or the end of the source file.
Stitching at the Beginning: If the stitching position is set to the beginning of the source file, you need to customize the file for stitching at the beginning.
Stitching at the End: If the stitching position is set to the end of the source file, you need to customize the file for stitching at the end.
Sample Rate: The sample rate can be the same as the source audio or a custom value.
Audio Bitrate: Controls both audio quality and file size.
Number of Channels: Can be the same as the source audio or a custom value.
7. Click OK to complete template creation.
After successful creation, you can perform operations such as View, Edit, Clone, and Delete on the newly created template in the custom template list.
Note:
You can use Cloud Infinite to create tasks or workflows to apply audio-video stitching templates. Broadcasting Professional Format Transcoding
Supports transcoding processing for special formats such as XAVC and Prores.
Operation Steps
2. In the left sidebar, click Bucket Management to go to the Bucket Management page.
3. Click the Bucket Name or Manage in the right operation bar to go to the corresponding Bucket page.
4. In the left sidebar, click Task & Workflow > Template Configuration to go to the Template Configuration page.
5. Select Media Processing > Broadcast Professional Format Transcoding, and click Create Broadcast Professional Format Transcoding Template.
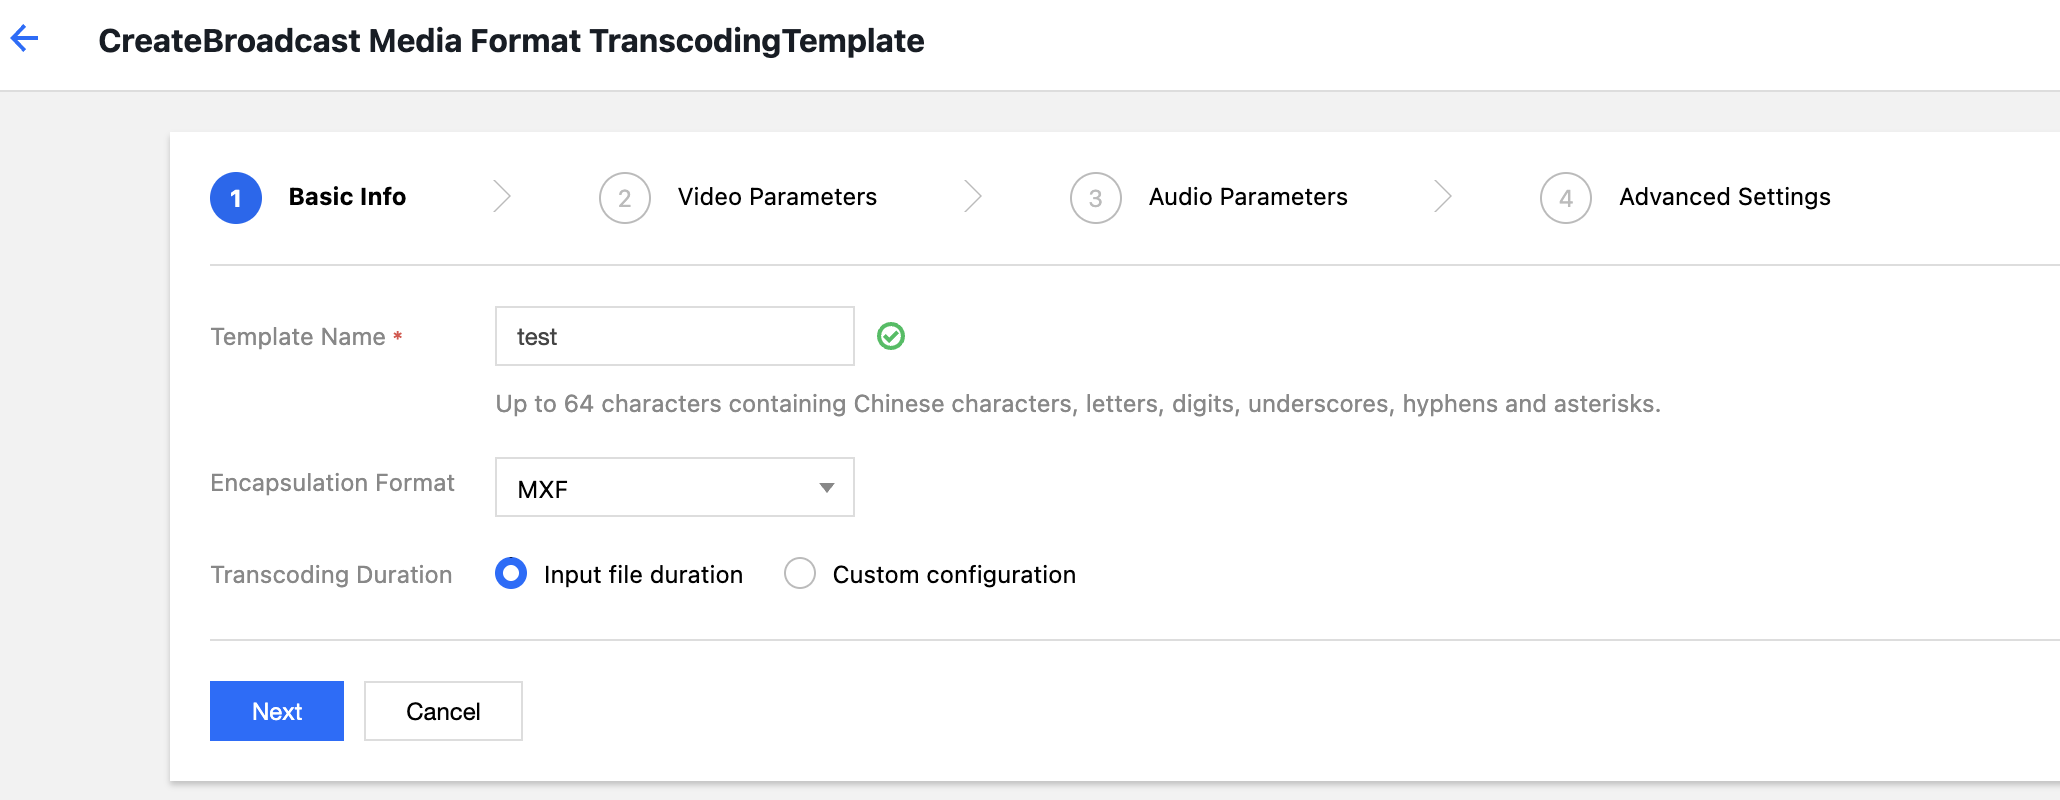
6. In the pop-up Create Broadcast Professional Format Transcoding Template window, configure the settings step by step.
The configuration items are described as follows:
Basic information
Template Name: Up to 64 characters. Only Chinese, English, digits, underscore (_), hyphen (-), and asterisk (*) are supported.
Container Format: Includes mxf, mov, and mkv formats.
Transcoding Duration: Can be selected as source video duration or custom configured duration.
Video Parameters
Encoding Format: Converts files from the original video format to the selected encoding format.
Encoder Preset: Select the preset sampling rate and other configurations.
Bitrate: You can choose a custom bitrate or adjust the bitrate via the bitrate control factor.
Resolution: Controls the frame size of the output video.
Video Frame Rate: The frequency at which bitmap images appear consecutively on the display, measured in frames.
Audio Parameters: Audio parameters can be customized according to user requirements.
Advanced Settings: Advanced setting parameters can be customized according to user requirements.
7. Click Complete to complete template creation.
After creation, you can perform View, Edit, Clone, and Delete operations on the new template in the custom template list. Note:
To use broadcast-grade format transcoding capabilities, contact us. You can use Cloud Infinite to create tasks or workflows to apply broadcast-professional format transcoding templates. Smart Audio
Speech Recognition
Convert speech to text, supporting Chinese, English, and 23 dialects.
Operation Steps
2. In the left sidebar, click Bucket Management to go to the Bucket Management page.
3. Click the Bucket Name or Manage in the right operation bar to go to the corresponding Bucket page.
4. In the left sidebar, click Task & Workflow > Template Configuration to go to the template configuration page.
5. Select Intelligent Speech > ASR, click Create ASR Template.
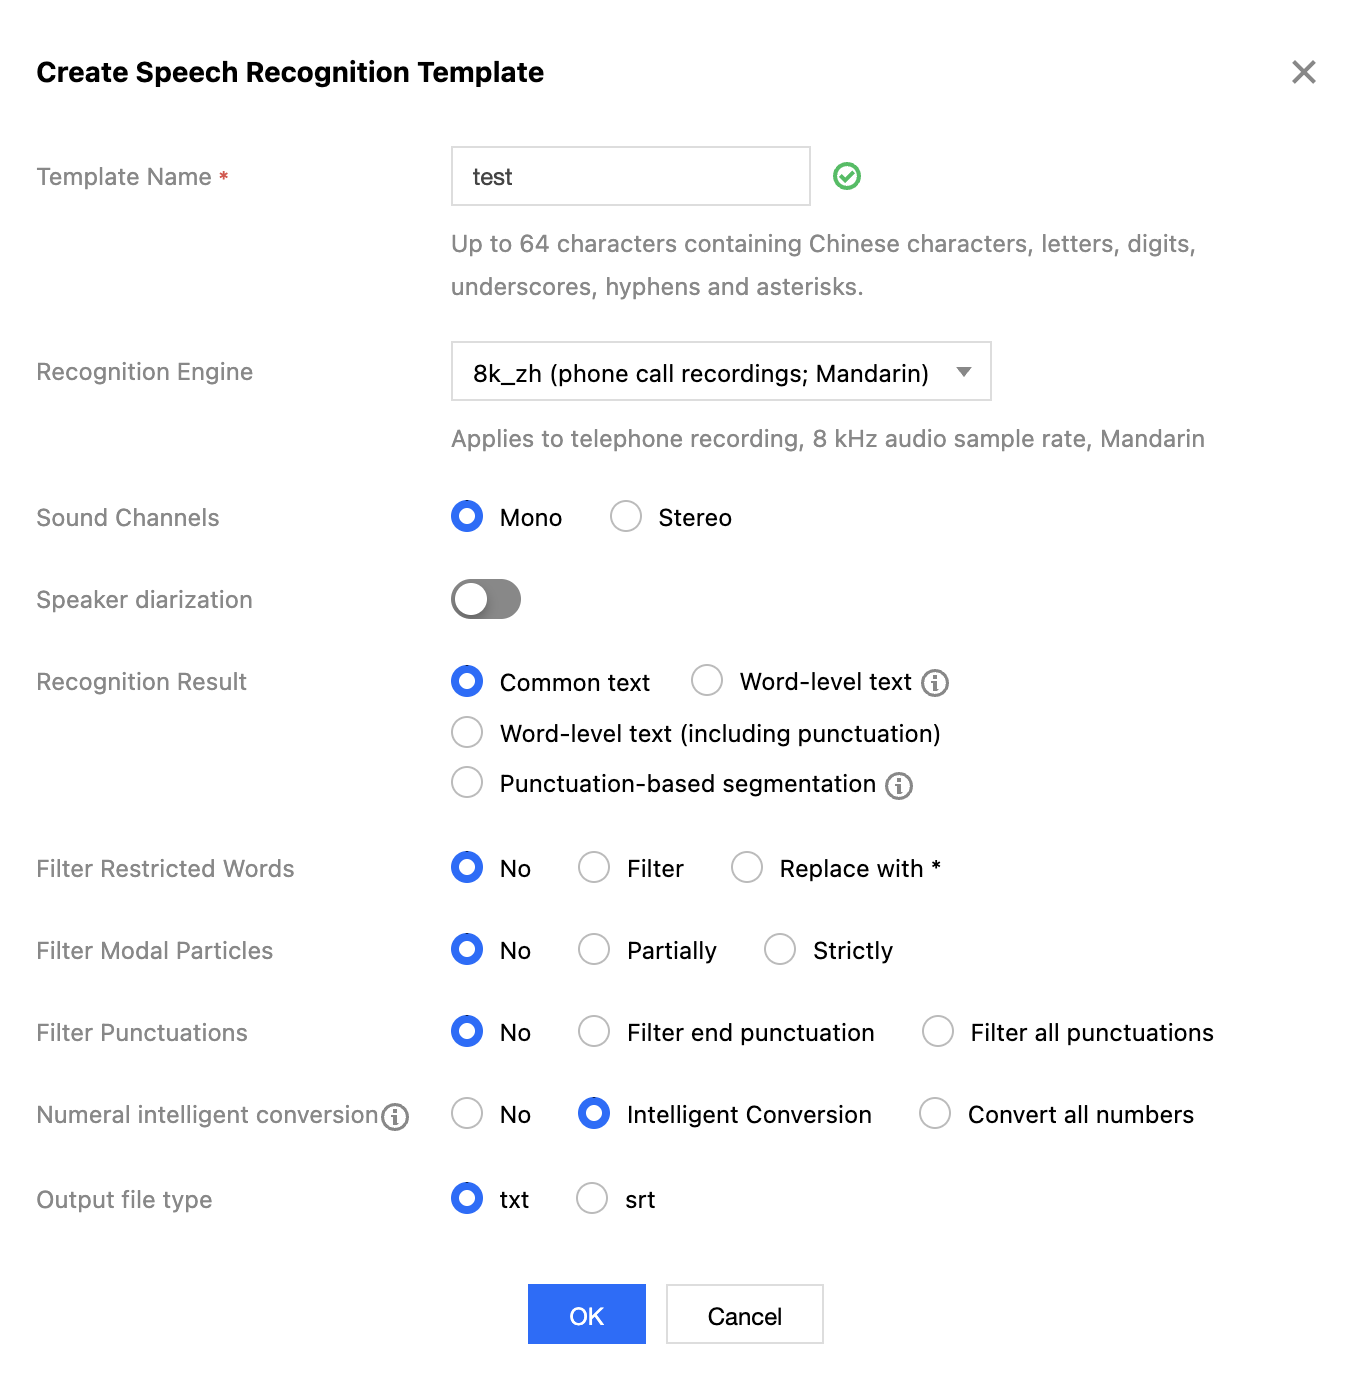
6. In the pop-up Create ASR Template window, configure custom settings.
The configuration items are described as follows:
Template Name: Up to 64 characters. Only Chinese, English, digits, underscore (_), hyphen (-), and asterisk (*) are supported.
Recognition Engine: Select the desired voice.
Select Number of Channels: Choose asynchronous or synchronous processing based on text length.
Speaker Diarization: Automatically distinguishes between different speakers and labels the content.
Recognition Results: You can choose to return plain text or at word granularity level.
Filter Profanity: Choose whether to filter profanity.
Filter Interjections: Choose whether to filter interjections.
Filter Punctuation: Choose whether to filter punctuation.
Intelligent Number Conversion: Convert numbers to Arabic numerals.
Output File Type: You can choose srt or txt format.
7. Click OK to complete template creation.
After successful creation, you can perform operations such as View, Edit, Clone, and Delete on the newly created template in the custom template list.
Note:
You can use Cloud Infinite to create tasks or workflows to apply to ASR templates. Voice Separation
You can separate the same audio file into vocal tracks and background sound tracks, facilitating post-production video editing and playback.
Operation Steps
2. In the left sidebar, click Bucket Management to go to the Bucket Management page.
3. Click the Bucket Name or Manage in the right operation bar to go to the corresponding Bucket page.
4. In the left sidebar, click Tasks & Workflows > Template Configuration to go to the Template Configuration page.
5. Select Intelligent Speech > Voice Separation, and click Create Voice Separation Template.
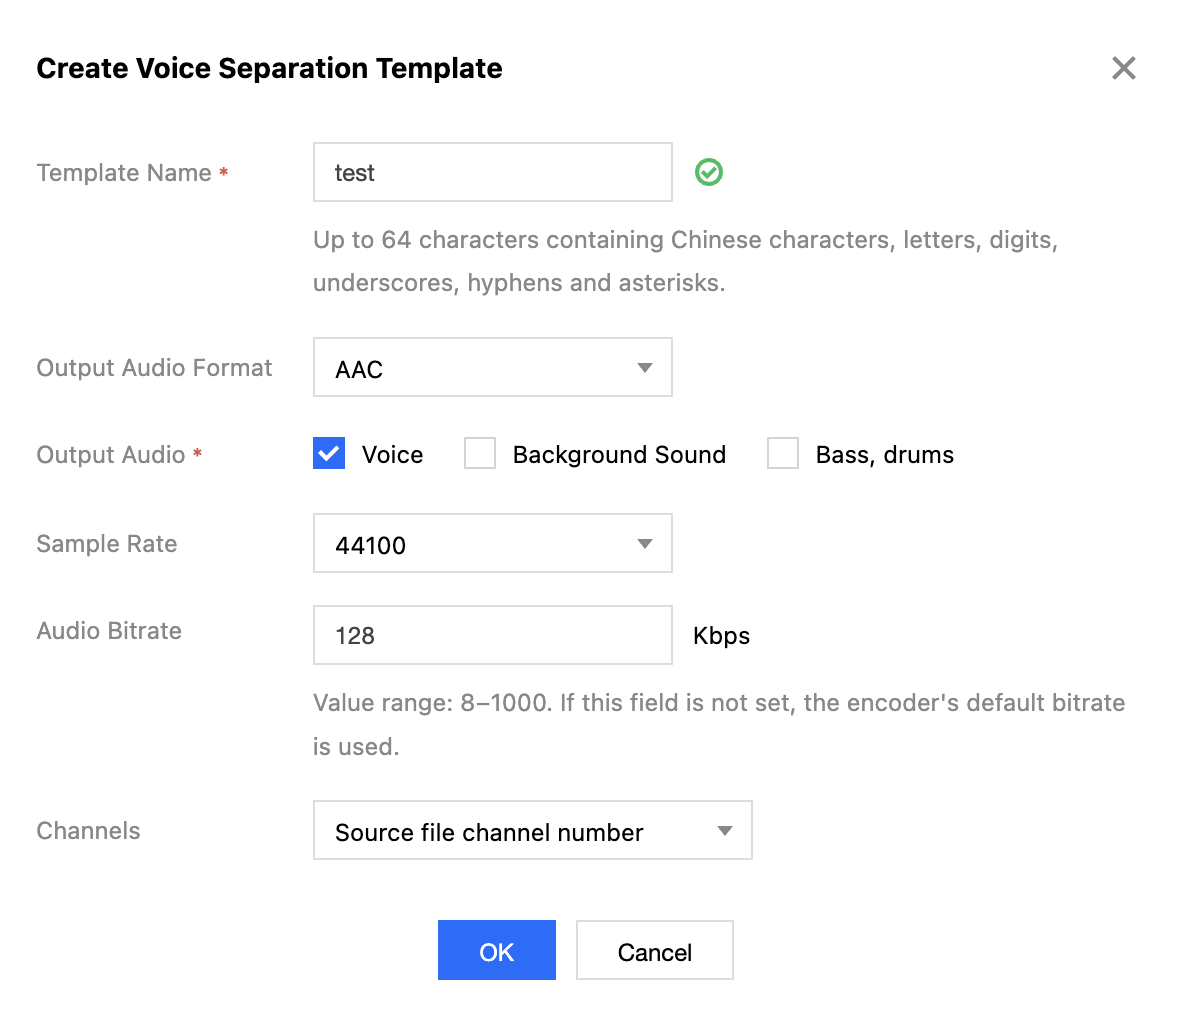
6. In the pop-up Create Voice Separation Template window, configure custom settings.
The configuration items are described as follows:
Template Name: Up to 64 characters. Only Chinese, English, digits, underscore (_), hyphen (-), and asterisk (*) are supported.
Output Audio Format: including MP3, AAC, AMR, and FLAC.
Output Audio: can be specified as vocal or background sound.
Audio Parameters: Audio parameters can be customized according to user requirements.
7. Click OK to complete template creation.
After creation, you can View, Edit, Clone, or Delete the newly created template in the custom template list. Note:
You can use Cloud Infinite to create tasks or workflows to apply the voice separation template. TTS
Through advanced deep learning technologies, text is converted into natural and smooth speech.
Operation Steps
2. In the left sidebar, click Bucket Management to go to the Bucket Management page.
3. Click the Bucket Name or Manage in the right operation bar to go to the corresponding Bucket page.
4. In the left sidebar, click Tasks & Workflows > Template Configuration to go to the Template Configuration page.
5. Select Intelligent Voice > TTS, and click Create TTS Template.
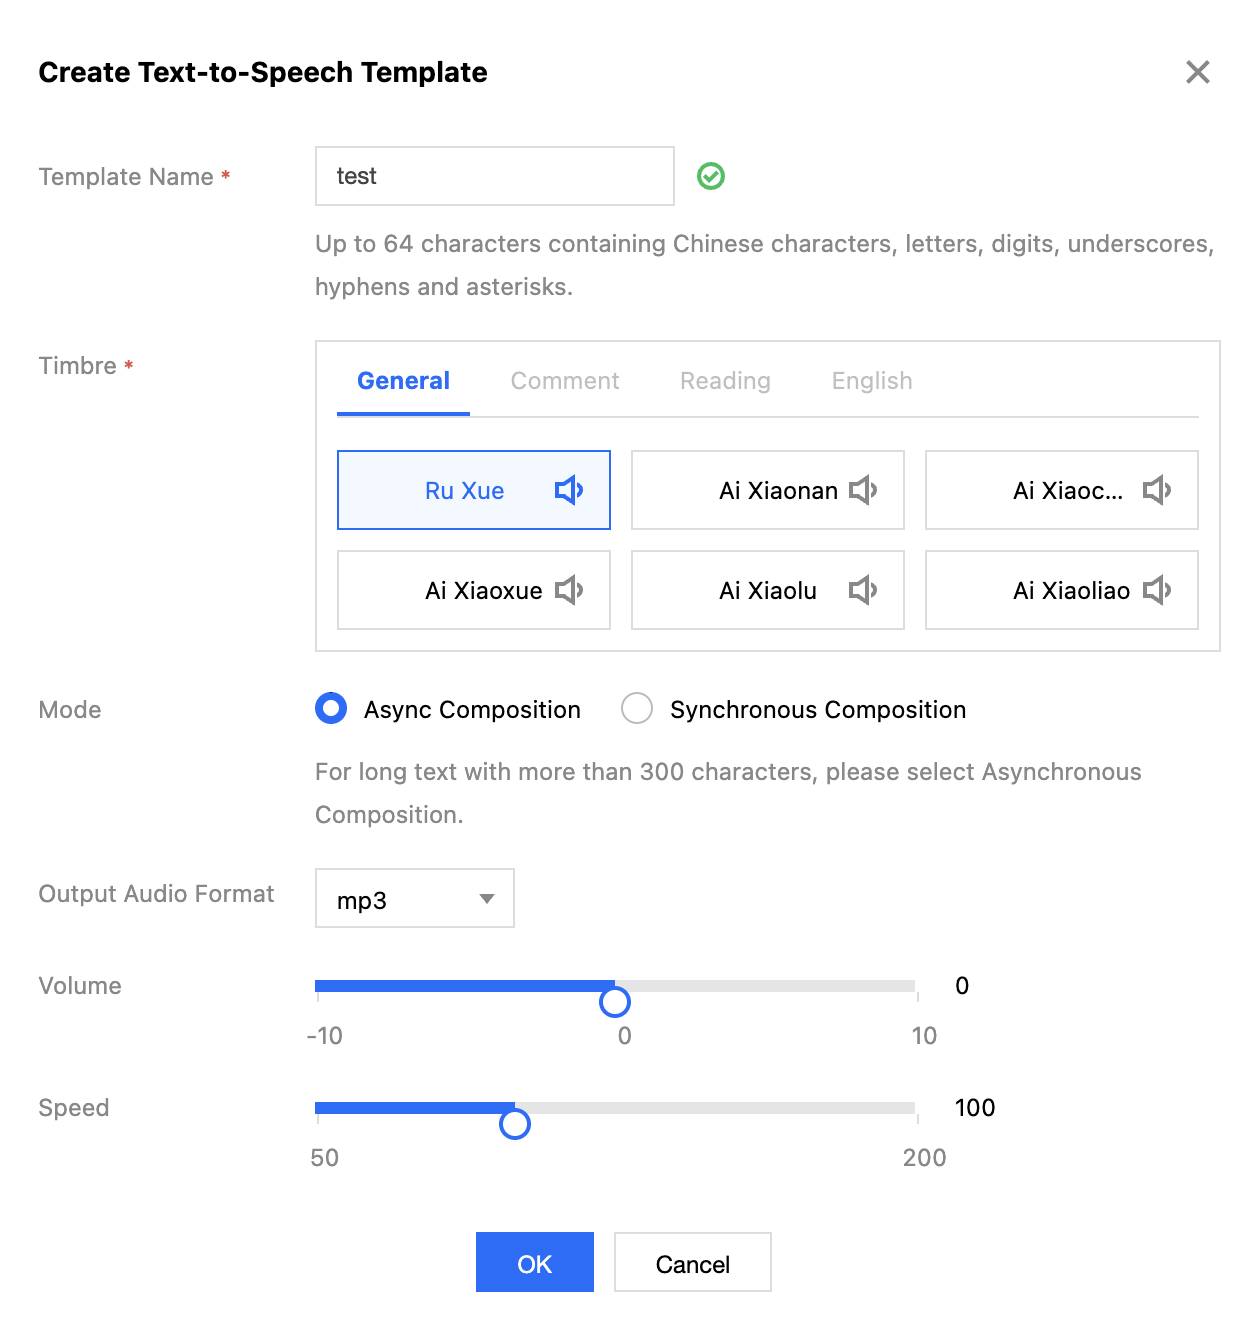
6. In the pop-up Create TTS Template window, configure custom settings.
The configuration items are described as follows:
Template Name: Up to 64 characters. Only Chinese, English, digits, underscore (_), hyphen (-), and asterisk (*) are supported.
Voice Selection: Select the voice you need.
Emotion: Some voices support selecting different emotions.
Processing Mode: Select asynchronous or synchronous processing mode based on the length of the text.
Output Audio Format: Includes MP3, WAV, and PCM formats.
Volume: Adjust the volume level.
Speech Rate: Adjust the speech rate of the output audio.
7. Click OK to complete template creation.
After creation, you can View, Edit, Clone, or Delete the newly created template in the custom template list. Note:
You can use Cloud Infinite to create tasks or workflows, and apply TTS templates. Audio Noise Reduction
Audio Noise Reduction is designed for scenarios such as course recording and post-production of outdoor filming to remove equipment background noise and ambient noise from audio.
Operation Steps
2. In the left sidebar, click Bucket Management to go to the Bucket Management page.
3. Click the Bucket Name or Manage in the right operation bar to go to the corresponding Bucket page.
4. In the left sidebar, click Tasks & Workflows > Template Configuration to go to the Template Configuration page.
5. Select Intelligent Speech > Audio Noise Reduction, and click Create Audio Noise Reduction Template.
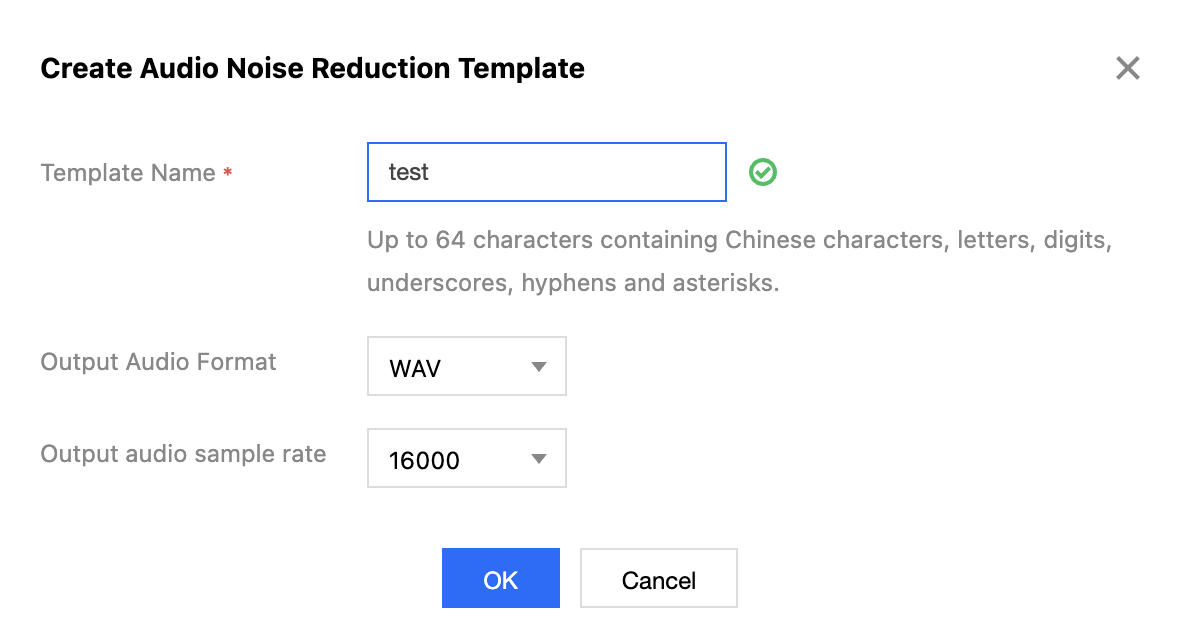
6. In the pop-up Create Audio Noise Reduction Template window, configure custom settings.
The configuration items are described as follows:
Template Name: Up to 64 characters. Only Chinese, English, digits, underscore (_), hyphen (-), and asterisk (*) are supported.
Output Audio Format: including WAV, MP3, and M4A formats.
Output Audio Sample Rate: The output audio sample rate can be selected as needed.
7. Click OK to complete template creation.
After successful creation, you can perform operations such as View, Edit, Clone, and Delete on the newly created template in the custom template list.
Note:
You can use Cloud Infinite to create tasks or workflows, and apply TTS templates. Image Processing
Image Processing supports flexible image editing, such as image rotation, cropping, transcoding, scaling, etc., and provides image slimming solutions including Guetzli compression, TPG transcoding, HEIF transcoding, etc., as well as copyright protection solutions such as adding image or text watermarks and exclusive Blind Watermark, meeting the image needs in various business scenarios.
Operation Steps
2. In the left sidebar, click Bucket Management to go to the Bucket Management page.
3. Click the Bucket Name or Manage in the right operation bar to go to the corresponding Bucket page.
4. In the left sidebar, click Tasks & Workflows > Template Configuration to go to the Template Configuration page.
5. Select Image Processing and click Create Image Processing Template.
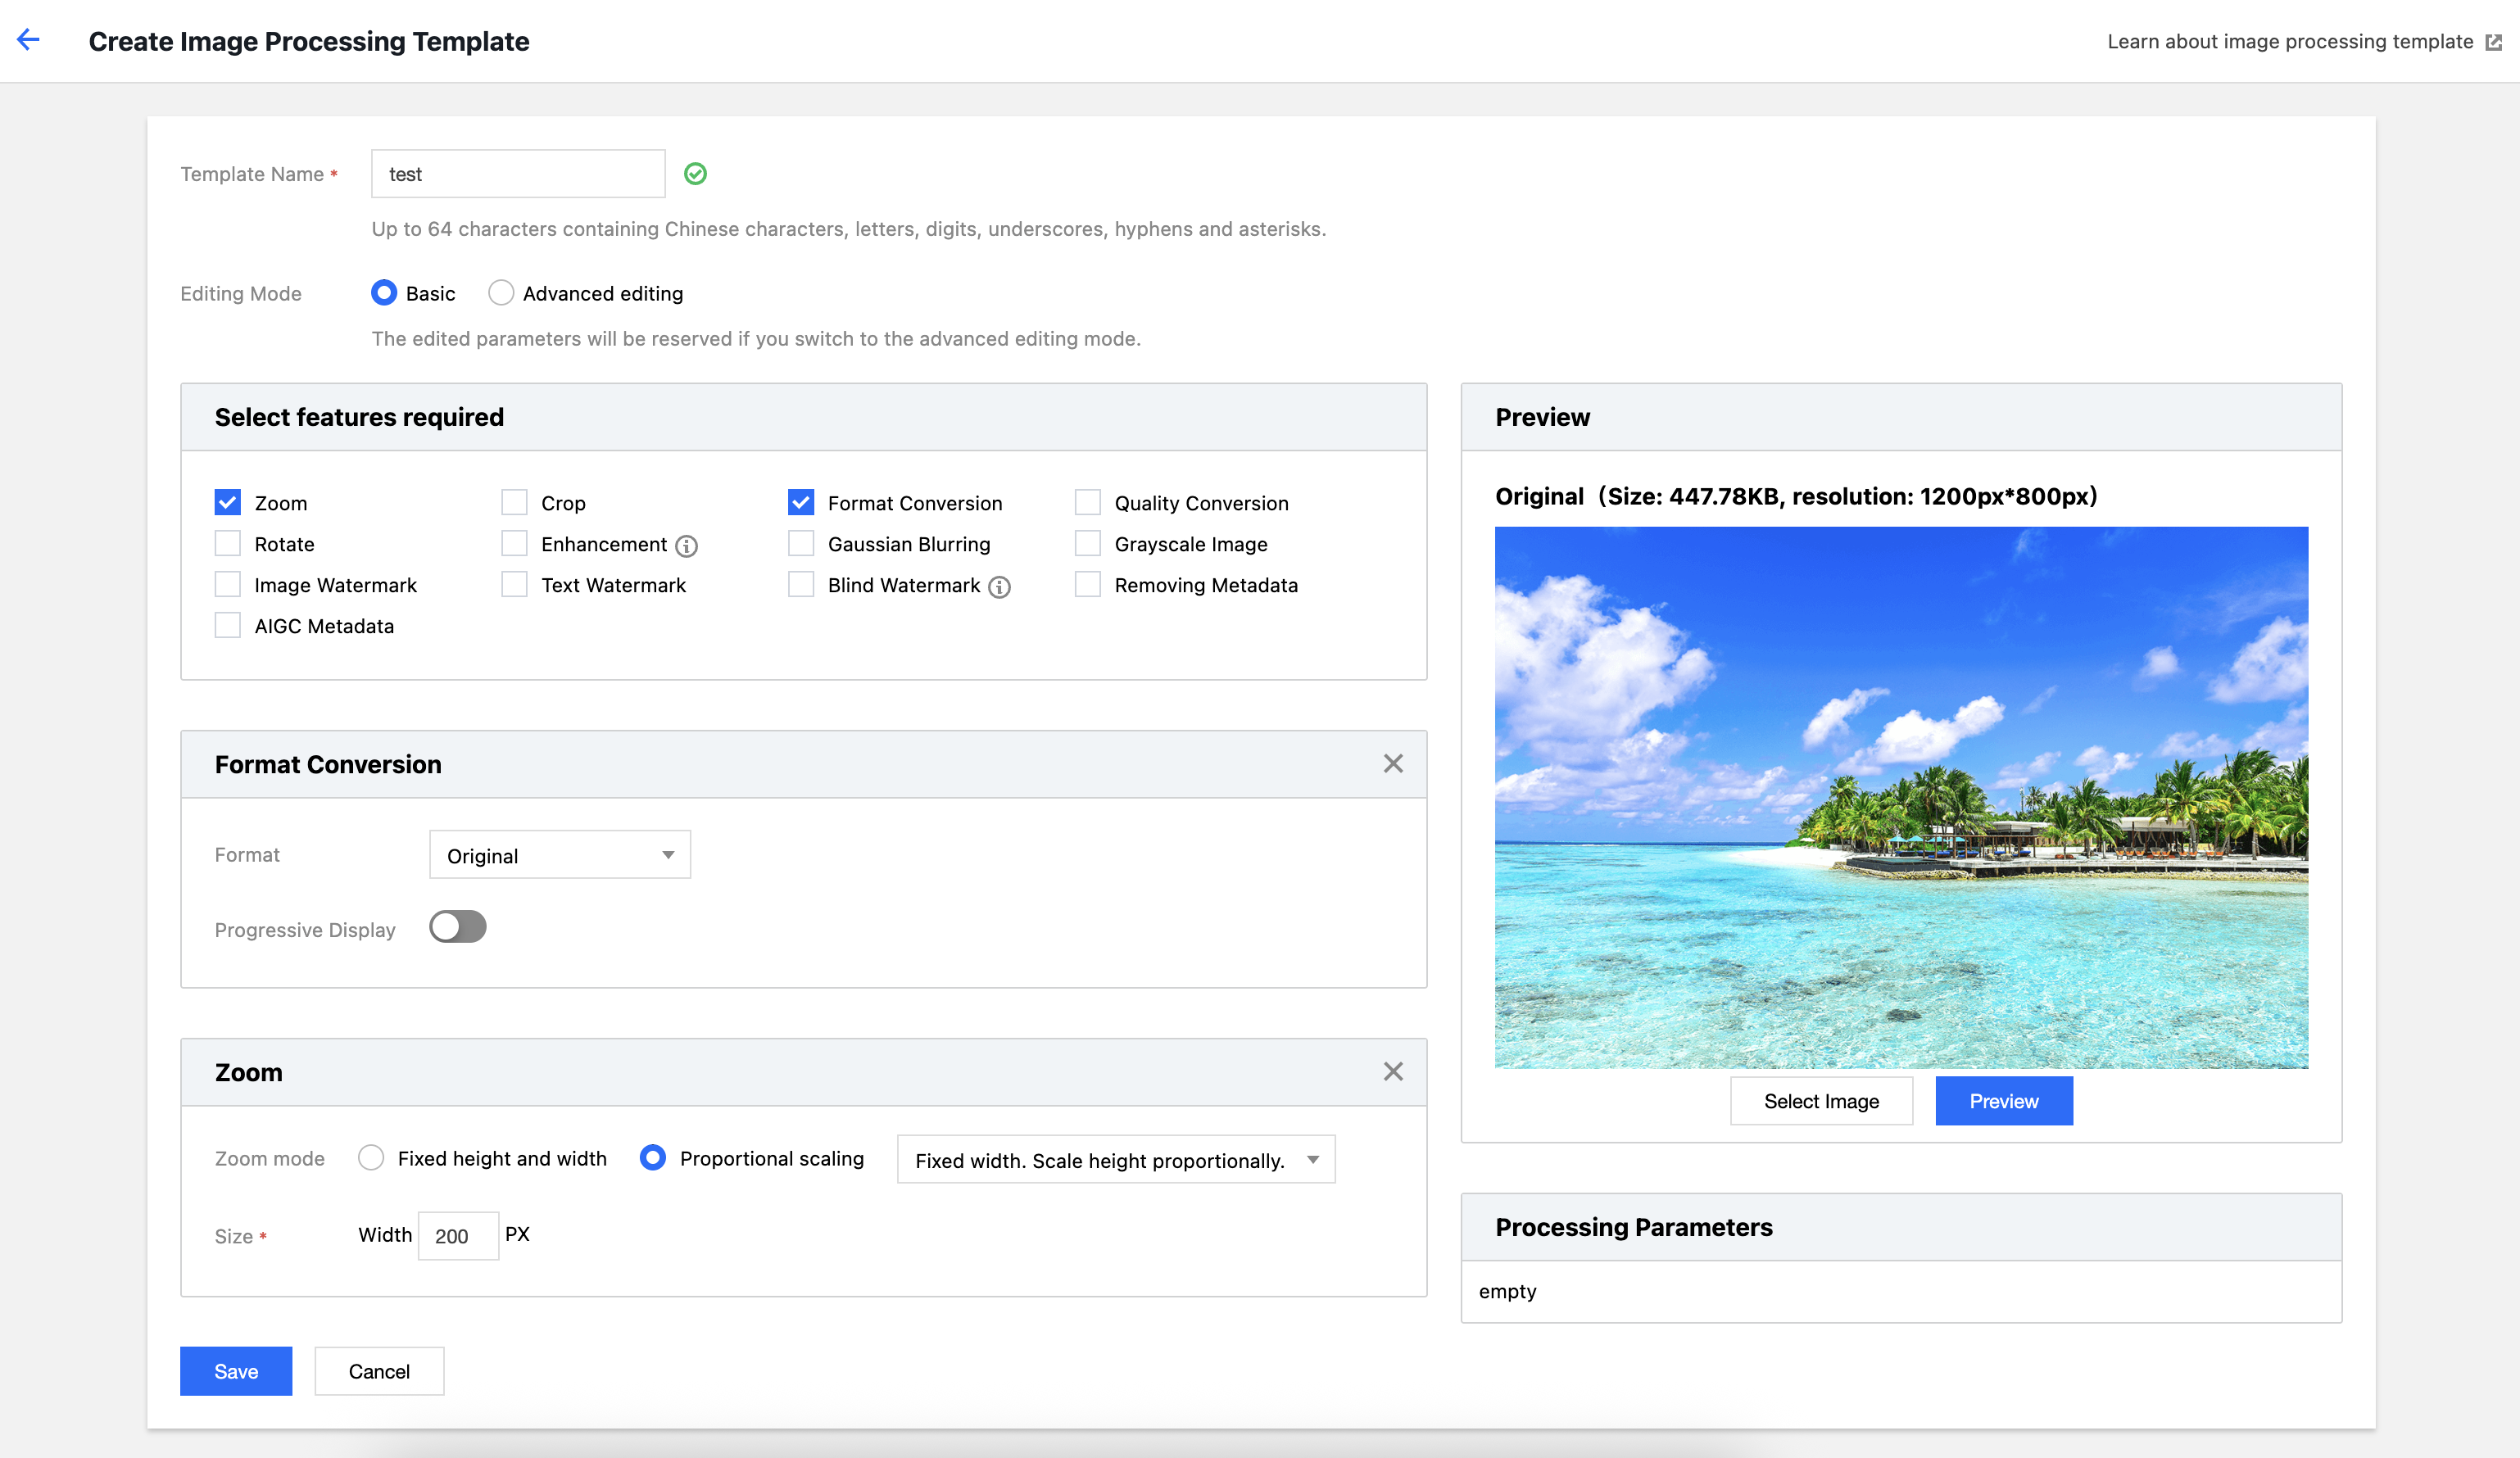
6. In the pop-up Create Image Processing Template window, configure custom settings.
The configuration items are described as follows:
Template Name: Up to 64 characters in length, supporting only Chinese, English, digits, underscore _, hyphen -, and *.
Edit Mode: You can choose Basic Edit or Advanced Edit. In Basic Edit mode, users can select multiple Image Processing operations and preview the processing effects; in Advanced Edit mode, users need to edit Image Processing operations themselves based on the API.
7. Click Save to complete the template creation.
After successful creation, you can perform operations such as View, Edit, Clone, and Delete on the newly created template in the custom template list.
Note:
You can use Cloud Infinite to create tasks or workflows to apply Image Processing templates. Content Recognition
General OCR
General OCR (Optical Character Recognition) intelligently recognizes text content in images or PDFs as editable text based on deep learning technology.
Operation Steps
2. In the left sidebar, click Bucket Management to go to the Bucket Management page.
3. Click the Bucket Name or Manage in the right operation bar to go to the corresponding Bucket page.
4. In the left sidebar, click Task & Workflow > Template Configuration to go to the template configuration page.
5. Select CR > General OCR, click Create General OCR Template.
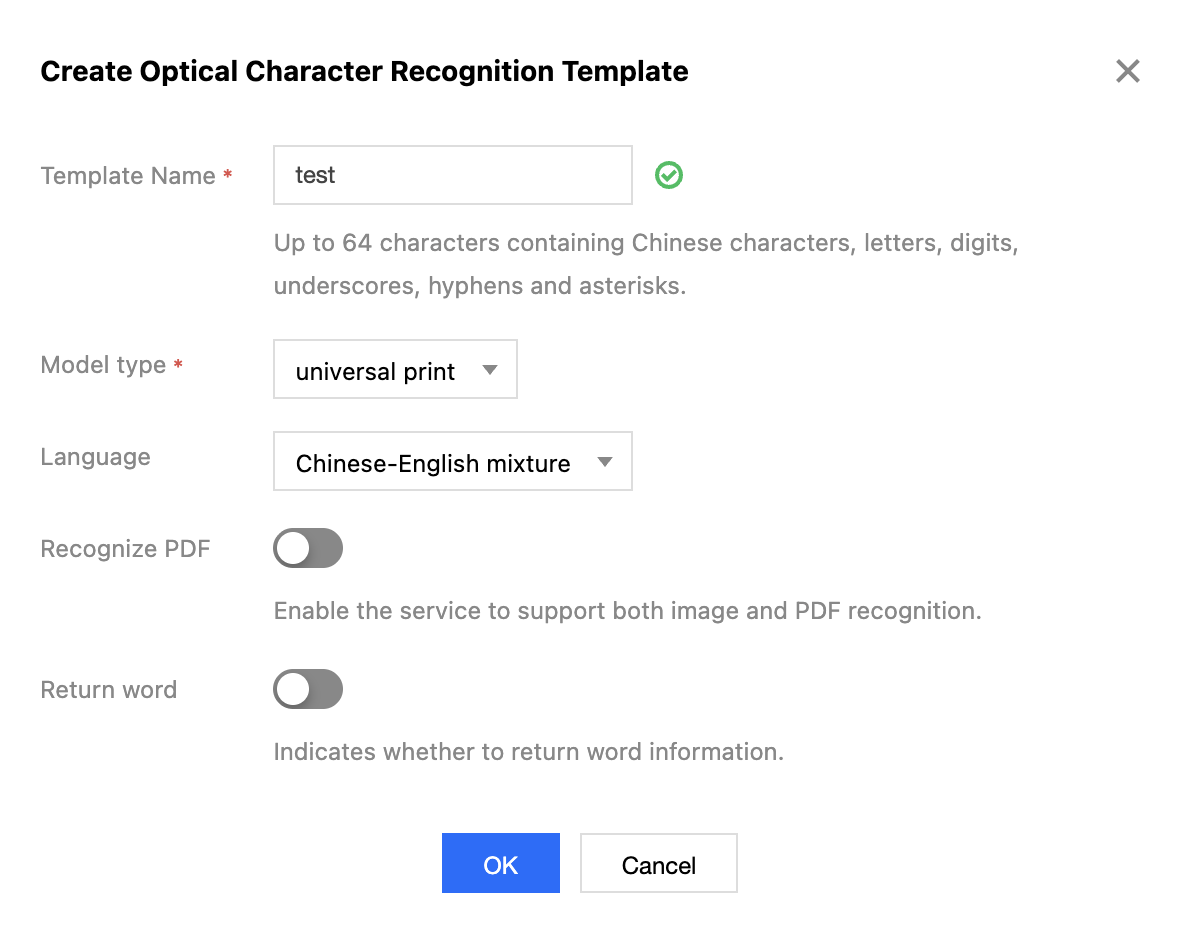
6. In the pop-up Create General OCR Template window, perform custom configuration.
The configuration items are described as follows:
Template Name: Up to 64 characters in length, supporting only Chinese, English, digits, underscore _, hyphen -, and *.
Model Type: Select the type of text to be recognized.
Language: Some model types allow selection of the language to be recognized.
PDF Recognition: Some model types can choose whether to support PDF recognition.
PDF Page Number: When "PDF recognition" is enabled, you can customize the page numbers of PDF pages to be recognized.
Return Single Character: Some model types allow you to choose whether to return the single character information.
Return Single Character Coordinates: When the model type is set to "Handwriting Recognition", you can choose whether to return the four-point positioning coordinates of single characters.
7. Click OK to complete template creation.
After successful creation, you can perform operations such as View, Edit, Clone, and Delete on the newly created template in the custom template list.
Note:
You can use Cloud Infinite to create tasks or workflows to apply General OCR templates. Video Object Detection
Video content is analyzed using computer vision technology to extract objects such as people, cars, pets, and perform analysis and recognition.
Operation Steps
2. In the left sidebar, click Bucket Management to go to the Bucket Management page.
3. Click the Bucket Name or Manage in the right operation bar to go to the corresponding Bucket page.
4. In the left sidebar, click Task & Workflow > Template Configuration to go to the template configuration page.
5. Select CR > Video Object Detection, and click Create Video Object Detection Template.
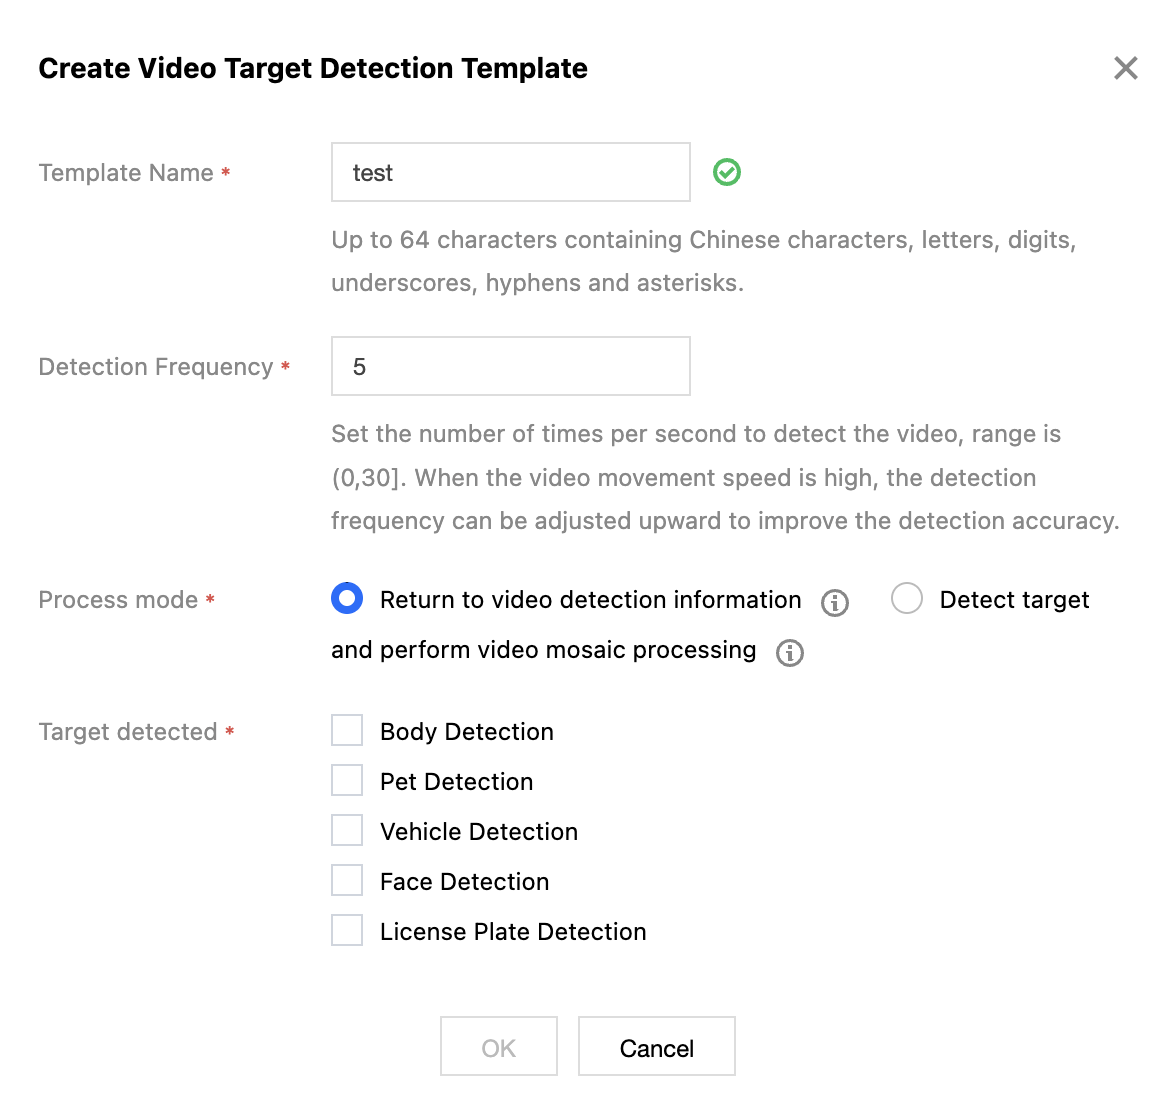
6. In the pop-up Create Video Object Detection Template window, configure custom settings.
The configuration items are described as follows:
Template Name: Up to 64 characters in length, supporting only Chinese, English, digits, underscore _, hyphen -, and *.
Detection Frame Rate: The number of video detections per second can be customized.
Processing Method: You can choose to return video detection information or detect targets and apply video mosaic processing. If "Return video detection information" is selected, users can detect multiple targets; if "Detect targets and apply video mosaic processing" is selected, users can blur faces or license plates and configure related parameters.
7. Click OK to complete template creation.
After successful creation, you can perform operations such as View, Edit, Clone, and Delete on the newly created template in the custom template list.
Note:
You can use Cloud Infinite to create tasks or workflows to apply the Video Object Detection Template.