Can I customize the shooting resolution of short videos? What custom resolutions can I use?
The customizable parameters of short video shooting include frame rate (number of frames per second), GOP length (number of seconds between key I frames), video bitrate (volume of audio/video data generated by the encoder per second), and maximum/minimum shooting duration. We offer 4 shooting resolutions as constants for your choice: 360 × 640, 540 × 960, 720 × 1280, and 1080 × 1920.
The following describes why the shooting resolution is set as a constant instead of a variable:
The 4 constants are mainstream shooting resolutions.
Android phones may not support non-mainstream resolutions, the use of which may lead to problems such as green screen and pixelation.
You can call the startCameraCustomPreview API of the TXUGCRecord class to pass in custom shooting parameters, as shown below:
// Custom configuration
TXRecordCommon.TXUGCCustomConfig customConfig = new TXRecordCommon.TXUGCCustomConfig();
Why can’t I receive the onRecordComplete callback after shooting ends on Android?
Before shooting a short video, please call the setVideoRecordListener() API of the TXUGCRecord class to set a listener for the shooting callback.
To end shooting, you need to call the stopRecord() API of the TXUGCRecord class.
How do I resume shooting from where I stopped last time?
If you call stopRecord, the video segments shot will be spliced, so after the onRecordComplete callback is received, the demo will call mTXCameraRecord.getPartsManager().deleteAllParts() to delete the segment files.
If shooting is interrupted, and you want to resume shooting from where you stopped, do not call mTXCameraRecord.getPartsManager().deleteAllParts().
@Override
public void onRecordComplete(TXRecordCommon.TXRecordResult result){
mDuration = mTXCameraRecord.getPartsManager().getDuration(); // Total shooting duration
if(mTXCameraRecord != null){
mTXCameraRecord.getPartsManager().deleteAllParts(); // Delete the video segments already shot
}
startPreview(); // Enter the preview page
}
Why are background music settings for shooting not working?
You must set the background music before calling the shooting API (startRecord of TXUGCRecord) so that the settings can take effect. The call sequence in the code is as shown below:
TXRecordCommon.TXUGCSimpleConfig simpleConfig = new TXRecordCommon.TXUGCSimpleConfig();
// 2. Specify the path of the background music file and play the music
mBGMDuration = mTXCameraRecord.setBGM(mBGMPath);
mTXCameraRecord.playBGMFromTime(0, mBGMDuration);
// 3. Start shooting (`customVideoPath`: The path of the video generated. `customPartFolder`: The folder of the video segments shot. `customCoverPath`: The path of the thumbnail.)
int result = mTXCameraRecord.startRecord(customVideoPath, customPartFolder, customCoverPath);
Does UGSV support photo taking?
You can call the snapshot API of the TXUGCRecord class to take a photo, which will be returned asynchronously through the TXRecordCommon.ITXSnapshotListener callback. The sample code is as follows:
What formats are supported for video importing? Can I import videos with a resolution higher than 720p (such as 2K and 4K)? Is there an upper limit on the size of imported videos?
Currently, you can import only MP4 video files on Android. There are no limits on the resolution or size of imported files.
The resolution of imported videos is not limited. The maximum video resolution after preprocessing is 720p, no matter how high the original video resolution is.
To speed up video import, the SDK allows you to skip preprocessing since v4.7, but some features, such as reversed playback and frame-specific preview, become unavailable. For videos whose resolution is higher than 720p, you are not advised to skip preprocessing. Preview requires the decoding of every frame. On phones with poor performance, it may take a long time for a frame to be decoded and rendered, resulting in stutter.
What background music formats are supported during short video editing?
Currently, only MP3 and M4A files are supported.
What custom outputs does short video editing support?
Editing supports custom video bitrate (in SDK 4.5 or later) and audio bitrate (in SDK 4.7 or later). For the resolution, you can choose from five constants: 360 × 640, 480 × 640, 540 × 960, 720 × 1280, and 1080 × 1920.
Currently, the SDK does not support recording background music and human voice at the same time. Therefore, to change the background music during editing, just set the volume of the original audio to 0. See the code below for detailed directions:
// Set the original audio to 0 to remove the recorded background music
mTXVideoEditer.setVideoVolume(0.0f);
// Specify the local path of the background music to use
String bgmPath = getBGMPath();
mTXVideoEditer.setBGM(bgmPath);
// Set the volume of the background music. Value range: 0.0f-1.0f
mTXVideoEditer.setBGMVolume(1.0f);
How do I switch between the Activity window and the full screen mode to display the preview image?
You need to dynamically modify the dimensions of the parent layout for the video preview view passed in to the SDK. The SDK will internally adjust the video dimensions dynamically according to the video width and height and the parent layout dimensions. The APIs of the SDK need to be called in the following sequence:
Call stopPlay first, modify the width and height of FrameLayout passed in to the SDK, call initWithPreview(parm), pass in the new FrameLayout, and call startPlay again.
// Stop playback
mTXVideoEditer.stopPlay();
if(isFullScreen){
// If the full screen mode is used, you can use the following code to switch to the window mode
FrameLayout.LayoutParams params = new FrameLayout.LayoutParams(ViewGroup.LayoutParams.MATCH_PARENT, 1500);
mVideoPlayerLayout.setLayoutParams(params);
initPlayerLayout(false);
isFullScreen =false;
}else{
// If the window mode is used, you can use the following code to switch to the full screen mode
FrameLayout.LayoutParams params = new FrameLayout.LayoutParams(ViewGroup.LayoutParams.MATCH_PARENT, ViewGroup.LayoutParams.MATCH_PARENT);
In the UGSV demo app, the video editing module places clipping and other editing features such as filters are on the same page. Can I show them on different pages?
You can clip (setCutTimeFrom) and preprocess (processVideo) a video first. Then, you can edit the clipped and preprocessed video. After editing, set the clipping duration (setCutTimeFrom) to the total duration of the edited video, and call generateVideo to generate the video. This can avoid reduced image quality caused by two compressions.
Note:
Before generating the final video, make sure you set the clipping duration to the total duration of the processed and clipped video. Otherwise, the video will be clipped again.
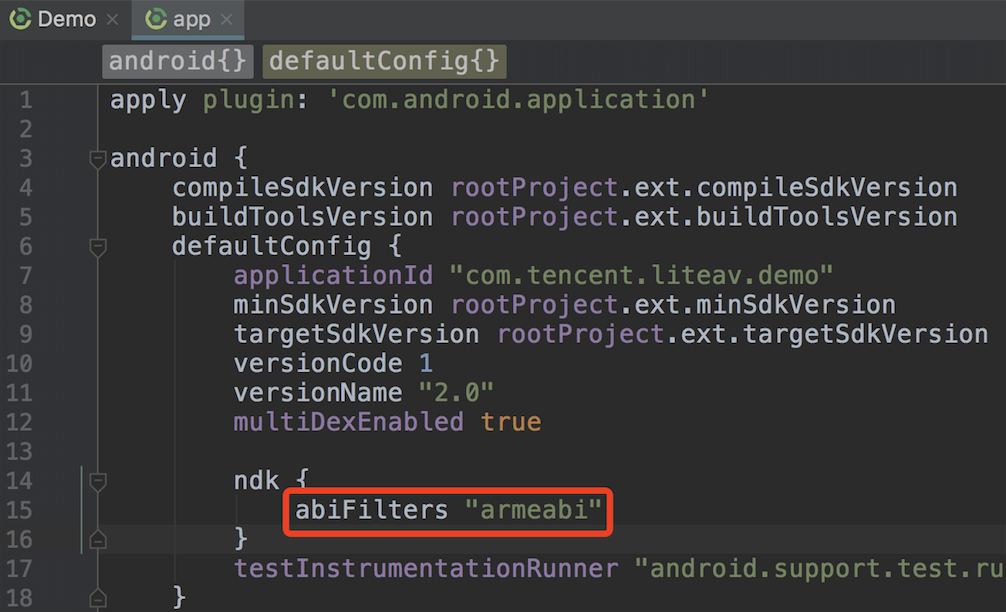
What should I do if the following error occurs when I integrate the SDK?
You can use the armeabi and armeabi-v7a architectures.
As shown above, set abiFilters to armeabi in build.gradle in app.
What should I do if a conflict occurs when I try to integrate two or more media SDKs?
Because all Tencent Cloud media SDKs use the same underlying modules, the duplicate symbol error occurs if you integrate two or more SDKs into your project.
To avoid the problem, instead of integrating two SDKs, we recommend you use the All-in-One SDK.
Why can I no longer use UGSV features after updating the SDK?
1. If you use Android Studio, after replacing the AAR file, change the AAR reference in build.gradle of app to the name of the AAR file in /libs of your project. Then, clean your project and build it again.
2. Check the SDK version. You need a license to use v4.5 and later versions of the SDK.
If you don’t have a license, please buy one first. The UGSV SDK comes in Lite edition and Standard edition.
How do I implement a progress bar in my Android project?
In UGSV, video playback is based on the UGSV player. You need to write your own code for progress bar. For detailed directions, see Player SDK - Playback progress listening.