This document introduces the live playback feature of the Video Cloud SDK.
Live streaming and video on demand
In live streaming, the video streams published by hosts in real time are the source of streaming. When hosts stop publishing streams, the video played stops. Since video is streamed in real time, players do not have progress bars when they play live streaming URLs.
In video on demand (VOD), video files in the cloud are the source of streaming. Videos can be played at any time as long as they are not deleted from the cloud, and the playback progress can be adjusted using the progress bar. Video streaming websites such as Tencent Video and Youku Tudou are typical applications of VOD.
Supported protocols
The table below lists the common protocols used for live streaming. We recommend FLV URLs (which start with http and end with flv) for LVB and WebRTC for LEB. For more information, please see LEB.
Protocol
Pro
Con
Playback Latency
HLS
Mature, well adapted to high-concurrency scenarios
SDK integration is required.
3s - 5s
FLV
Mature, well adapted to high-concurrency scenarios
The Video Cloud SDK does not impose any limit on the sources of playback URLs, which means you can use it to play both Tencent Cloud and non-Tencent Cloud URLs. However, the player of the SDK supports only live streaming URLs in FLV, RTMP, HLS (M3U8), and WebRTC formats and VOD URLs in MP4, HLS (M3U8), and FLV formats.
Sample Code
Regarding frequently asked questions among developers, Tencent Cloud offers a straightforward API example project, which you can use to quickly learn how to use different APIs.
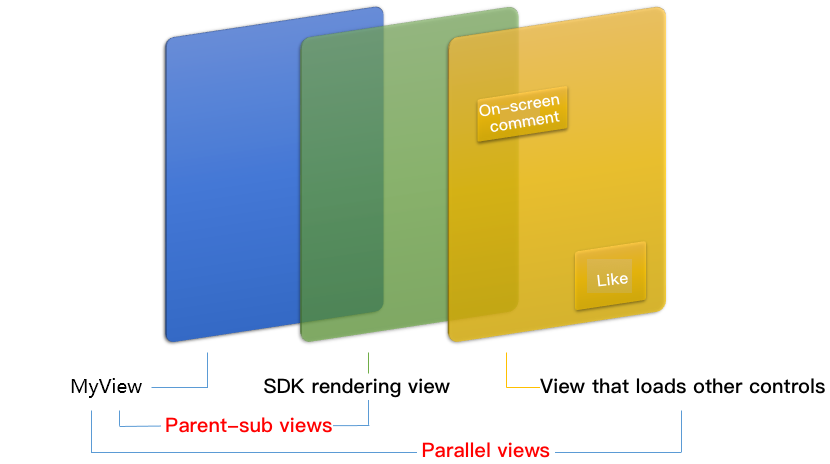
In iOS, a view is used as the basic UI rendering unit. Therefore, you need to configure a view, whose size and position you can adjust, for the player to display video images on.
// Use setRenderView to bind a rendering view to the player
[_txLivePlayer setRenderView:_myView];
Technically, the player does not render video images directly on the view (_myView in the sample code) you provide. Instead, it creates a subview for OpenGL rendering over the view.
You can adjust the size of video images by changing the size and position of the view. The SDK will make changes to the video images accordingly.
How can I animate views?
You are allowed great flexibility in view animation, but note that you need to modify the transform rather than frame attribute of the view.
[UIView animateWithDuration:0.5 animations:^{
_myView.transform =CGAffineTransformMakeScale(0.3,0.3);// Shrink by 1/3
Images are scaled to fill the entire screen, and the excess parts are cropped. There are no black bars in this mode, but images may not be displayed in whole.
V2TXLiveFillModeFit
Images are scaled as large as the longer side can go. Neither side exceeds the screen after scaling. Images are centered, and there may be black bars.
setRenderRotation: clockwise rotation of video
Value
Description
V2TXLiveRotation0
Original
V2TXLiveRotation90
Rotate 90 degrees clockwise
V2TXLiveRotation180
Rotate 180 degrees clockwise
V2TXLiveRotation270
Rotate 270 degrees clockwise
Step 7. Pause playback
Technically speaking, you cannot pause a live playback. In this document, by pausing playback, we mean freezing video and disabling audio. In the meantime, new video streams continue to be sent to the cloud. When you resume playback, it starts from the time of resumption. This is in contrast to VOD. With VOD, when you pause and resume playback, the player behaves the same way as it does when you pause and resume a local video file.
// Pause playback
[_txLivePlayer pauseAudio];
[_txLivePlayer pauseVideo];
// Resume playback
[_txLivePlayer resumeAudio];
[_txLivePlayer resumeVideo];
Step 8. Stop playback
// Stop playback
[_txLivePlayer stopPlay];
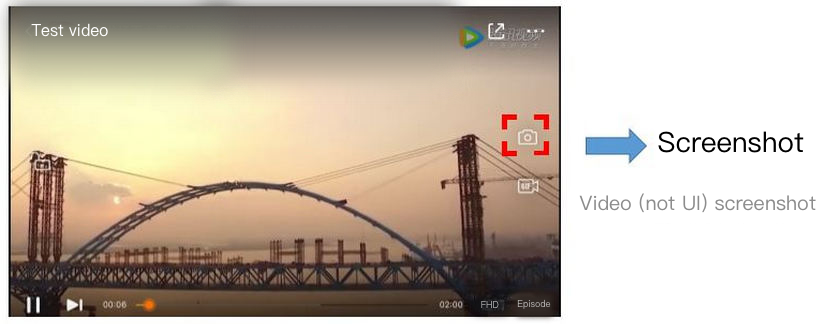
Step 9. Take a screenshot
Call snapshot to take a screenshot of the live video streamed. You can get the screenshot taken in the onSnapshotComplete callback of V2TXLivePlayerObserver. This method captures a frame of the streamed video. To capture the UI, use the corresponding API of the iOS system.
The live playback feature of the SDK is not based on FFmpeg, but Tencent Cloud’s proprietary playback engine, which is why the SDK offers better latency control than open-source players do. We provide three latency control modes, which can be used for showrooms, game streaming, and hybrid scenarios.
Comparison of the three modes
Mode
Stutter
Average Latency
Scenario
Remarks
Speedy
More likely than the speedy mode
2-3s
Live showroom (Chongding Dahui)
The mode delivers low latency and is suitable for latency-sensitive scenarios.
Smooth
Least likely of the three
>= 5s
Game streaming (Penguin Esports)
Playback is least likely to stutter in this mode, which makes it suitable for ultra-high-bitrate streaming of games such as PUBG.
Auto
Self-adaptive to network conditions
2-8s
Hybrid
The better network conditions at the audience end, the lower the latency.
Code to integrate the three modes
// Auto mode
[_txLivePlayer setCacheParams:1 maxTime:5];
// Speedy mode
[_txLivePlayer setCacheParams:1 maxTime:1];
// Smooth mode
[_txLivePlayer setCacheParams:5 maxTime:5];
// Start playback after configuration
Note:
For more information on stuttering and latency control, see Video Stutter.
Listening for SDK Events
You can bind a V2TXLivePlayerObserver to your V2TXLivePlayer object to receive callback notifications about the player status, playback volume, first audio/video frame, statistics, warning and error messages, etc.
Periodically triggered notifications
The onStatisticsUpdate callback notification is triggered every 2 seconds to update you on the player’s status in real time. Like a car’s dashboard, the callback gives you information about the SDK, such as network conditions and video information.
Parameter
Description
appCpu
CPU usage (%) of the application
systemCpu
CPU usage (%) of the system
width
Video width
height
Video height
fps
Frame rate (fps)
audioBitrate
Audio bitrate (Kbps)
videoBitrate
Video bitrate (Kbps)
The onPlayoutVolumeUpdate callback, which notifies you of the player’s volume, works only after you call enableVolumeEvaluation to enable the volume reminder. You can set the interval of the callback by specifying the intervalMs parameter of enableVolumeEvaluation.
Event-triggered notifications
Other callbacks are triggered when specific events occur.