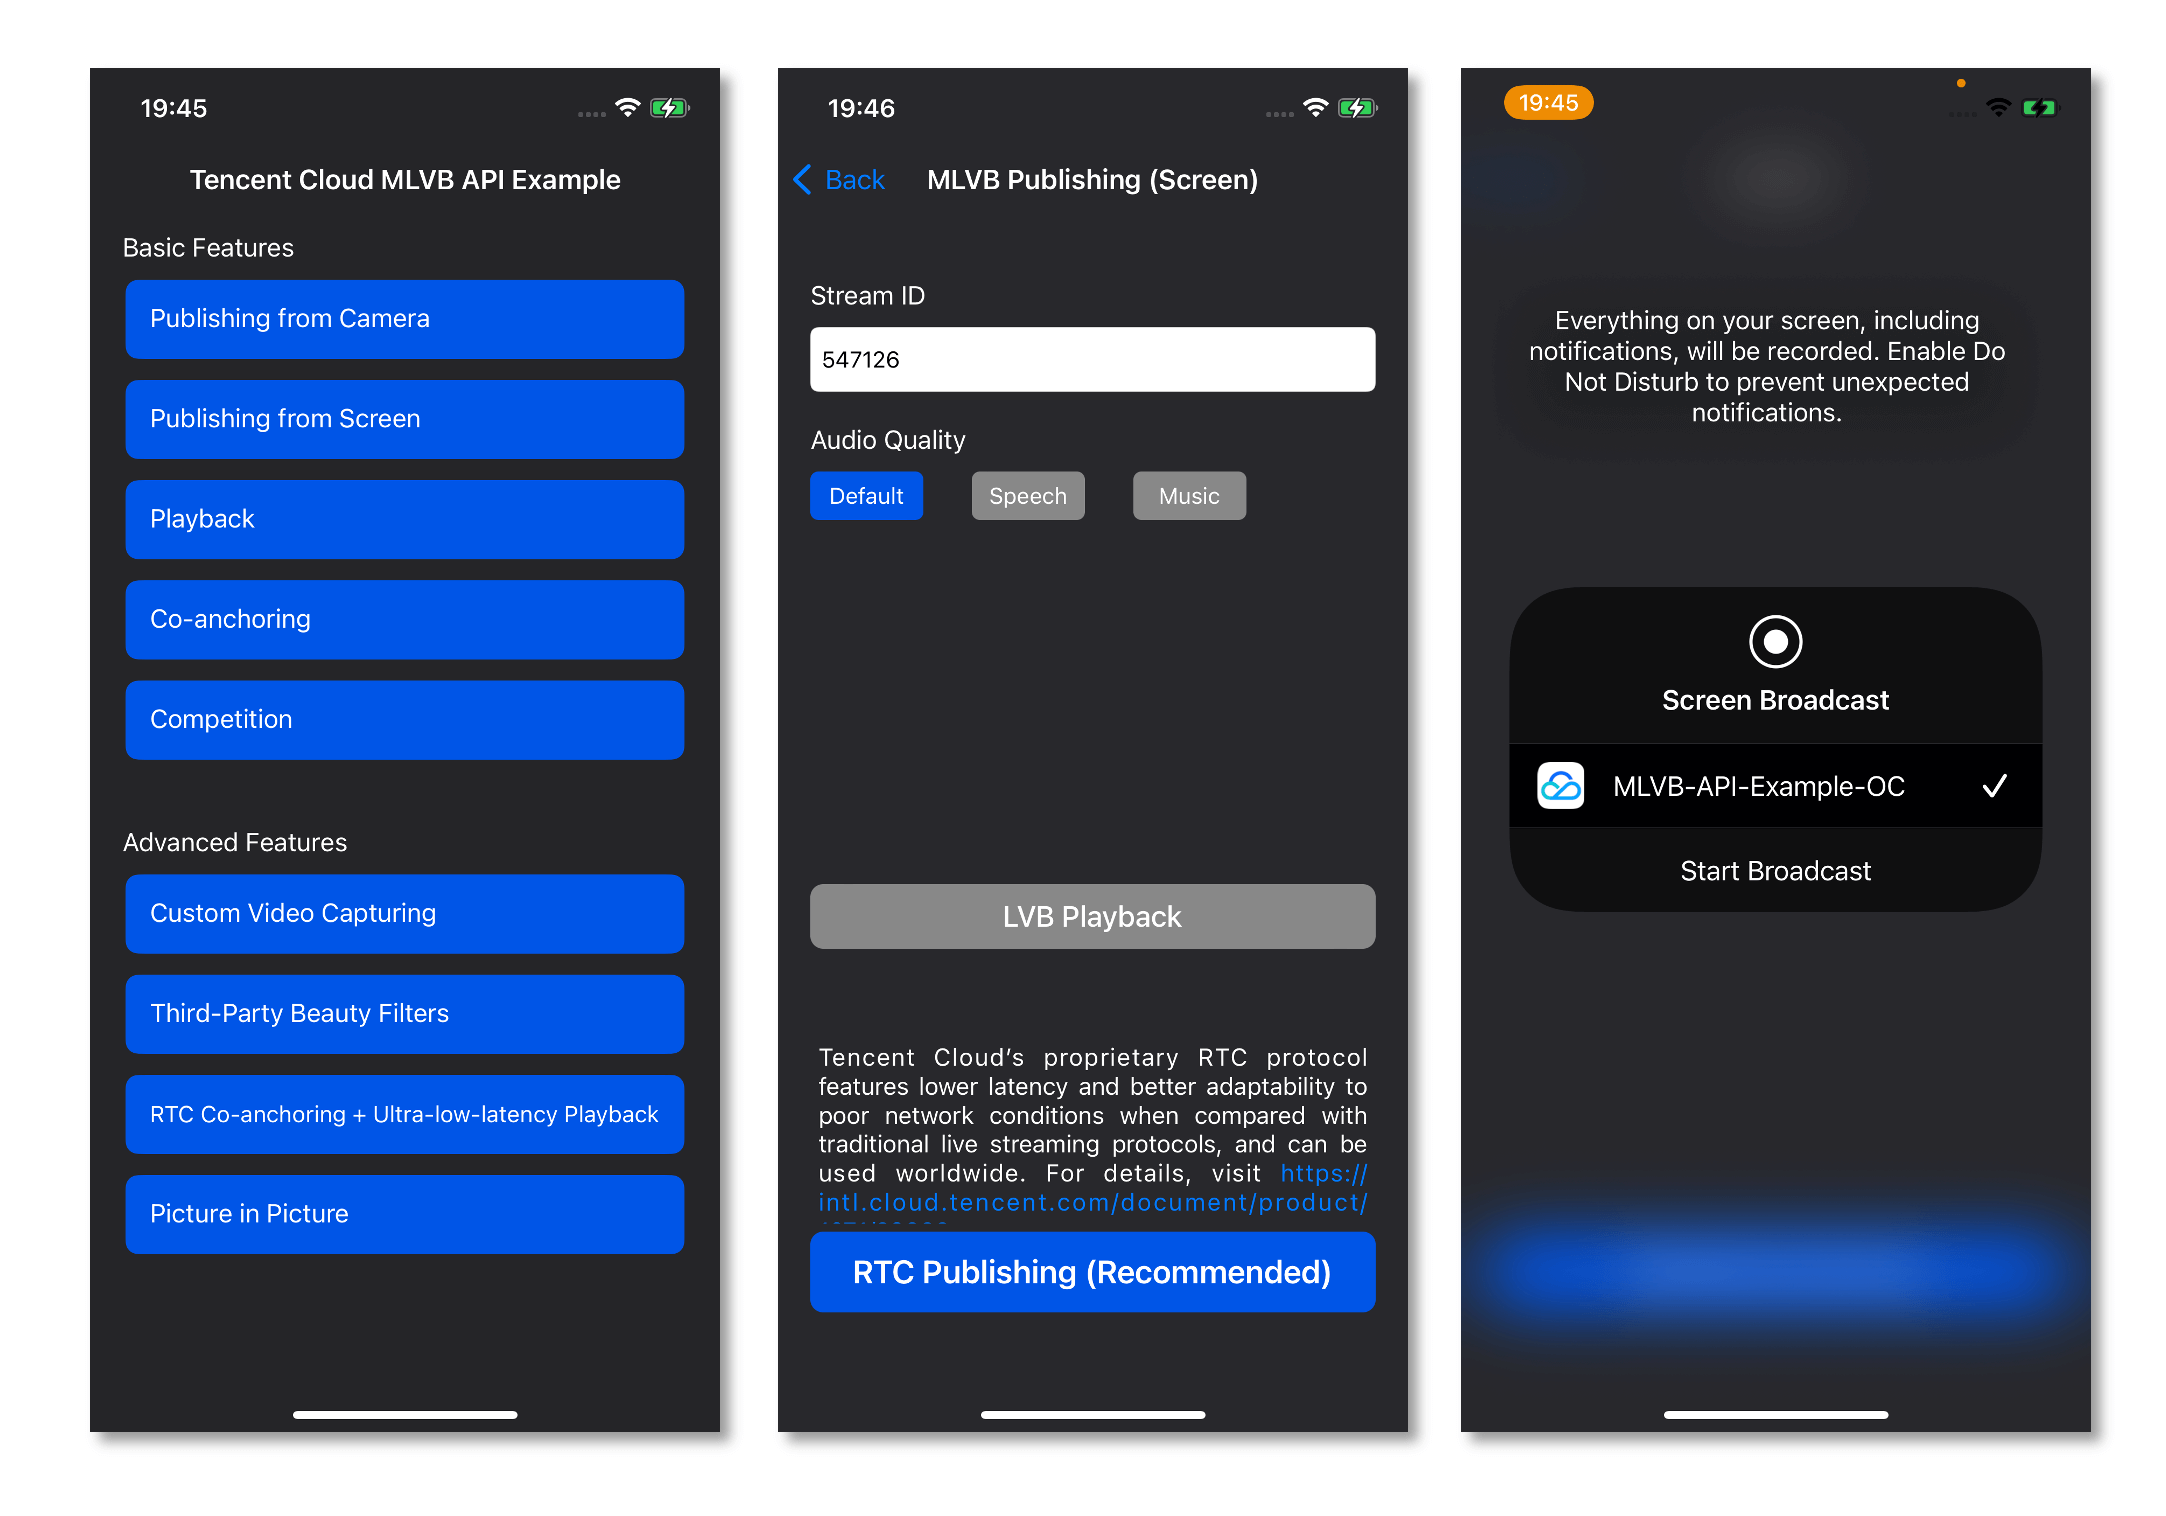
Screen recording allows a host to live stream the image on their phone screen. It can be combined with local camera preview and is used in scenarios such as game streaming and mobile app demos. The Tencent Cloud LiteAV SDK offers screen recording capabilities via V2TXLivePusher. The UIs for screen recording operations in the SDK API-Example project are as shown below:
Restrictions
The screen recording feature is available only on iOS 11.0 or later. This document describes how to use ReplayKit 2 on iOS 11 to push streams from the screen. The parts about the use of the SDK also apply to other custom stream push scenarios. For more information, see the code sample in the TXReplayKit_Screen folder of the demo.
Screen recording is a new feature on iOS 10. In addition to using ReplayKit to record video from the screen, which is possible on iOS 9, with iOS 10, users can also stream live video from the screen. For more information, see Go Live with ReplayKit. On iOS 11, Apple made ReplayKit more usable and more universally applicable and launched ReplayKit 2, going from supporting ReplayKit alone to allowing the recording of the entire screen. Therefore, we recommend you use ReplayKit 2 on iOS 11 to enable the screen recording feature. Screen recording relies on extensions, which operate as independent processes. However, to ensure system smoothness, iOS allocates limited resources to extensions and may kill extensions with high memory usage. Given this, Tencent Cloud has further reduced the memory usage of the LiteAV SDK while retaining its high streaming quality and low latency to ensure the stability of extensions.
Sample Code
Tencent Cloud offers an easy-to-understand API example project to help you quickly learn how to use different APIs.
Xcode 9 or above is required, and your iPhone must be updated to iOS 11 or above. Screen recording is not supported on emulators.
Create a broadcast upload extension
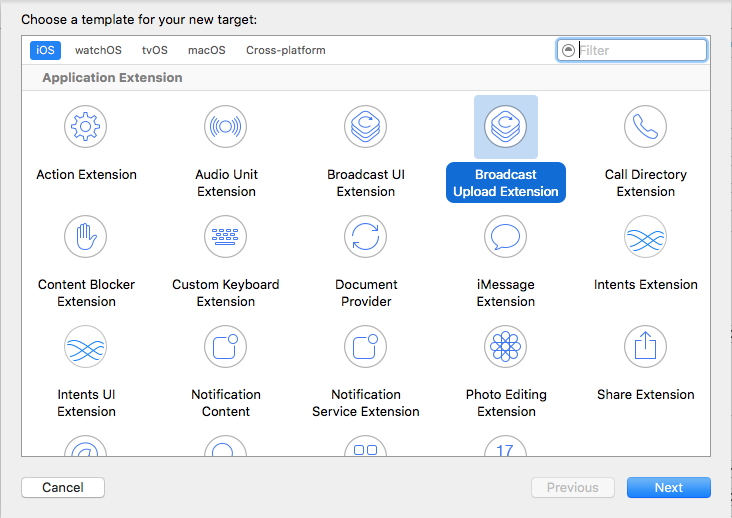
Open your project with Xcode and select New > Target... > Broadcast Upload Extension, as shown below.
Enter a product name and click Finish. A new directory with the product name entered will appear in your project. Under the directory, there is an automatically generated SampleHandler class, which is responsible for screen recording operations.
SDK Integration
1. Download the SDK
Download the SDK and follow the instructions in [SDK Integration](https://www.tencentcloud.com/document/product/1071/38155 to integrate the SDK into your application.
2. Configure a license for the SDK
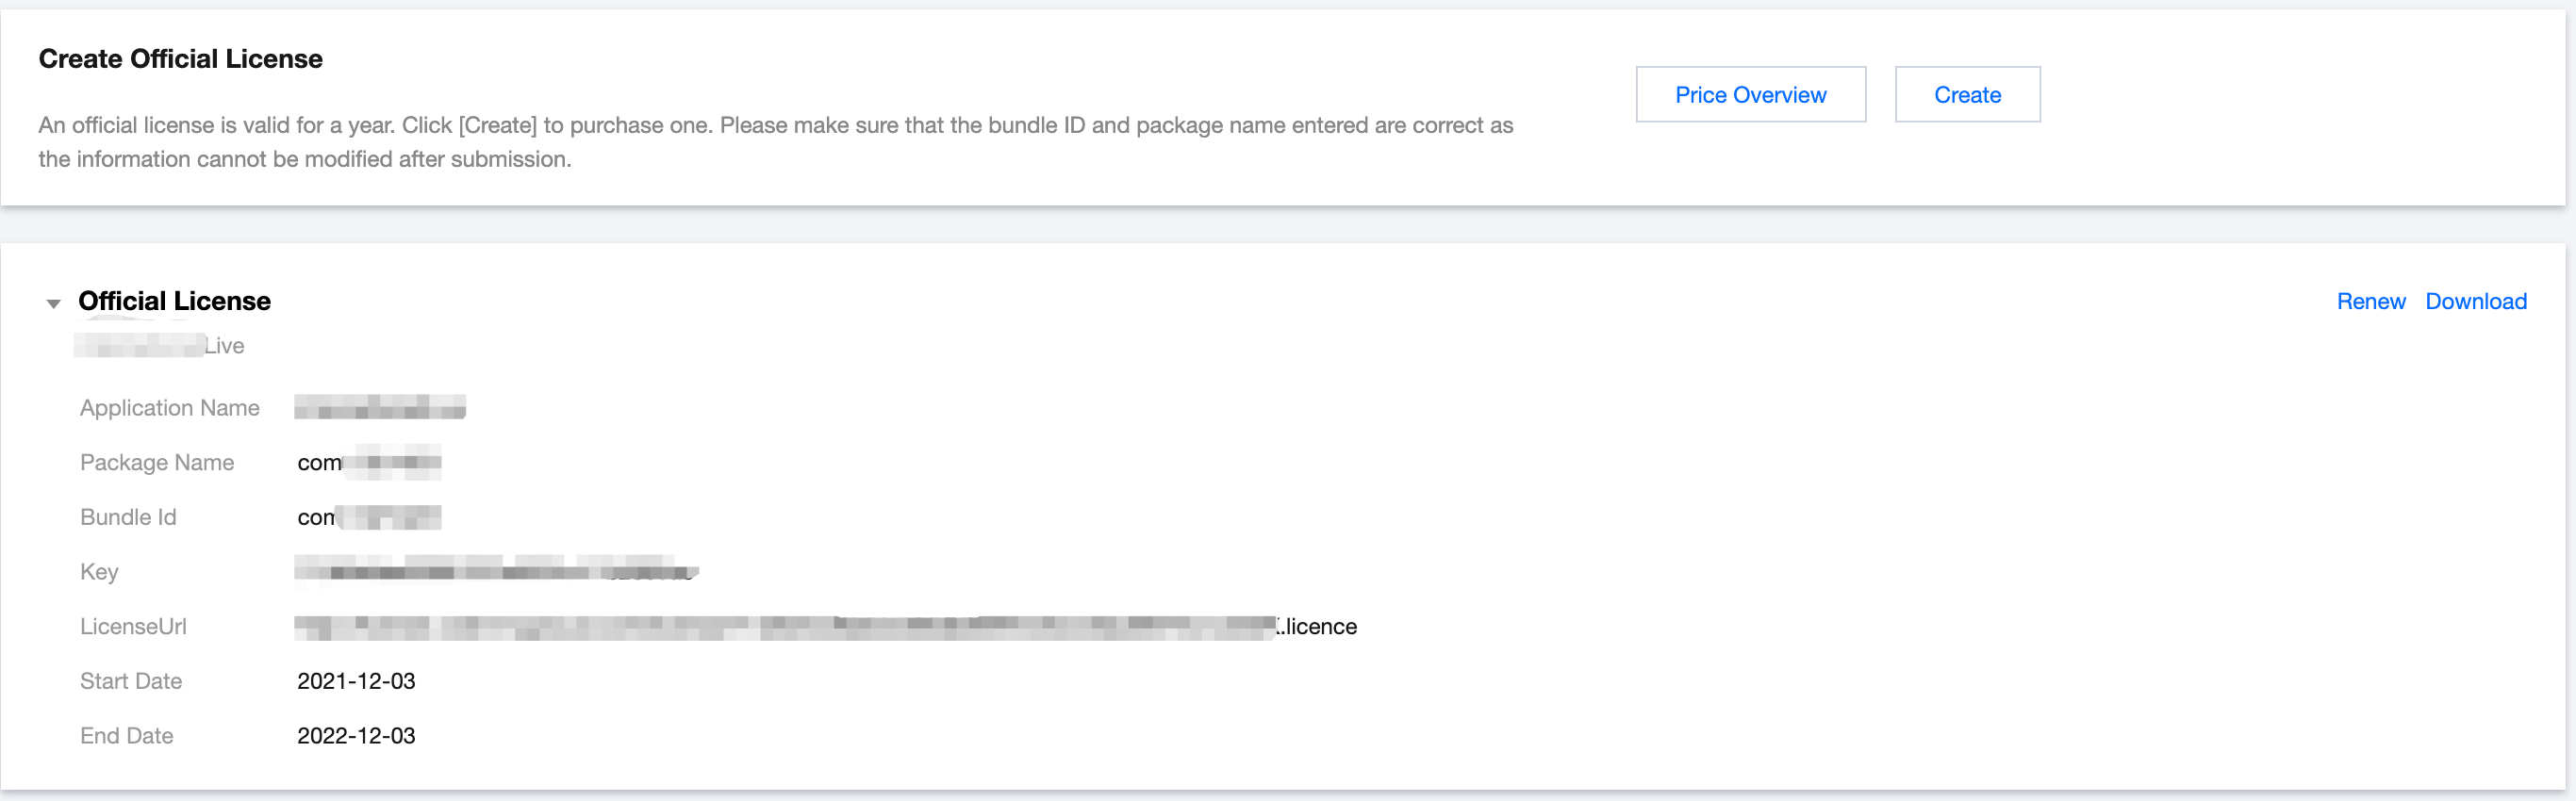
1. Get the license:
If you have the required license, get the license URL and key in the CSS console.
If you don't have the required license, apply for a license as instructed in New License and Renewal.
2. Before your application calls features of LiteAVSDK, complete the following configuration (preferably in - [AppDelegate application:didFinishLaunchingWithOptions:]):
To use screen recording, you need to use a subclass of the system API RPBroadcastSampleHandler to get the screen audio/video data. Here, add the following code to the custom subclass SampleHandler.m to implement screen recording:
// The application group ID. The ID must match `startScreenCapture` of `V2TXLivePusher` and can be set to `nil`, but setting it as instructed in the documentation will make the feature more reliable.
In the implementation class of RPBroadcastSampleHandler, you need to call the corresponding method inTXReplayKitExt to set the screen recording information and handle screen recording events.
The broadcastFinished callback can be used to get the reason that screen recording is stopped and can be used to prompt the user to take action.
Call startScreenCapture to start screen recording and then call the startPush API in V2TXLivePusher to start pushing the stream.
Note:
If you select the RTMP protocol for stream push in step 3, you can generate a stream push address as instructed in Quick URL Generation.
// The application group ID for data sharing between the host application and Broadcast Upload Extension during screen recording on iOS. It can be set to `nil`, but setting it as instructed in our documentation will make the feature more reliable.
[livePusher startScreenCapture:@"group.com.xxx"];
[livePusher startMicrophone];
// Pass in the corresponding URL based on the stream push protocol to start stream push. The URL for the RTMP protocol starts with `rtmp://`, which doesn't support mic connect.
If the startPush API returns V2TXLIVE_ERROR_INVALID_LICENSE, it means your license verification failed. Check the error code and error message in the onLicenceLoaded callback in Step 2. Configure a license for the SDK.
On iOS 11 or later, you can enable screen recording only by pulling down the status bar and pressing and holding the screen recording button.
On iOS 12 or later, you can use `RPSystemBroadcastPickerView` to pop up the screen recording selection page as instructed in TRTCBroadcastExtensionLauncher.m.
6. Set landscape stream push and the resolution
Call setVideoQuality to set the resolution (you can select from a number of resolutions) and orientation for stream publishing. Below is an example:
Call setWatermark in V2TXLivePusher to add a watermark to videos output by the SDK. The position of the watermark is determined by the (x, y, scale) parameter passed in.
The watermark image must be in PNG rather than JPG format. The former carries opacity information, which allows the SDK to better address the image aliasing issue (changing the extension of a JPG image to PNG won't work).
The (x, y, scale) parameter specifies the normalized coordinates of the watermark relative to the resolution of the published video. For example, if the resolution of the published video is 540 x 960, and (x, y, scale) is set to (0.1, 0.1, 0.1), the actual pixel coordinates of the watermark will be (540 x 0.1, 960 x 0.1). The width of the watermark will be the video width x 0.1, and the height will be scaled automatically.
// Set the video watermark
[livePusher setWatermark:image x:0 y:0 scale:1];
8. Stop stream push
As there can be only one V2TXLivePusher object running at a time, make sure that you release all the resources when stopping publishing.
// Stop stream push
[livePusher stopScreenCapture];
[livePusher stopPush];
Event Handling
1. Listening for events
The SDK listens for publishing events and errors via the V2TXLivePusherObserver delegate. See V2TXLiveCode for a detailed list of events and error codes.
2. Errors
An error indicates that the SDK encountered a serious problem that made it impossible for stream publishing to continue.
Event ID
Code
Description
V2TXLIVE_ERROR_FAILED
-1
A common unclassified error occurred.
V2TXLIVE_ERROR_INVALID_PARAMETER
-2
An invalid parameter was passed in during API calling.
V2TXLIVE_ERROR_REFUSED
-3
The API call was rejected.
V2TXLIVE_ERROR_NOT_SUPPORTED
-4
The API cannot be called.
V2TXLIVE_ERROR_INVALID_LICENSE
-5
Failed to call the API due to invalid license.
V2TXLIVE_ERROR_REQUEST_TIMEOUT
-6
The server request timed out.
V2TXLIVE_ERROR_SERVER_PROCESS_FAILED
-7
The server could not handle your request.
3. Warnings
A warning indicates that the SDK encountered a problem whose severity level is warning. Warning events trigger tentative protection or recovery logic and can often be resolved.
Event ID
Code
Description
V2TXLIVE_WARNING_NETWORK_BUSY
1101
Bad network connection: Data upload blocked due to limited upstream bandwidth.
V2TXLIVE_WARNING_VIDEO_BLOCK
2105
Stuttering during video playback.
V2TXLIVE_WARNING_CAMERA_START_FAILED
-1301
Failed to turn the camera on.
V2TXLIVE_WARNING_CAMERA_OCCUPIED
-1316
The camera is occupied. Try a different camera.
V2TXLIVE_WARNING_CAMERA_NO_PERMISSION
-1314
No access to the camera. This usually occurs on mobile devices and may be because the user denied the access.
V2TXLIVE_WARNING_MICROPHONE_START_FAILED
-1302
Failed to turn the mic on.
V2TXLIVE_WARNING_MICROPHONE_OCCUPIED
-1319
The mic is occupied. This occurs when, for example, the user is currently having a call on the mobile device.
V2TXLIVE_WARNING_MICROPHONE_NO_PERMISSION
-1317
No access to the mic. This usually occurs on mobile devices and may be because the user denied the access.
V2TXLIVE_WARNING_SCREEN_CAPTURE_NOT_SUPPORTED
-1309
The system does not support screen sharing.
V2TXLIVE_WARNING_SCREEN_CAPTURE_START_FAILED
-1308
Failed to start screen recording. If this occurs on a mobile device, it may be because the user denied the access.
V2TXLIVE_WARNING_SCREEN_CAPTURE_INTERRUPTED
-7001
Screen recording was stopped by the system
Appendix: Communication and Data Transfer Between Extensions and Host Applications
ReplayKit2 invokes only the broadcast upload extension during screen sharing. The extension does not support UI operations and cannot implement complicated business logic. Therefore, the host app is often responsible for implementing business logic such as authentication, while the extension focuses on recording the screen and publishing the audio and video data captured. This makes it necessary to communicate and transfer data between the extension and host app.
1. Sending local notifications
Users should be informed of the status of the extension. For example, in cases where the host app is not started, you can send a local notification asking users to interact with the host app. Below is an example of sending a notification to users when the broadcast upload extension is started.
[self sendLocalNotificationToHostAppWithTitle:@"Tencent Cloud Screen Sharing" msg:@"Screen recording has started. Return to Cloud Video Toolkit > MLVB > Screen Sharing to set the publishing URL, orientation, and resolution." userInfo:@{kReplayKit2UploadingKey: kReplayKit2Uploading}];
You can use this notification to ask the user to return to the host app to configure publishing information and start stream publishing.
2. Sending notifications between processes via CFNotificationCenter
The extension and host app may also need to interact with each other in real time, which cannot be achieved through local notifications because with local notifications, code is triggered only after users tap the banner. Neither can it be implemented via NSNotificationCenter because NSNotificationCenter does not allow communication between processes. To send notifications between processes, you will need CFNotificationCenter, but instead of using the userInfo field for data transfer, you must configure an app group and use NSUserDefault for data transfer. For example, after getting the publishing URL, the host app can notify the broadcast upload extension via CFNotificationCenter that stream publishing can start. You may also use the clipboard, but delayed rendering is needed as the clipboard sometimes fails to transfer data between processes in real time.
The extension can start publishing streams after receiving this notification. As the notification is at the CF layer, to facilitate operations, it needs to be sent to the Cocoa layer via NSNotificationCenter.
ReplayKit2 is a new framework introduced by Apple in iOS 11, for which relatively few official documents have been released. The framework is still being improved, and problems have been found. See below for some common questions you may have when using ReplayKit2.
1. When does screen recording stop automatically?
Screen recording stops automatically when the screen locks or there is an incoming call. At such times, the broadcastFinished function in SampleHandler will be invoked, and you can send a notification to users about the interruption.
2. Why does screen recording stop sometimes during screen sharing?
The problem usually occurs after landscape/portrait mode switch if the resolution for stream publishing is set high. The broadcast upload extension is allocated a memory of only 50 MB and will be killed if its memory usage exceeds the limit. Given this, we recommend that you set the resolution to 720p or lower.
3. Why are images streamed from the screen of iPhone X distorted?
iPhone X has a notch at the top of the screen, so video captured from the screen is not in the aspect ratio of 16:9. If you set the output resolution for stream publishing to 16:9, for example, to HD (960 × 540), the images published will be slightly distorted because their original aspect ratio is not 16:9. We recommend that you set the resolution according to your screen size. Besides, if you play video streamed from the screen of iPhone X in aspect fit mode, the video may have black bars, and if you play it in aspect fill mode, the video may be cropped.