Creating an Account
Download
Focus Mode
Font Size
This document describes the account types that can be created for TDSQL-C for MySQL clusters through the console, as well as the operation methods and related instructions for creating accounts and modifying read/write attributes.
Account Type
You can use the following table to learn about the account types supported by TDSQL-C for MySQL.
Note:
In this document, the primary instance refers to the read-write instance.
Account Category | Account Type | Read/Write Attribute | Description |
root account | Read-write account | Read-write account (auto) | After a cluster is created, the root account is generated by default and is unique. You cannot create additional root accounts after the cluster is created. The read/write attribute of this account is Read-Write Account (Auto) by default and cannot be modified. |
Non-root account | Read-write account | Read-write account (auto) | After a cluster is created, you can create additional accounts of this type separately. You can modify the read/write attribute. |
| | Read-write account (access only the primary instance) | After a cluster is created, you can create additional accounts of this type separately. You can modify the read/write attribute. |
| Read-only account | Read-only account (read-only error reported) | After a cluster is created, you can create additional accounts of this type separately. You can modify the read/write attribute. |
| | Read-only account (read-only failures read from the primary instance) | After a cluster is created, you can create additional accounts of this type separately. You can modify the read/write attribute. |
Read/Write Attribute Description
The account creation feature of TDSQL-C for MySQL now supports read/write attribute configuration. Note that this read/write attribute is not the account permission traditionally created through a direct MySQL connection to control user permissions on database and table data operations (such as SELECT or INSERT). Instead, it is a connection request distribution control attribute specific to the database proxy layer.
The read/write attribute itself is unrelated to the read or write permissions that your account actually has when connecting to MySQL. Its purpose is to accurately distribute your requests to read-only instances or read-write instances. After you configure the read/write attribute for an account that accesses the cluster through the database proxy connection address, the account gains the corresponding routing capability: users only need to use one proxy connection address and one account, and the database proxy automatically and evenly distributes received database requests to the specified instances (read-write instances RW or read-only instances RO) based on the account's read/write attribute, without changing the proxy address or modifying business code. The types are described as follows:
Note:
Read-write accounts (accessing only the primary instance), read-only accounts (reporting errors on read-only faults), and read-only accounts (reading from the primary instance on read-only faults) are special accounts.
Read-write account (auto)
With this attribute, the read/write request distribution capability of your account depends on whether the database proxy is enabled. If the database proxy is not enabled, you can directly connect to MySQL through this account. If the database proxy is enabled, it can automatically distinguish read and write requests through its read-write splitting capability, sending write requests to read-write instances and read requests to read-only instances.
Read-write account (access only the primary instance)
With this attribute, your requests are routed only to read-write instances by default. To access read-only instances, you can specify this through a HINT.
Read-only account (read-only error reported)
With this attribute, your requests are routed only to read-only instances. Read-only fault error reporting means that when you connect to the database through the database proxy address and a read-only instance encounters a fault, read requests directly report errors and are not forwarded to read-write instances.
Read-only account (read-only failures read from the primary instance)
With this attribute, your requests are routed only to read-only instances. Read-only fault read primary instance means that when you connect to the database through the database proxy address and a read-only instance encounters a fault, read requests are forwarded to read-write instances.
Note
Database proxy switch and read/write attribute: When the database proxy is not enabled, you can only create accounts with the read/write attribute of "Read-write account (auto)" and cannot create special accounts. To create a special account, enable the database proxy first.
Notes on disabling the database proxy: If an account is set as a special account, when you disable the database proxy, the system prompts "You have enabled a non-auto type account. The account will be unavailable if the database proxy is disabled." If you insist on disabling the database proxy, the read/write attribute of the corresponding special account cannot be changed. You can change its read/write attribute only after re-enabling the database proxy.
After the read-only analysis engine is enabled, the system creates a database account named "txsqlPlugins_analytics_repl" by default. This account is used by the read-only analysis engine to pull data from the read-write instance for use. Do not delete this account.
Creating Accounts
1. Log in to the TDSQL-C for MySQL console.
2. Select a region at the top of the page based on your actual console view mode and perform corresponding operations.
Click the target cluster in the cluster list on the left to go to the cluster management page.

Find the target cluster in the cluster list on the left, and click Cluster ID or Operation column's Management option to enter the cluster management page.

3. On the cluster management page, select the Account Management page and click Create Account.
4. In the Create Account window, configure the following information and click OK.
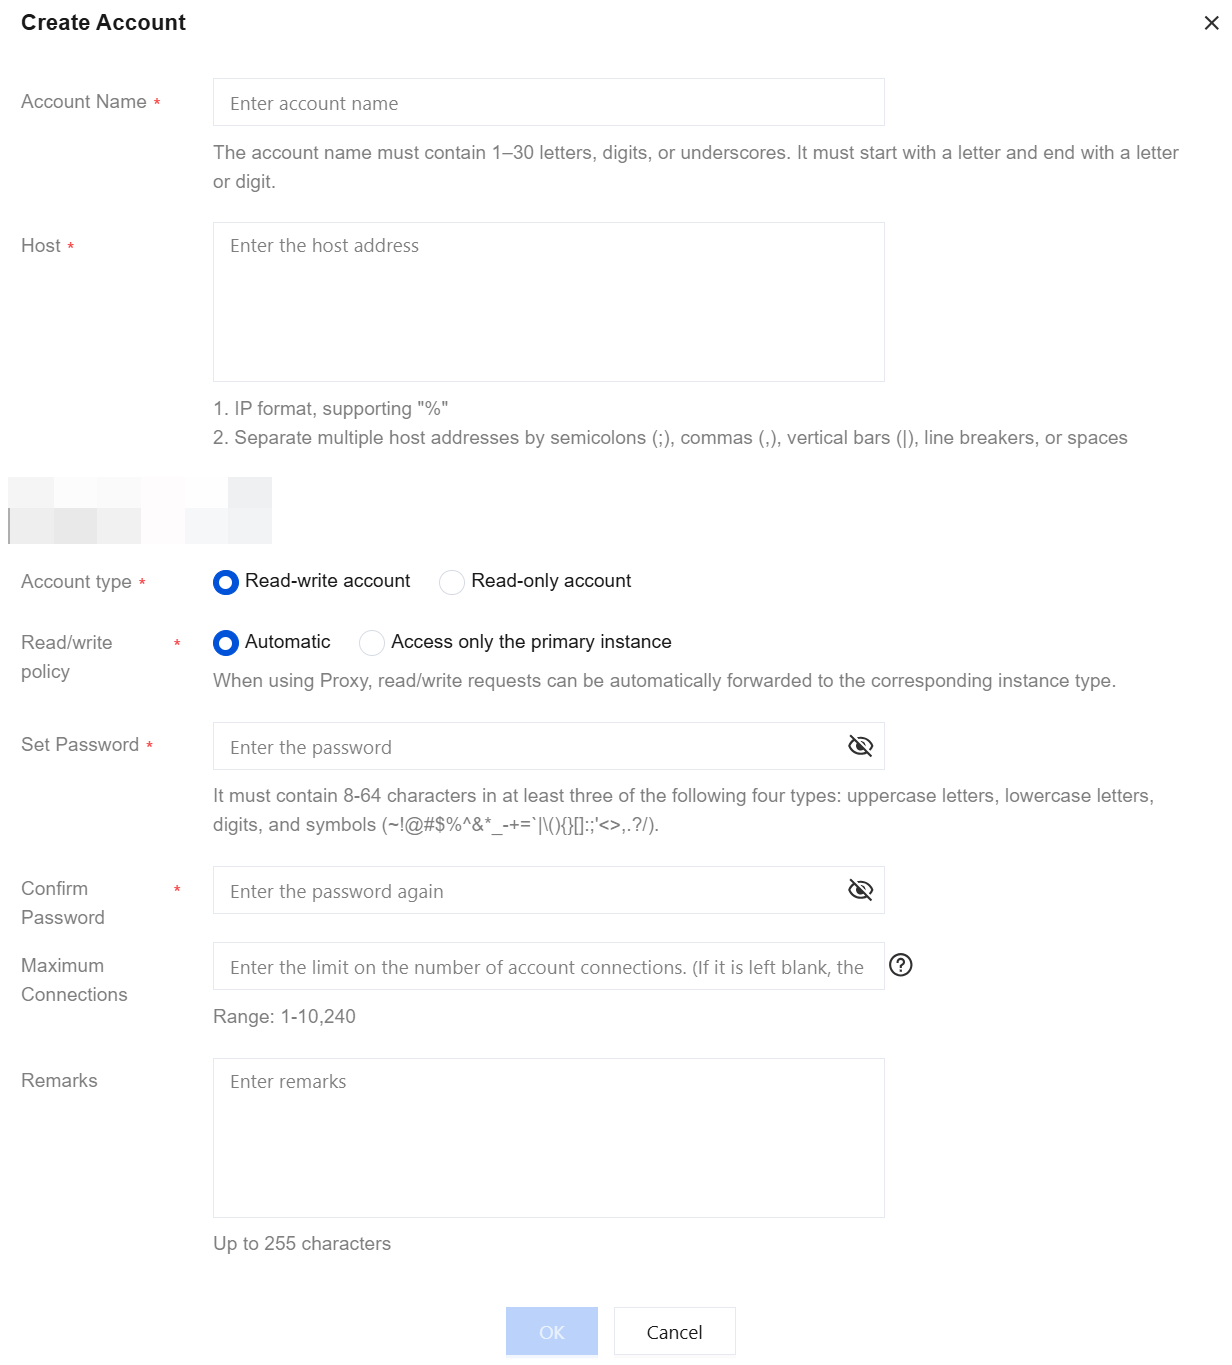
Parameter | Description |
Account Name | A database account name must contain 1 - 30 characters, consisting of letters, digits, and special characters. It must start with a letter and end with a letter or digit. The only supported special character is _. |
Host | Specify a host address to access the database. Both IP addresses and % are supported. Separate multiple hosts with delimiters, which can be ;,|, line breaks, and spaces.Example 1: Entering % indicates no restriction on the IP address range, allowing clients from any IP address to access the database with this account. Note: If % is entered as the host address, account security risks, such as malicious connections and brute force cracking, may occur. It is recommended to enter specific host addresses to access the database. Example 2: Entering 10.5.10.% allows clients within the IP address range 10.5.10.% to access the database with this account. |
Account type | Select an account type. Read-Write Account. Read-Only Account. |
Read/write policy | Set a read-write policy only when the account type is a read-write account. For policy details, see Read-write Attribute Description. Automatic. Access only the primary instance. |
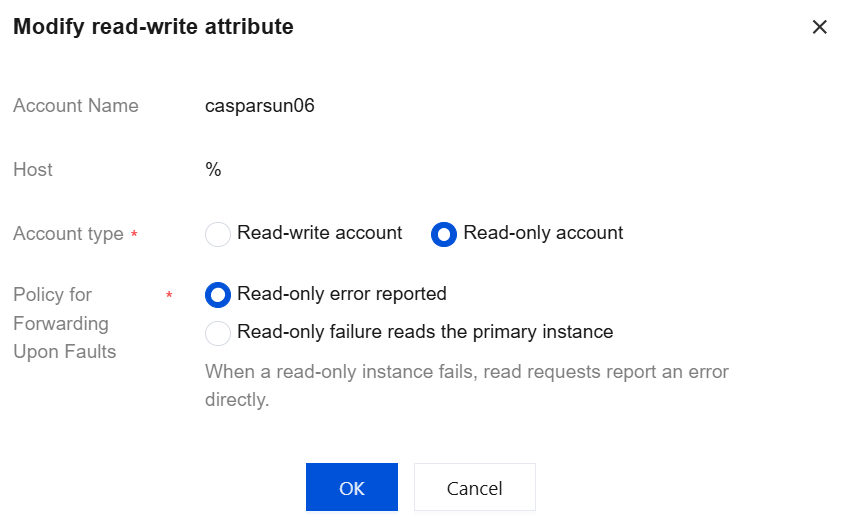
Failover Policy | Set a failover policy only when the account type is a read-only account. For policy details, see Read-write Attribute Description. Read-only fault error reporting. When a read-only fault occurs, read from the primary instance. |
Set Password | The password must be 8 to 64 characters in length and contain any three types of the following characters: uppercase letters, lowercase letters, digits, and special characters ~!@#$%^&*_-+=`|\\(){}[]:;'<>,.?/. |
Confirm Password | Enter the account password again and ensure the two passwords are consistent. |
Maximum Connections | Enter the maximum number of connections allowed for this account. Valid values range from 1 to 10240. If this field is not specified, no additional limit is set. The maximum number of connections to the account is 10,240. For core transaction services, you can set the number of connections to 50 - 200. Set the value based on your actual business needs. For internal operations systems, you can set the number of connections to 20 - 100. Set the value based on your actual business needs. Administrators/individual users can set the number of connections to 2 - 10. Set the value based on your actual business needs. |
Remarks | Add remarks for the account. You can enter up to 255 characters. |
5. After a database account is created, you can manage it in the account list, including modifying permissions, resetting the password, changing read/write attributes, cloning the account, and deleting the account. The specific operations supported for an account are subject to the console display.
Changing Account Read/Write Attributes
1. Log in to the TDSQL-C for MySQL console.
2. Select a region at the top of the page based on your actual console view mode and perform corresponding operations.
Click the target cluster in the cluster list on the left to go to the cluster management page.
Find the target cluster in the cluster list on the left, and click Cluster ID or Operation column's Management option to enter the cluster management page.
3. On the cluster management page, select the Account Management tab.
4. Locate the target account in the account list, and click More > Modify read-write attribute in its operation column.
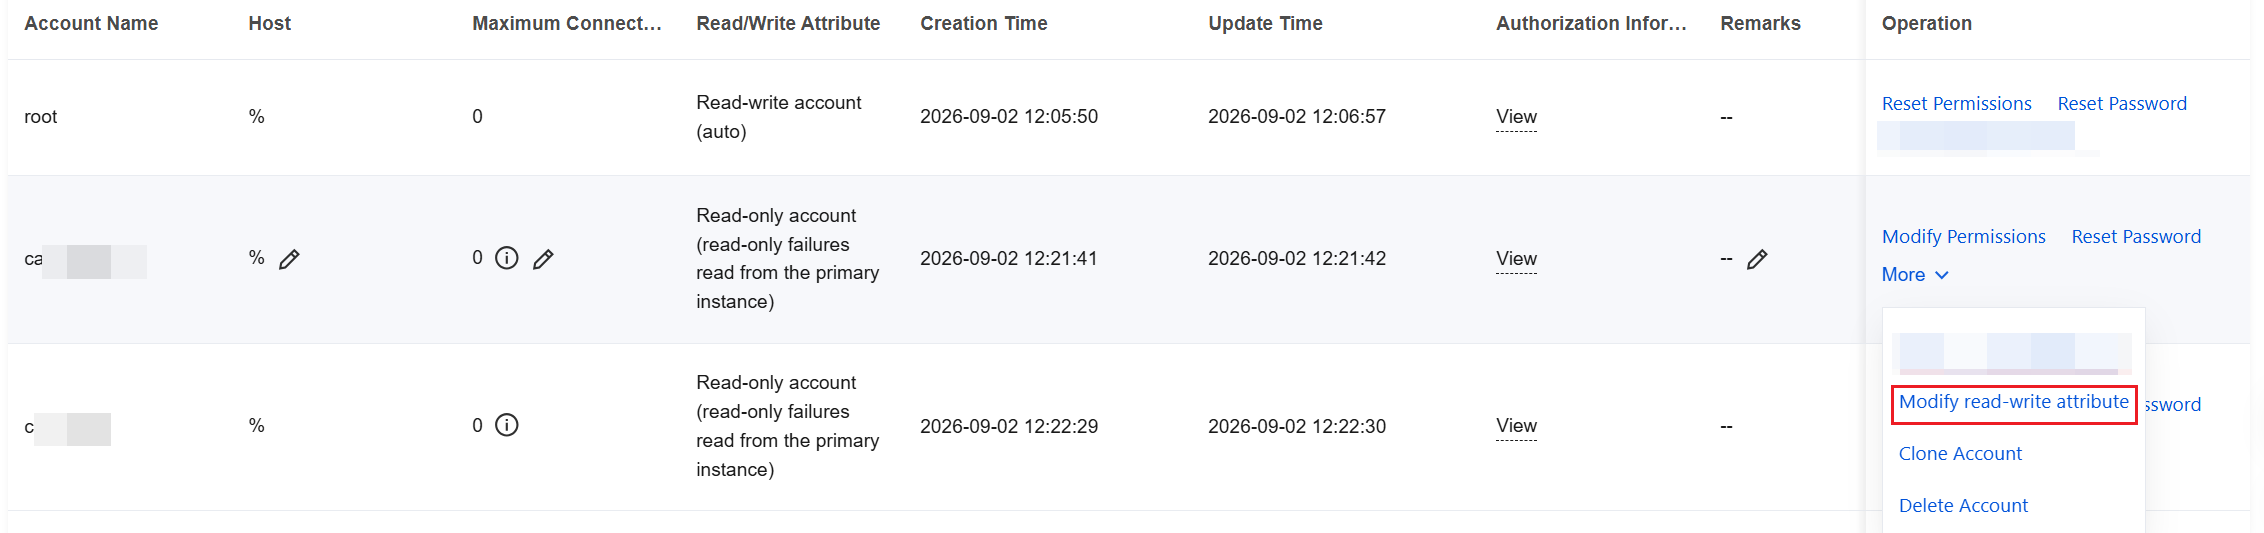
5. In the pop-up window, set the read/write attributes of the account as needed, and click OK.
Related APIs
API | Description |
This API (CreateAccounts) is used to create user accounts. |
Help and Support
Was this page helpful?
You can also Contact sales or Submit a Ticket for help.
Help us improve! Rate your documentation experience in 5 mins.
Feedback