- Release Notes
- Product Introduction
- Getting Started
- Console Guide
- Product Management
- Rule Engine
- Overview
- Data Processing
- Rule Function
- Data Forwarding to Another Topic
- Data Forwarding to Third-Party Service
- Data Forwarding to CKafka
- Data Forwarding to TDMQ
- Data Forwarding to CTSDB
- Data Forwarding to TencentDB for MySQL
- Data Forwarding to TencentDB for MongoDB
- Data Forwarding to Tencent CloudBase
- Data Forwarding to TDSQL for MySQL
- Sub-account Access to IoT Hub
- Firmware Upgrade
- Resource Management
- Certificate Management
- Developer Manual
- API Documentation
- Device Connection Manual
- FAQs
- IoT Hub Policy
- Glossary
Scenario 1: Device Interconnection
Last updated: 2021-08-30 16:45:33
此文档已过期弃用
Overview
If you need to achieve the features as shown below in a smart home scenario (this is not a real product but only used to demonstrate IoT Hub's capabilities), you can follow the steps in this document.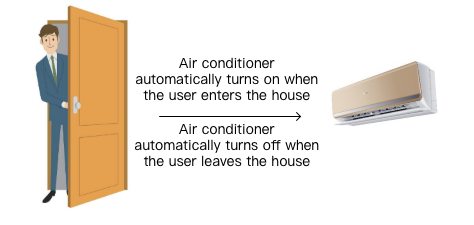
Solution
Two types of smart devices (door and air conditioner) can be created in the IoT Hub SDK and connected with each other based on cross-device messaging and the rule engine as shown below: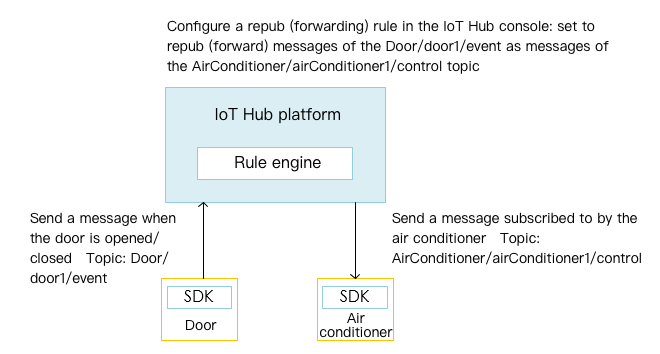
Note:
airConditioner1cannot achieve message communication by directly subscribing to the update messages ofdoor1. For the reason, please see Feature Components - Permission Management.
Directions
Creating door product and device
- Log in to the IoT Hub console and click Products on the left sidebar.
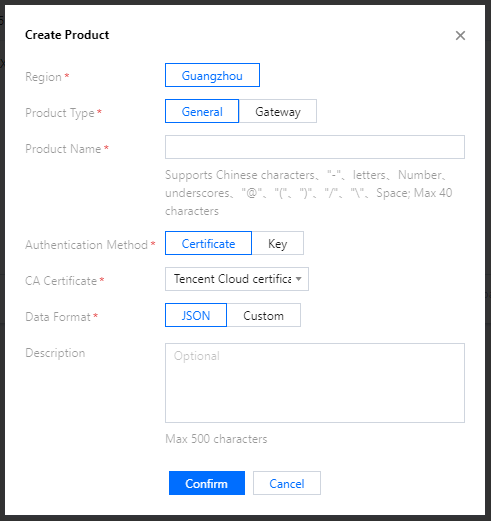
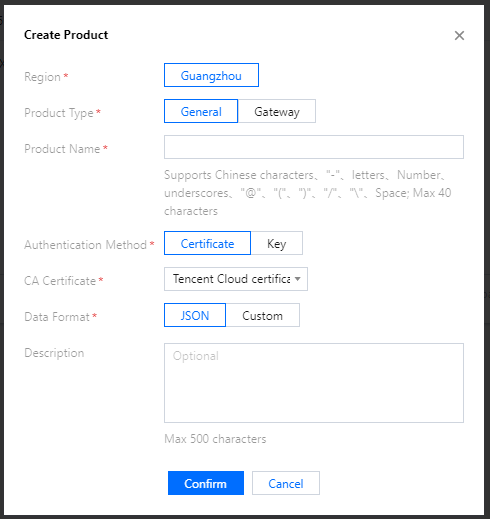
- On the product list page, click Create Product.
- Create a door product (Door), select the authentication method, enter the product description, and click Confirm.
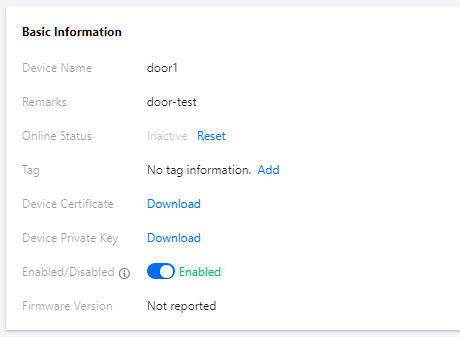
- After successful creation, you can view the basic information of the product.
- Click to enter the Door product, select the Devices tab, and create a device (door1).
Note:
If you create a device with asymmetric encryption, a device key will be returned, which will be used for device communication and will not be stored on the IoT Hub backend. Please keep it confidential.
- Click Manage to query the device details.
- Certificate authentication:
- Key authentication:

- Certificate authentication:
Creating air conditioner product and device
- Log in to the IoT Hub console and click Products on the left sidebar.
- On the product list page, click Create Product.
- Create an air conditioner product (AirConditioner), select the authentication method, enter the product description, and click Confirm.
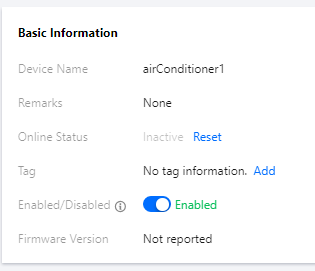
- After successful creation, you can view the basic information of the product.
- Create a device (airConditioner1) on the Devices tab page.
- Click Manage to query the device details.
On the device details page, the device certificate and device private key are used for TLS-based MQTT asymmetric encryption, and the symmetric key is used for symmetric encryption (for the differences between those two communication methods, please see Feature Components - Device Connection.
Note:The creation of the above resources can be done by the backend through RESTful APIs. For more information, please see API Overview.
Creating rule engine
For detailed directions, please see Overview.
Downloading SDK
For the SDK download method, please see SDK Download.
Compiling and running SDK for C demo
SDK for C demo:
samples/scenarized/door_mqtt_sample.cis the MQTT-based logic code for the door device.samples/scenarized/aircond_shadow_sample.cis the MQTT-based logic code for the air conditioner device.
Below describes how to compile and run the device interconnection demo in a Linux environment with key authentication as an example:
1. Compile the SDK
Modify CMakeLists.txt to ensure that the following options exist:
set(BUILD_TYPE                   "release")
set(COMPILE_TOOLS                "gcc")
set(PLATFORM                     "linux")
set(FEATURE_MQTT_COMM_ENABLED ON)
set(FEATURE_MQTT_DEVICE_SHADOW ON)
set(FEATURE_AUTH_MODE "KEY")
set(FEATURE_AUTH_WITH_NOTLS OFF)
set(FEATURE_DEBUG_DEV_INFO_USED  OFF)
Run the following script for compilation:
./cmake_build.sh
The demo outputs aircond_shadow_sample and door_mqtt_sample are in the output/release/bin folder.
2. Enter the device information
Enter the information of the airConditioner1 device created above in the JSON file aircond_device_info.json.
"auth_mode":"KEY",
"productId":"GYT9V6D4AF",
"deviceName":"airConditioner1",
"key_deviceinfo":{
    "deviceSecret":"vXeds12qazsGsMyf5SMfs6OA6y"
}
Enter the information of the door1 device in another JSON file door_device_info.json.
"auth_mode":"KEY",
"productId":"S3EUVBRJLB",
"deviceName":"door1",
"key_deviceinfo":{
    "deviceSecret":"i92E3QMNmxi5hvIxUHjO8gTdg"
}
3. Run the aircond_shadow_sample demo
In the code of aircond_shadow_sample, _register_subscribe_topics implements the subscription to the /{productID}/{deviceName}/control topic and registers the corresponding callback handler. After receiving a message from this topic, the callback determines whether the message content is "come_home" or "leave_home" and instructs airConditioner to turn on or off accordingly. _simulate_room_temperature simply simulates the changes in indoor temperature and energy consumption of airConditioner. You can also implement other custom logic.
Because the device interconnection scenario involves two demos running simultaneously, you can run the air conditioner demo in the current terminal console first, and you can see that the demo subscribes to the topic and then enters the loop waiting status. The initial status of the air conditioner is close:
./output/release/bin/aircond_shadow_sample -c ./device_info.json
INF|2019-09-16 23:25:17|device.c|iot_device_info_set(67): SDK_Ver: 3.1.0, Product_ID: GYT9V6D4AF, Device_Name: airConditioner1
INF|2019-09-16 23:25:19|mqtt_client.c|IOT_MQTT_Construct(125): mqtt connect with id: Nh9Vc success
DBG|2019-09-16 23:25:19|mqtt_client_subscribe.c|qcloud_iot_mqtt_subscribe(138): topicName=$shadow/operation/result/GYT9V6D4AF/airConditioner1|packet_id=56171
DBG|2019-09-16 23:25:19|shadow_client.c|_shadow_event_handler(63): shadow subscribe success, packet-id=56171
INF|2019-09-16 23:25:19|aircond_shadow_sample.c|event_handler(96): subscribe success, packet-id=56171
INF|2019-09-16 23:25:19|shadow_client.c|IOT_Shadow_Construct(172): Sync device data successfully
INF|2019-09-16 23:25:19|aircond_shadow_sample.c|main(256): Cloud Device Construct Success
DBG|2019-09-16 23:25:19|mqtt_client_subscribe.c|qcloud_iot_mqtt_subscribe(138): topicName=GYT9V6D4AF/airConditioner1/control|packet_id=56172
DBG|2019-09-16 23:25:19|shadow_client.c|_shadow_event_handler(63): shadow subscribe success, packet-id=56172
INF|2019-09-16 23:25:19|aircond_shadow_sample.c|event_handler(96): subscribe success, packet-id=56172
INF|2019-09-16 23:25:19|aircond_shadow_sample.c|main(291): airConditioner state: close
INF|2019-09-16 23:25:19|aircond_shadow_sample.c|main(292): currentTemperature: 32.000000, energyConsumption: 0.000000
4. Run the door_mqtt_sample demo to simulate a homecoming event
Open another terminal console and run the door demo. According to the program launch parameter -t airConditioner1 -a come_home, you can see that the demo sends a JSON message {"action": "come_home", "targetDevice": "airConditioner1"} to the /{productID}/{deviceName}/event topic, which notifies the target device airConditioner1 of the homecoming event.
./output/release/bin/door_mqtt_sample -c  ./output/release/bin/device_info.json -t airConditioner1 -a come_home
INF|2019-09-16 23:29:11|device.c|iot_device_info_set(67): SDK_Ver: 3.1.0, Product_ID: S3EUVBRJLB, Device_Name: door1
INF|2019-09-16 23:29:11|mqtt_client.c|IOT_MQTT_Construct(125): mqtt connect with id: d89Wh success
INF|2019-09-16 23:29:11|door_mqtt_sample.c|main(229): Cloud Device Construct Success
DBG|2019-09-16 23:29:11|mqtt_client_publish.c|qcloud_iot_mqtt_publish(329): publish topic seq=46683|topicName=S3EUVBRJLB/door1/event|payload={"action": "come_home", "targetDevice": "airConditioner1"}
INF|2019-09-16 23:29:11|door_mqtt_sample.c|main(246): Wait for publish ack
INF|2019-09-16 23:29:11|door_mqtt_sample.c|event_handler(81): publish success, packet-id=46683
5. Observe the message reception of the air conditioner and simulate a message response
Observe the printout of aircond_shadow_sample. You can see that the homecoming message sent by door1 and forwarded by the cloud has been received, the state has changed to open, and the indoor temperature currentTemperature (adjusted to the configured default temperature) and the energy consumption energyConsumption have changed dynamically.
INF|2019-09-16 23:29:11|aircond_shadow_sample.c|main(291): airConditioner state: close
INF|2019-09-16 23:29:11|aircond_shadow_sample.c|main(292): currentTemperature: 32.000000, energyConsumption: 0.000000
INF|2019-09-16 23:29:12|aircond_shadow_sample.c|on_message_callback(140): Receive Message With topicName:GYT9V6D4AF/airConditioner1/control, payload:{"action":"come_home","targetDevice":"airConditioner1"}
INF|2019-09-16 23:29:12|aircond_shadow_sample.c|main(291): airConditioner state: open
INF|2019-09-16 23:29:12|aircond_shadow_sample.c|main(292): currentTemperature: 31.000000, energyConsumption: 1.000000
Configuring SDK for Android demo
Implement SDK for Android door demo
Door.java is the door device class. Please enter the PRODUCT_ID, DEVICE_NAME, DEVICE_CERT_NAME, and DEVICE_KEY_NAME obtained in the previous steps for product and device creation and place the device certificate and device private key files in the assets directory:
/**
* Product ID
*/
private static final String PRODUCT_ID = "YOUR_PRODUCT_ID";
/**
* Device name
*/
protected static final String DEVICE_NAME = "YOUR_DEVICE_NAME";
/**
* Key
*/
private static final String SECRET_KEY = "YOUR_DEVICE_PSK";
/**
* Device certificate name
*/
private static final String DEVICE_CERT_NAME = "YOUR_DEVICE_NAME_cert.crt";
/**
* Device private key file name
*/
private static final String DEVICE_KEY_NAME = "YOUR_DEVICE_NAME_private.key";
- Perform an emptiness check on the MQTT connection instance in
enterRoom(). If it is empty, perform initialization and initiateconnect(); otherwise, determine whether the connection is valid, and if so, publish theeventtopic. - As an example, the content of the message is assembled and published based on the action (
come_homeorleave_home) andtargetDeviceName(name of the device to relay to) parameters you specified when running the program. You can organize the message content and topic on your own to execute your own message publishing logic.
Implementing SDK for Android air conditioner demo
Airconditioner.java is the air conditioner device class. Just like in Implementing SDK for Android door demo, you need to enter the information related to the product and device first.
- Initialize the MQTT connection instance in the
Airconditionerconstructor and initiateconnect(). - After the MQTT connection is successfully established, subscribe to the
controltopic.
Running demo
Click the Run icon in Android Studio to install the demo.
Switch the bottom tab to the device interconnection fragment and observe the log information in the demo and logcat. The following is the log information in logcat:
airConditioner1 was connected to IoT Hub and subscribed to the topiccom.qcloud.iot I/com.qcloud.iot.mqtt.TXMqttConnection: Start connecting to ssl://connect.iot.qcloud.com:8883 com.qcloud.iot I/com.qcloud.iot.mqtt.TXMqttConnection: onSuccess! com.qcloud.iot I/IoTEntryActivity: connected to ssl://connect.iot.qcloud.com:8883 com.qcloud.iot I/com.qcloud.iot.mqtt.TXMqttConnection: Starting subscribe topic: ******/airConditioner1/control com.qcloud.iot I/IoTEntryActivity: onSubscribeCompleted, subscribe successClick Enter to connect to IoT Hub and publish the
controltopic. The corresponding message is:"{\"action\": \"come_home\", \"targetDevice\": \"airConditioner1\"}"Observe the log information in the demo and logcat. The following is the log information in logcat:
door1 was connected to IoT Hub
com.qcloud.iot I/com.qcloud.iot.mqtt.TXMqttConnection: Start connecting to ssl://connect.iot.qcloud.com:8883
com.qcloud.iot I/com.qcloud.iot.mqtt.TXMqttConnection: onSuccess!
com.qcloud.iot I/IoTEntryActivity: connected to ssl://connect.iot.qcloud.com:8883
door1 published a topic (come_home)
com.qcloud.iot I/com.qcloud.iot.mqtt.TXMqttConnection: Starting publish topic: ******/door1/event Message: {"action": "come_home", "targetDevice": "airConditioner1"}airConditioner1 received the topic forwarded by the rule engine
com.qcloud.iot I/com.qcloud.iot.mqtt.TXMqttConnection: Received topic: ******/airConditioner1/control, message: {"action":"come_home","targetDevice":"airConditioner1"}
com.qcloud.iot D/IoTEntryActivity: receive command: open airconditioner, count: 1
Click Leave to publish the
controltopic. The corresponding message is:"{\"action\": \"leave_home\", \"targetDevice\": \"airConditioner1\"}"Observe the log information in the demo and logcat. The following is the log information in logcat:
door1 published a topic (leave_home)
com.qcloud.iot I/com.qcloud.iot.mqtt.TXMqttConnection: Starting publish topic: ******/door1/event Message: {"action": "leave_home", "targetDevice": "airConditioner1"}airConditioner1 received the topic forwarded by the rule engine
com.qcloud.iot I/com.qcloud.iot.mqtt.TXMqttConnection: Received topic: ******/airConditioner1/control, message: {"action":"leave_home","targetDevice":"airConditioner1"}
com.qcloud.iot D/IoTEntryActivity: receive command: close airconditioner, count: 2

 Yes
Yes
 No
No
Was this page helpful?