Before using the client for message sending and receiving, you need to create resources such as clusters, topics, and groups in the TDMQ for RocketMQ console. When running the client, you need to configure the relevant resource information.
2. Click Create Cluster, select the cluster specifications, and click Buy Now to create a cluster.
You can quickly create a cluster by referring to the following sample values. For detailed explanations of specific parameters, see Creating a Cluster.
Parameter
Example
Cluster Version
Select 5.x.
Billing Mode
Clusters in the 5.x architecture support two modes: pay-as-you-go and monthly subscription.
Region
Select the region that is closest to your business. Cloud products located in different regions are completely isolated from each other on the private network, and the region cannot be modified after purchase, so select it carefully. For example, a Cloud Virtual Machine (CVM) instance in the Guangzhou region cannot access a cluster in the Shanghai region over a private network.
Deployment Method
Keep the default value. Both single-AZ deployment and multi-AZ deployment are supported. For multi-AZ deployment, you can select two availability zones for deployment.
Cluster Specification
Basic Edition. Basic Edition, Pro Edition, and Platinum Edition are supported. Different cluster types vary in performance specifications and features. For more information, see Product Series.
TPS Specification
Keep the default value. TPS specifications include the sum of produced and consumed messages. Each message is converted based on a unit of 4 KB, and special message types are converted according to specific ratios.
Message Retention Period
Keep the default value.
Topic Count
Keep the default value.
Number of Groups
The default ratio of the number of topics to the number of groups is 1:10.
VPC
Authorize binding the access point domain name of the newly purchased cluster to the Virtual Private Cloud (VPC).
Public Network Access
Keep it disabled. Enabling public network bandwidth will incur additional fees. You can disable it on the Cluster Management page.
Cluster Name
Enter the cluster name. The name must be 3 to 64 characters in length and can contain only digits, letters, hyphens (-), and underscores (_).
Tag
Optional. Tags are used to classify and manage resources from different dimensions.
Terms of Service
Select I have read and agree to the TDMQ for RocketMQ Terms of Service.
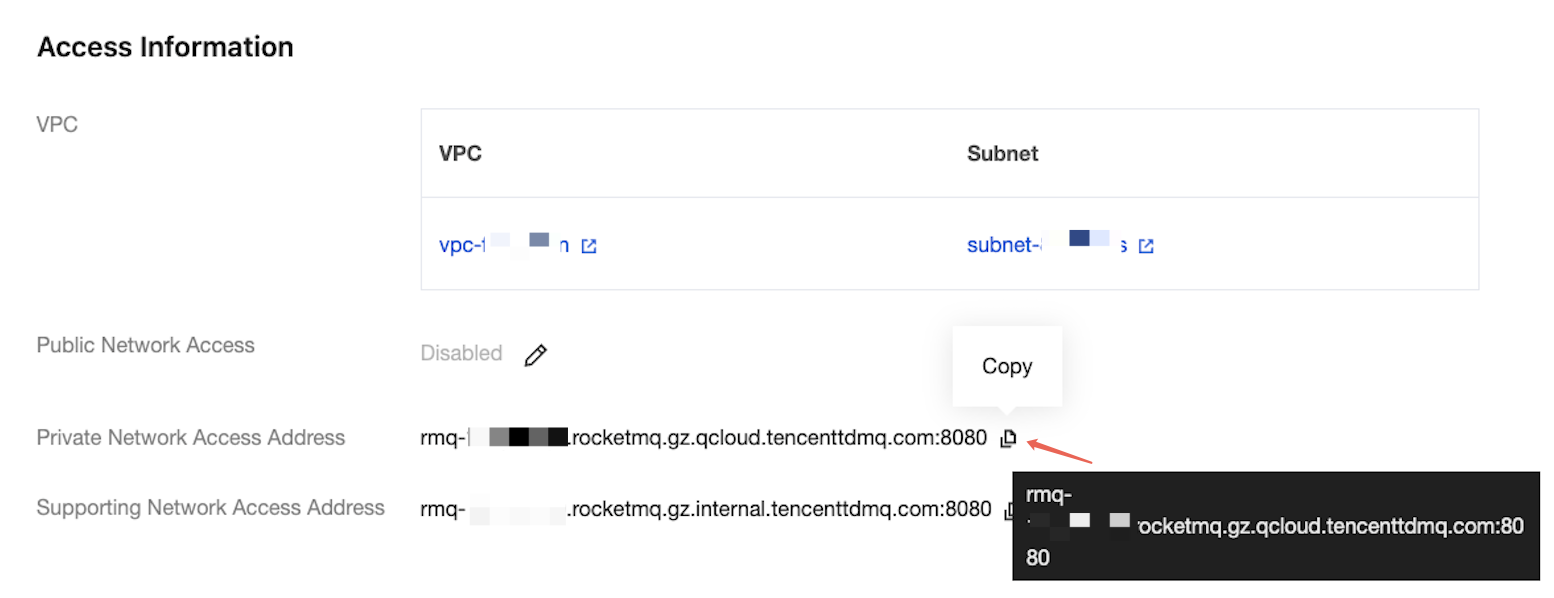
3. On the Cluster List page, click the created cluster ID. In the Access Information section of the Cluster Details page, obtain the access point information of the cluster.
Step 2. Configuring Cluster Permission
1. Click the ID of the cluster created in Step 1 to go to the Cluster Details page.
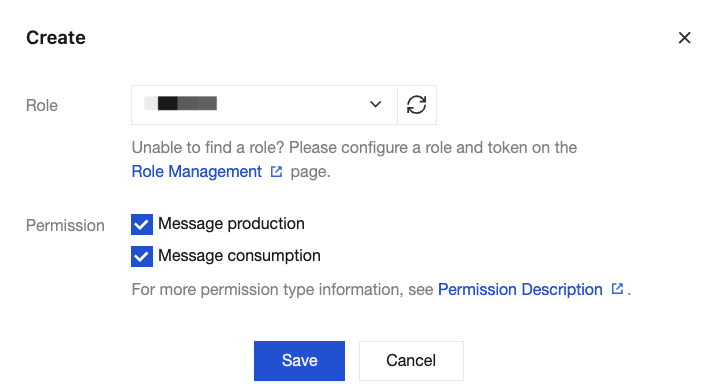
2. In the upper part of the page, select the Cluster Permission tab, click Add Role to create a role, and configure production and consumption permissions for the role.
Note:
5.x clusters support disabling the access control list (ACL) permission feature on the Cluster Management page. However, to ensure cluster security, the system will first verify whether public network access is enabled before allowing ACL to be disabled. If public network access is enabled, you need to disable public network access before disabling ACL permissions.
3. On the Cluster Permissions page, obtain the AccessKey and SecretKey.
Step 3. Creating a Topic
1. On the cluster basic info page, select the Topic tab to go to the Topic List page.
2. Click Create, enter the topic name, select General Messages for the message type, keep other options as default, and click Submit to create a topic.
Note:
This document takes the sending and receiving of normal messages as an example. Therefore, the topic you created for normal messages according to the above steps cannot be used to send and receive other types of messages.
Step 4. Creating a Group
1. On the cluster basic info page, select the Group tab to go to the Group List page.
2. Click Create, enter the group name, keep other options as default, and click Submit to create a group.
Step 1. Creating a Cluster and Obtaining the Access Point Information
2. Click Create Cluster, select the cluster specifications, and click Buy Now to create a cluster.
You can quickly create a cluster by referring to the following sample values. For detailed explanations of specific parameters, see Creating a Cluster.
Parameter
Example
Cluster Version
Select 4.x.
Cluster Type
Exclusive Cluster: Exclusive physical resources, high data security, and virtually unrestricted usage. You can purchase on demand according to different node specifications.
General Cluster: Exclusive physical resources, high data security, and virtually unrestricted usage. Sold based on TPS ranges with fixed node specifications.
Billing Mode
Only the monthly subscription (prepaid) billing mode is supported.
Cloud Migration Components
Disabled.
Region
Select the region that is closest to your business. Cloud products located in different regions are completely isolated from each other on the private network, and the region cannot be modified after purchase, so select it carefully. For example, a CVM instance in the Guangzhou region cannot access a cluster in the Shanghai region over a private network.
Deployment Mode
Keep the default value. Both single-AZ deployment and multi-AZ deployment are supported. For multi-AZ deployment, you can select two availability zones for deployment.
Cluster Specification
Select different cluster specifications based on your business requirements. You can keep the default value.
Exclusive clusters are sold based on different node specifications.
General clusters are sold based on TPS ranges with fixed node specifications.
Topic Count
Keep the default value.
Number of Groups
The default ratio of the number of topics to the number of groups is 1:10.
VPC
Authorize binding the access point domain name of the newly purchased cluster to the Virtual Private Cloud (VPC).
Public Network Access
Keep it disabled. Enabling public network bandwidth will incur additional fees. You can disable it on the Cluster Management page.
Cluster Name
Enter the cluster name. The name must be 3 to 64 characters in length and can contain only digits, letters, hyphens (-), and underscores (_).
Tag
Optional. Tags are used to classify and manage resources from different dimensions.
Terms of Service
Select I have read and agree to the TDMQ for RocketMQ Terms of Service.
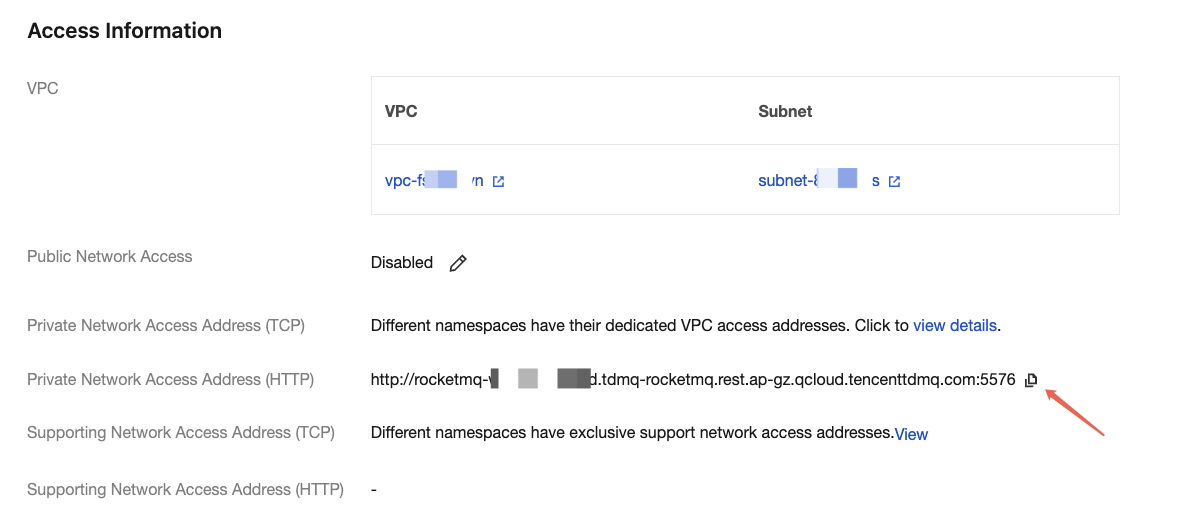
3. On the Cluster List page, click the created cluster ID. In the Connection Information section of the Cluster Details page, obtain the access point information of the cluster.
Step 2. Configuring Permissions
4.x general clusters and exclusive clusters differ slightly in the steps for setting permissions. You can refer to the following tabs to view the corresponding instructions.
General Cluster
Exclusive Clusters
1. Click the ID of the cluster created in Step 1 to go to the Cluster Details page.
2. In the upper part of the page, select the Role Management tab, click Add Role to create a role, and configure production and consumption permissions for the role.
3. On the Role Management page, obtain the AccessKey and SecretKey.
Creating a Namespace
1. Click the ID of the cluster created in Step 1 to go to the Cluster Details page.
2. Select the Namespace tab at the top, click Create, and set the namespace name and description information to create a namespace.
Creating a Role and Granting Permissions
1. On the Cluster Details page, select the Role Management tab, and click Add Role to create a role.
2. On the Role Management page, obtain the AccessKey and SecretKey.
3. In the upper part of the page, select the Namespace tab, find the newly created namespace, and click Configure Permission in the operation column.
4. On the Configure Permission page, click Confugure Permission to grant production and consumption permissions to the newly created role.
Step 3. Creating a Topic
1. On the Cluster Details page, select the Topic tab to go to the Topic List page.
2. Click Create, enter the topic name, select General Messages for the message type, keep other options as default, and click Submit to create a topic.
Note:
This document takes the sending and receiving of normal messages as an example. Therefore, the topic you created for normal messages according to the above steps cannot be used to send and receive other types of messages.
Step 4. Creating a Group
1. On the Cluster Details page, select the Group tab to go to the Group List page.
2. Click Create, enter the group name, select TCP for the protocol type, keep other options as default, and click Submit to create a group.
Note:
TDMQ for RocketMQ supports both HTTP and TCP protocols. Therefore, it is recommended to create a group for each protocol. If multiple consumers use the same group to consume messages, with certain consumers using the TCP protocol and others using the HTTP protocol, it may lead to consumption failures, message duplication, or message loss.