Superapp Homepage
Unduh
Mode fokus
Ukuran font
Feature description
Superapp is the host environment for running mini programs or mini games. It is created by superapp team admin or senior developers on the superapp homepage. After creating a superapp, a configuration file is generated. Download the configuration file and import it into the code project to complete the mini program container SDK integration.

Roles and permissions
Feature | Role | Super Admin | Platform Admin | App Admin | App Senior Developer | App Developer | App Operator | Reviewer |
Application homepage | Read-only | Read-only | ✓ | ✓ | ✓ | ✓ | ✓ |
Create / modify / delete application | - | - | ✓ | ✓ | - | - | - |
Download configuration file | - | - | ✓ | ✓ | ✓ | - | - |
Add / modify package name | - | - | ✓ | ✓ | - | - | - |
Generate encryption key | - | - | ✓ | ✓ | - | - | - |
View / copy encryption key | - | - | ✓ | ✓ | ✓ | - | - |
Super admin/platform admin: Has read-only access to the superapp homepage with permission to view superapps; cannot create, modify, or delete superapps.
Superapp admin/senior superapp developer: Has access to the superapp homepage, including permissions to view, create, modify, and delete superapps, download configuration files, add or modify package names, and generate and view the encryption key.
Superapp developer: Has access to the superapp homepage with permissions to view superapps, download configuration files, and view and copy the encryption key.
Superapp operator/approver: Has access to the superapp homepage with permission to view superapps.
How to operate
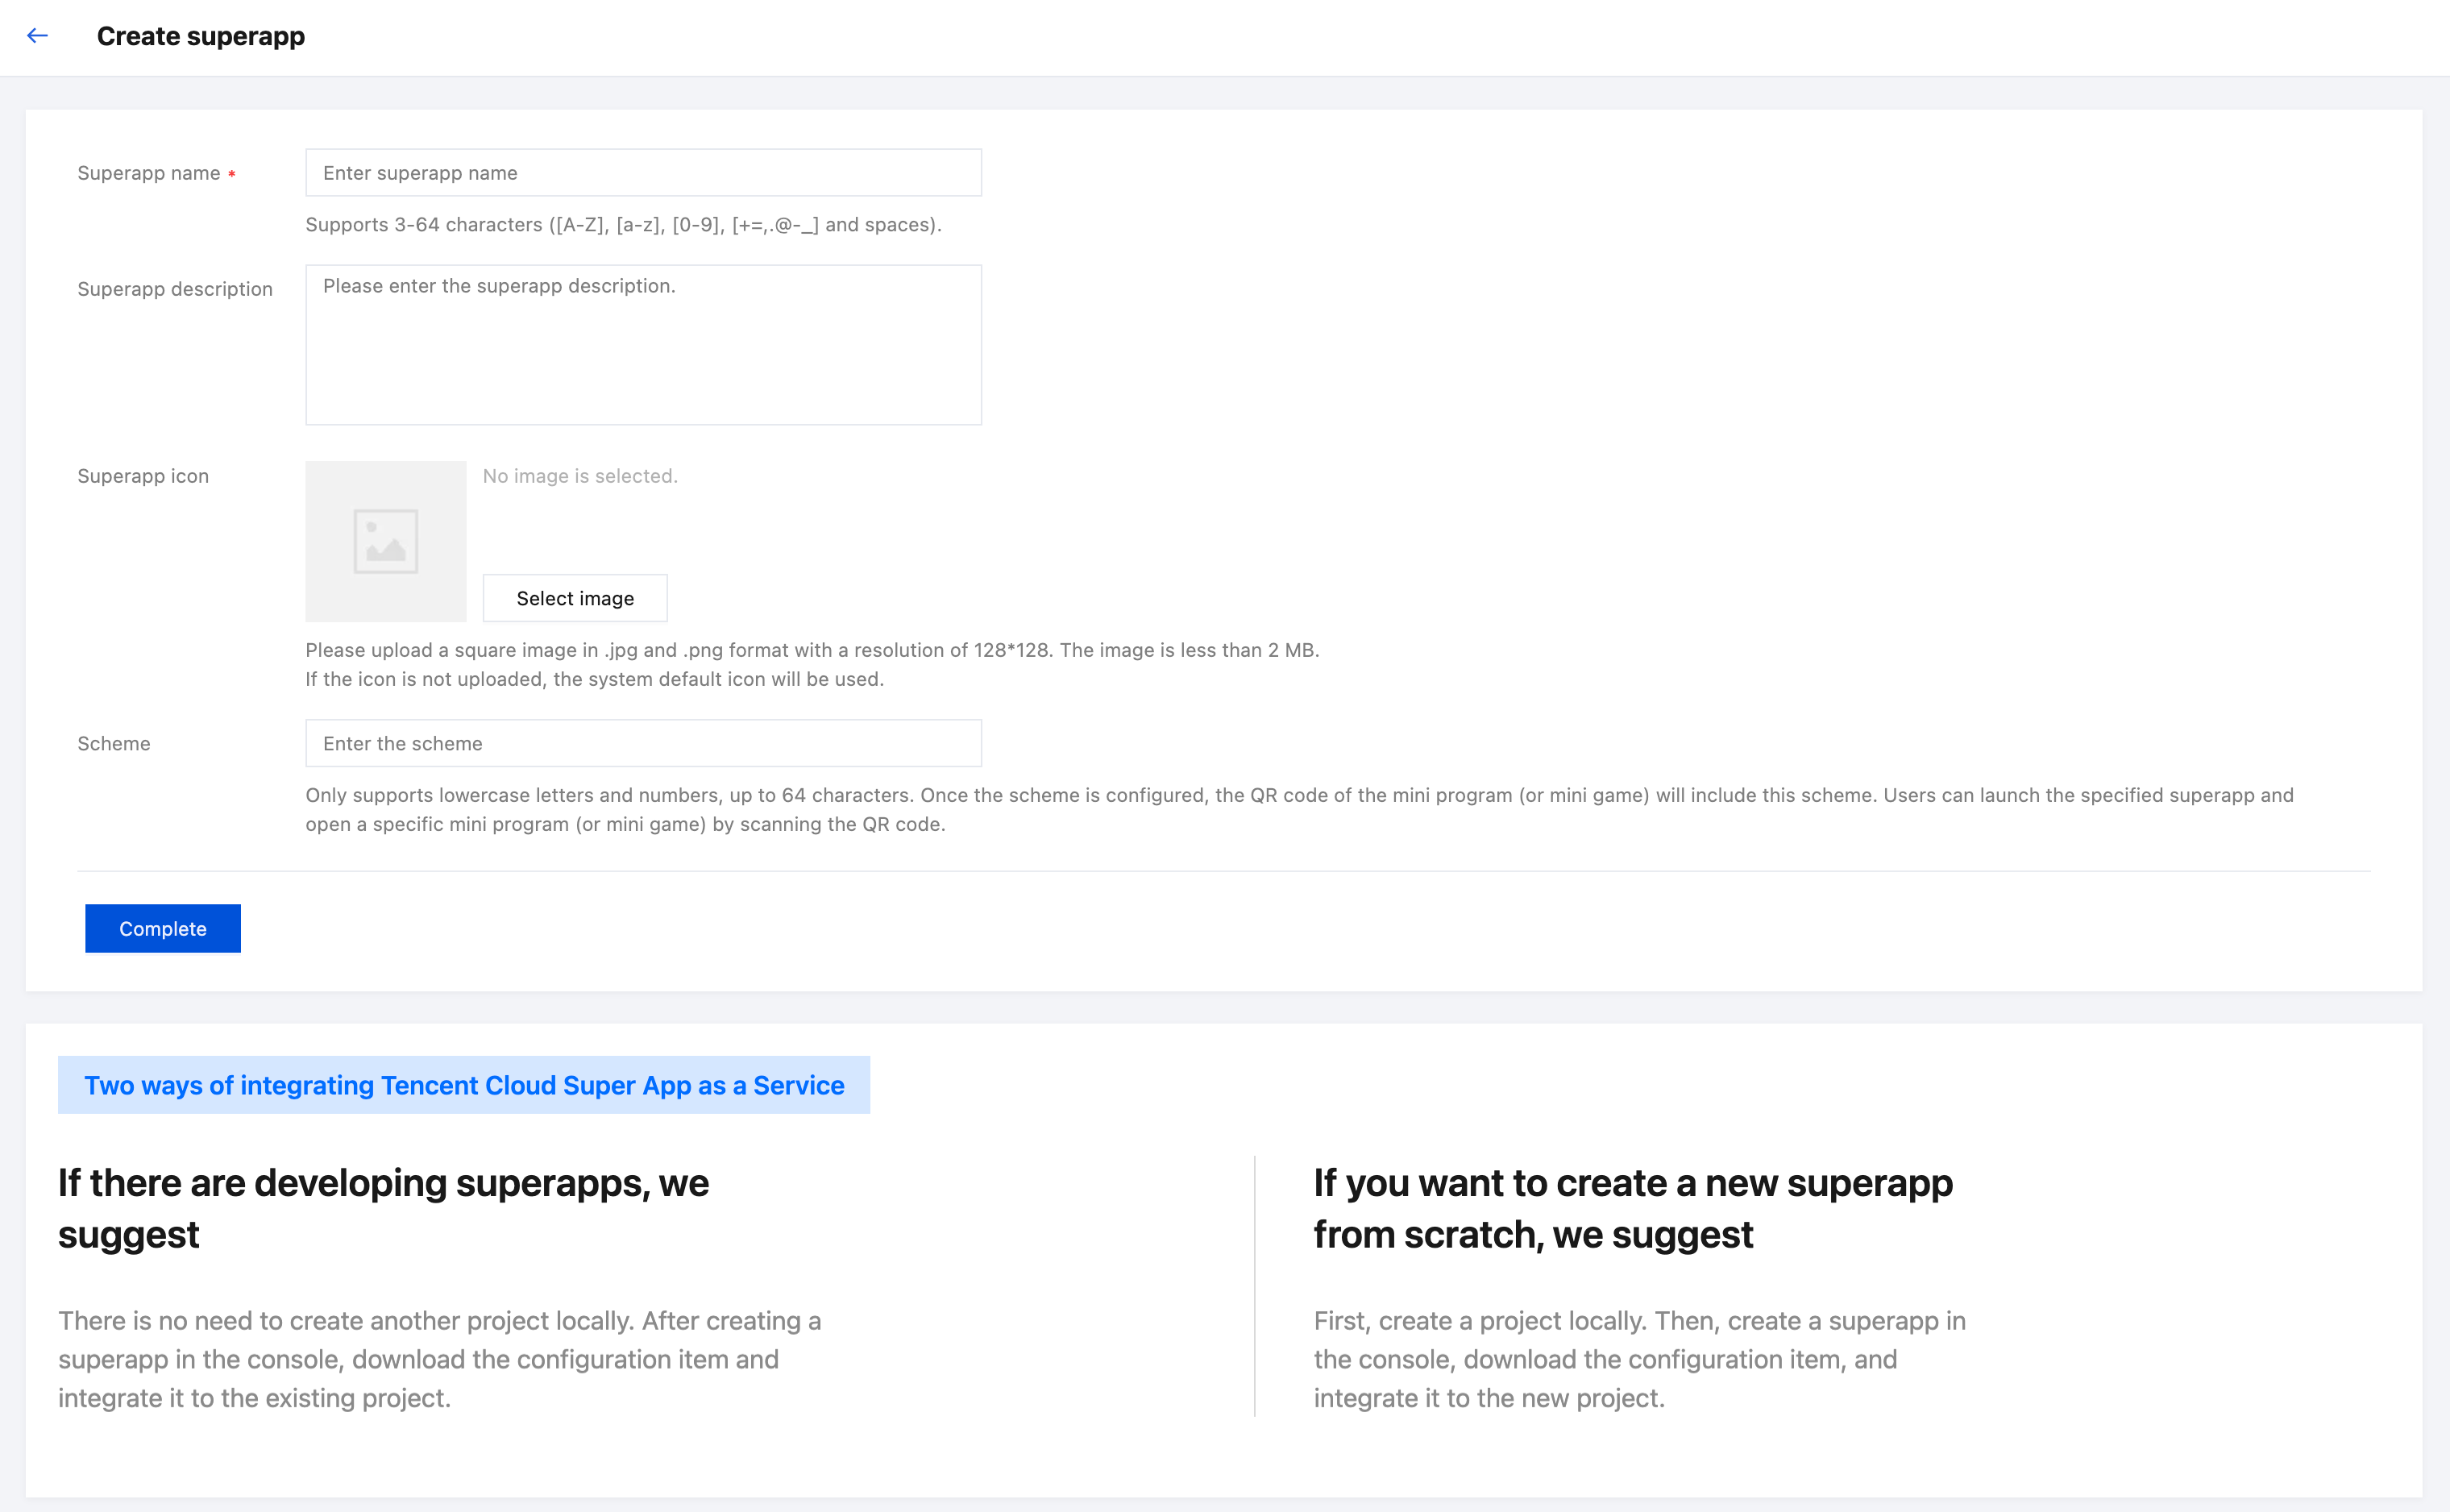
1. Create a superapp
Fields:
Fields | Detail | Required |
Superapp name | Supports Chinese characters, upper and lower case English letters, digits, spaces and a limited set of special symbols ( +, =, ,, ., @, -, _); 3-64 characters. | Required |
Superapp description | A short description of the Superapp, mainly for internal team reference. | Optional |
Superapp icon | Supports a square image in JPG or PNG format with a resolution of 128*128 and a file size within 2 MB. If no logo is uploaded, the system default icon is used. | Optional |
Scheme | Up to 64 characters. Once a scheme is configured, the QR code of a mini program (or mini game) will carry this scheme. Users can then scan the QR code with their phone's built-in scanner to launch the Superapp directly and open the mini program (or mini game). | Optional |
2. Complete the integration
2.1 Configuration method overview
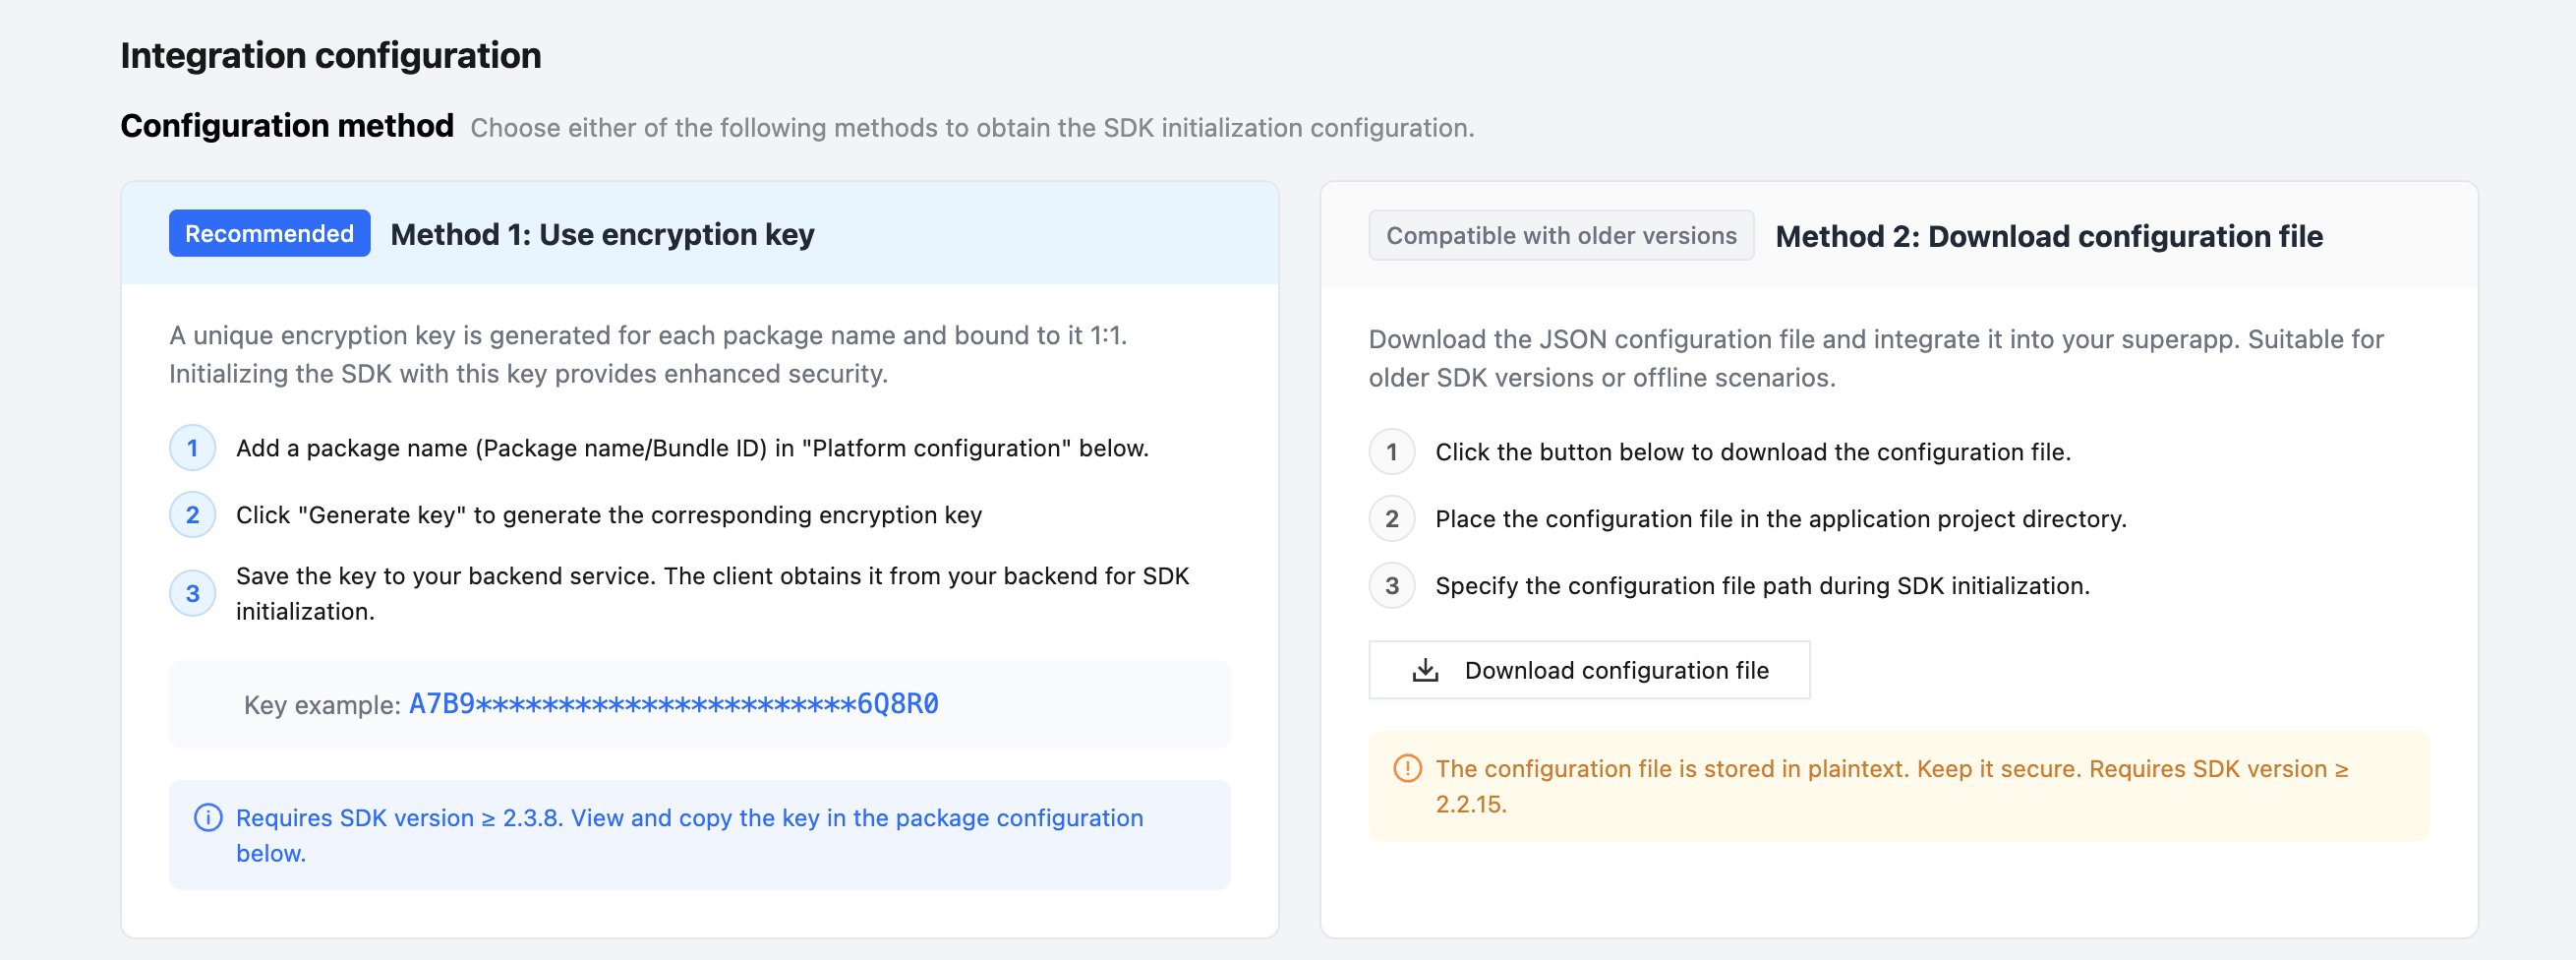
After adding a Package name / Bundle ID, the Superapp needs to obtain the SDK initialization configuration from the console. Two methods are currently available — choose either one. You can review the descriptions in the Configuration Method area:
Configuration method | Use case | Security | SDK version requirement | Binding |
Method 1: Use encryption key | New SDK versions; recommended for production | Higher (key delivery is controlled by your backend) | ≥ 2.3.8 | 1:1 binding with Package name / Bundle ID |
Method 2: Download config file | Legacy SDK versions or offline scenarios | The configuration file is stored in plaintext and must be protected by yourself | ≥ 2.2.15 | Bound at the application level |
Note:
Only one of the two methods is needed for SDK initialization — do not use both at the same time.
Method 1: Use encryption key is recommended, as it is more secure and binds 1:1 with the package name, making access control and auditing easier.
If your SDK version is lower than 2.3.8, use Method 2: Download config file.
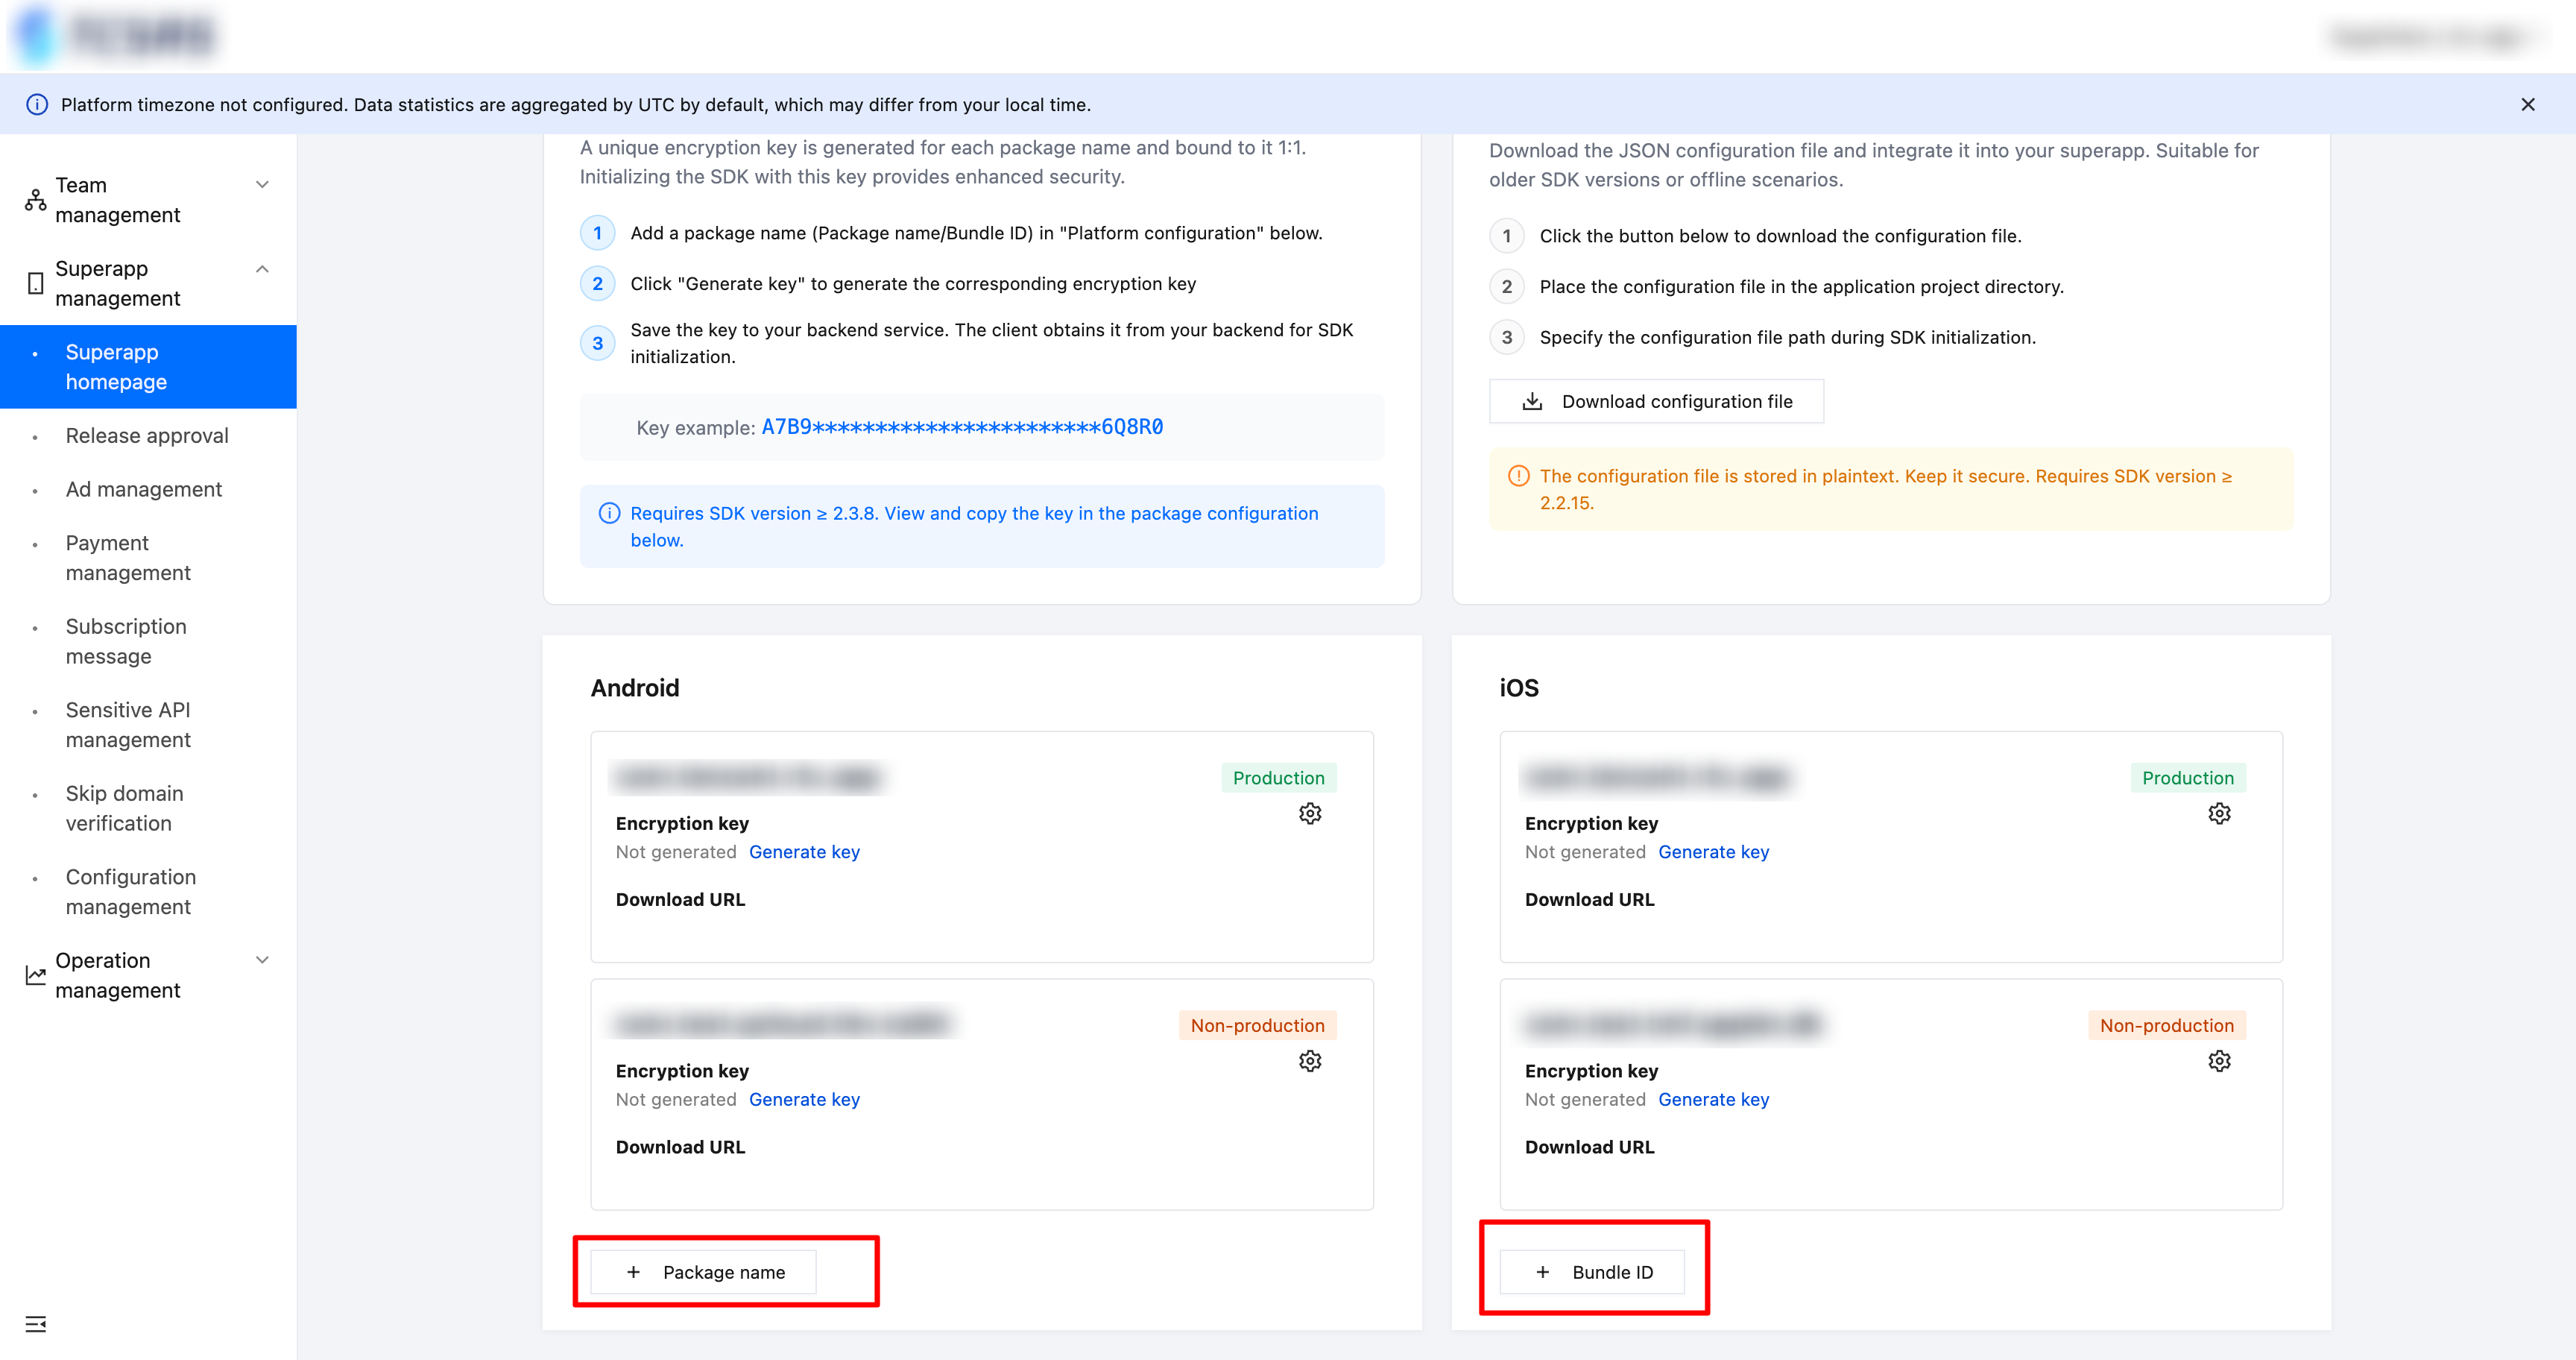
2.2 Add the package name or bundle ID
Add the package name for Android and bundle ID for iOS.
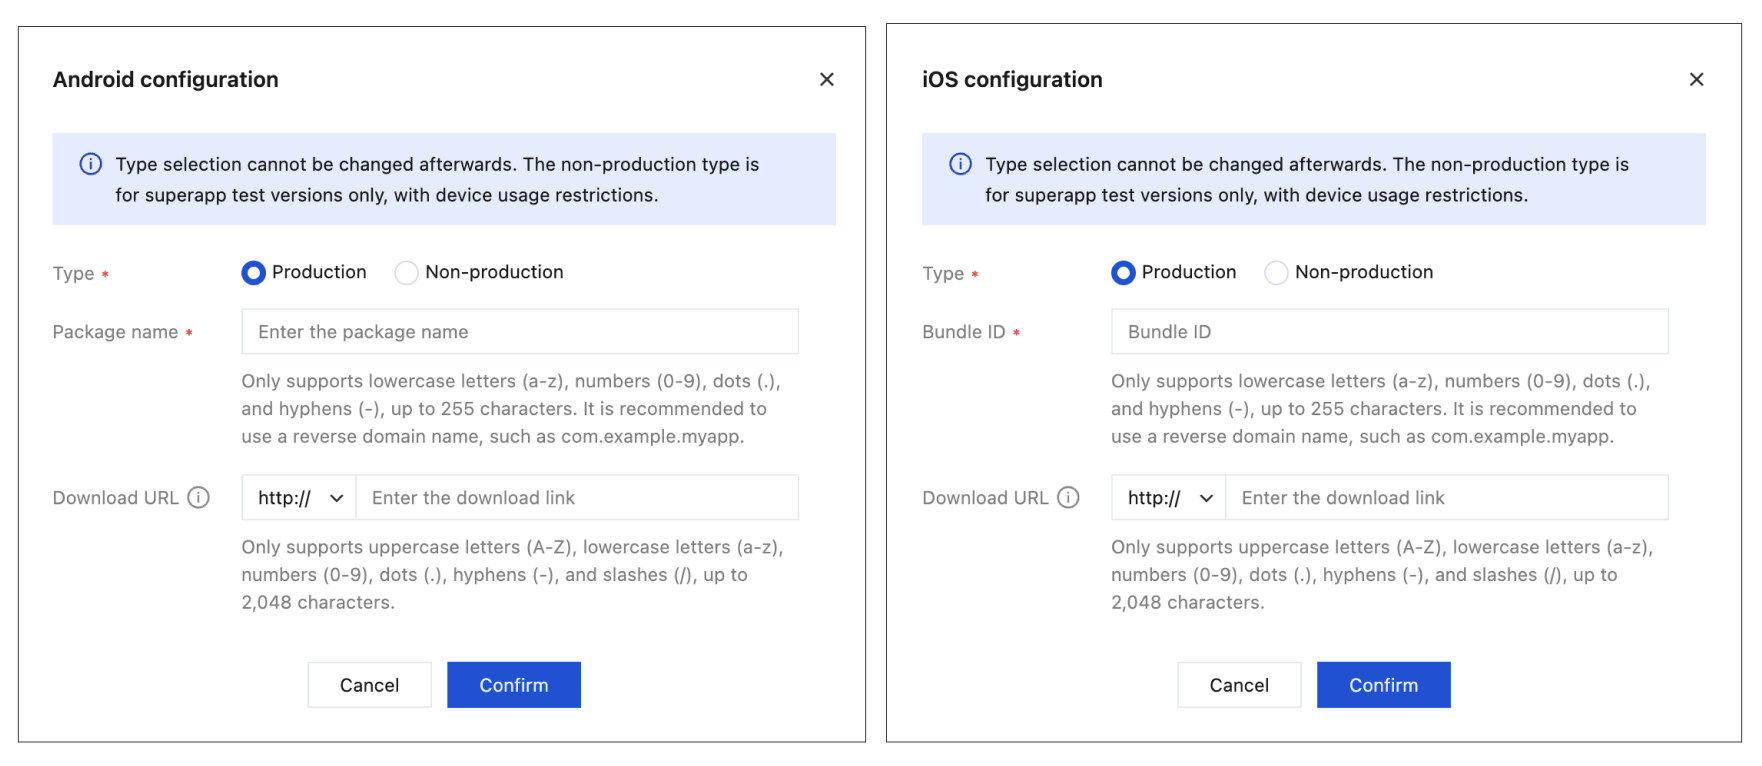
The following fields need to be filled in when adding the package name/bundle ID:
Type: Once selected, the type cannot be changed. Package names for non-production types are only used for superapp test versions and have a monthly device usage limit (up to 500 devices).
Package name/bundle ID: Only supports lowercase letters (a-z), numbers (0-9), dots (.), and hyphens (-), up to 255 characters. It is recommended to use reverse domain name notation, such as com.example.myapp.
Download URL: Only supports uppercase letters (A-Z), lowercase letters (a-z), numbers (0-9), dots (.), hyphens (-), and slashes (/), up to 2,048 characters.
Note:
Each Superapp may have at most one production Package name / Bundle ID and one non-production Package name / Bundle ID.
The Package name / Bundle ID can only be used by the real Superapp. The SAS SDK obtains the actual Package name / Bundle ID of the Superapp at runtime and matches it against the value configured in the console; if they do not match, SDK features will be unavailable (mini programs cannot be opened).
2.3 Using the encryption key
A unique encryption key can be generated for each Package name / Bundle ID. The SDK is initialized with this key, and the key is 1:1 bound to the package name. Compared with a plaintext configuration file, this approach offers higher security and is recommended for production.
2.3.1 Generate an encryption key
1. On the application homepage, first follow 2.2 to add a production or non-production Package name / Bundle ID.
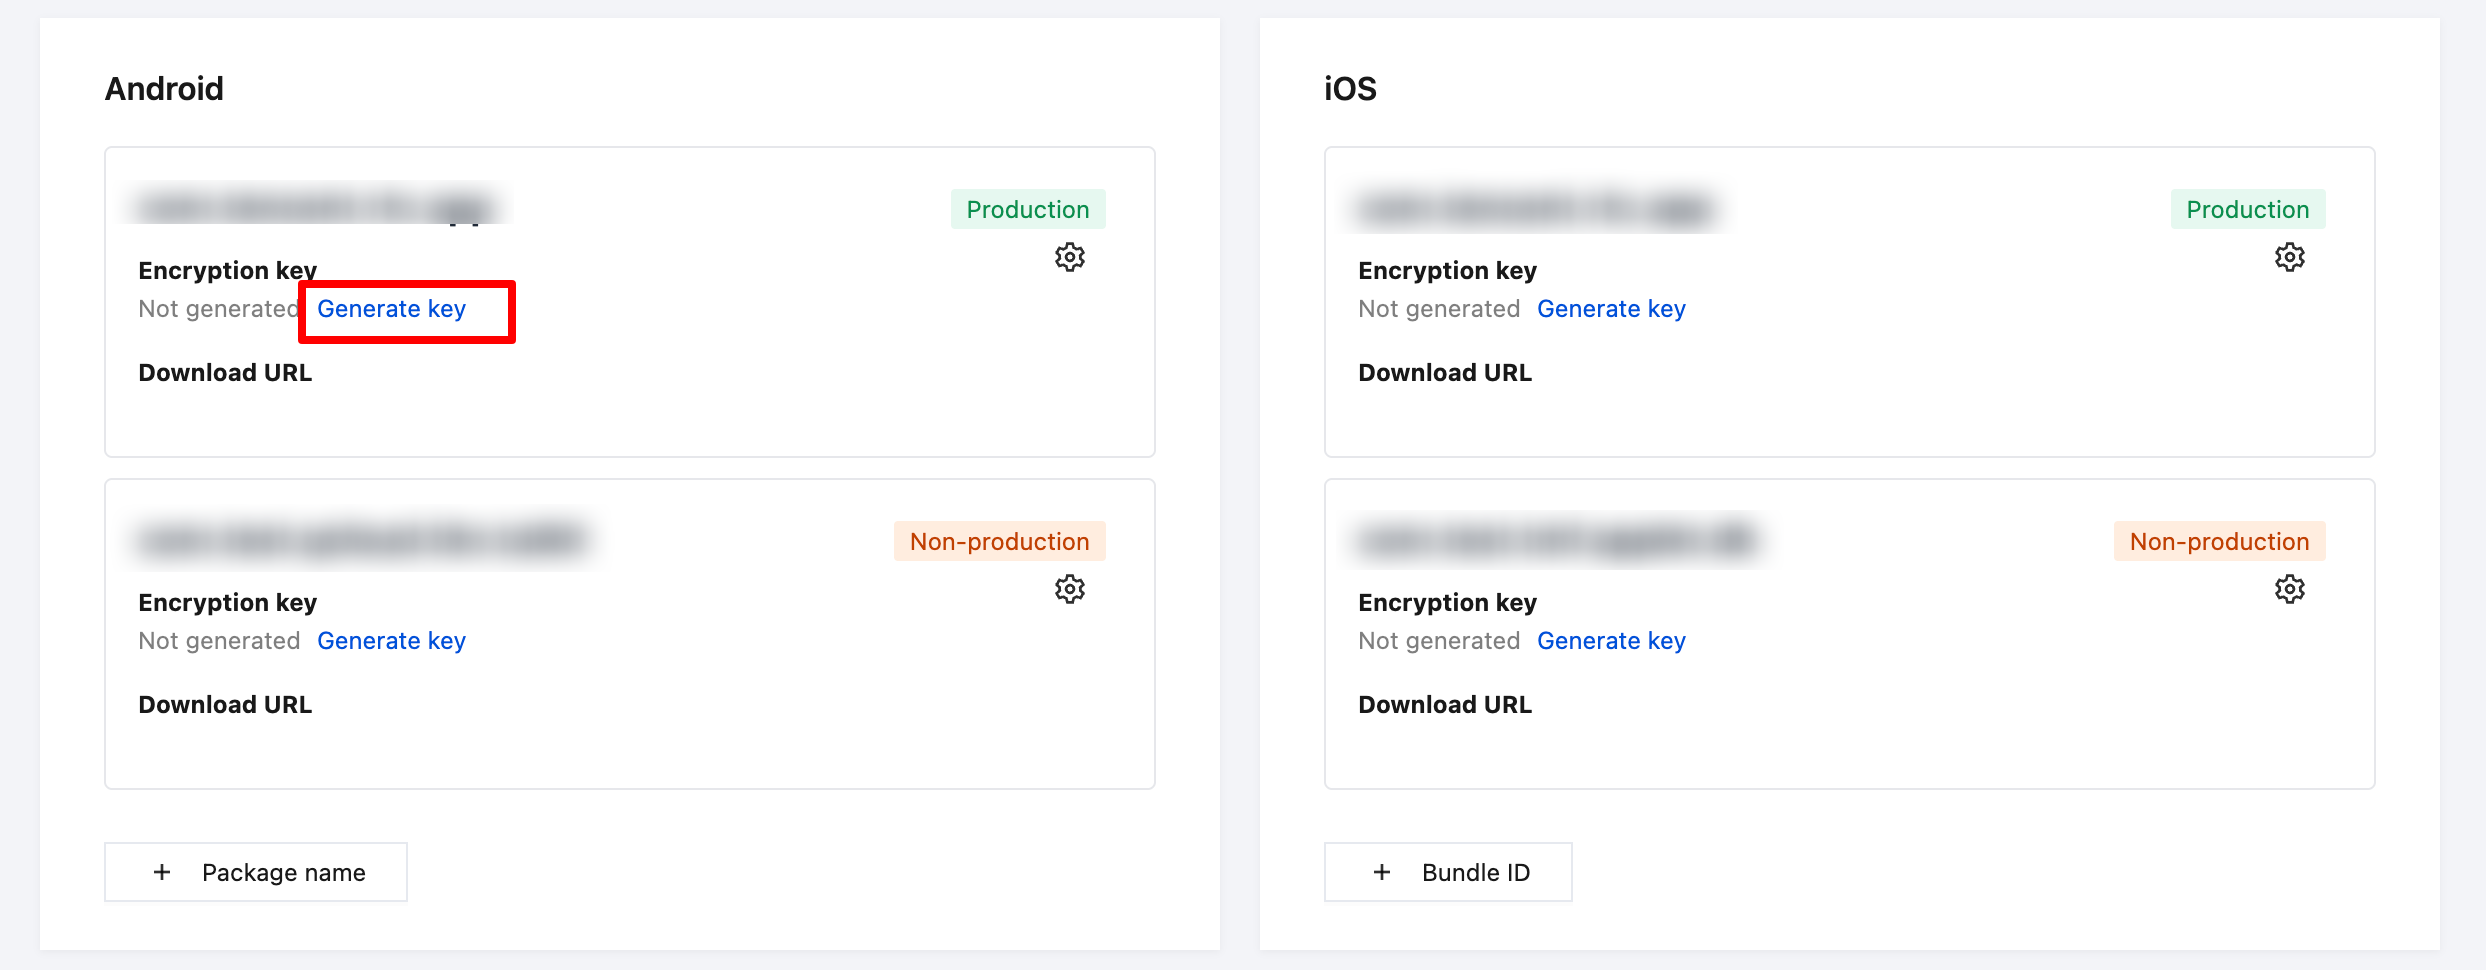
2. In the row of the corresponding package name, locate the encryption key field:
If the status is Not generated, click the Generate key button. The system will generate a unique key for that package name. After successful generation, a masked value (e.g.
A7B9***********************6Q8R0) is shown together with the message key generated successfully.Each Package name / Bundle ID has exactly one encryption key. Clicking the button again will not produce a new key.
2.3.2 View and copy the key
1. After the key is generated, the encryption key field shows a masked string together with a get key button.
2. Click get key and the system pops up a key-detail dialog showing the full key content.
3. Click the copy button inside the dialog to copy the key to the clipboard; the message copied successfully appears.
4. Save the copied key on your backend service. The backend then delivers the key to the client, and the client uses it during SDK initialization to complete the integration.
2.3.3 Cautions
Note:
The encryption key is 1:1 bound to the Package name / Bundle ID. Different package names have different keys, and they are not interchangeable.
This method requires SDK version ≥ 2.3.8. For lower SDK versions, use Method 2: Download config file instead.
Do not hard-code the key into client-side code or public repositories. It is recommended to store the key on your business backend and deliver it to clients on demand at runtime.
Only App Admin / App Senior Developer can use the Generate key action; App Developer can view and copy an existing key; other roles can only see whether a key has been generated (read-only).
If you suspect the key has been leaked, contact the App Admin to handle it (e.g., regenerate or change the package name) and update the key stored on your business backend accordingly.
2.4 Download the configuration file
After adding a Package name / Bundle ID, the Superapp developer needs to download the configuration file and import it into the Superapp code project.
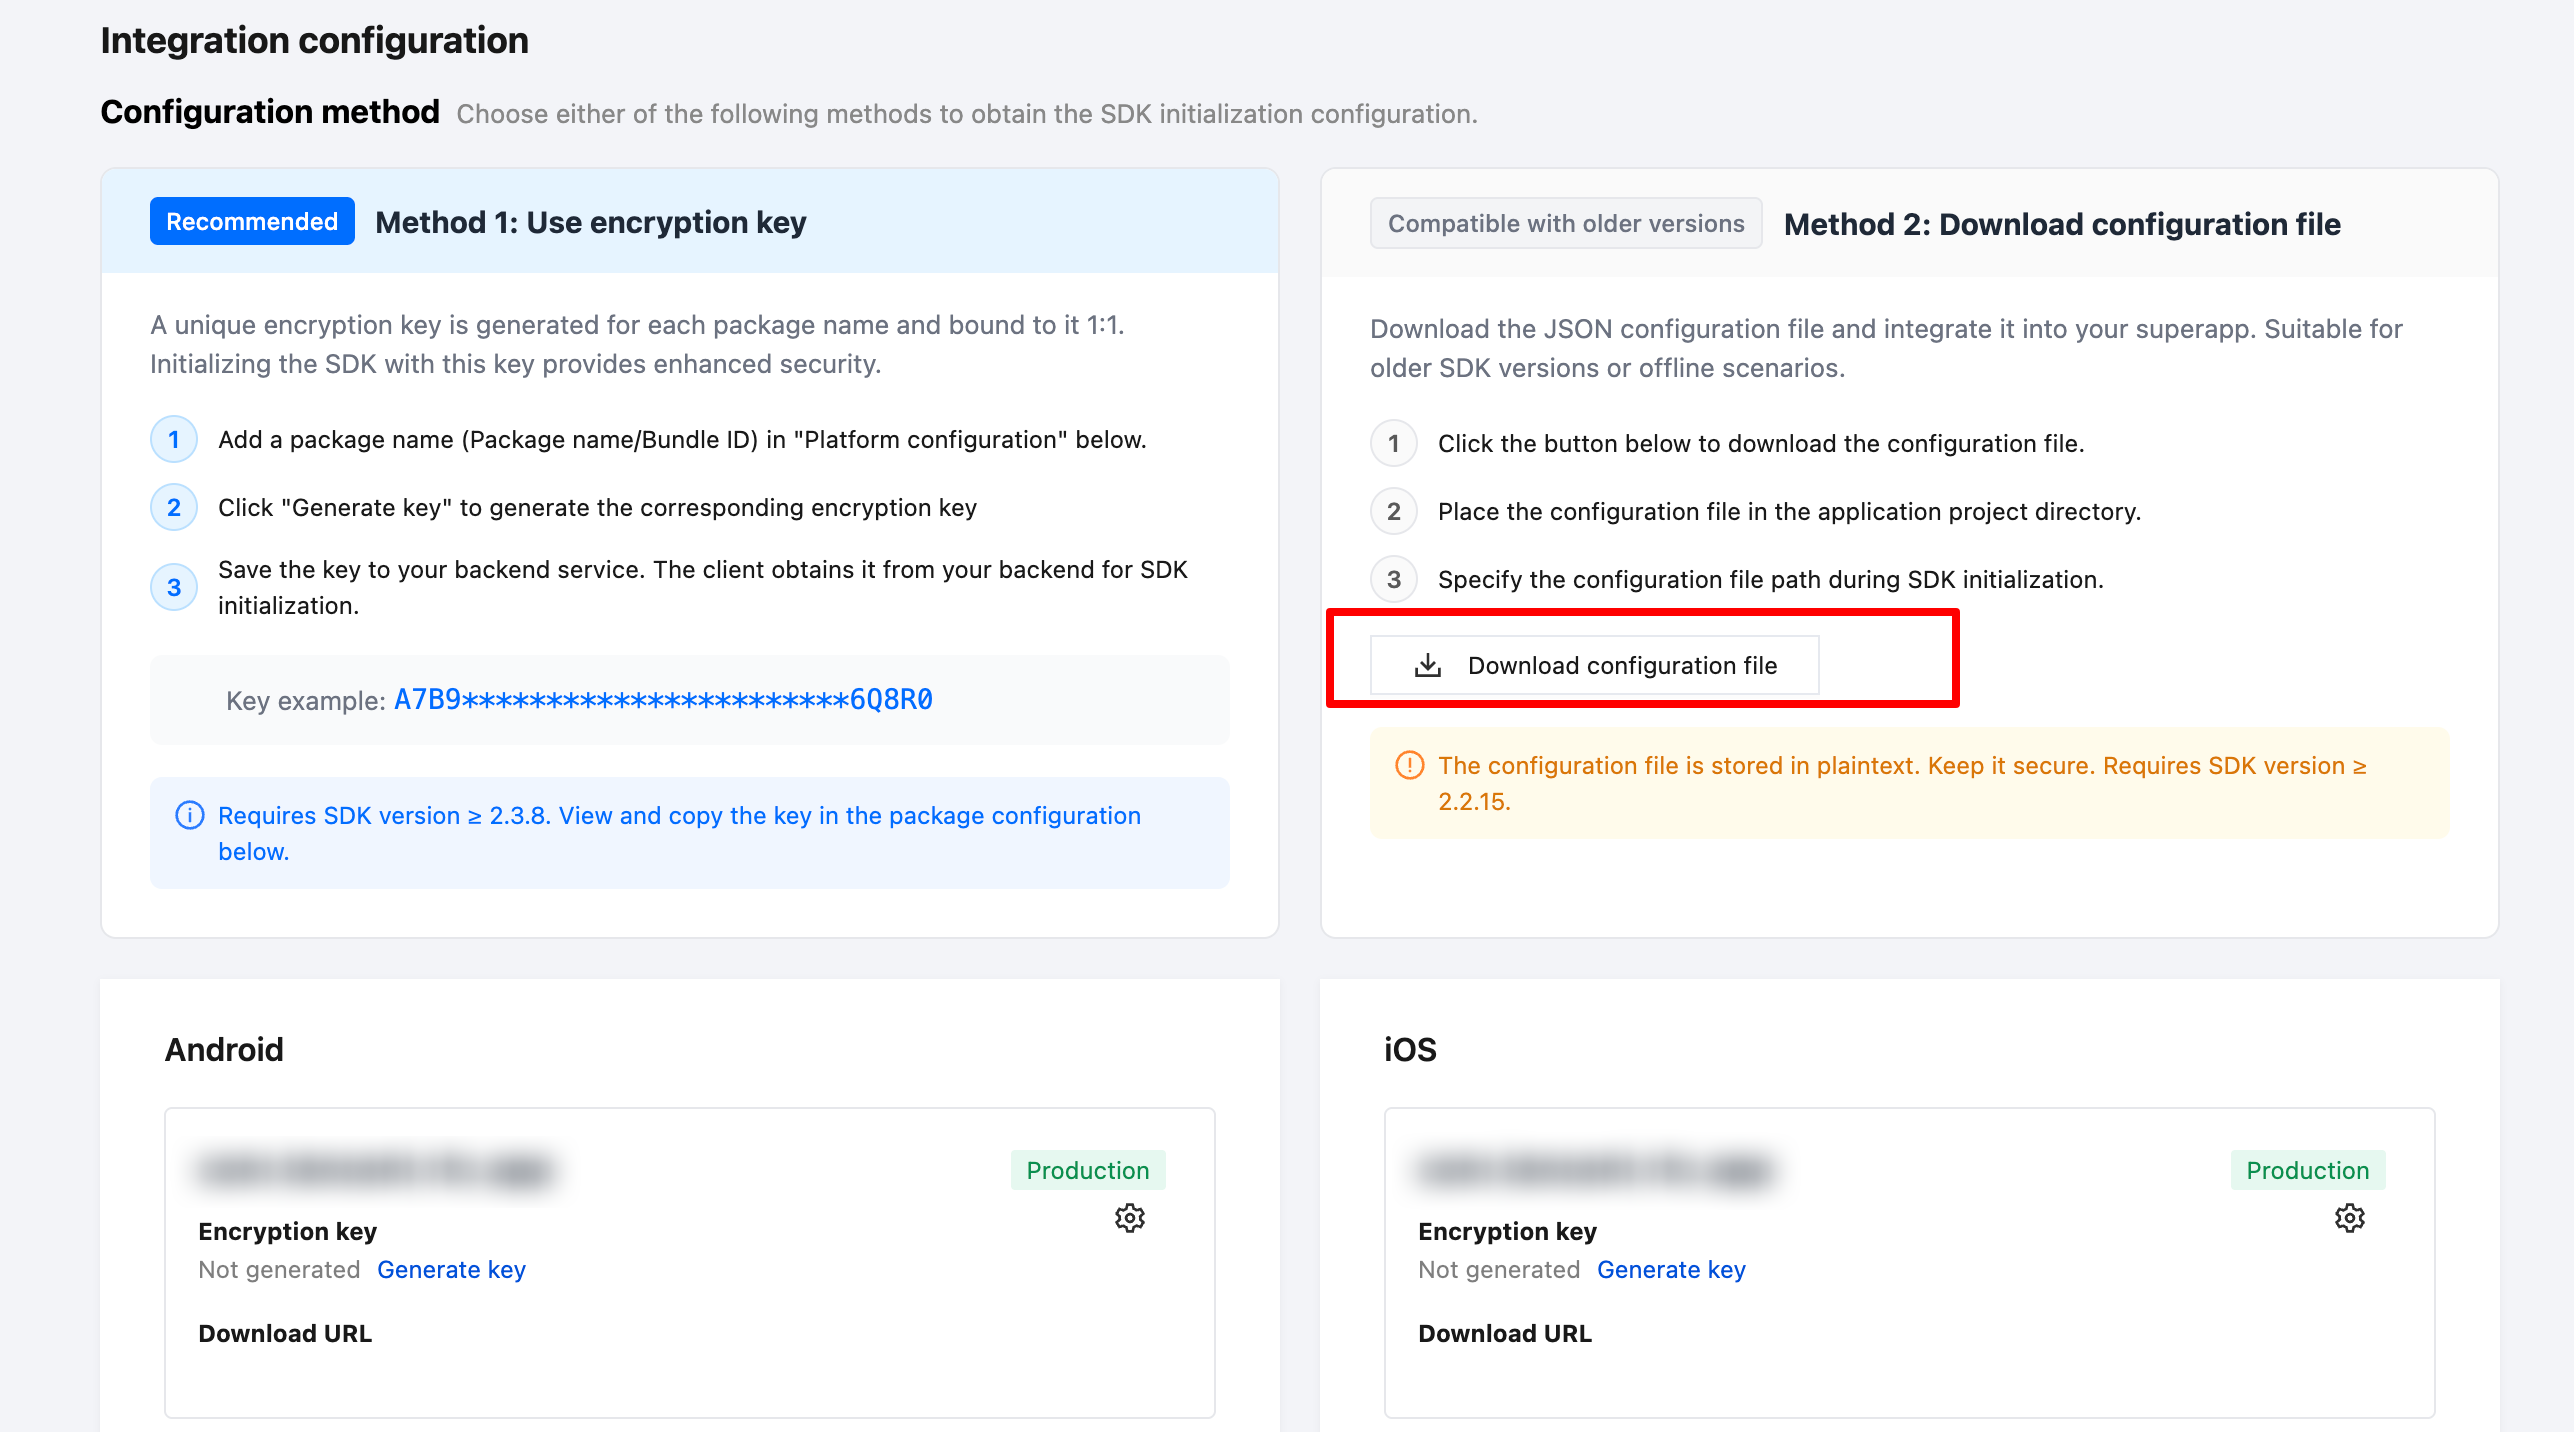
Steps:
1. Locate Method 2: Download config file under Configuration Method.
2. Click the Download config file button to download the JSON-formatted configuration file.
3. Place the configuration file into the application project directory (on Android, it is recommended to put it under the
assets root directory; on iOS, import the configuration file into the app and include it in the build resources).4. During SDK initialization, build a
TMFAppletConfig object from the configuration file, then use this TMFAppletConfig to initialize the mini program engine.Note:
You must add a Package name / Bundle ID first; otherwise downloading the configuration file will fail.
The configuration file is stored in plaintext — keep it safe and do not upload it to public repositories.
This method requires SDK version ≥ 2.2.15.
Bantuan dan Dukungan
Apakah halaman ini membantu?
Anda juga dapat Menghubungi Penjualan atau Mengirimkan Tiket untuk meminta bantuan.
masukan