Rule groups are used to centrally create, orchestrate, and maintain reusable rule sets. They support CFW rule group management, covering internet boundary rules, NAT boundary rules, VPC boundary rules, and enterprise security group rules. Rule groups also enable fine-grained, lifecycle management of the groups and their internal rules, including creating, editing, sorting, filtering, and batch operations. This provides the rule foundation for subsequent cross-account rule distribution processes.
In a multi-account scenario, a rule group serves as the core vehicle for one-time orchestration and multi-account deployment: It defines only the rule content and order. For details on which specific accounts or account groups the rule group is deployed to, see Rule Management.
Operation Steps
Create Rule Group
1. Log in to the FWM console. In the left-side navigation pane, select Rule Group.
2. On the Rule Group Management page, select the target product for which you want to create a rule group, and then click Creating Rule Group.
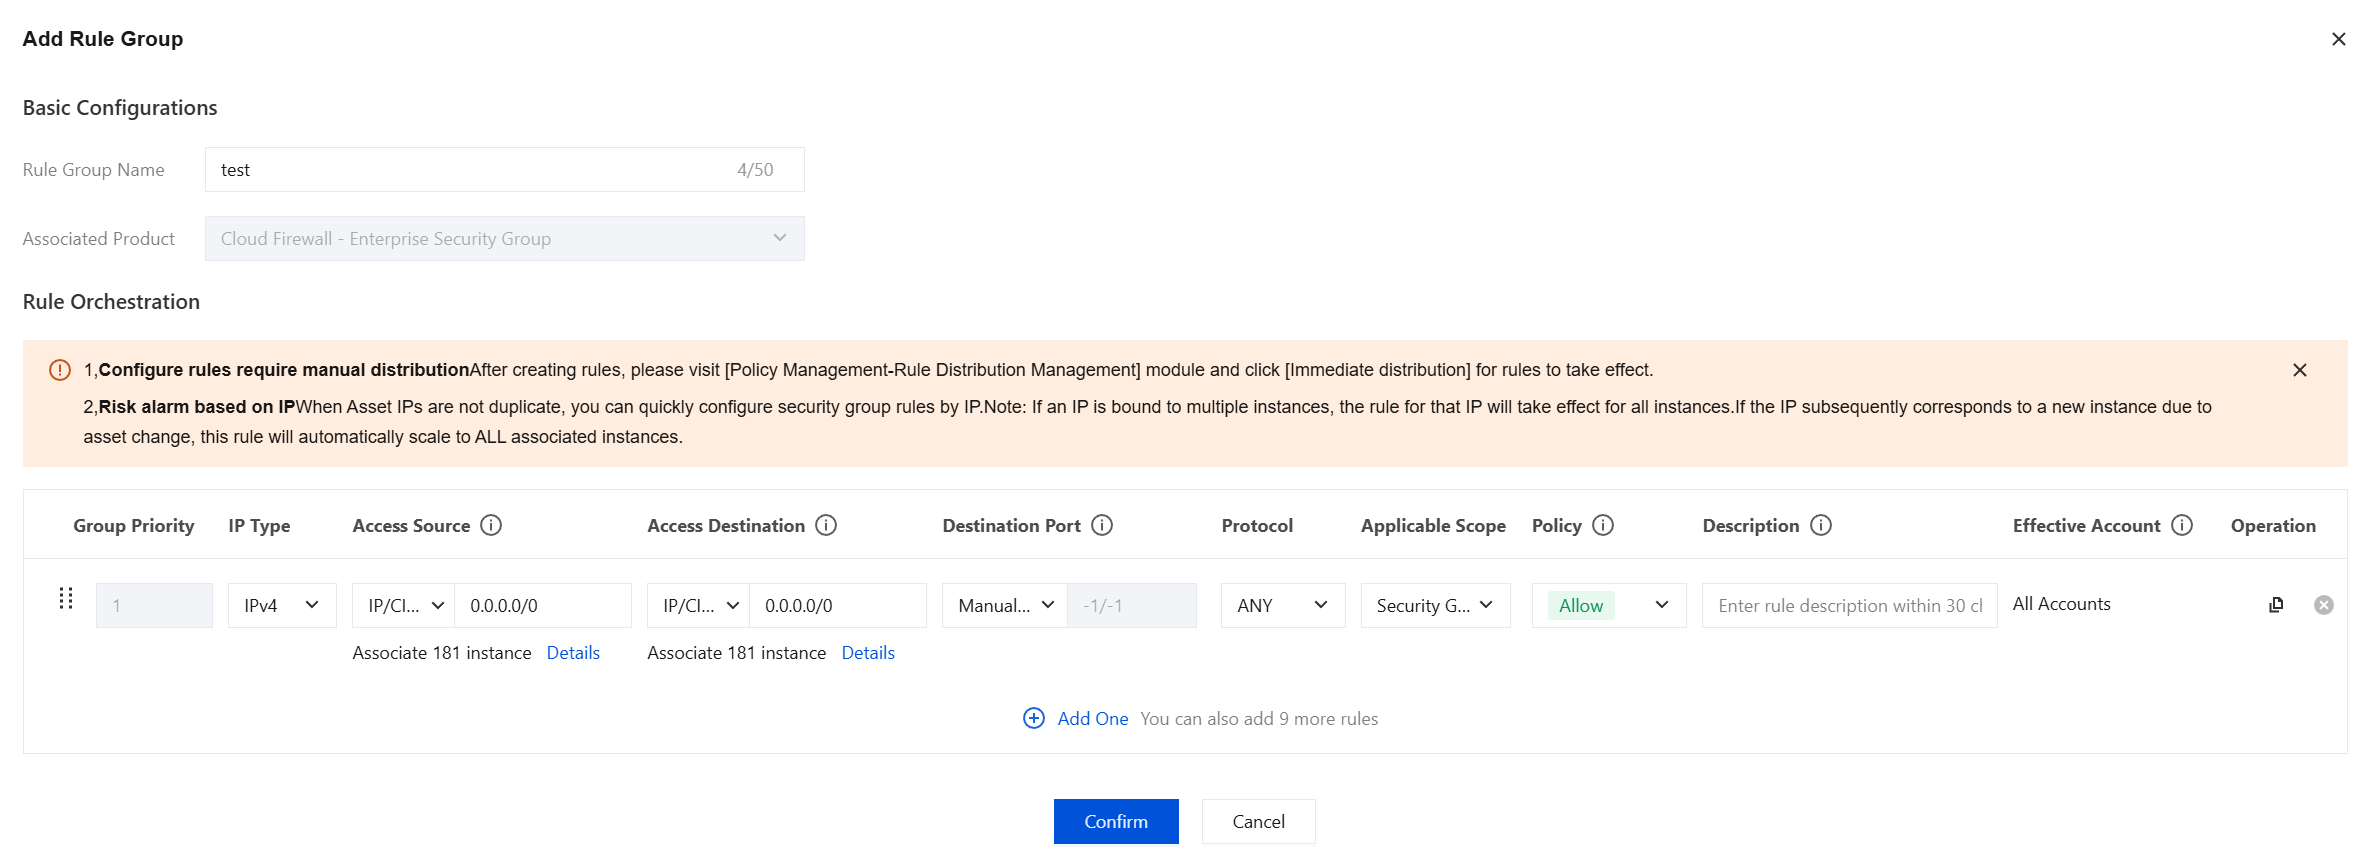
3. On the Add Rule Group page, configure the following parameters:
(Group) Priority: It is automatically assigned values of 1, 2, 3... in the order of addition, with a smaller number indicating a higher priority. The priority numbers cannot be edited directly. You can only adjust the order by dragging the
icon at the beginning of a row up or down, and the priority will be updated accordingly.
Take effect account: Specify the accounts where the rule takes effect.
Note:
Asset instances, resource tags, and address templates in the access source and access destination are all bound to an account. The access source and access destination must belong to the same account. Rules take effect only under the bound account and do not take effect when deployed to other accounts.
IP Type (Supported by VPC Boundary and Enterprise Security Group): Select the IP type for which the rule takes effect.
Applicable Scope
Internet Boundary: The serial firewall.
NAT Boundary: The region or firewall instance where the current rule takes effect.
VPC Boundary: The firewall instance where the current rule takes effect.
Enterprise Security Group: A security group or a Lighthouse firewall.
Access Source and Access Destination
IP Address (Supported by Internet Boundary, NAT Boundary, and VPC Boundary):
Entry Manually: Enter any IP address or CIDR address directly, such as 10.10.10.10 or 10.10.10.10/24. Multiple objects are supported and separated by commas.
Note:
When you enter 0.0.0.0/0, the backend automatically associates all public IP addresses. Similarly, when you enter a CIDR address, it takes effect only on public IP addresses within that network segment.
Address Template: Select from the created IP address templates. To create a custom address template, see Creating a Template.
Address Book: Select from the created address books. To create a custom address book, refer to Create Address Book.
IP address/CIDR (Supported by Enterprise Security Group): Enter any IP address or CIDR address directly, such as 10.10.10.10 or 10.10.10.10/24. Multiple objects are supported and separated by commas.
Domain Name (Supported by Internet Boundary, NAT Boundary, and VPC Boundary): When selecting the domain name type, select the input method and match mode in sequence:
Entry Manually: Enter the domain name directly.
Note:
When you enter *, the backend automatically associates all domain names.
When you enter a wildcard domain name (such as *.example.com), the backend automatically associates all second-level domain names that start with *.
Address Template: Select from the created domain name templates.
Note:
If you specify an address outside the CIDR of the local VPC or the peer VPC in a VPC boundary rule, the rule will not take effect.
Strict match mode does not support domain name templates that contain wildcard domain names (such as *.example.com). If the selected domain name template contains a wildcard domain name, an error will be reported upon submission.
Address Book: Select from the created address books. To create a custom address book, refer to Create Address Book.
FQDN Match: Performs identification matching based on the Host header field or SNI extension field in application-layer packets.
Loose Matching: The FQDN matching rule is satisfied, or the destination IP address being accessed belongs to any IP address in the current DNS resolution result of the domain name. The rule is matched when either condition is met.
Strict Matching: The FQDN matching rule must be satisfied, and the destination IP address of the access must belong to any IP address in the current DNS resolution result of the domain name. The rule is hit only when both conditions are met simultaneously.
Address Template (Supported by Internet Boundary, NAT Boundary, and VPC Boundary): Select from the created IP address templates. For details about custom address templates, see Creating a Template.
Parameter Template (Supported by Enterprise Security Group): Select the desired template from existing templates. For details about custom parameter templates, see Creating a Parameter Template.
Asset Instance: Select a specific instance as the access destination.
Resource Tag: Select the access destination based on resource tags. The public IP addresses of instances with matching tags will be matched against the corresponding boundary rules.
Location (Supported by Internet Boundary and NAT Boundary): It refers to the actual geographic location corresponding to an IP address, encompassing provinces within the Chinese mainland, the Hong Kong/Macao/Taiwan (China) region, and continents overseas.
Asset Geography (Supported by Enterprise Security Group): Select a specific region.
Address Book (Supported by Enterprise Security Group): Select from the created address books. To create a custom address book, refer to Create Address Book.
Destination Port: Manually enter the destination port, or select an existing protocol port template from an address template or address book (not supported by Enterprise Security Group). For custom address templates, see Creating a Template. For custom address books, see Creating an Address Book.
It supports single port numbers, port ranges based on '/', and discrete port values separated by commas.
Destination Port Instance
Description
-1/-1
Indicates all ports.
80
Indicates port 80.
80,443,3389
Indicates that the rule applies to ports 80, 443, and 3389.
80/443
Indicates that the rule applies to all ports from 80 to 443.
80/443,3389
Indicates that the rule applies to all ports from 80 to 443 and port 3389.
Protocol
Internet Boundary
Direction
Destination Type
Supported Protocols
Inbound
IP address (manual input/address template)
ANY, TCP, UDP, ICMP, FTP (Entry Manually Only)
Domain name > FQDN matching (manual input/address template)
ANY, HTTP/HTTPS, HTTP, HTTPS, SMTP/SMTPS, SMTP, SMTPS, DNS (supported only for domain names)
Domain Name > Loose matching, Domain Name > Strict Matching
Not supported.
Asset Instance, Resource Tag, Asset Group
ANY, TCP, UDP, ICMP, FTP (Entry Manually Only)
Outbound
IP address (manual input/address template)
ANY, TCP, UDP, ICMP, FTP (Entry Manually Only)
Domain name > FQDN matching (manual input/address template)
ANY, HTTP/HTTPS, HTTP, HTTPS, SMTP/SMTPS, SMTP, SMTPS, DNS (supported only for domain names)
Domain name > Loose matching (manual input/address template), Domain name > Strict matching (manual input/address template)
TCP,UDP
Geographic location
ANY,TCP,UDP,ICMP
NAT Boundary
Direction
Destination Type
Supported Protocols
Inbound
IP Address, Asset Instance, Resource Tag, Address Template > IP Address Template
ANY,TCP,UDP
Address template > Domain Name Address Template
Not supported.
Outbound
IP Address, Location, Address Template > IP Address Template
ANY, TCP, UDP, ICMP, FTP (IP Address Only)
Domain Name > FQDN Matching, Address template > Domain Name Address Template
ANY, HTTP/HTTPS, HTTP, HTTPS, SMTP/SMTPS, SMTP, SMTPS, DNS (Domain Name Only)
Domain Name > Loose matching, Domain Name > Strict Matching
TCP,UDP
VPC Boundary
Destination Type
Supported Protocols
IP Address, Asset Instance, Resource Tag, Address Template > IP Address Template
ANY, TCP, UDP, ICMP, FTP (IP Address Only)
Domain Name > FQDN Matching, Address template > Domain Name Address Template
ANY, HTTP/HTTPS, HTTP, HTTPS, SMTP/SMTPS, SMTP, SMTPS, DNS (Domain Name Only)
Domain Name > Loose matching, Domain Name > Strict Matching
TCP,UDP
Enterprise Security Group: It supports the ANY, TCP, UDP, and ICMP protocols.
Policy
Pass(Enterprise Security Group is Allow): It permits traffic that matches the rule, records the number of matches but not the access control logs, and records the traffic logs.
Observe: Permit traffic that matches the rule, record the number of matches, and log both access control and traffic logs.
Block (Enterprise Security Group is Reject): It blocks traffic that matches the rule, records the number of matches and the access control logs, and the traffic logs record information of a request packet from the traffic.
Description: It is used to describe the rule and supports up to 50 characters.
4. If you have already edited the preceding rule and the subsequent rule to be configured is similar to it, you can quickly generate a new rule by using the copy feature, and then adjust the details as needed.
Click
in the operation bar to add a new rule below the currently selected rule and automatically copy all content of the current rule.
Click
below to add a new rule at the bottom of the rule list and automatically copy the content of the last rule in the list.
Note:
A rule group supports adding up to 10 rules at a time.
5. After it is confirmed that everything is correct, click Confirm to complete the configuration.
Note:
A rule does not take effect immediately after creation. Go to the Rule Management page and manually deploy the rule to activate it.
Risk notice for IP address-based configuration: When asset IP addresses are not duplicated, you can quickly configure security group rules by IP address. Note: If an IP address is bound to multiple instances, the rule for that IP address will be applied to all instances under it. If asset changes later cause that IP address to correspond to new instances, this rule will also be automatically extended to all associated instances.
Manage Rule Group
On the Rule Group page, you can filter and query rule groups by combining multiple resource attributes, and then manage the target rule groups.
Delete Rule Group
Delete a Single Rule: In the Actions column of the target rule group, click Delete.
Batch Delete: First, select multiple rule groups, and then click Batch Delete above the list.
Note:
A rule group cannot be deleted if it has associated deployment accounts. Go to the Rule Management page, remove the relevant deployment rule groups to ensure no associated deployment accounts exist, and then proceed with the deletion.
Deleted rule groups cannot be recovered.
Edit Rule Group
In the Actions column of the target rule group, click Edit to go to the edit page. Alternatively, you can click the Rule Group Name in the rule group list to enter the edit page.
This page is divided into two parts:
Basic Information: You can only modify the rule group name by clicking
. Other basic information parameters cannot be edited.
Rule Information: You can add, query, modify, delete, and sort all rules within the current rule group.
Query Rule: You can filter and query rules by combining multiple resource attributes.
Create Rule: Click Create Rule to add a rule within this group. For parameter descriptions, see Create Rule Group.
Edit Rule: Click Edit in the Actions column of the target rule to modify its detailed configuration.
Delete Rule: Click Delete in the Actions column of the target rule to delete it. To delete multiple rules, select them and then click Batch Delete.
Quick Sort: The top-to-bottom order of rules in the list indicates their priority from high to low. To adjust the order, follow the steps below:
a. Click Quick Sort above the list.
b. Hover the mouse over the rule row you need to adjust. When the cursor changes to a drag icon, press and hold the left mouse button and drag up or down.
c. After the position is adjusted to the target position, click Save. Rules at the top of the list have higher priority than those at the bottom. The system automatically updates the priority values.
Manage Address Book
Address books are used to centrally maintain reusable collections of IP addresses or domain names, serving as template sources for access sources, access destinations, and destination ports in rule groups. Address books created in FWM can be distributed to multiple managed accounts. After distribution, read-only copies are generated in the CFW instance of each account, and these copies cannot be modified or deleted in CFW.
Create Address Book
1. Log in to the FWM console. In the left-side navigation pane, select Rule Group.
2. On the Rule Group page, click Address Book Settings in the upper-right corner.
3. On the Address Book Management page, click Create Template.
4. In the Create Address Book pop-up window, select Scope of Use and Template Type:
Scope of Use: Border Firewall (Internet/VPC/NAT) or Enterprise Security Group.
IP Address Template: Contains IP addresses or CIDR blocks and supports IP address ranges.
Enterprise Security Group: Supports both ipv4 and ipv6.
Domain Name Template: Contains domain name addresses and supports wildcard domain names.
Protocol Port Template (not supported by Enterprise Security Group): A combination of protocol and port, distinguished by Layer 4 or Layer 7 protocols. Ports can be configured as a single port, discrete ports, a continuous port range, or all ports.
5. Enter a Name. The name cannot be empty or duplicate, and can contain up to 100 characters.
6. Enter the corresponding content based on the selected template type.
The supported formats for IP Address Template are as follows: When entering line by line, enter one address per line and press Enter to start a new line. When pasting in batches, separate multiple addresses with English commas ,. If duplicate IP addresses or network segments are entered, the system automatically merges them.
Format
Example
Single IP address
IPv4: 10.0.0.1
IPv6: 2001:db8::1
CIDR block
IPv4: 10.0.1.0/24
IPv6: 2001:db8::/32
IP address range
IPv4: 10.0.0.1-10.0.0.100
IPv6: 2001:db8::1-2001:db8::ff
The supported formats for Domain Name Template are as follows: When entering line by line, enter one domain name per line and press Enter to start a new line. When pasting in batches, separate multiple domain names with English commas ,. Duplicate entries are automatically merged by the system.
Format
Example
Specific domain name
www.domain.com
Wildcard domain
*.domain.com
All domains
*
The protocol and port formats supported by Protocol Port Template vary by protocol type. When entering line by line, enter one entry per line and press Enter to start a new line. When pasting in batches, separate multiple protocol ports with English commas ,.
Protocol Type
Supported protocols
Format Example
Layer 4 protocol
TCP,UDP
Single port: TCP:80
Discrete ports: TCP:80,443
Continuous port range: TCP:3306/20000
All ports: TCP:-1/-1
Layer 7 protocol
HTTP,HTTPS,SMTP,SMTPS
Single port: HTTP:80
Discrete ports: HTTP:80,443
Continuous port range: HTTP:3306/20000
All ports: HTTP:-1/-1
7. Enter a Description. The description can be empty and supports up to 45 characters.
8. Click Confirm to complete the creation.
Edit Address Book
In the address book list, click Edit in the operation column of the target address book to modify its name, address content, and description.
Note:
An address book that is associated with delivered tasks can still be edited, and modifications will be synchronized to all rules and delivered copies that reference the address book.
Delete Address Book
In the address book list, click Delete in the operation column of the target address book, and then click Confirm in the confirmation pop-up window.
Note:
An address template that has associated rules cannot be deleted. Clear the associated rules before proceeding.
After an address book is deleted, its copies generated on the CFW side of each account will be cleared synchronously.