Client Security
Download
Focus Mode
Font Size
Client Security uses security policies to uniformly constrain what members can do on the client, including which files they can read and write, which commands they can execute, which networks they can access, and whether the built-in runtime is enabled. Enterprise administrators can create different policies for different departments or members to tighten or relax control over client behavior as needed.
Note:
Enterprise policies serve as the baseline: Policies delivered to clients act as the enterprise bottom line. Members can add personal configurations on top of this baseline, such as adding stricter rules, but cannot exceed the limits of enterprise policies.
When multiple policies are matched, the one with the highest priority takes effect: If the same member matches multiple enterprise policies at the same time, only the policy with the highest priority number takes effect as a whole (a larger number indicates a higher priority).
Policy Update Latency: After a policy is saved, enabled, or disabled, it takes effect immediately when a member restarts the client. If the client is not restarted, the policy is automatically synced by the client backend on a cycle of approximately 10 minutes and takes effect within approximately 10 minutes.
Operation Steps
Step 1: Entering the Client Security Policy List
Log in to the WorkBuddy Enterprise admin console, and go to Security Center > Client Security in the left sidebar to view the list of existing policies for the current enterprise. The list is empty when you enter this page for the first time.
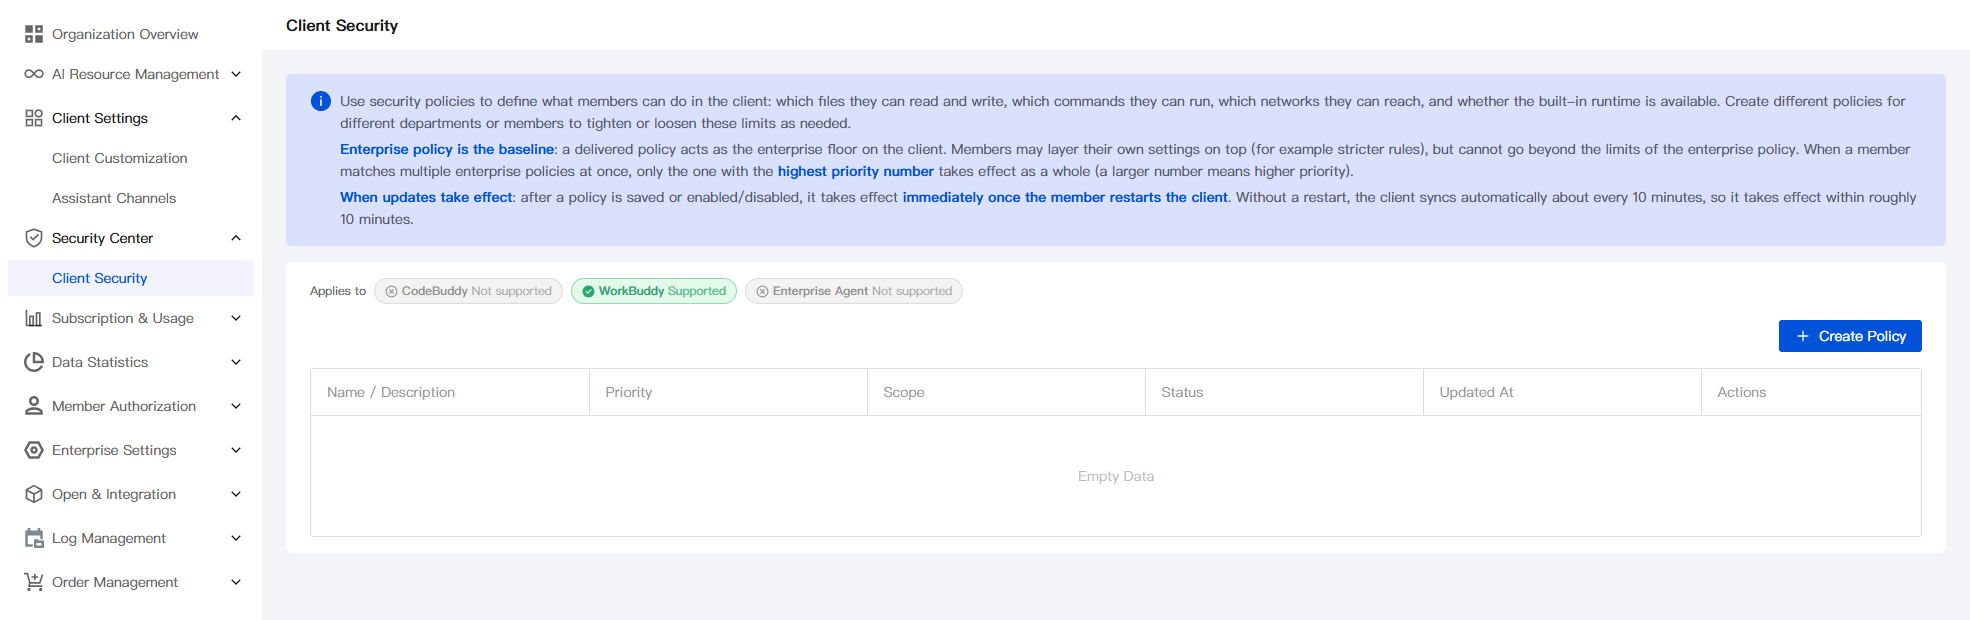
The fields in the list are described as follows:
Field | Description |
Policy Name / Description | Display name and description of the policy. |
Priority | An integer. A larger value indicates a higher priority. When the same member matches multiple policies, only the policy with the highest priority takes effect as a whole. |
Effective Scope | Only the names of departments/members are displayed (departments are distinguished by folder icons, and members by portrait icons). When you hover over a name, the full hierarchical path is displayed (for example, Tencent-CodeBuddy / R&D Department / AI Innovation Team). |
Status | Status is displayed in color blocks: Enabled (green) / Disabled (gray). Policies that are not enabled will not be delivered to clients. |
Update time | Time when the policy was last saved, enabled, or disabled. |
Operation | Provides common operations such as Edit / Enable, Disable / Delete. |
Note:
By default, the list is sorted with enabled policies first and disabled policies at the bottom. Within the same status, policies are sorted by priority number in descending order, allowing administrators to quickly identify the currently active policy with the highest priority.
Step 2: Creating a Policy
Click + New Policy in the upper-right corner of the list to go to the creation page. The Basic Information section is used to configure the policy metadata.
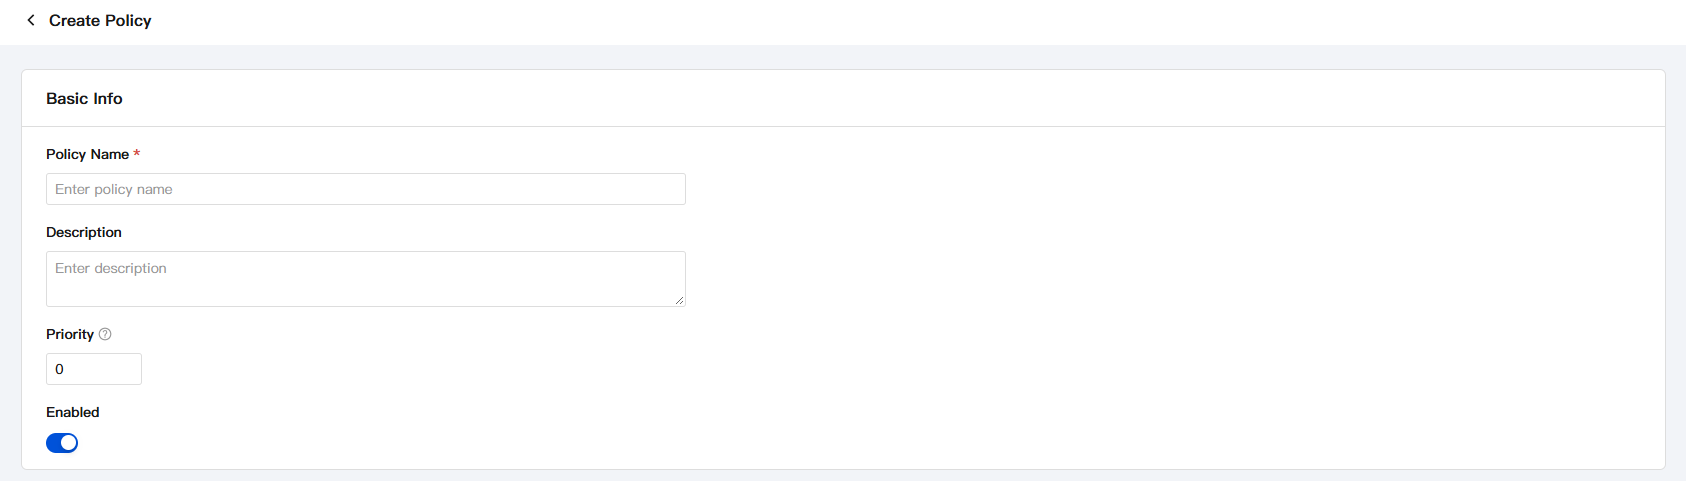
Field | Required | Description |
Policy Name | Required | Unique display name of the policy. Name it based on the use case or department for easy identification. |
Description | Optional. | Used to supplement the purpose and scope of the policy. |
Priority | Required | An integer. Default value: 0. A larger value indicates a higher priority. When the same member matches multiple policies, only the policy with the highest priority takes effect as a whole. The priority value must be globally unique within the enterprise. If a conflict with an existing policy occurs upon saving, the frontend intercepts the operation and prompts the conflicting policy name. Adjust the value and retry. A disabled policy still occupies its value and cannot be reused by other policies. To free up a value for a new policy, delete the old policy or modify its priority first. |
Enabling log access | Required | A switch. Default value: Enabled. After it is disabled, the policy is saved but not delivered to clients. |
Step 3: Policy Configuration
The Sandbox Security tab is used to configure three types of rules for AI execution in the client isolated sandbox: file protection, command control, and network access.
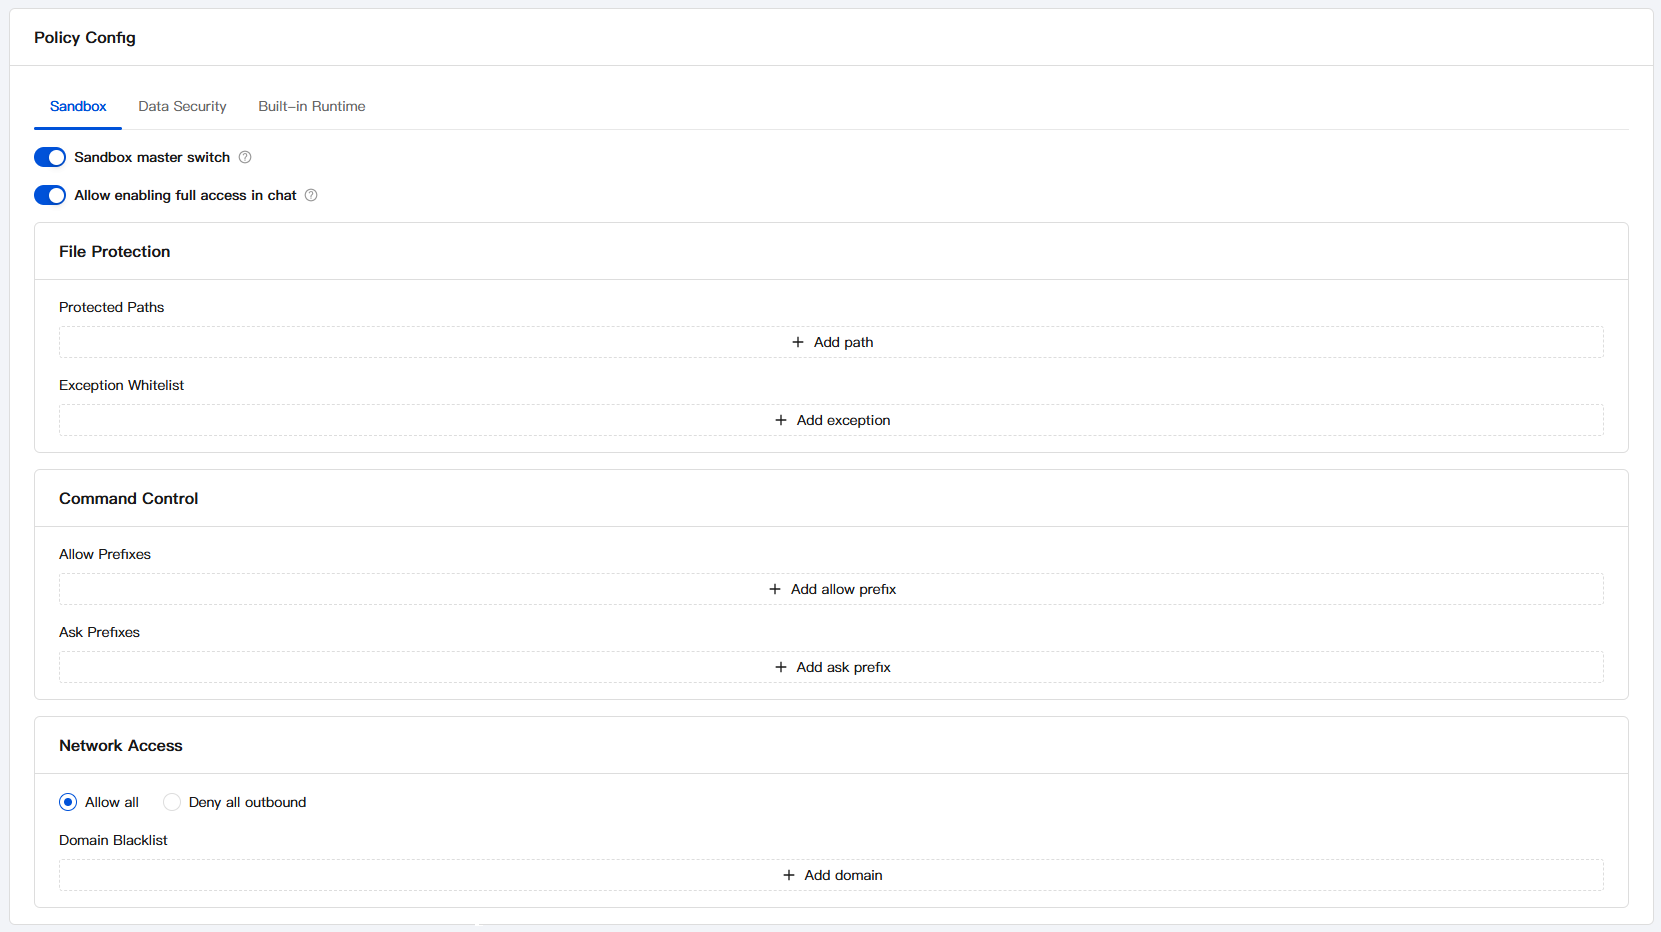
Switch at the top of the page
Switch | Description |
Sandbox security master switch | Enable or disable the sandbox security policy. After it is disabled, all rules under this tab do not take effect. Default value: Enabled. |
Allow enabling full access in conversations | Controls whether the "Allow full access" toggle in the "Default permission ∨" menu below the client input box is available. Defaults to enabled. When this toggle is enabled, members can decide whether to switch to full access mode within a conversation. When this toggle is disabled, the "Allow full access" entry in the client is grayed out and cannot be switched, a tooltip on hover explains the reason, and all sessions are forced to run within the sandbox security constraints. This configuration is independent of the sandbox master switch and the file / command / network rules and does not affect them. It controls the entry for the client session authorization mode, not the sandbox interception switch. |
File Protection
Control which file paths AI can read from and write to.
Field | Description |
Protected path | Sensitive paths that need protection (such as ~/.ssh/* and /etc/*). AI cannot access paths that match this list, and blocked actions are written to audit logs. glob wildcards are supported (*, **, and ?). |
Exception allowlist | Exceptions to protected paths. For example, if /etc/* is protected as a whole, the allowlist can separately allow /etc/hosts to be readable by AI. glob is also supported. |
Command Control
Control which commands AI can execute.
Field | Description |
Allowlist prefix | Commands that match this prefix are executed directly without a confirmation prompt (such as ls, cat, and git status). The prefix is matched against the first segment separated by spaces. |
Prompt prefix | Commands that match this prefix must display a confirmation dialog before execution and require explicit authorization from members (such as rm and sudo). Commands that match neither the allowlist prefix nor the confirmation prefix follow the client's default policy. |
Network Access
Control outbound requests initiated by AI. Select one of the following modes: Allow All or Deny All Outbound Access. Each mode is paired with its corresponding exception list.
Mode | Associated Exception List | Description |
Allow all (default) | Domain blocklist | All outbound requests are allowed by default, and AI cannot access domains that match the domain blocklist. Wildcards are supported, such as *.example.com. |
Forbid all external access | Exception allowlist | All outbound requests are denied by default, and only domains that match the exception allowlist are accessible. This is suitable for strict network isolation scenarios. |
Note:
All block/allow actions for file protection, command control, and network access are logged for subsequent audit and traceability.
Step 4: Policy Configuration · Data Security
The Data Security tab controls the protection policy for AI deletion operations.

Field | Description |
Deletion Protection | Toggle. Enabled by default. When the toggle is enabled, AI prioritizes moving files to the trash or recycle bin when deleting them. When the toggle is disabled, files are permanently deleted in the system default manner. |
Batch Deletion Approval Threshold | Numeric input box. Default value: 20. Takes effect only after deletion protection is enabled. When the number of files deleted by AI in a single operation reaches this threshold, an approval confirmation dialog is triggered, requiring explicit authorization from a member. |
Step 5: Policy Configuration · Built-in Runtime
The Built-in Runtime tab controls which client built-in runtime tools AI can invoke. After the built-in runtime is disabled, AI cannot use any tools in the list.
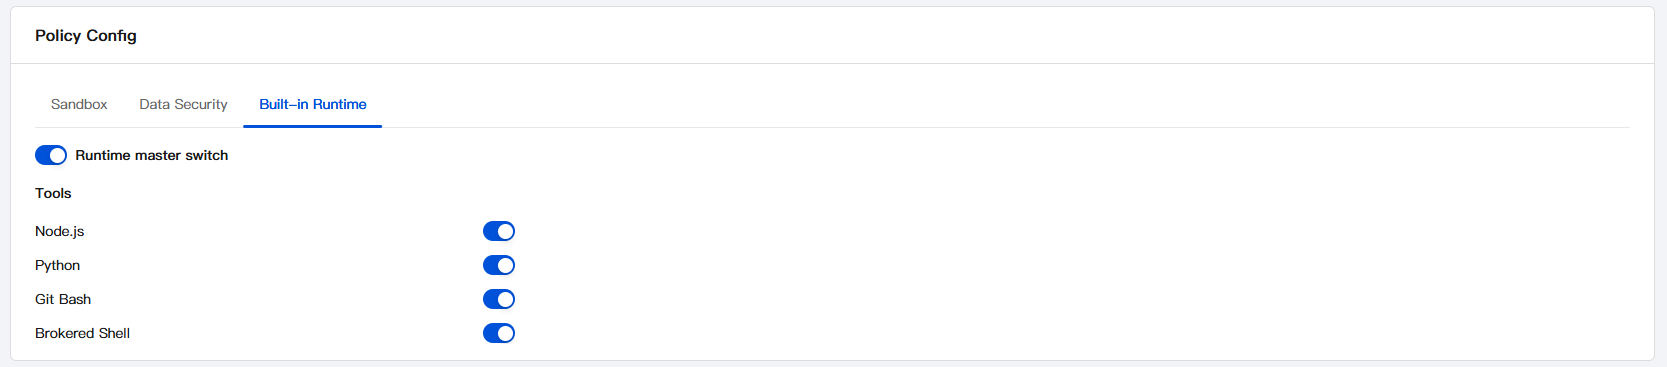
Field | Description |
Built-in runtime master switch | Enables or disables the built-in runtime capability. Enabled by default. After it is disabled, all tools in the tool list become unavailable. |
Node.js | Whether to allow AI to use the built-in Node.js runtime. Enabled by default. |
Python | Whether to allow AI to use the built-in Python runtime. Enabled by default. |
Git Bash | Whether to allow AI to use the built-in Git Bash (commonly used in Windows scenarios). Enabled by default. |
Brokered Shell | Whether to allow AI to use the brokered shell (built-in isolated shell). Enabled by default. |
Note:
Individual tool switches take effect only when the Built-in Runtime master switch is enabled. When the master switch is disabled, tools are unavailable regardless of the status of individual switches.
Step 6: Configuring the Effective Scope
In the Scope module at the bottom of the page, specify the targets for the policy. You can assign it by department or specify individual members. If no selection is made, the policy will not be assigned to any members.

+ Department: Select a department from the organization tree. After a department is selected, all members under the department (including sub-departments) are subject to this policy.
+ Member: Targets specific members, suitable for tightening or relaxing permissions for individual users.
After the selection is complete, the page displays the selected scope and the number of assigned members after deduplication, allowing administrators to verify the actual member coverage of the policy.
Note:
Member and department data is synced from OneID. For details, see the documentation on organizational structure sync.
If the same member is matched by multiple enterprise policies at the same time, only the policy with the highest priority number takes effect as a whole, without field-level merging.
Step 7: Saving and Delivering
After completing the basic information, policy configuration, and scope settings, click Save at the bottom of the page. The policy takes effect immediately and enters the distribution process.
For member clients that are already online, the changes take effect immediately after a restart.
Without a restart, the client backend automatically syncs on a cycle of approximately 10 minutes, and all target members are typically covered within 10 minutes.
Policy Enforcement Logic on Clients
Policies issued by administrators on this page are delivered to clients as the enterprise baseline and take effect after being merged with members' personal configurations, following these principles:
Enterprise policies take precedence: Rules issued by the enterprise serve as the bottom line, and members cannot disable or exceed these enterprise rules on the client. For example, if the enterprise restricts access to
*.tencent.com, members can only further narrow the scope on this basis.Members can add on top: Within the scope allowed by enterprise policies, members can add stricter personal rules on the client.
Intersection principle: When enterprise policies and personal policies conflict, the intersection is applied, with enterprise constraints taking precedence. Member-added rules can only be stricter, not broader.
System authorizations are not managed: OS-level permissions such as full disk access, accessibility, and automation are not within the scope of enterprise distribution. The client labels this section as "Local authorization · Not managed by the enterprise", and members grant these permissions at the system level on their own.
The full access entry is managed: Only when the enterprise policy enables "Allow full access in conversations" can members switch to full access from the "Default permission ∨" menu below the client input box. After it is disabled, the entry is grayed out and cannot be switched in all conversations.
Note:
When the same member is matched by multiple enterprise policies, only the policy with the highest priority number takes effect as a whole, without field-level merging. This means that rules cannot be stacked by relying on "low-priority policies allowing by default and high-priority policies further tightening restrictions." Administrators must specify the complete rule set in a single policy.
Policy Management
Return to the policy list page to manage existing policies as follows:
Edit: Modify the basic information, policy configuration, or effective scope. After saving, the changes are distributed through the same mechanism.
Enable/Disable: Temporarily disable a policy without deleting it. When the policy is disabled, clients are no longer subject to the policy.
Delete: Permanently delete a policy. After deletion, members previously subject to the policy will fall back to the remaining policy with the highest priority (or the client default policy).
Help and Support
Was this page helpful?
You can also Contact sales or Submit a Ticket for help.
Help us improve! Rate your documentation experience in 5 mins.
Feedback