This document describes how to create an image of the system disk of a Linux server.
Directions
Preparations
Check the following before you start:
Note:
If you need to prepare and export a data disk image, skip this operation.
Checking the partitioning and starting mode of the OS
1. Run the following command to check whether the OS partition is an MBR partition.
sudoparted -l /dev/sda |grep'Partition Table'
If msdos is returned, it's an MBR partition and you can proceed to the next step.
If gpt is returned, it's a GPT partition.
2. Run the following commands to check whether the OS starts in EFI mode.
sudols /sys/firmware/efi
If there is a file, the OS starts in EFI mode. Submit a ticket for assistance.
If no file exists, proceed to the next step.
Checking system-critical files
Check system-critical files, including but not limited to the following:
Note:
Follow the distribution standards to ensure that the paths and permissions of the system-critical files are correct and the files can be read and written normally.
/etc/grub2.cfg: It’s recommended to use uuid in the kernel parameter for root mounting. Other methods (such as root=/dev/sda) may cause a system startup failure. The mounting steps are as follows:
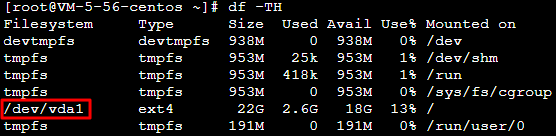
1.1 Run the following command to get the file system name of /root.
df -TH
Obtain the file system name in the result as shown below. In this document, the file system name of the /root is /dev/vda1.
1.2 Run the following command to get the UUID.
sudo blkid /dev/vda1
Note:
The file system UUID is not fixed. Confirm and update it regularly. For example, after the file system is formatted, its UUID will change.
1.3 Run the following command to use VI editor to open the /etc/fstab file.
vi /etc/fstab
1.4 Press i to enter edit mode.
1.5 Move the cursor to the end of the file, press Enter, and add the following content according to the example above:
1.6 Press ESC, enter :wq, and press Enter to save the configuration and exit the editor.
/etc/fstab: Do not attach other disks here, which may cause the system startup failure after migration because the disk is not found.
/etc/shadow: Granted with the read-write permissions.
Uninstalling software
Uninstall the conflicting drivers and software (including VMware tools, Xen tools, Virtualbox GuestAdditions, and other software that comes with underlying drivers).
After the migration to the cloud, hardware changes include but are not limited to:
The graphics card changes to Cirrus VGA.
The disk changes to Virtio Disk. The device name is vda or vdb.
The ENI changes to Virtio Nic. By default, only eth0 is available.
Querying partitions and their sizes
Run the following command to query the current OS partition format and determine the partitions to be copied and their sizes.
mount
A result similar to the following is returned:
proc on /proc type proc (rw,nosuid,nodev,noexec,relatime)
sys on /sys type sysfs (rw,nosuid,nodev,noexec,relatime)
dev on /dev type devtmpfs (rw,nosuid,relatime,size=4080220k,nr_inodes=1020055,mode=755)
run on /run type tmpfs (rw,nosuid,nodev,relatime,mode=755)
/dev/sda1 on / type ext4 (rw,relatime,data=ordered)
securityfs on /sys/kernel/security type securityfs (rw,nosuid,nodev,noexec,relatime)
tmpfs on /dev/shm type tmpfs (rw,nosuid,nodev)
devpts on /dev/pts type devpts (rw,nosuid,noexec,relatime,gid=5,mode=620,ptmxmode=000)
tmpfs on /sys/fs/cgroup type tmpfs (ro,nosuid,nodev,noexec,mode=755)
cgroup on /sys/fs/cgroup/unified type cgroup2 (rw,nosuid,nodev,noexec,relatime,nsdelegate)
cgroup on /sys/fs/cgroup/systemd type cgroup (rw,nosuid,nodev,noexec,relatime,xattr,name=systemd)
pstore on /sys/fs/pstore type pstore (rw,nosuid,nodev,noexec,relatime)
cgroup on /sys/fs/cgroup/cpu,cpuacct type cgroup (rw,nosuid,nodev,noexec,relatime,cpu,cpuacct)
cgroup on /sys/fs/cgroup/cpuset type cgroup (rw,nosuid,nodev,noexec,relatime,cpuset)
cgroup on /sys/fs/cgroup/rdma type cgroup (rw,nosuid,nodev,noexec,relatime,rdma)
cgroup on /sys/fs/cgroup/blkio type cgroup (rw,nosuid,nodev,noexec,relatime,blkio)
cgroup on /sys/fs/cgroup/hugetlb type cgroup (rw,nosuid,nodev,noexec,relatime,hugetlb)
cgroup on /sys/fs/cgroup/memory type cgroup (rw,nosuid,nodev,noexec,relatime,memory)
cgroup on /sys/fs/cgroup/devices type cgroup (rw,nosuid,nodev,noexec,relatime,devices)
cgroup on /sys/fs/cgroup/pids type cgroup (rw,nosuid,nodev,noexec,relatime,pids)
cgroup on /sys/fs/cgroup/freezer type cgroup (rw,nosuid,nodev,noexec,relatime,freezer)
cgroup on /sys/fs/cgroup/net_cls,net_prio type cgroup (rw,nosuid,nodev,noexec,relatime,net_cls,net_prio)
cgroup on /sys/fs/cgroup/perf_event type cgroup (rw,nosuid,nodev,noexec,relatime,perf_event)
systemd-1 on /home/libin/work_doc type autofs (rw,relatime,fd=33,pgrp=1,timeout=0,minproto=5,maxproto=5,direct,pipe_ino=12692)
systemd-1 on /proc/sys/fs/binfmt_misc type autofs (rw,relatime,fd=39,pgrp=1,timeout=0,minproto=5,maxproto=5,direct,pipe_ino=12709)
debugfs on /sys/kernel/debug type debugfs (rw,relatime)
mqueue on /dev/mqueue type mqueue (rw,relatime)
hugetlbfs on /dev/hugepages type hugetlbfs (rw,relatime,pagesize=2M)
tmpfs on /tmp type tmpfs (rw,nosuid,nodev)
configfs on /sys/kernel/config type configfs (rw,relatime)
tmpfs on /run/user/1000 type tmpfs (rw,nosuid,nodev,relatime,size=817176k,mode=700,uid=1000,gid=100)
gvfsd-fuse on /run/user/1000/gvfs type fuse.gvfsd-fuse (rw,nosuid,nodev,relatime,user_id=1000,group_id=100)
According to the result, the root partition resides in /dev/sda1, no independent partitions reside in /boot or /home, sda1 contains the boot partition, and mbr is missing. Therefore, we only need to copy the entire sda.
Note:
The exported image should contain at least the root partition and mbr. If mbr is missing, the operating system cannot be started.
If /boot and /home are independent partitions in the current operating system, the exported image should also contain them.
Exporting an image
Choose the appropriate image export method as needed.
Using a platform tool to export an image
Using commands to export an image
For details about how to use the image export tools of virtualization platforms, such as VMWare vCenter Convert and Citrix XenConvert, see the tool documentations on these platforms.
Note:
Tencent Cloud Service Migration supports images in qcow2, vhd, raw, and vmdk formats.
Note:
This method poses higher risks. For example, the file system's metadata may be corrupted when I/O is busy. We recommended that you check the image to make sure that the image is intact and correct after it is exported.
You can use either the qemu-img or dd command to export an image.
Use the qemu-img command
Run the following command to install the required package. This document uses Debian as an example. The package name may vary by distributions, such as qemu-img for CentOS.
apt-getinstall qemu-utils
Run the following command to export /dev/sda to /mnt/sdb/test.qcow2.
sudo qemu-img convert -f raw -O qcow2 /dev/sda /mnt/sdb/test.qcow2
In this command, /mnt/sdb indicates the mounted new disk or another network storage.
To convert its format, modify the value of the -O parameter to one of the following:
Parameter Value
Description
qcow2
qcow2 format
vhd
vhd format
vmdk
vmdk format
raw
No format
Using the dd command
For example, run the following command to export an image in raw format.
The count parameter specifies the number of partitions to be copied, which can be queried by running the fdisk command. To copy all partitions, ignore count.
For example, run the following command to view the number of partitions of /dev/sda.
fdisk -lu /dev/sda
Disk /dev/sda: 1495.0 GB, 1494996746240 bytes
255 heads, 63 sectors/track, 181756 cylinders, total 2919915520 sectors
Units = sectors of 1 * 512=512 bytes
Sector size (logical/physical): 512 bytes / 4096 bytes
I/O size (minimum/optimal): 4096 bytes / 4096 bytes
Disk identifier: 0x0008f290
According to the result of the fdisk command, the sda1 ends at 41945087 * 512 bytes, so set count to 20481 M.
Refer to Image Format Conversion and use qemu-img to convert the original image into a supported format.
Checking the image
Note:
The image file system that you prepare may be corrupted because you prepared the image without stopping the service or due to other reasons. Therefore, we recommend that you check the image after preparing it.
If the image format is supported by the current platform, you can directly open and check the image file system. For example, the Windows platform supports VHD images, the Linux platform allows you to use qemu-nbd to open QCOW2 images, and the Xen platform allows you to directly open VHD files. This document uses the Linux platform as an example:
1. Run the following commands in sequence to check whether the nbd component exists.
modprobe nbd
lsmod |grep nbd
If a result similar to the following is returned, the nbd component exists. If nothing is returned, check whether the kernel compilation option CONFIG_BLK_DEV_NBD is enabled. If not, enable it or change the system before compiling the kernel again.
2. Run the following commands in sequence to check the image.
qemu-nbd -c /dev/nbd0 xxxx.qcow2
mount /dev/nbd0p1 /mnt
After you run the qemu-nbd command, /dev/nbd0 maps to xxx.qcow2, and /dev/nbd0p1 indicates the first partition of the virtual disk. If nbd0p1 does not exist or mount fails, the image may be incorrect.
You can also start the CVM to check whether the image file works before uploading the image.


 Yes
Yes
 No
No
Was this page helpful?