Migrating Data from InnoDB to RocksDB with DTS
Download
Focus Mode
Font Size
TXRocks is a transactional storage engine developed by Tencent's TXSQL team based on RocksDB, a very popular high-performance persistent key-value (KV) store.
Compared with the B+tree structure used by InnoDB, the LSM tree structure adopted by TXRocks uses much less storage space. InnoDB's B+tree split often results in half-full pages, idle pages, and space waste; therefore, InnoDB has a lower effective page utilization. The size of TXRocks SST files is generally set to dozens or hundreds of MB or a greater value. Therefore, TXRocks has much fewer wastes caused by 4K alignment. Although an SST file is divided into blocks, those blocks don't need to be aligned. In addition, TXRocks SST files use prefix compression, so that only one record will be generated for data records with the same prefix. SST files at different levels can adopt different compression algorithms, further reducing the storage space overheads. Generally, the storage space usage can be reduced by 50%.
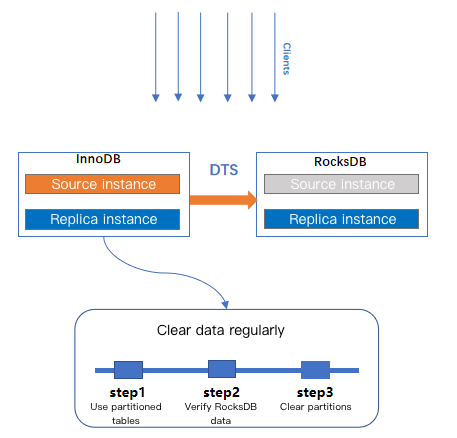
You can sync InnoDB data to RocksDB through DTS to improve the write performance and save the storage space.
Note:
Data Transmission Service (DTS) is a data transmission service that integrates such features as data migration, sync, and subscription, helping you migrate your databases without interrupting your business and build a high-availability database architecture for remote disaster recovery through real-time sync channels. Its data subscription feature grants you real-time access to incrementally updated data in your TencentDB instance, so that you can consume such data based on your business needs.
Notes
When using DTS for data sync, make sure that incremental data is synced to RocksDB and DELETE operations are blocked.
After data is transferred to RocksDB, check the data validity first and then clear the data in the source database to reduce the storage space usage.
You can use partitioned tables for source tables to improve the data clearing efficiency (pay attention to the use limits of partitioned tables and note that target tables don't support partitioning).
RocksDB performs compaction operations regularly to effectively reduce the storage space usage.
For more information on the RocksDB engine, see Instructions.
Directions
1. Log in to the DTS console, select Data Migration on the left sidebar, and click Create Migration Task to enter the Create Migration Task page.
2. On the Create Migration Task page, select the types, regions, and specifications of the source and target instances and click Buy Now.
Configuration Item | Description |
Source Instance Type | Select the source database type, which cannot be changed after purchase. Here, select MySQL. |
Source Instance Region | Select the source database region. If the source database is a self-built one, select a region nearest to it. |
Target Instance Type | Select the target database type, which cannot be changed after purchase. Here, select MySQL. |
Target Instance Region | Select the target database region. |
Specification | Select the specification of the migration linkage according to your business conditions. For the performance and billing details of different specifications, see Billing Overview. |
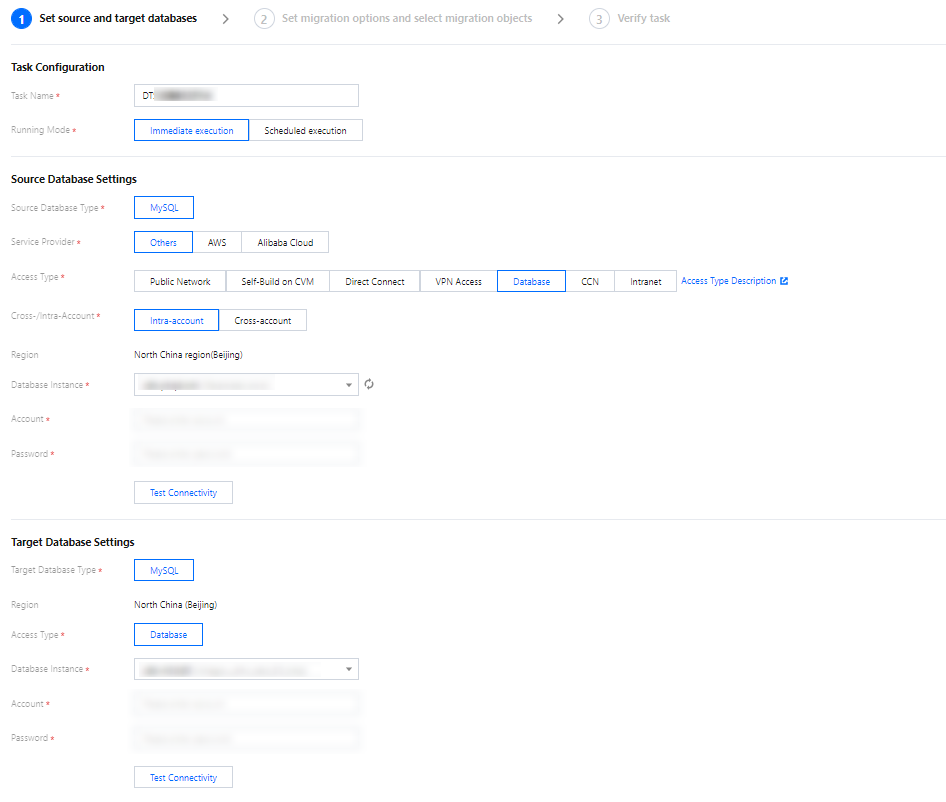
3. In the Operation column of the migration task, select More > Configure. On the Set source and target databases page, configure the task, source database, and target database settings. After the source and target databases pass the connectivity test, click Save.
Note:
If the connectivity test fails, troubleshoot and fix the problem as prompted and as instructed in Database Connection Check and try again.
4. On the Set migration options and select migration objects page, configure the migration type and objects and click Save.
Note:
If you want to use a tool such as gh-ost and pt-osc to perform online DDL operations on a table during migration, you must select the entire database (or entire instance) where the table resides rather than only the table as the migration object; otherwise, the temporary table data generated by online DDL changes cannot be migrated to the target database.
If you want to rename a table (for example, rename table A table B) during migration, you must select the entire database (or entire instance) where table A resides rather than only table A as the migration object; otherwise, the system will report an error.
Configuration Item | Description |
Migration Type | Select a type based on your scenario. Structural migration: Structured data such as databases and tables in the source database will be migrated. Full migration: The entire database will be migrated. The migrated data will only be existing content of the source database when the task is initiated but not include the incremental data written to the source database after the task is initiated. Full + Incremental migration: The migrated data will include the existing content of the source database when the task is initiated as well as the incremental data written to the source database after the task is initiated. If there are data writes to the source database during migration, and you want to smoothly migrate the data in a non-stop manner, select this option. |
Migration Object | Entire instance: Migrate the entire database instance excluding the system databases such as `information_schema`, `mysql`, `performance_schema`, and `sys`. Specified objects: Migrate specified objects. |
Specified objects | Select the objects to be migrated in Source Database Object and move them to the Selected Object box. |
Migrate Account | Select this feature if you want to migrate the account information of the source database. |
5. On the task verification page, verify the task. After the verification is passed, click Start Task.
6. Return to the data migration task list, and you can see that the task has entered the Preparing status. After 1–2 minutes, the data migration task will be started.
Select Structural migration or Full migration: Once completed, the task will be stopped automatically.
Select Full + Incremental migration: After full migration is completed, the migration task will automatically enter the incremental data sync stage, which will not stop automatically. You need to click Complete to manually stop the incremental data sync.
Manually complete incremental data sync and business switchover at appropriate time.
Observe whether the migration task is in the incremental sync stage and is not in the lag status. If so, stop writing data to the source database for a few minutes.
Manually complete incremental sync when the data gap between the target and the source databases is 0 MB and the time lag between them is 0 seconds.

7. After the migration task status becomes Task successful, the InnoDB data has been synced to RocksDB.
Help and Support
Was this page helpful?
You can also Contact sales or Submit a Ticket for help.
Help us improve! Rate your documentation experience in 5 mins.
Feedback