This document describes how to use the data migration feature of DTS to migrate data from SQL Server to TencentDB for SQL Server.
Notes
When DTS performs full data migration, it will occupy certain source instance resources, which may increase the load of the source instance and the database pressure. If your database has low configurations, we recommend that you migrate data during off-peak hours.
Full migration is implemented with tables locked, during which write operations will be blocked for seconds.
The source and target databases must meet the requirements for the migration feature and version as instructed in Databases Supported by Data Migration.
The service where the source database is located must open the file sharing port 445.
The source database must be set to "full recovery mode", and we recommend you make a full backup before migration.
The local disk space of the source database must be large enough, so that the remaining free space can fit the size of the database to be migrated.
If the source instance is not a TencentDB for SQL Server or TencentDB for SQL Server Basic Edition instance (such as a public network/CVM-based self-built instance or instance on another cloud), an account with the sysadmin permission needs to be used in the target database for migration, and the xp_cmdshell stored procedure must be able to run. If the source instance is a TencentDB for SQL Server High-Availability Edition or Cluster Edition instance, there is no permission restriction on the target database account.
You need to change to the built-in account "Local System" for SQL service startup in the source database. The source database account is unrestricted but needs to have the sysadmin permissions.
The SQL service of the source database is running, and the login identity's built-in account in the startup configuration needs to be changed to Local System.
Note:
The SQL Server service needs to be restarted after the account is changed.
Application restrictions
Only one migration task can be initiated at any time for the same source instance.
Currently, cross-region migration is supported between the Chinese mainland and Hong Kong (China) but not between other regions.
Only database-level migration is supported (i.e., all objects in the database must be migrated together), while single-table migration is not supported.
Logins, job agents, triggers, and database links (link server) at the instance level cannot be migrated.
Operation restrictions
Do not modify or delete user information (including username, password, and permissions) in the source and target databases and port numbers during migration; otherwise, the migration task will fail.
Do not perform transaction log backup during incremental sync; otherwise, the transaction log will be truncated and become discontinuous.
If you only perform full data migration, do not write new data into the source instance during migration; otherwise, the data in the source and target instances will be inconsistent. In scenarios with data writes, to ensure the data consistency in real time, we recommend you select full + incremental data migration.
For full + incremental data migration, after you click Complete and the task status becomes Completed, do not write new data to the source database. We recommend you stop writing for at least two minutes; otherwise, the data in the source and target databases may be inconsistent.
Supported SQL operations
Operation Type
Supported SQL Operations
DML
INSERT, UPDATE, DELETE, and REPLACE
DDL
TABLE: CREATE TABLE, ALTER TABLE, DROP TABLE, TRUNCATE TABLE, and RENAME TABLE
VIEW: CREATE VIEW, ALTER VIEW, and DROP VIEW
INDEX: CREATE INDEX and DROP INDEX
DATABASE: CREATE DATABASE, ALTER DATABASE, and DROP DATABASE
Environment requirements
Note:
The system will automatically check the following environment requirements before starting a migration task and report an error if a requirement is not met. If you can identify the failed check item, fix it as instructed in Database Connection Check; otherwise, wait for the system verification to complete and fix the problem according to the error message.
Type
Environment Requirements
Source database requirements
The service where the source instance resides must open the file sharing port 445.
The source and target databases can be connected.
The server where the source database resides must have enough outbound bandwidth; otherwise, the migration speed will be affected.
Target database requirements
Only migration from Basic Edition to High Availability Edition (including Dual-Server High Availability Edition and Cluster Edition) is supported, and the version number of the target instance must be later than that of the source database.
The target database cannot have the same name as the source database.
The disk space of the target database must be at least 1.5 times the size of the source database.
The target database cannot have access requests or active businesses; otherwise, migration will fail.
Directions
1. Log in to the DTS console, select Data Migration on the left sidebar, and click Create Migration Task to enter the Create Migration Task page.
2. On the Create Migration Task page, select the types, regions, and specifications of the source and target instances and click Buy Now.
Configuration Item
Description
Source Instance Type
Select the source database type, which cannot be changed after purchase. In this scenario, select SQL Server.
Source Instance Region
Select the source database region. If the source database is a self-built one, select a region nearest to it.
Target Instance Type
Select the target database type, which cannot be changed after purchase. In this scenario, select SQL Server.
Target Instance Region
Select the target database region.
Specification
Select the specification of the migration link based on your business conditions. For the performance and billing details of different specification, see Billing Overview.
3. On the Set source and target databases page, configure the task, source database, and target database settings. After the source and target databases pass the connectivity test, click Create.
Note:
If the connectivity test fails, troubleshoot as prompted or as instructed in Database Connection Check and try again.
Setting Type
Configuration Item
Description
Task Configuration
Task Name
Set a task name that is easy to identify.
Running Mode
Immediate execution: The task will be started immediately after the task verification is passed.
Scheduled execution: You need to configure a task execution time and the task will be started automatically then.
Tag
Tags are used to manage resources by category in different dimensions. If the existing tags do not meet your requirements, go to the console to create more.
Source Database Settings
Source Database Type
The source database type selected during purchase, which cannot be changed.
Region
The source database region selected during purchase, which cannot be changed.
Access Type
Select a type based on your scenario. In this scenario,
Database
is selected as an example. For the preparations for different access types, see
Public Network: The source database can be accessed through a public IP.
Self-Build on CVM: The source database is deployed in a CVM instance.
Direct Connect: The source database can be interconnected with VPCs through Direct Connect.
VPN Access: The source database can be interconnected with VPCs through VPN Connections.
Database: The source database is a TencentDB instance.
CCN: The source database can be interconnected with VPCs through CCN.
For a third-party cloud database, you can select
Public Network
generally or select
VPN Access
,
Direct Connect
, or
CCN
based on your actual network conditions.
Database Instance
Select the instance ID of the source database.
Account
Account of the source SQL Server database, which must have the required permissions.
Password
Password of the source SQL Server database.
Target Database Settings
Target Database Type
The target database type selected during purchase, which cannot be changed.
Region
The target database region selected during purchase, which cannot be changed.
Access Type
Select a type based on your scenario. In this scenario, select Database.
Database Instance
Select the instance ID of the target database.
Account
Account of the target database, which must have the required permissions.
Password
Password of the target database.
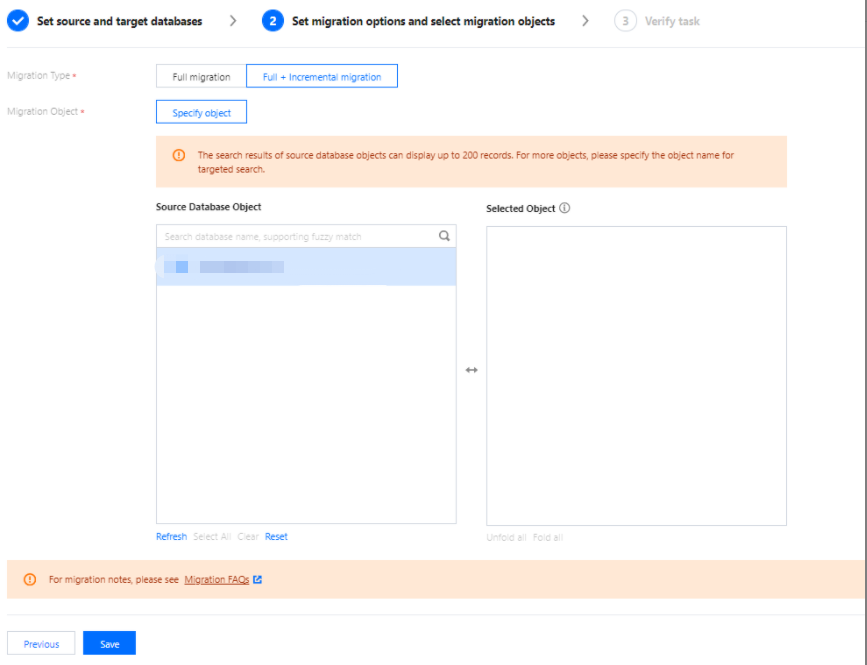
4. On the Set migration options and select migration objects page, configure the migration type and objects and click Save.
Configuration Item
Description
Migration Type
Select a type based on your scenario.
Full migration: The entire database will be migrated. The migrated data will only be existing content of the source database when the task is initiated but not include the incremental data written to the source database after the task is initiated.
Full + Incremental migration: The migrated data will include the existing content of the source database when the task is initiated as well as the incremental data written to the source database after the task is initiated. If there are data writes to the source database during migration, and you want to smoothly migrate the data in a non-stop manner, select this option.
Specified objects
Only database-level migration is supported; that is, all objects in the specified database must be migrated together. Select the database to be migrated in Source Database Object and move it to the Selected Object box.
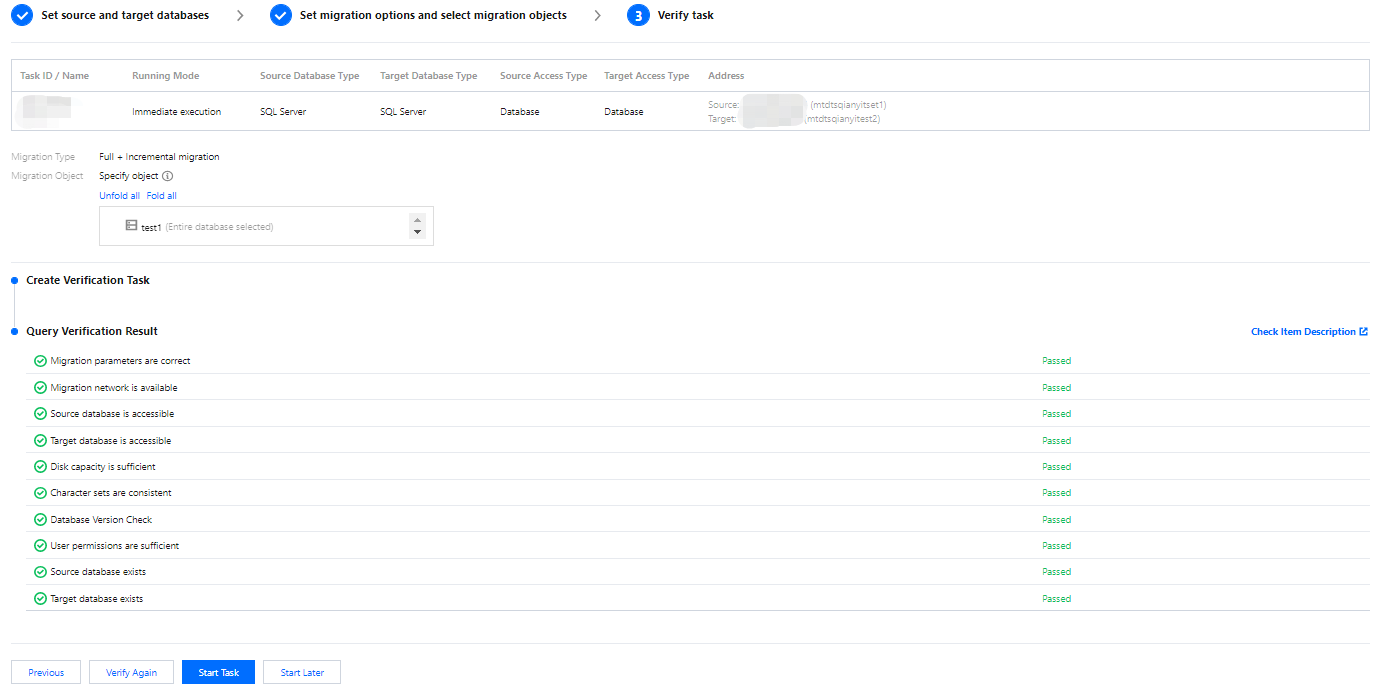
5. On the task verification page, verify the task. After the verification is passed, click Start Task.
If the verification failed, fix the problem as instructed in Database Connection Check and initiate the verification task again.
Failed: It indicates that a check item fails and the task is blocked. You need to fix the problem and run the verification task again.
Alarm: It indicates that a check item doesn't completely meet the requirements, and the task can be continued, but the business will be affected. Before continuing the task, you need to assess whether to ignore the alarm or fix the problem as prompted.
6. Return to the data migration task list, and you can see that the task has entered the Preparing status. After 1–2 minutes, the data migration task will be started.
Select Full migration: Once completed, the task will be stopped automatically.
Select Full + Incremental migration: After full migration is completed, the migration task will automatically enter the incremental data sync stage, which will not stop automatically. You need to click Complete to manually stop the incremental data sync.
Manually complete incremental data sync and business switchover at appropriate time.
After the migration stage status becomes Prepared, stop writing data to the source database for a few minutes and then manually complete incremental sync.
7. (Optional) If you want to view, delete, or perform other operations on a task, click the task and select the target operation in the Operation column. For more information, see Viewing Task.
8. After the migration task status becomes Task successful, you can formally cut over the business. For more information, see Cutover Description.


 Yes
Yes
 No
No
Was this page helpful?