Eliminating Instances Securely
Download
Focus Mode
Font Size
Before an instance is eliminated, ensure that all business traffic is successfully migrated to prevent an adverse impact on business. Below are the specific operation schemes to ensure that instances can be eliminated securely.
Step 1: Confirming Whether an Instance Has Any Unreleased Access
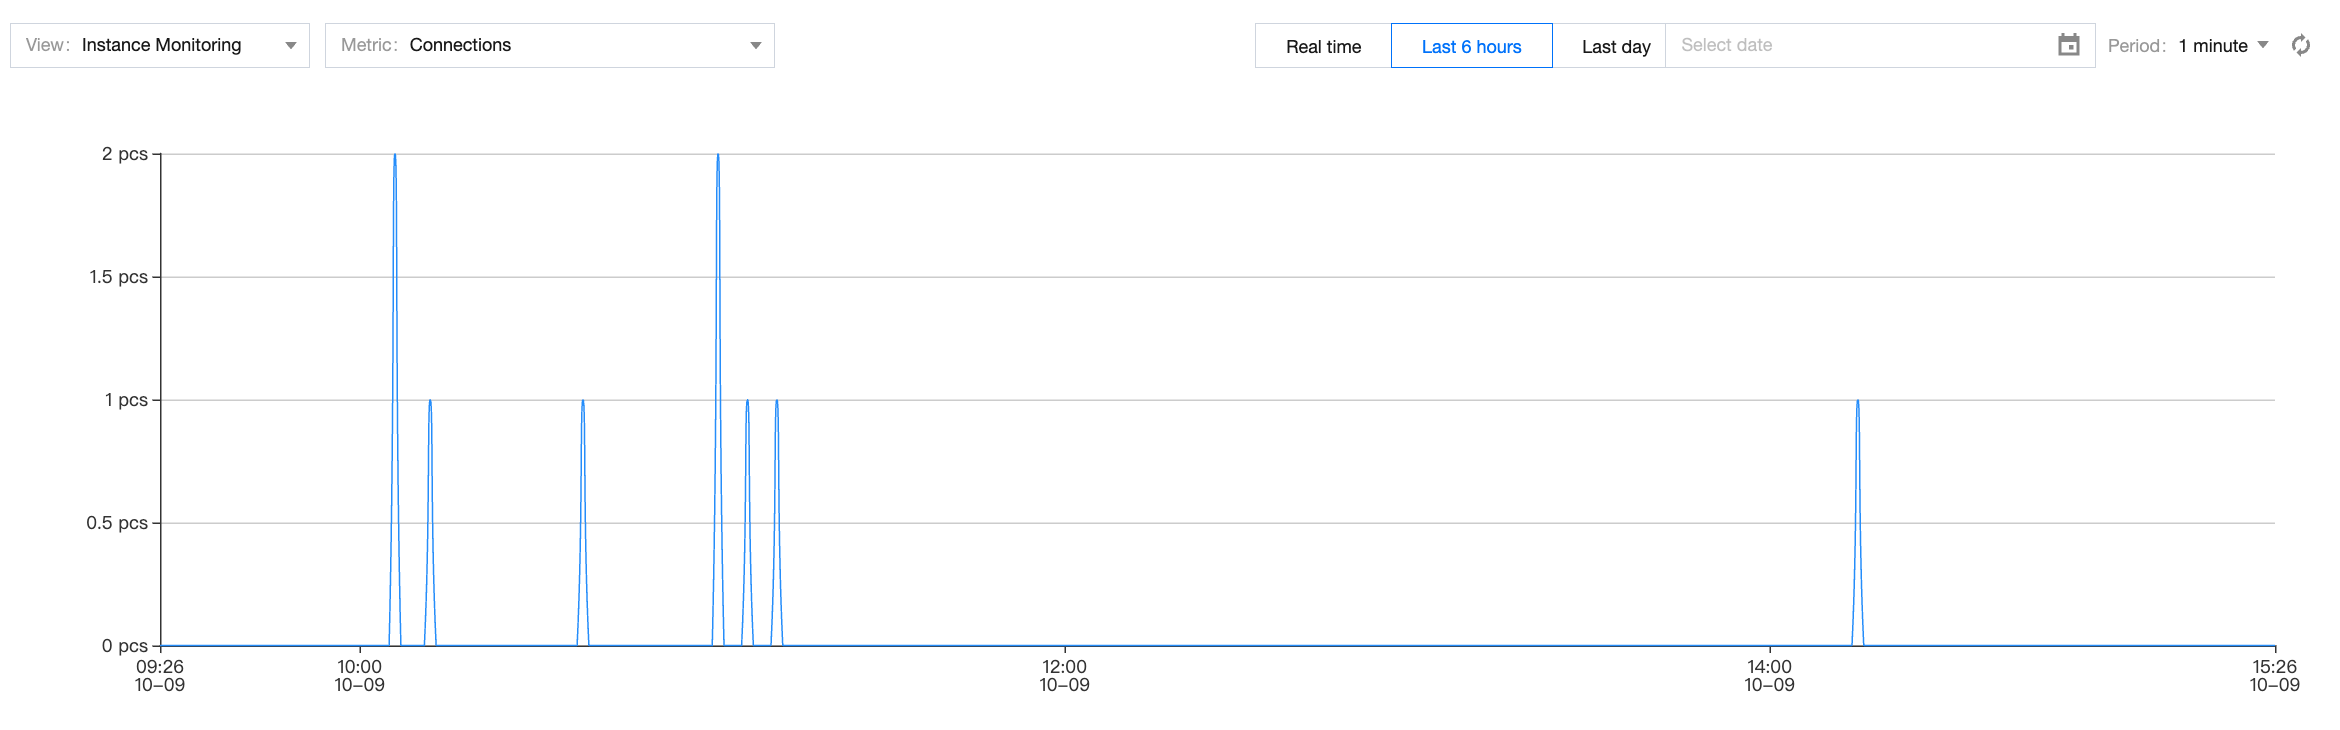
1. Log in to the Tencent Cloud Distributed Cache console and click the Instance ID to go to the Instance Details page. Switch to the System Monitoring > Monitoring Metric page.
2. In the drop-down list of View, select Instance Monitoring. In the drop-down list of Metric, select Connections and Total Requests. Set the Period to 5 Seconds.
3. Under the monitoring view for instance monitoring metrics Connections and Total Requests, confirm whether there is unreleased connection access, taking the number of connections as an example, as shown in the figure below. If the number of requested connections or connections is not 0, execute Step 2.
Step 2: Counting Access Source Addresses
1. Call the TencentDB for DBbrain (DBbrain) API DescribeRedisProcessList to obtain the list of real-time session details of the instance and confirm the source IP addresses of all access proxy nodes.
Note:
DescribeRedisProcessList is a real-time API. The business side needs to write scripts to continually collect the IP addresses accessing the instance (if any) through this API (it is recommended not to exceed 24 hours).
Reasonably control the frequency and duration of API calls to reduce performance overhead on the instance proxy, and avoid inducing performance fluctuations such as slow queries. If the instance needs to handle other businesses, potential impacts should be carefully assessed.
2. Perform aggregation analysis on the obtained IP addresses. If no expected IP address accesses the instance within the specified time period, execute Step 3.
Step 3: Disconnecting Instance Access Sources
After it is confirmed that there are no expected access sources, the access path to the instance should be disconnected to check whether the business experiences any errors.
Scheme 1: Changing the Password
Note:
Before the password is reset, ensure that users remember the current password so that it can be reverted in case of any business exceptions, allowing for a quick rollback of the instance to its original status.
Changing the password only affects newly established connections and leaves existing ones unaffected. If the business involves a continuous, persistent connection, no error prompts will be triggered. In this case, adopt Scheme 2.
1. Log in to the Tencent Cloud Distributed Cache console, and find the target instance in the instance list.
2. Click the target Instance ID to go to the Instance Details page, switch to the Account Management page, and find the Default Account or custom account for which you need to change the password in the account list. In the Operation column, click Reset Password, to change the password for accessing instances. For password complexity requirements and specific operations, see Resetting Passwords.

Scheme 2: Modifying the Network to Which the Instance Belongs
Note:
Before the VIP configuration is modified, back up the current VIP information so that if any issues occur in the business, you can revert to the original VIP address quickly to roll back to the previous status. Additionally, the original VIP address may be occupied by other instances, which poses a risk of rollback failure.
1. Log in to the Tencent Cloud Distributed Cache console, and find the target instance in the instance list.
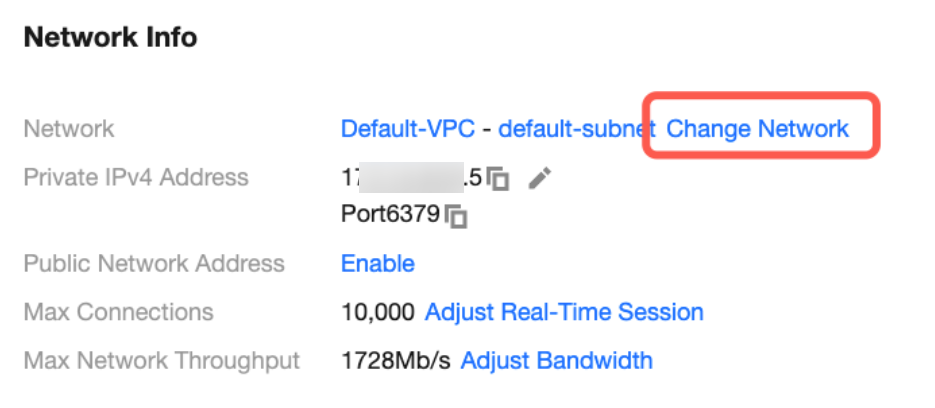
2. Click the target instance ID to go to the Instance Details page.
3. On the Instance Details page, the network to which the current Redis instance belongs and the private network address can be viewed under the Network Information area. Click Change Network next to Network and then configure the new network information in the Change Network dialog box. For specific operations, see Changing Network.
Step 4: Isolating an Instance
Log in to the Tencent Cloud Distributed Cache console, select the instance to be isolated in the instance list. Return and isolate the instance in the Operation column. For specific operations and isolation details, see Returning and Isolating Instances. To recover an isolated instance, pay attention to the retention period of the instance in the recycle bin. For specific recovering operations, see Recovering Isolated Instances.
Note:
Before an instance is terminated, it is recommended to create a backup file and download it to the local computer for storage on the Backup and Restoration page. For specific operations, see Downloading Backup Files.
Clicking Offline Now in the recycle bin can delete and terminate an instance immediately, including data and process. Proceed with caution according to the actual needs. For specific operations, see Immediately Eliminating Instances.
Help and Support
Was this page helpful?
You can also Contact sales or Submit a Ticket for help.
Help us improve! Rate your documentation experience in 5 mins.
Feedback