Memperluas Partisi GPT dan Sistem File (Lebih dari 2 TB)
Download
Mode fokus
Ukuran font
Terakhir diperbarui: 2025-09-19 14:29:50
Ikhtisar
Jika disk cloud Anda memiliki partisi GPT yang berisi sistem file, Anda dapat menggunakan salah satu metode berikut untuk memperluas partisi dan sistem file:
Anda dapat menggunakan alat perluasan otomatis termasuk e2fsck dan resize2fs untuk menambahkan kapasitas disk cloud yang diperluas ke sistem file yang ada di CVM Linux.Untuk memastikan perluasan yang sukses, persyaratan berikut harus dipenuhi:
Cara untuk memperluas dan mempartisi telah dikonfirmasi.Untuk informasi selengkapnya, lihat Menentukan Metode Perluasan.
Sistem file-nya adalah EXT atau XFS.
Sistem file saat ini tidak memiliki kesalahan.
Petunjuk
Menetapkan kapasitas yang diperluas ke partisi GPT yang ada
1. Jalankan perintah berikut sebagai pengguna root untuk mengonfirmasi perubahan kapasitas disk cloud.
parted<Disk path> print
Dengan menggunakan jalur disk /dev/vdc sebagai contoh, jalankan perintah berikut:
parted /dev/vdc print
Jika pesan seperti yang ditunjukkan pada gambar berikut muncul dalam proses, masukkan Fix.
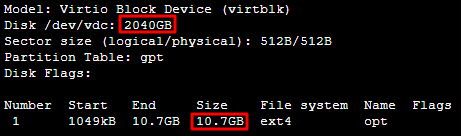
Ukuran disk cloud adalah 2.040 GB setelah perluasan dan kapasitas partisi yang ada adalah 10,7 GB, seperti yang ditunjukkan pada gambar berikut:
2. Jalankan perintah berikut untuk memeriksa apakah disk cloud memiliki partisi yang terpasang.
mount|grep'<Disk path>'
Dengan menggunakan jalur disk /dev/vdc sebagai contoh, jalankan perintah berikut:
mount|grep'/dev/vdc'
Hasil berikut menunjukkan bahwa disk cloud memiliki satu partisi (vdc1) yang dipasang ke /data.
Jalankan perintah berikut untuk melepas semua partisi dari disk cloud.
umount<Mount point>
Dengan menggunakan titik pemasangan /data sebagai contoh, jalankan perintah berikut:
umount /data
Hasil berikut menunjukkan bahwa tidak ada partisi yang terpasang.Lanjutkan ke langkah berikutnya.
3. Jalankan perintah berikut untuk menggunakan alat partisi parted.
parted'<Disk path>'
Dengan menggunakan jalur disk /dev/vdc sebagai contoh, jalankan perintah berikut:
parted'/dev/vdc'
4. Jalankan perintah berikut untuk mengubah unit dari pengaturan default "GB" menjadi "sector" untuk tampilan dan pengoperasian.
unit s
5.
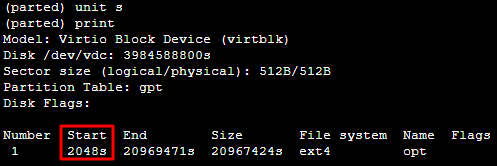
Jalankan perintah berikut untuk melihat partisi dan mencatat nilai Start.
print
Perhatian:
Catat nilai Start.Setelah partisi dihapus dan partisi yang baru dibuat, nilai Start harus tetap tidak berubah.Jika tidak, data akan hilang.
6. Jalankan perintah berikut untuk menghapus partisi yang ada.
rm<Partition Number>
Misalnya, jalankan perintah berikut untuk menghapus partisi “1” dari disk cloud.
rm1
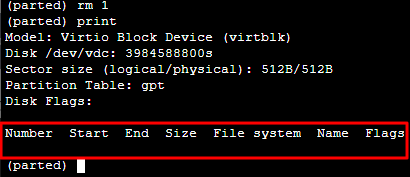
7. Jalankan perintah berikut untuk mengonfirmasi penghapusan.Informasi yang dikembalikan adalah seperti yang ditunjukkan di bawah ini:
print
Perhatian:
Anda dapat segera menjalankan perintah rescue, dan memasukkan nilai Start dan End saat diminta untuk memulihkan partisi yang terhapus secara tidak sengaja.
8. Jalankan perintah berikut untuk membuat partisi utama baru.
mkpart primary <Sektor awal dari partisi asli>100%
100% dalam perintah menunjukkan partisi ini untuk akhir disk.Masukkan nilai Start yang diperoleh di langkah 5.Dalam dokumen ini, sektor awal dari partisi asli adalah 2048s (yaitu, nilai Start adalah 2048s), jalankan perintah berikut:
mkpart primary 2048s 100%
Jika status muncul seperti yang ditunjukkan pada gambar berikut, masukkan Ignore.
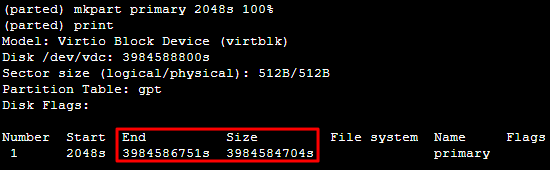
9. Jalankan perintah berikut untuk memeriksa apakah partisi baru telah berhasil dibuat.
print
Jika hasil seperti yang ditunjukkan pada gambar berikut dikembalikan, partisi baru telah berhasil dibuat.
10. Jalankan perintah berikut untuk menutup alat parted.
quit
11. Jalankan perintah berikut untuk memeriksa partisi yang diperluas.
e2fsck -f <Partition path>
12. Dengan menggunakan partisi baru “1” (jalur partisinya adalah /dev/vdc1) sebagai contoh, jalankan perintah berikut:
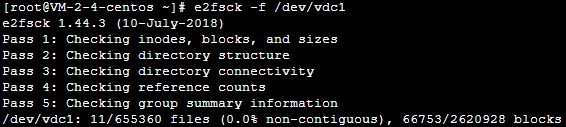
e2fsck -f /dev/vdc1
Gambar berikut menunjukkan output perintah.
13. Gunakan perintah khusus sistem file untuk mengubah ukuran setiap sistem file di partisi baru.
Jalankan perintah berikut pada Sistem file EXT.
resize2fs <Partition path>
Dengan menggunakan jalur partisi `/dev/vdc1 sebagai contoh, jalankan perintah berikut:
resize2fs /dev/vdc1
Jika hasil seperti yang ditunjukkan pada gambar berikut dikembalikan, perluasan berhasil.
Jalankan perintah berikut pada sistem file XFS.
xfs_growfs <Partition path>
Dengan menggunakan jalur partisi /dev/vdc1 sebagai contoh, jalankan perintah berikut:
xfs_growfs /dev/vdc1
14. Jalankan perintah berikut untuk memasang partisi baru secara manual.
mount<Partition path><Mount point>
Dengan menggunakan jalur partisi /dev/vdc1 dan titik pemasangan /data sebagai contoh, jalankan perintah berikut:
mount /dev/vdc1 /data
15. Jalankan perintah berikut untuk melihat partisi baru.
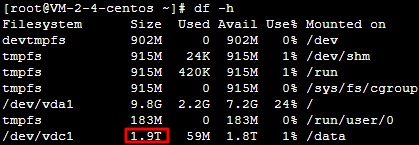
df -h
Jika hasil seperti yang ditunjukkan pada gambar berikut dikembalikan, pemasangan berhasil, dan Anda dapat melihat disk data.
Memformat kapasitas yang diperluas menjadi partisi GPT baru yang terpisah
1. Jalankan perintah berikut sebagai pengguna root untuk mengonfirmasi perubahan kapasitas disk cloud.
parted<Disk path> print
Dengan menggunakan jalur disk /dev/vdc sebagai contoh, jalankan perintah berikut:
parted /dev/vdc print
Jika pesan seperti yang ditunjukkan pada gambar berikut muncul dalam proses, masukkan Fix.
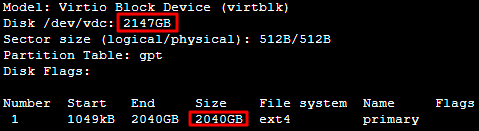
Ukuran disk cloud adalah 2.147 GB setelah perluasan dan kapasitas partisi yang ada adalah 2.040 GB, seperti yang ditunjukkan pada gambar berikut.
2. Jalankan perintah berikut untuk memeriksa apakah disk cloud memiliki partisi yang terpasang.
mount|grep'<Disk path>'
Dengan menggunakan jalur disk /dev/vdc sebagai contoh, jalankan perintah berikut:
mount|grep'/dev/vdc'
Hasil berikut menunjukkan bahwa disk cloud memiliki satu partisi (vdc1) yang dipasang ke /data.
Jalankan perintah berikut untuk melepas semua partisi dari disk cloud.
umount<Mount point>
Dengan menggunakan titik pemasangan /data sebagai contoh, jalankan perintah berikut:
umount /data
Hasil berikut menunjukkan bahwa tidak ada partisi yang terpasang.Lanjutkan ke langkah berikutnya.
3. Jalankan perintah berikut untuk menggunakan alat partisi parted.
parted'<Disk path>'
Dengan menggunakan jalur disk /dev/vdc sebagai contoh, jalankan perintah berikut:
parted'/dev/vdc'
4.
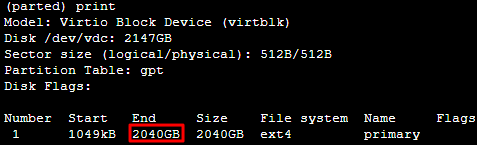
Jalankan perintah berikut untuk melihat partisi dan mencatat nilai End, yang akan digunakan sebagai offset awal partisi berikutnya.
print
5. Jalankan perintah berikut untuk membuat partisi utama.Partisi ini dimulai pada akhir partisi yang ada, dan mencakup semua ruang baru pada disk.
mkpart primary start end
Dapatkan nilai End di langkah 4. Dalam contoh ini, nilai End adalah 2.040 GB, jalankan perintah berikut:
mkpart primary 2040GB 100%
6. Jalankan perintah berikut untuk memeriksa apakah partisi baru telah dibuat.
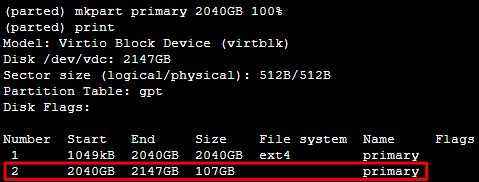
print
Jika output berikut dikembalikan, partisi telah dibuat.
7. Jalankan perintah berikut untuk menutup alat parted.
quit
8. Jalankan perintah berikut untuk memformat partisi baru menjadi EXT2, EXT3, dll. sesuai kebutuhan.
mkfs.<fstype><Partition path>
Dengan menggunakan EXT4 sebagai contoh, jalankan perintah berikut:
mkfs.ext4 /dev/vdc2
9. Jalankan perintah berikut untuk memasang partisi baru secara manual.
mount<Partition path><Mount point>
Dengan menggunakan jalur partisi /dev/vdc2 dan titik pemasangan /data sebagai contoh, jalankan perintah berikut:
mount /dev/vdc2 /data
10. Jalankan perintah berikut untuk melihat partisi baru:
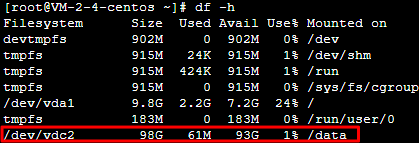
df -h
Jika hasil seperti yang ditunjukkan pada gambar berikut dikembalikan, pemasangan berhasil, dan Anda dapat melihat disk data.