If your cloud disk has a MBR partition that contains the file system, with a disk size of less than 2 TB after expansion, you can use either of the following methods to extend partitions and file systems:
You can use automatic expansion tools including fdisk, e2fsck and resize2fs to add the expanded cloud disk capacity to the existing file system on a Linux CVM. To ensure a successful expansion, the following requirements must be met:
The disk size after expansion does not exceed 2 TB.
Only use Python version 2 because of compatibility with expansion tools in this document.
Directions
Assigning the expanded capacity to an existing MBR partition
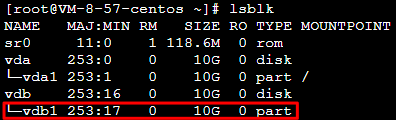
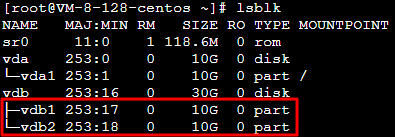
Run the following command as the root user to query partitions of the cloud disk.
lsblk
The following output indicates there is only one partition. In this case, you can perform the automatic expansion using tools.
The following output indicates there are two partitions: vdb1 and vdb2. In this case, you need to choose a partition to be extended as instructed in manual expansion.
Automatic Expansion
Manual Expansion
Note:
This method is only applicable to the scenario where there is only one partition. If you have two or more partitions, choose manual expansion.
1. Run the following command as the root user to unmount the partition.
umount<Mount point>
Taking the mount point `/data` as an example, run the following command:
umount /data
2. Run the following command to download an expansion tool.
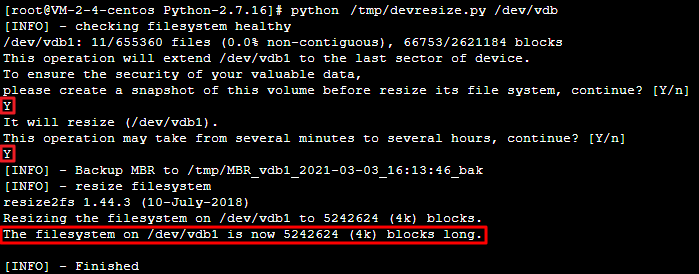
3. Run the following command to use the tool for expansion.
python /tmp/devresize.py <Disk path>
Taking the disk path `/dev/vdb` and the file system `vdb1` as an example, run the following command:
python /tmp/devresize.py /dev/vdb
If The filesystem on /dev/vdb1 is now XXXXX blocks long. is output as follows, the expansion is successful. Then, perform step 4.
If [ERROR] - e2fsck failed!! is output, perform the following steps:
a. Run the following command to fix the partition where the file system resides.
fsck -a <Partition path>
Taking the disk path /dev/vdb and the file system `vdb1` as an example, run the following command:
fsck -a /dev/vdb1
b. After the partition is fixed, run the following command again to use the tool for expansion.
python /tmp/devresize.py /dev/vdb
4.
Run the following command to manually mount the extended partition. This document uses the mount point /data as an example.
mount<Partition path><Mount point>
If a partition at the partition path /dev/vdb1 exists before expansion, run the following command:
mount /dev/vdb1 /data
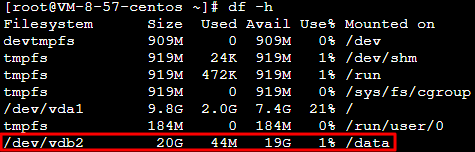
5. Run the following command to view the partition capacity after expansion.
df -h
If the result similar to the following figure is returned, the mounting is successful, and you can see the data disk.
6. Run the following command to view the data information of the original partition after expansion and check whether the new storage space has been added to the file system.
ll /data
1. Run the following command as the root user to unmount the partition.
umount<Mount point>
2. Run the following command to extend the vdb2 partition. Replace vdb2 with your actual partition when using the command.
growpart /dev/vdb 2
3. Run the following command to extend the file system of the partition.
resize2fs /dev/vdb2
If the following output is returned, the file system has been extended.
4. Run the following command to manually mount the extended partition. This document uses the mount point /data as an example.
mount<Partition path><Mount point>
If a partition at the partition path `/dev/vdb2` exists before expansion, run the following command:
mount /dev/vdb2 /data
5. Run the following command to view the partition capacity after expansion.
df -h
If the result similar to the following figure is returned, the mounting is successful, and you can see the data disk.
6. Run the following command to view the data information of the original partition after expansion and check whether the new storage space has been added to the file system.
ll /data
Formatting the expanded capacity into an independent new MBR partition
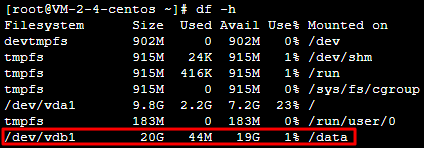
1. Run the following command as the root user to view the mounted partition of the data disk.
df -h
As shown in the following figure, the mounted partition of the data disk is 20 GB.
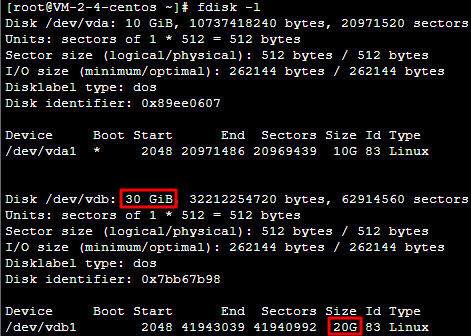
2. Run the following command to view the data disk that has no partition after expansion:
fdisk -l
As shown in the following figure, the data disk has been expanded to 30 GB.
3. Run the following command to unmount all mounted partitions.
umount<Mount point>
Taking the mount point /data as an example, run the following command:
umount /data
Note:
After all the partitions of the cloud disk are unmounted, perform step 4 again.
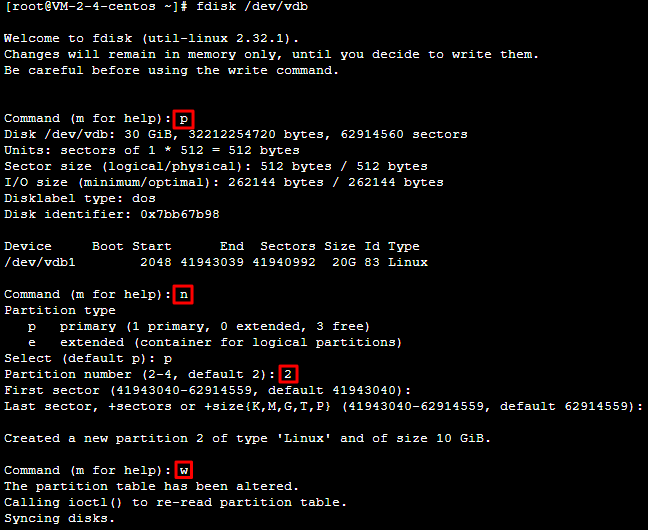
4. Run the following command to create a partition.
fdisk<Disk path>
Taking the disk path /dev/vdb as an example, run the following command:
fdisk /dev/vdb
Perform the following steps in sequence when prompted.
4.1 Enter p to check existing partitions, such as /dev/vdb1 in this document.
4.2 Enter n to create a partition.
4.3 Enter p to create a primary partition.
4.4 Enter 2 to create the second primary partition.
4.5 Press Enter twice to use the default partition size.
4.6 Enter w to save the partition table and start partitioning.
See below:
Note:
This document takes creating one partition as an example. You can also create multiple partitions as needed.
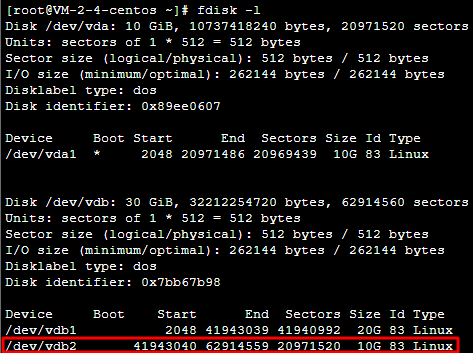
5. Run the following command to view the new partition.
fdisk -l
The following figure shows that the new partition vdb2 has been created.
6. Run the following command to format the new partition and create a file system in a desired format, such as EXT2 or EXT3.
mkfs.<fstype><Partition path>
Taking EXT4 as an example, run the following command:
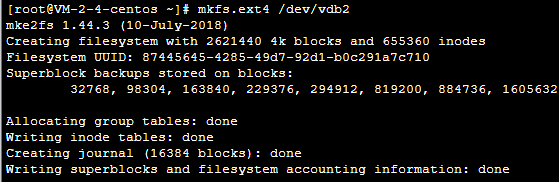
mkfs.ext4 /dev/vdb2
The following figure shows the successful creation of the EXT4 file system.
7. Run the following command to create a mount point.
mkdir<New mount point>
Taking the new mount point /data1 as an example, run the following command:
mkdir /data1
8. Run the following command to manually mount the new partition.
mount<New partition path><New mount point>
Taking the new partition path /dev/vdb2 and the new mount point /data1 as an example, run the following command:
mount /dev/vdb2 /data1
9. Run the following command to view the new partition.
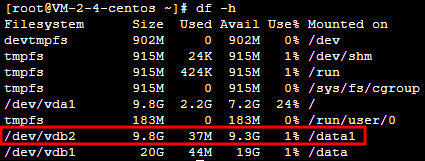
df -h
If the result as shown in the following figure is returned, the mounting is successful, and you can see the data disk.
Note:
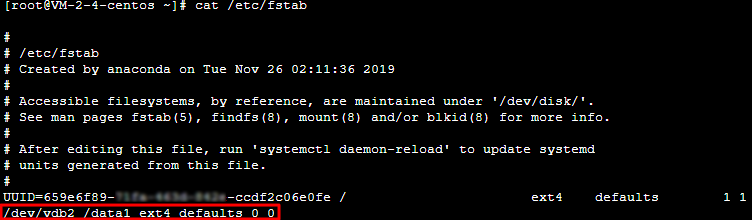
To allow the CVM instance to automatically mount a data disk upon restart or startup, perform step 10 and step 11 to add the new partition information to /etc/fstab.


 Yes
Yes
 No
No
Was this page helpful?