If your cloud disk has a GPT partition that contains the file system, you can use either of the following methods to extend partitions and file systems:
You can use automatic expansion tools including e2fsck and resize2fs to add the expanded cloud disk capacity to the existing file system on a Linux CVM. To ensure a successful expansion, the following requirements must be met:
Assigning the expanded capacity to an existing GPT partition
1. Run the following command as the root user to confirm changes in cloud disk capacity.
parted<Disk path> print
Taking the disk path /dev/vdc as an example, run the following command:
parted /dev/vdc print
If a message as shown in the following figure appears in the process, enter Fix.
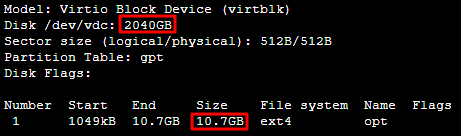
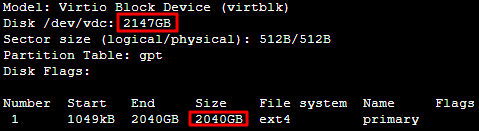
The cloud disk size is 2,040 GB after expansion and the existing partition capacity is 10.7 GB, as shown in the following figure:
2. Run the following command to check whether the cloud disk has partitions mounted.
mount|grep'<Disk path>'
Taking the disk path /dev/vdc as an example, run the following command:
mount|grep'/dev/vdc'
The following result indicates that the cloud disk has one partition (vdc1) mounted to /data.
Run the following command to unmount all partitions from the cloud disk.
umount<Mount point>
Taking the mount point /data as an example, run the following command:
umount /data
The following result indicates that there is no partition mounted. Proceed to the next step.
3. Run the following command to use the parted partition tool.
parted<Disk path>
Taking the disk path /dev/vdc as an example, run the following command:
parted /dev/vdc
4. Run the following command to change the unit from the default "GB" to "sector" for display and operation.
unit s
5. Run the following command to view partitions and record their Start values.
print
Note:
Do record Start values. After a partition is deleted and a new one is created, the Start value must remain unchanged. Otherwise, data may be lost.
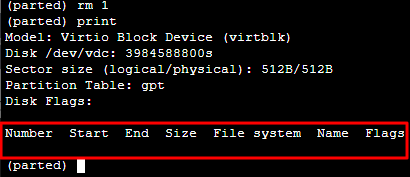
6. Run the following command to delete the existing partition.
rm<Partition Number>
For example, run the following command to delete the partition "1" from the cloud disk.
rm1
7. Run the following command to confirm the deletion. The returned information is as shown below:
print
Note:
You can immediately run the rescue command, and enter Start and End values as prompted to restore a partition being accidentally deleted.
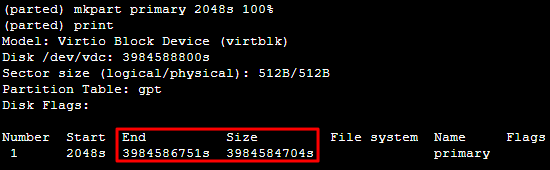
8. Run the following command to create a new primary partition.
mkpart primary <Start sector of the original partition>100%
The 100% in the command indicates this partition goes to the end of the disk. Enter the Start value obtained in step 5. In this document, the start sector of the original partition is 2048s (that is, the Start value is 2048s), run the following command:
mkpart primary 2048s 100%
If a status as shown in the following figure appears, enter Ignore.
9. Run the following command to check whether the new partition has been created successfully.
print
If the result as shown in the following figure is returned, the new partition has been created successfully.
10. Run the following command to close the parted tool.
quit
11. Run the following command to sync the partition table to the operating system.
partprobe
12. Run the following command to check the extended partition.
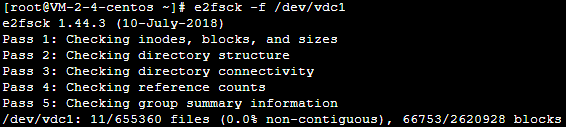
e2fsck -f <Partition path>
Taking the new partition "1" (its partition path is /dev/vdc1) as an example, run the following command:
e2fsck -f /dev/vdc1
The following figure shows the command output.
13. Use a file system-specific command to resize each file system on the new partition.
Run the following command on the EXT file system.
resize2fs <Partition path>
Taking the partition path `/dev/vdc1 as an example, run the following command:
resize2fs /dev/vdc1
If the result as shown in the following figure is returned, the expansion is successful.
Run the following command on the XFS file system.
xfs_growfs <Partition path>
Taking the partition path /dev/vdc1 as an example, run the following command:
xfs_growfs /dev/vdc1
14. Run the following command to manually mount the new partition:
mount<Partition path><Mount point>
Taking the partition path /dev/vdc1 and the mount point /data as an example, run the following command:
mount /dev/vdc1 /data
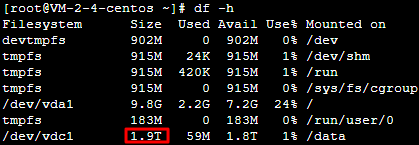
15. Run the following command to view the new partition:
df -h
If the result as shown in the following figure is returned, the mounting is successful, and you can see the data disk.
Formatting the expanded capacity into an independent new GPT partition
1. Run the following command as the root user to confirm changes in cloud disk capacity.
parted<Disk path> print
Taking the disk path /dev/vdc as an example, run the following command:
parted /dev/vdc print
If a message as shown in the following figure appears in the process, enter Fix.
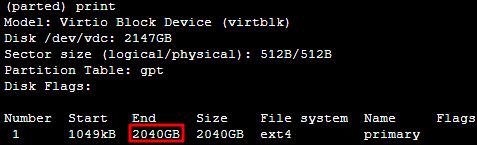
The cloud disk size is 2,147 GB after expansion and the existing partition capacity is 2,040 GB, as shown in the following figure.
2. Run the following command to check whether the cloud disk has partitions mounted.
mount|grep'<Disk path>'
Taking the disk path /dev/vdc as an example, run the following command:
mount|grep'/dev/vdc'
The following result indicates that the cloud disk has one partition (vdc1) mounted to /data.
Run the following command to unmount all partitions from the cloud disk.
umount<Mount point>
Taking the mount point /data as an example, run the following command:
umount /data
The following result indicates that there is no partition mounted. Proceed to the next step.
3. Run the following command to use the parted partition tool.
parted'<Disk path>'
Taking the disk path /dev/vdc as an example, run the following command:
parted'/dev/vdc'
4. Run the following command to view partitions and record their End values, which will be used as the start offset of the next partition.
print
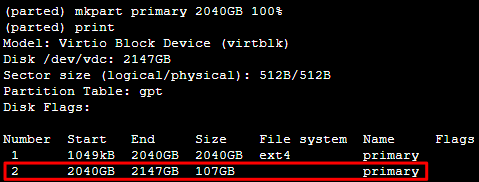
5. Run the following command to create a primary partition. This partition starts at the end of existing partitions, and covers all the new space on the disk.
mkpart primary start end
Obtain the End value in step 4. In this example, the End value is 2,040 GB, run the following command:
mkpart primary 2040GB 100%
6. Run the following command to check whether the new partition has been created.
print
If the following output is returned, the partition has been created.
7. Run the following command to close the parted tool.
quit
8. Run the following command to format the new partition into EXT2, EXT3, etc. as needed.
mkfs.<fstype><Partition path>
Taking EXT4 as an example, run the following command:
mkfs.ext4 /dev/vdc2
9. Run the following command to manually mount the new partition.
mount<Partition path><Mount point>
Taking the partition path /dev/vdc2 and the mount point /data as an example, run the following command:
mount /dev/vdc2 /data
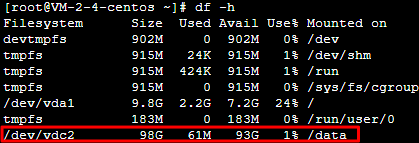
10. Run the following command to view the new partition.
df -h
If the result as shown in the following figure is returned, the mounting is successful, and you can see the data disk.


 Yes
Yes
 No
No
Was this page helpful?