在 CVM 本地搭建 PostgreSQL 异地灾备环境
Download
聚焦模式
字号
背景
为保证业务正常运行,一个高可用的数据库架构是不可或缺的。数据库一旦出现丢失、不可用等问题,将会造成重大影响和经济损失。通过主备架构,当主数据库因突发硬件故障而无法工作时,备用数据库可立即接管服务,保证数据库服务能够正常提供。而在 CVM 自建 PostgreSQL 灾备环境,则能够将云上数据同步至本地,提高对不可抗力的应对能力。
本文主要介绍如何搭建云数据库 PostgreSQL 为主数据库,云服务器 CVM 自建 PostgreSQL 为备数据库的主备环境。
前置条件
云服务器 CVM 中必须安装与云数据库相同版本的 PostgreSQL 数据库,详细安装教程请参考 PostgreSQL 官方文档。Linux 系统的云服务器配置请参见 快速配置 Linux 云服务器。示例使用 PostgreSQL 14 版本。
注意:
本方法需要用到 pg_basebackup 工具,两个工具均仅支持13及以上的 PostgreSQL 版本。
步骤1: 将云数据库主库数据物理备份到 CVM 本地备库
1. 使用 root 账号登录云服务器 CVM ,执行以下命令安装中文字符集。
1.1. 若您的 CVM 系统为 Debian/Ubuntu ,请使用 root 权限使用以下命令:
[root@VM-10-18-tencentos ~]# sudo locale-gen zh_CN.UTF-8
1.2. 若您的 CVM 系统为 CentOS/TencentOS ,请使用 root 权限执行以下命令进入配置文件内容:
[root@VM-10-17-tencentos ~]# vi /etc/locale.conf
按 i 键进入编辑模式,将文件内容修改为:
LANG="zh_CN.UTF-8"
按 esc 键退出编辑模式,再直接输入 :wq 保存修改并退出。退出后,执行以下命令使配置生效:
[root@VM-10-17-tencentos ~]# source /etc/locale.conf
1.3. 安装完毕,您可通过以下命令查看字符集是否安装成功:
[root@VM-10-17-tencentos ~]# locale -a | grep zh_CNzh_CNzh_CN.gb18030zh_CN.gb2312zh_CN.gbkzh_CN.utf8
若返回信息前缀为 zh ,则安装成功。
2. 创建普通权限用户。若您的本地数据库中已经存在普通权限用户,可跳过本步骤。
注意:
创建备份数据目录时,必须使用普通权限用户。PostgreSQL 出于安全考虑,启动命令 pg_ctl 不允许以 root 或 postgres 超级用户身份运行。
使用以下命令完成创建普通用户 pgsql 。
[root@VM-10-6-tencentos pgsql]# useradd -r -s /bin/bash pgsql
3. 通过重命名目录,将当前云服务器中的数据目录进行备份。
系统默认数据目录为 /usr/local/pgsql/data ,您可根据实际情况修改命令。
执行以下命令,使用普通用户 pgsql ,停止当前 PostgreSQL 服务运行:
[root@VM-10-17-tencentos ~]# su - pgsql #使用普通用户 pgsql 登录本地数据库[pgsql@VM-10-17-tencentos ~]$ cd /usr/local/pgsql/data[pgsql@VM-10-17-tencentos data]$ /usr/local/pgsql/bin/pg_ctl stop -D /usr/local/pgsql/datawaiting for server to shut down.... doneserver stopped
执行以下命令,重命名数据目录,将其作为备份。示例备份目录名为 data-bak-2025 ,可根据实际情况修改。
[pgsql@VM-10-6-tencentos postgresql-14.2]# mv /usr/local/pgsql/data /usr/local/pgsql/data-bak-2025
重新新建一个数据目录 /usr/local/pgsql/data 作为数据库存放数据的目录。将新的数据库目录权限修改为700 ,即仅限目录所有者拥有读、写和执行权限,其他用户无操作权限:
[pgsql@VM-10-6-tencentos postgresql-14.2]# cd /usr/local/pgsql[pgsql@VM-10-6-tencentos pgsql]# mkdir data[pgsql@VM-10-6-tencentos pgsql]# chmod 700 data
4. 执行以下命令,使用 pg_basebackup 工具在线备份主库数据。
其中,-h 参数后需填写云数据库的 IP 地址,-U 参数后需填写连接数据库的账号,此处为 dbadmin 。若云数据库与云服务器处于同一 VPC 下,则建议填写云数据库的内网 IP 地址。
[pgsql@VM-10-6-tencentos pgsql]# exit[root@VM-10-6-tencentos pgsql]# date && /usr/local/pgsql/bin/pg_basebackup -R -Xs -D /usr/local/pgsql/data -h *.*.*.* -p 5432 --verbose -P -U dbadmin && datePassword:
提示 Password: ,输入连接数据库账号的密码,按回车键即可。
最终显示信息 pg_basebackup: base backup completed 则代表物理备份成功。
步骤2: 修改配置文件,添加主备链路
1. 执行以下命令,进入 postgresql.conf 配置文件中。
[root@VM-10-6-tencentos pgsql]# vi /usr/local/pgsql/data/postgresql.conf
按 i 键进入编辑模式,找到以下内容,在每行的行首添加英文字符 # 将其注释掉。
synchronous_standby_namesextension_blacklisttencentdb_enable_copy_totencentdb_relcache_evict_numtencentdb_relcache_max_numsoft_limit_connectionsshared_preload_librariestencentdb_syscache_max_numbasebackup_exclude_pathstencentdb_syscache_evict_numtencentdb_enable_trusted_extensiontencentdb_az_fivedisable_dblink_connect_to_othertencentdb_enable_superuser_unsafe_behaviour
说明:
开源环境无法识别特殊参数,请您将配置文件中所有 tencentdb 为前缀的项全部注释掉。
并且,修改以下项:
port = 5432 #将原本的端口号修改为5432log_directory = '/usr/local/pgsql/logs' #可根据实际需要调整log_destination = 'csvlog' #将原本的'csvlog,auditlog'修改为log_destination = 'csvlog'
最后,在文件末尾添加两行:
unix_socket_directories = '/usr/local/pgsql/data' #可根据实际需要调整primary_conninfo = 'host=*.*.*.* port=5432 user=dbadmin password=对应密码' #host填写云数据库IP地址,user填写连接数据库的账号名
修改完毕后,按 esc 键退出编辑模式,并输入 :wq 保存修改并退出文件。
2. 执行以下命令,进入 pg_hba.conf 配置文件中。
[root@VM-10-6-tencentos pgsql]# vi /usr/local/pgsql/data/pg_hba.conf
按 i 键进入编辑模式,找到以下内容,在行首添加英文字符 # 将其注释掉。
host all postgres 0.0.0.0/0 reject
修改完毕后,按 esc 键退出编辑模式,并输入 :wq 保存修改并退出文件。
步骤3: 启动数据库,查看备份数据
使用普通用户 pgsql 账号登录,启动云服务器本地的数据库:
[root@VM-10-6-tencentos pgsql]# su - pgsql[pgsql@VM-10-6-tencentos pgsql]$ /usr/local/pgsql/bin/pg_ctl -D /usr/local/pgsql/data -l logfile startwaiting for server to start.... doneserver started
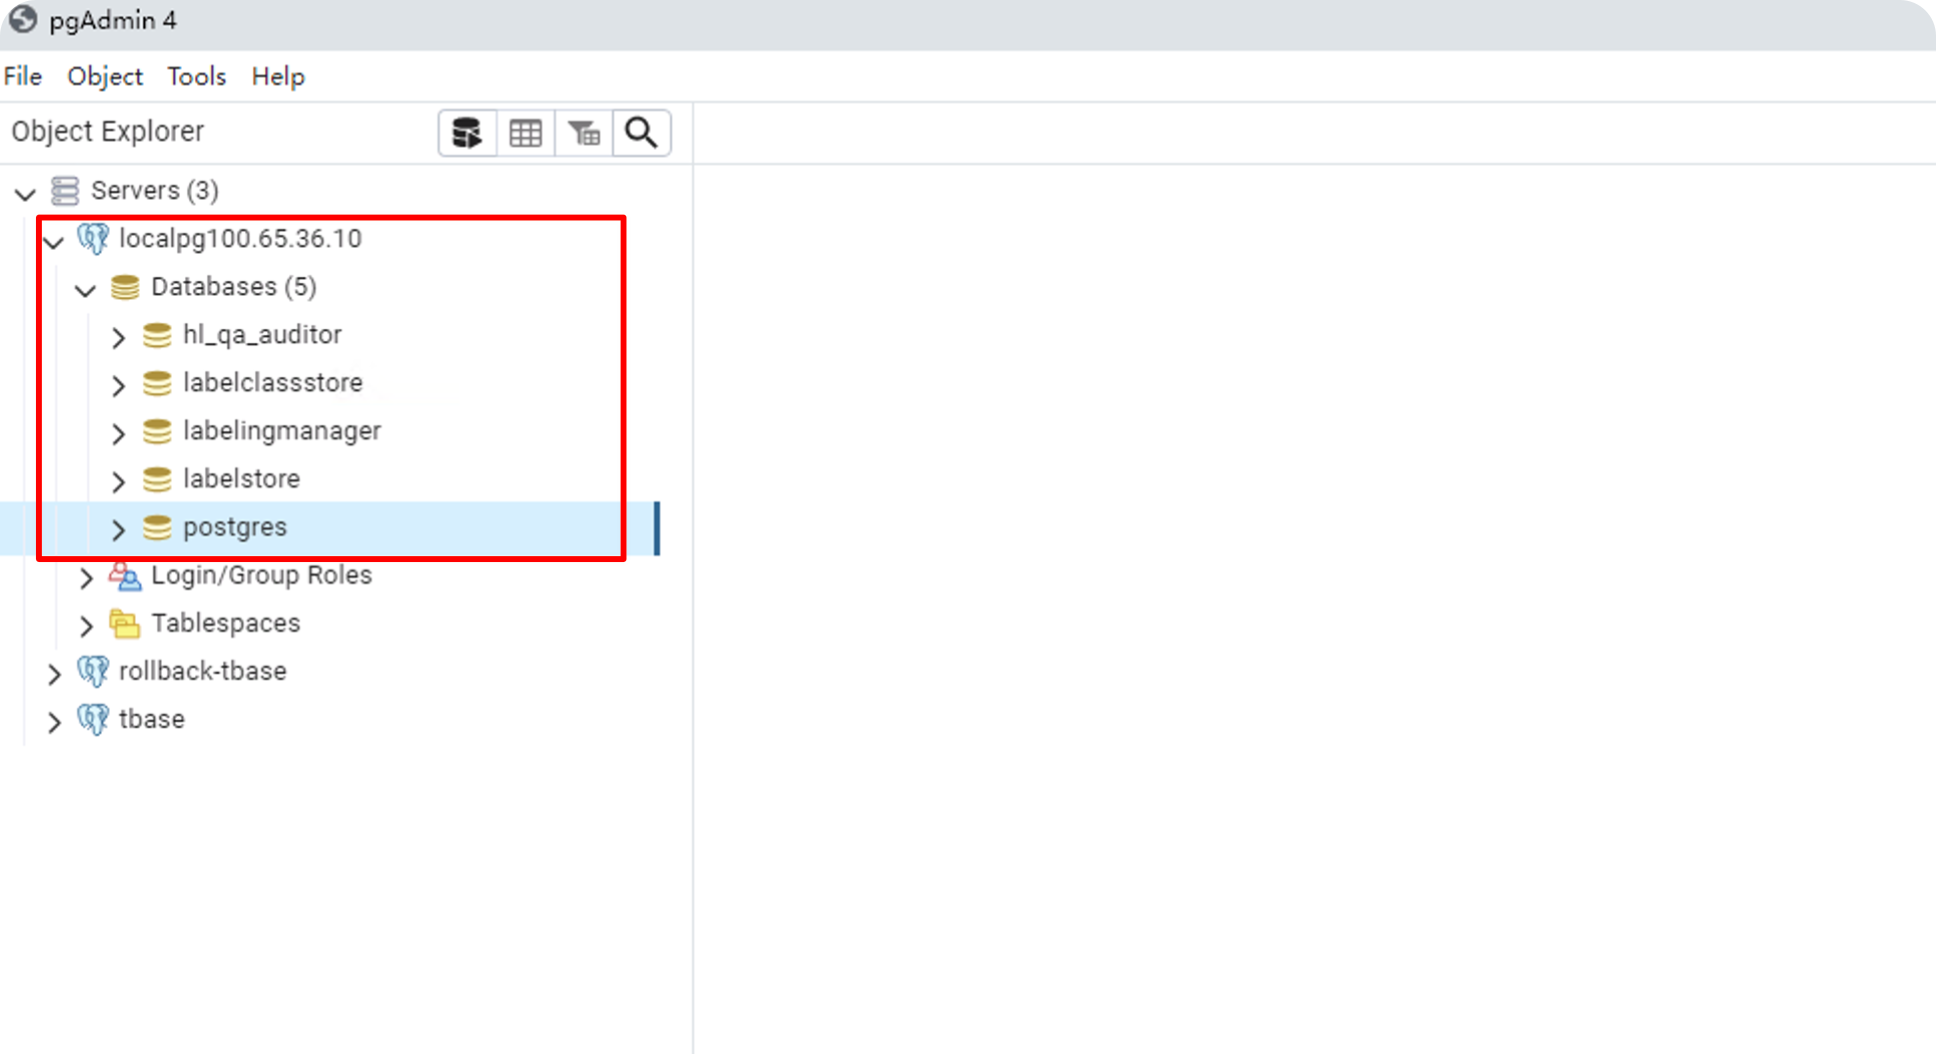
在 pgAdmin 客户端连接到云服务器的数据库,可以查看到物理备份的数据。
步骤4: 验证主备链路
select * from pg_stat_replication;
如下图所示,执行结果将显示刚才建立的主备链路。
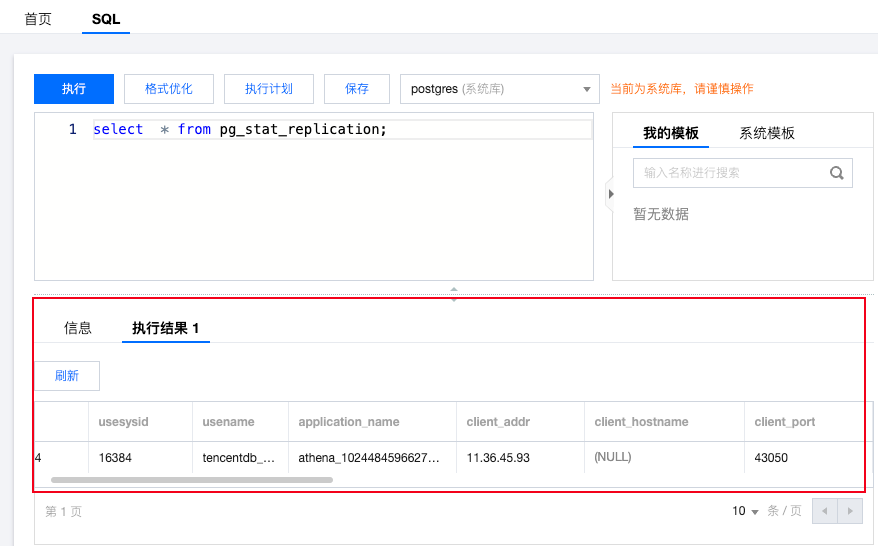
主备环境搭建成功。
文档反馈