在 TKE 上部署 AI 大模型
下载
聚焦模式
字号
概述
本文介绍如何在 TKE 上部署 AI 大模型,以 DeepSeek-R1 为例。使用 Ollama、vLLM 或 SGLang 等工具运行大模型并对外暴露 API,同时结合 OpenWebUI 提供交互界面。
部署架构
Ollama:提供的是 Ollama API。

vLLM 和 SGLang:两者均提供兼容 OpenAI 的 API。

工具介绍
Ollama 是一个运行大模型的工具,可以看作是大模型领域的 Docker,能够下载所需的大模型并暴露 API,简化大模型的部署。
vLLM 与 Ollama 类似,也是一个运行大模型的工具,针对推理做了很多优化,提高了模型的运行效率和性能,使得在资源有限的情况下也能高效运行大语言模型,并且提供兼容 OpenAI 的 API。
SGLang 与 vLLM 类似,性能更强,且针对 DeepSeek 做了深度优化,也是 DeepSeek 官方推荐的工具。
OpenWebUI 是一个大模型的 Web UI 交互工具,支持通过 Ollama 和 OpenAI 两种 API 与大模型进行互动。
技术选型
Ollama、vLLM 还是 SGLang?
Ollama:适合个人开发者或在本地开发环境中快速上手,具备良好的 GPU 硬件和大模型兼容性,易于配置,但在性能方面略逊于 vLLM。
vLLM:推理性能更好,也更节约资源,适合部署到服务器供多人协作,支持多机多卡分布式部署,上限更高,但能适配的 GPU 硬件比 Ollama 少,且需要根据不同 GPU 和大模型来调整 vLLM 的启动参数才能跑起来或者获得更好的性能表现。
SGLang:新兴的高性能解决方案,针对特定模型(如 DeepSeek)优化,具有更高的吞吐量。
选型建议:对于有一定技术基础并能投入精力调试的用户,优先考虑使用 vLLM 或 SGLang 在 Kubernetes 集群中进行部署;若追求简便快捷,则可以选择 Ollama。文中将对这两种方案分别给出详细的部署步骤。
AI 大模型数据如何存储?
AI 大模型通常占用大量存储空间,直接将其打包到容器镜像中并不现实。如果在启动时通过
initContainers 自动下载模型文件,会导致启动时间过长,因此建议使用共享存储来挂载 AI 大模型(即先通过 Job 任务将模型下载至共享存储,随后将该存储卷挂载到大模型运行的 Pod 内)。如此一来,后续 Pod 启动即可跳过模型下载环节,尽管仍需从共享存储通过网络加载模型,但如果选用高性能的共享存储(例如 Turbo 类型),这一过程依然迅速有效。在腾讯云上,可以使用文件存储 CFS 作为共享存储,CFS 具有高性能和高可用性,适合存储 AI 大模型。本文示例将使用 CFS 来存储 AI 大模型。
GPU 机型如何选?
不同机型搭载的 GPU 型号各异,请参照 GPU 计算型实例 和 GPU 渲染型实例 获取对应关系。相较于 vLLM,Ollama 对各类 GPU 的支持范围更广,兼容性更佳。建议您首先明确所选工具及目标大模型的需求,据此挑选合适的 GPU 型号,进而依据上述对照表确定要使用的 GPU 机型。此外,务必关注所选机型在各地区的销售状态及库存情况,可通过 购买云服务器 页面进行查询(实例族选择 GPU 机型)。
镜像说明
本文中示例使用的镜像都是官方提供的镜像 tag 为 latest,建议您根据自己的需求将这些镜像替换为特定版本的 tag。您可以访问以下这些链接来查看镜像的 tag 列表:
SGLang:lmsysorg/sglang
Ollama:ollama/ollama
vLLM:vllm/vllm-openai
这些官方镜像均托管在 DockerHub 上,且体积较大。在 TKE 环境中,默认提供免费的 DockerHub 镜像加速服务。中国大陆用户也可以直接从 DockerHub 拉取镜像,但速度可能较慢,尤其是对于较大的镜像,等待时间会更长。为提高镜像拉取速度,建议将镜像同步至 容器镜像服务 TCR,并在 YAML 文件中替换相应的镜像地址,这样可以显著加快镜像的拉取速度。
操作步骤
步骤1:准备集群
步骤2:准备 CFS 存储
安装 CFS 组件
1. 在集群列表中,单击集群 ID,进入集群详情页。
2. 选择左侧菜单栏中的组件管理,在组件页面单击新建。
3. 在新建组件管理页面中勾选 CFS(腾讯云文件存储)。
说明:
支持选择 CFS(腾讯云文件存储)或 CFSTurbo(腾讯云高性能并行文件系统),本文以 CFS(腾讯云文件存储)为例。
CFS-Turbo 的性能更强,读写速度更快,但成本也更高。如果希望大模型运行速度更快,可以考虑使用 CFS-Turbo。
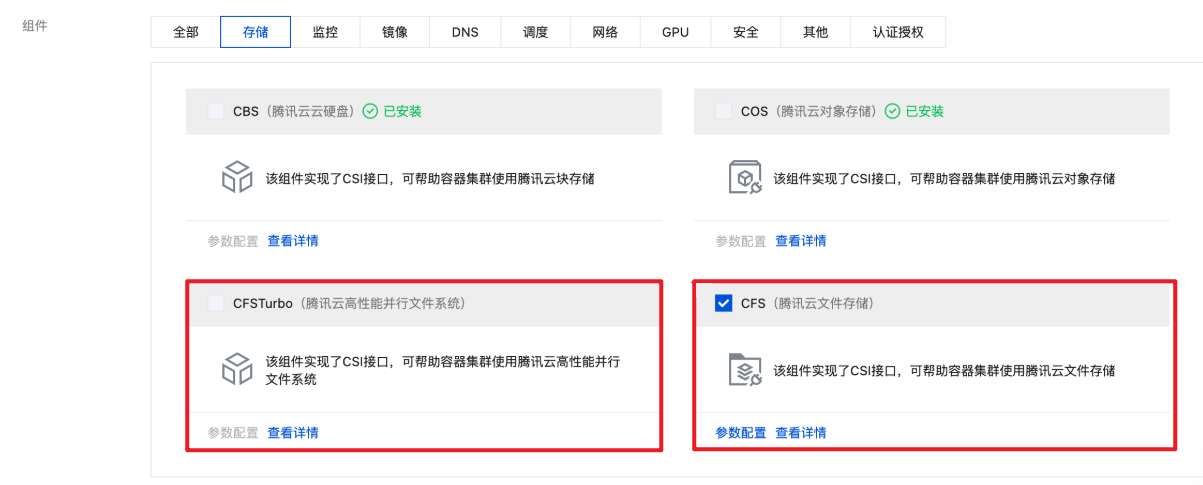
4. 单击完成即可创建组件。
新建 StorageClass
说明:
该步骤选择项较多,因此本文示例通过容器服务控制台来创建 PVC。若您希望通过 YAML 来创建,可以先用控制台创建一个测试 PVC,然后复制生成的 YAML 文件。
1. 在集群列表中,单击集群 ID,进入集群详情页。
2. 选择左侧菜单栏中的存储,在 StorageClass 页面单击新建。
3. 在新建存储页面,根据实际需求,创建 CFS 类型的 StorageClass。如下图所示:
说明:
如果是新建 CFS-Turbo StorageClass,则需要在 文件存储控制台 创建一个 CFS-Turbo 文件系统,然后,在创建 StorageClass 时,引用对应的 CFS-Turbo 实例。
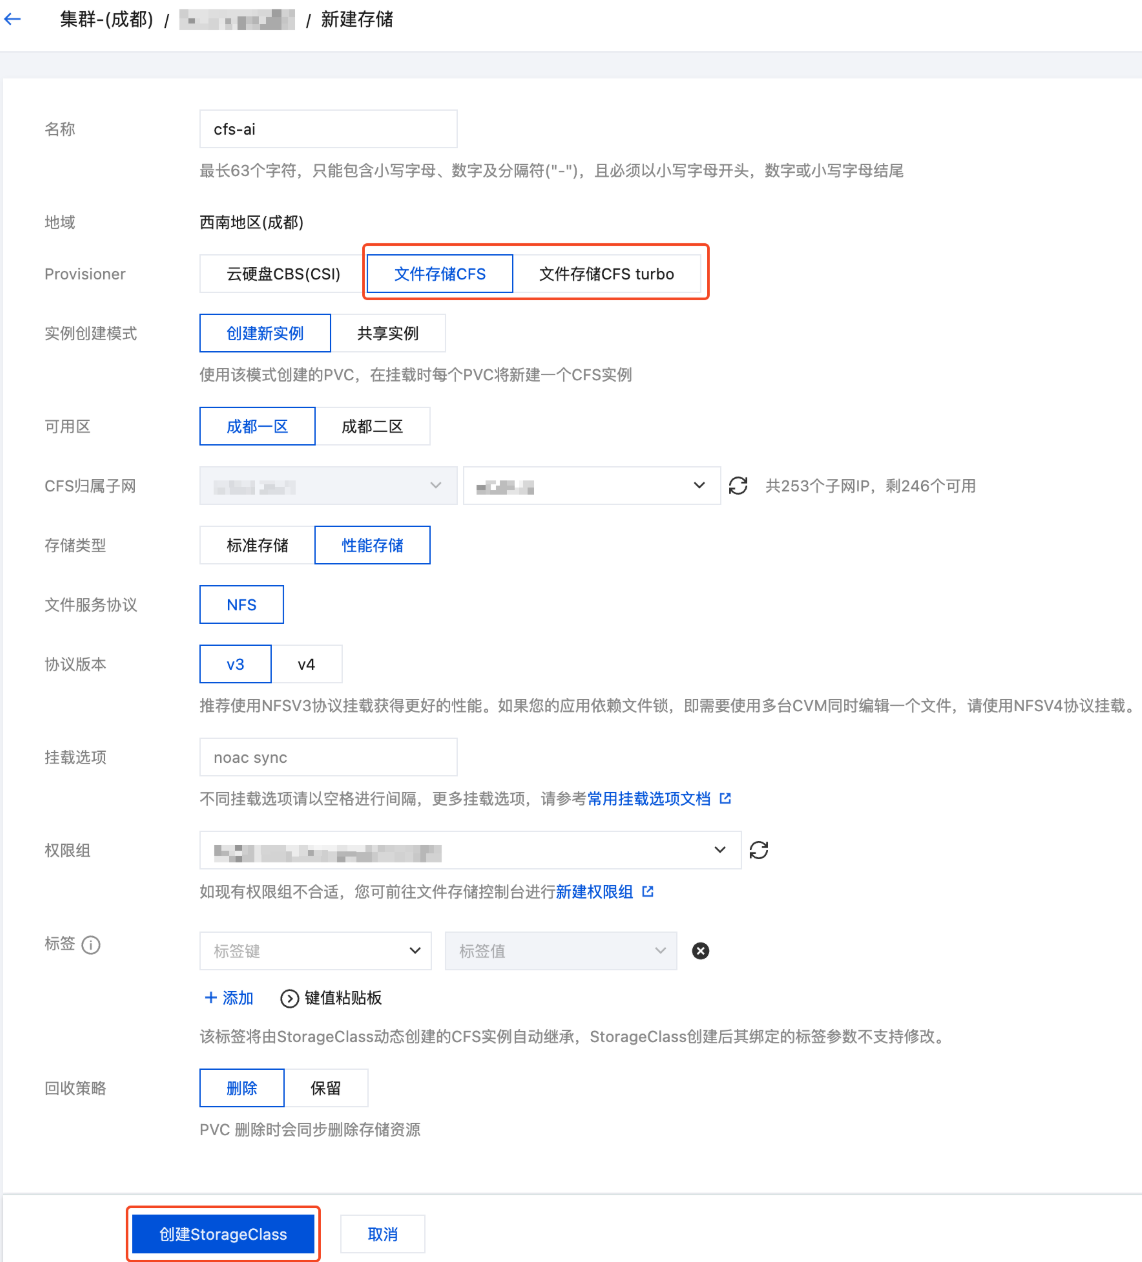
名称:请输入 StorageClass 名称,本文以 “cfs-ai” 为例。
Provisioner:选择 “文件存储 CFS”。
存储类型:建议选择“性能存储”,其读写速度比“标准存储”更快。
4. 单击创建 StorageClass,完成创建。
创建 PVC
1. 登录 容器服务控制台,在集群管理页面,选择集群 ID,进入集群的基本信息页面。
2. 单击页面右上角的 YAML 创建,进入 Yaml 创建资源页面。
3. 复制以下代码,创建一个 CFS 类型的 PVC,用于存储 AI 大模型:
注意:
请根据实际情况替换 storageClassName。
对于 CFS 而言,storage 大小可以随意指定,因为费用是根据实际占用的空间计算的。
apiVersion: v1kind: PersistentVolumeClaimmetadata:name: ai-modellabels:app: ai-modelspec:storageClassName: cfs-aiaccessModes:- ReadWriteManyresources:requests:storage: 100Gi
4. 创建另一个 PVC 给 OpenWebUI 使用,可使用同一个
storageClassName:apiVersion: v1kind: PersistentVolumeClaimmetadata:name: webuilabels:app: webuispec:accessModes:- ReadWriteManystorageClassName: cfs-airesources:requests:storage: 100Gi
步骤3:新建 GPU 节点池
1. 在集群管理页面,选择集群 ID,进入集群的基本信息页面。
2. 选择左侧菜单栏中的节点管理,在节点池页面单击新建。
3. 选择节点类型。配置详情请参见 创建节点池。
如果选择原生节点或普通节点:
建议选择较新的操作系统。
系统盘和数据盘默认大小为50GB,建议增加,如200GB,以避免因 AI 相关镜像较大而导致的节点磁盘空间压力大。
在机型配置中的 GPU 机型中选择一个符合需求且未售罄的机型,如果有 GPU 驱动选项,选择最新版本。
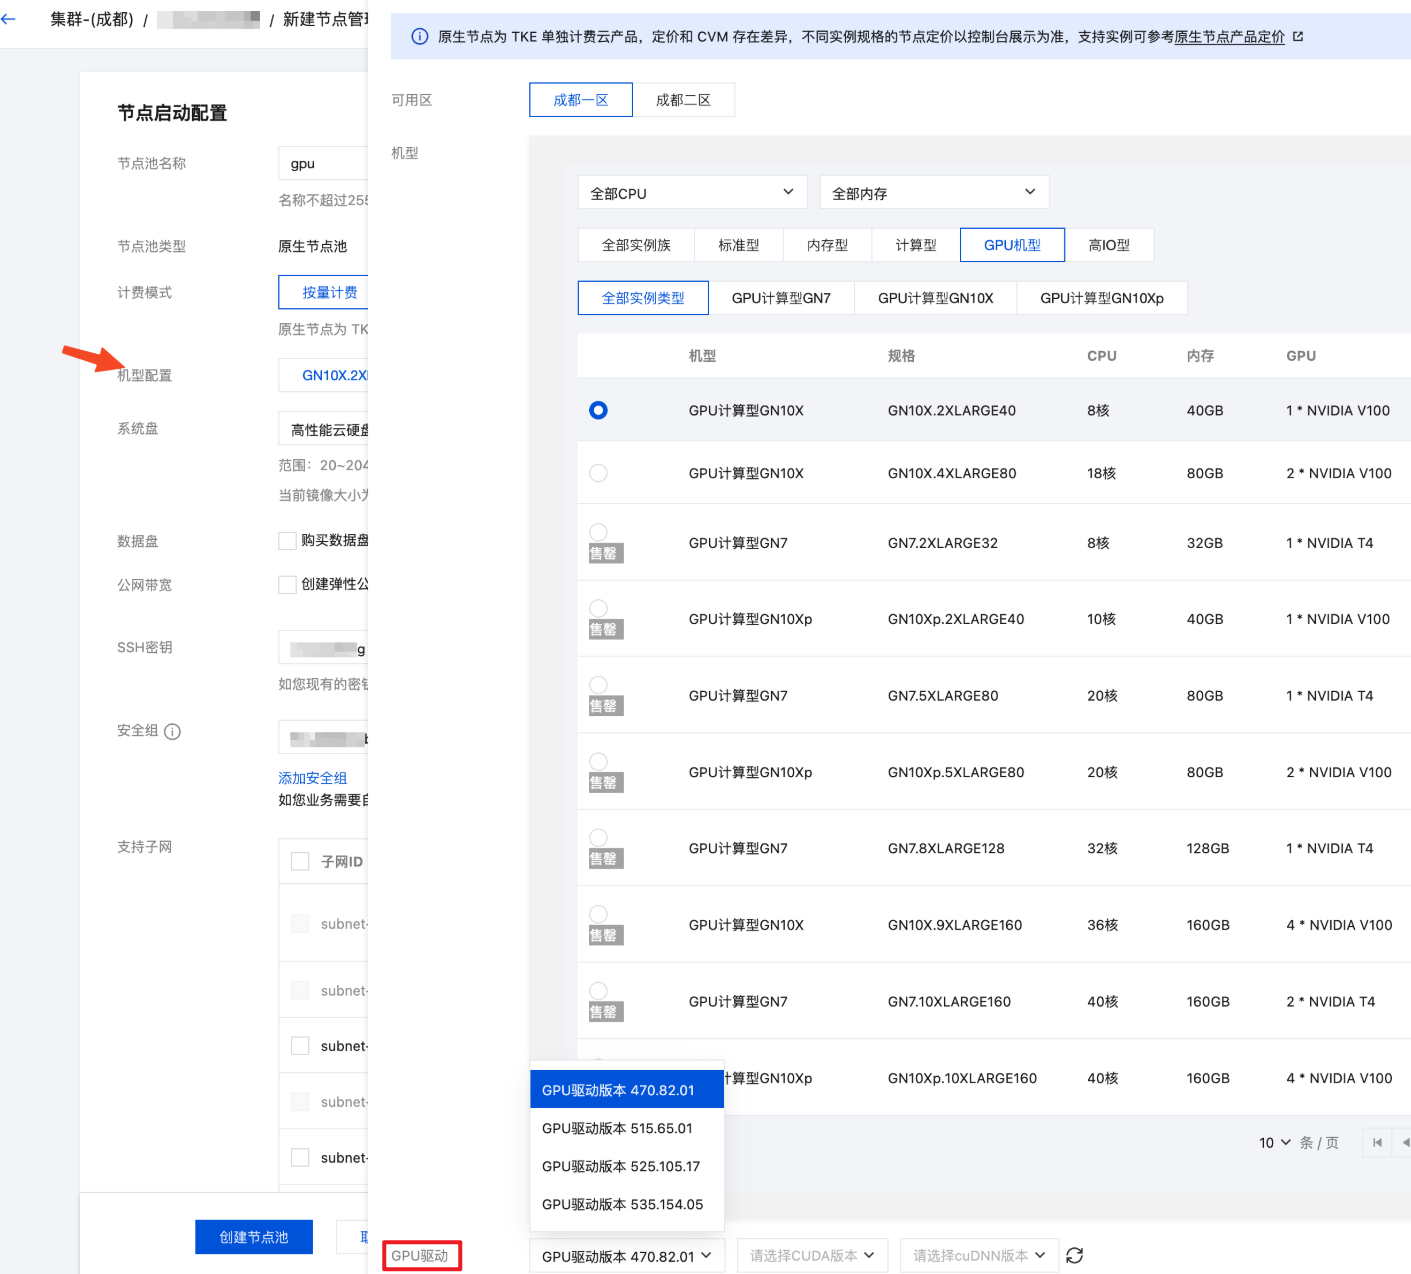
如果选择超级节点:超级节点是虚拟节点,每个 Pod 都是独占的轻量虚拟机,因此无需选择机型,在部署时通过 Pod 注解指定 GPU 卡的型号(后续示例中会有说明)。
4. 单击创建节点池。
说明:
GPU 插件无需显式安装。对于普通节点或原生节点,配置了 GPU 机型后,系统会自动安装 GPU 插件。对于超级节点,无需安装 GPU 插件。
步骤4:使用 Job 下载 AI 大模型
下发一个 Job,将所需的 AI 大模型下载到 CFS 共享存储中。以下分别是 vLLM、SGLang 和 Ollama 的 Job 示例:
注意:
请使用之前的 Ollama 或 vLLM 镜像执行脚本,下载所需的 AI 大模型。本示例中下载的是 DeepSeek-R1 模型。可以通过修改
LLM_MODEL 环境变量来替换所需的大语言模型。如果使用 Ollama,可以在 Ollama 模型库 中查询和搜索所需的模型。
如果使用 vLLM,可以在 Hugging Face 模型库 和 ModelScope 模型库 查询和搜索所需的模型。在中国大陆环境中,建议使用 ModelScope 模型库,以避免因网络问题导致的下载失败,通过
USE_MODELSCOPE 环境变量控制是否从 ModelScope 下载。vllm-download-model-job.yaml
apiVersion: batch/v1kind: Jobmetadata:name: vllm-download-modellabels:app: vllm-download-modelspec:template:metadata:name: vllm-download-modellabels:app: vllm-download-modelannotations:eks.tke.cloud.tencent.com/root-cbs-size: '100' # 如果用超级节点,默认系统盘只有 20Gi,vllm 镜像解压后会撑爆磁盘,用这个注解自定义一下系统盘容量(超过20Gi的部分会收费)。spec:containers:- name: vllmimage: vllm/vllm-openai:latestenv:- name: LLM_MODELvalue: deepseek-ai/DeepSeek-R1-Distill-Qwen-7B- name: USE_MODELSCOPEvalue: "1"command:- bash- -c- |set -exif [[ "$USE_MODELSCOPE" == "1" ]]; thenexec modelscope download --local_dir=/data/$LLM_MODEL --model="$LLM_MODEL"elseexec huggingface-cli download --local-dir=/data/$LLM_MODEL $LLM_MODELfivolumeMounts:- name: datamountPath: /datavolumes:- name: datapersistentVolumeClaim:claimName: ai-modelrestartPolicy: OnFailure
sglang-download-model-job.yaml
apiVersion: batch/v1kind: Jobmetadata:name: sglang-download-modellabels:app: sglang-download-modelspec:template:metadata:name: sglang-download-modellabels:app: sglang-download-modelannotations:eks.tke.cloud.tencent.com/root-cbs-size: '100' # 如果用超级节点,默认系统盘只有 20Gi,sglang 镜像解压后会撑爆磁盘,用这个注解自定义一下系统盘容量(超过20Gi的部分会收费)。spec:containers:- name: sglangimage: lmsysorg/sglang:latestenv:- name: LLM_MODELvalue: deepseek-ai/DeepSeek-R1-Distill-Qwen-32B- name: USE_MODELSCOPEvalue: "1"command:- bash- -c- |set -exif [[ "$USE_MODELSCOPE" == "1" ]]; thenexec modelscope download --local_dir=/data/$LLM_MODEL --model="$LLM_MODEL"elseexec huggingface-cli download --local-dir=/data/$LLM_MODEL $LLM_MODELfivolumeMounts:- name: datamountPath: /datavolumes:- name: datapersistentVolumeClaim:claimName: ai-modelrestartPolicy: OnFailure
ollama-download-model-job.yaml
apiVersion: batch/v1kind: Jobmetadata:name: ollama-download-modellabels:app: ollama-download-modelspec:template:metadata:name: ollama-download-modellabels:app: ollama-download-modelspec:containers:- name: ollamaimage: ollama/ollama:latestenv:- name: LLM_MODELvalue: deepseek-r1:7bcommand:- bash- -c- |set -exollama serve &sleep 5 # sleep 5 seconds to wait for ollama to startexec ollama pull $LLM_MODELvolumeMounts:- name: datamountPath: /root/.ollama # ollama 的模型数据存储在 `/root/.ollama` 目录下,挂载 CFS 类型的 PVC 到该路径。volumes:- name: datapersistentVolumeClaim:claimName: ai-modelrestartPolicy: OnFailure
步骤5:部署 Ollama、vLLM 或 SGLang
通过 Deployment 部署 vLLM:
apiVersion: apps/v1kind: Deploymentmetadata:name: vllmlabels:app: vllmspec:selector:matchLabels:app: vllmreplicas: 1template:metadata:labels:app: vllmspec:containers:- name: vllmimage: vllm/vllm-openai:latestimagePullPolicy: Alwaysenv:- name: PYTORCH_CUDA_ALLOC_CONFvalue: expandable_segments:True- name: LLM_MODELvalue: deepseek-ai/DeepSeek-R1-Distill-Qwen-7Bcommand:- bash- -c- |vllm serve /data/$LLM_MODEL \\--served-model-name $LLM_MODEL \\--host 0.0.0.0 \\--port 8000 \\--trust-remote-code \\--enable-chunked-prefill \\--max_num_batched_tokens 1024 \\--max_model_len 1024 \\--enforce-eager \\--tensor-parallel-size 1securityContext:runAsNonRoot: falseports:- containerPort: 8000readinessProbe:failureThreshold: 3httpGet:path: /healthport: 8000initialDelaySeconds: 5periodSeconds: 5resources:requests:cpu: 2000mmemory: 2Ginvidia.com/gpu: "1"limits:nvidia.com/gpu: "1"volumeMounts:- name: datamountPath: /data- name: shmmountPath: /dev/shmvolumes:- name: datapersistentVolumeClaim:claimName: ai-model# vLLM needs to access the host's shared memory for tensor parallel inference.- name: shmemptyDir:medium: MemorysizeLimit: "2Gi"restartPolicy: Always---apiVersion: v1kind: Servicemetadata:name: vllm-apispec:selector:app: vllmtype: ClusterIPports:- name: apiprotocol: TCPport: 8000targetPort: 8000
apiVersion: apps/v1kind: Deploymentmetadata:name: vllmlabels:app: vllmspec:selector:matchLabels:app: vllmreplicas: 1template:metadata:labels:app: vllmannotations:eks.tke.cloud.tencent.com/gpu-type: V100 # 指定 GPU 卡型号eks.tke.cloud.tencent.com/root-cbs-size: '100' # 超级节点系统盘默认只有 20Gi,vllm 镜像解压后会撑爆磁盘,用这个注解自定义一下系统盘容量(超过20Gi的部分会收费)。spec:containers:- name: vllmimage: vllm/vllm-openai:latestimagePullPolicy: Alwaysenv:- name: PYTORCH_CUDA_ALLOC_CONFvalue: expandable_segments:True- name: LLM_MODELvalue: deepseek-ai/DeepSeek-R1-Distill-Qwen-7Bcommand:- bash- -c- |vllm serve /data/$LLM_MODEL \\--served-model-name $LLM_MODEL \\--host 0.0.0.0 \\--port 8000 \\--trust-remote-code \\--enable-chunked-prefill \\--max_num_batched_tokens 1024 \\--max_model_len 1024 \\--enforce-eager \\--tensor-parallel-size 1securityContext:runAsNonRoot: falseports:- containerPort: 8000readinessProbe:failureThreshold: 3httpGet:path: /healthport: 8000initialDelaySeconds: 5periodSeconds: 5resources:requests:cpu: 2000mmemory: 2Ginvidia.com/gpu: "1"limits:nvidia.com/gpu: "1"volumeMounts:- name: datamountPath: /data- name: shmmountPath: /dev/shmvolumes:- name: datapersistentVolumeClaim:claimName: ai-model# vLLM needs to access the host's shared memory for tensor parallel inference.- name: shmemptyDir:medium: MemorysizeLimit: "2Gi"restartPolicy: Always---apiVersion: v1kind: Servicemetadata:name: vllm-apispec:selector:app: vllmtype: ClusterIPports:- name: apiprotocol: TCPport: 8000targetPort: 8000
1.
--served-model-name 参数指定大模型名称,应与前面下载 Job 中指定的名称一致。2. 模型数据引用前面下载 Job 使用的 PVC,并挂载到
/data 目录下。3. vLLM 监听 8000 端口暴露 API,定义 Service 以便后续被 OpenWebUI 调用。
通过 Deployment 部署 SGLang:
apiVersion: apps/v1kind: Deploymentmetadata:name: sglanglabels:app: sglangspec:selector:matchLabels:app: sglangreplicas: 1template:metadata:labels:app: sglangspec:containers:- name: sglangimage: lmsysorg/sglang:latestenv:- name: LLM_MODELvalue: deepseek-ai/DeepSeek-R1-Distill-Qwen-32Bcommand:- bash- -c- |set -xexec python3 -m sglang.launch_server \\--host 0.0.0.0 \\--port 30000 \\--model-path /data/$LLM_MODELresources:limits:nvidia.com/gpu: "1"ports:- containerPort: 30000volumeMounts:- name: datamountPath: /data- name: shmmountPath: /dev/shmvolumes:- name: datapersistentVolumeClaim:claimName: ai-model- name: shmemptyDir:medium: MemorysizeLimit: 40GirestartPolicy: Always---apiVersion: v1kind: Servicemetadata:name: sglangspec:selector:app: sglangtype: ClusterIPports:- name: apiprotocol: TCPport: 30000targetPort: 30000
apiVersion: apps/v1kind: Deploymentmetadata:name: sglanglabels:app: sglangspec:selector:matchLabels:app: sglangreplicas: 1template:metadata:labels:app: sglangannotations:eks.tke.cloud.tencent.com/gpu-type: V100 # 指定 GPU 卡型号eks.tke.cloud.tencent.com/root-cbs-size: '100' # 超级节点系统盘默认只有 20Gi,sglang 镜像解压后会撑爆磁盘,用这个注解自定义一下系统盘容量(超过20Gi的部分会收费)。spec:containers:- name: sglangimage: lmsysorg/sglang:latestenv:- name: LLM_MODELvalue: deepseek-ai/DeepSeek-R1-Distill-Qwen-32Bcommand:- bash- -c- |set -xexec python3 -m sglang.launch_server \\--host 0.0.0.0 \\--port 30000 \\--model-path /data/$LLM_MODELresources:limits:nvidia.com/gpu: "1"ports:- containerPort: 30000volumeMounts:- name: datamountPath: /data- name: shmmountPath: /dev/shmvolumes:- name: datapersistentVolumeClaim:claimName: ai-model- name: shmemptyDir:medium: MemorysizeLimit: 40GirestartPolicy: Always---apiVersion: v1kind: Servicemetadata:name: sglangspec:selector:app: sglangtype: ClusterIPports:- name: apiprotocol: TCPport: 30000targetPort: 30000
1.
LLM_MODEL 环境变量指定大模型名称,应与前面下载 Job 中指定的名称一致。2. 模型数据引用前面下载 Job 使用的 PVC,并挂载到
/data 目录下。3. SGLang 监听 30000 端口暴露 API,并定义 Service 以便后续被 OpenWebUI 调用。
通过 Deployment 部署 Ollama:
apiVersion: apps/v1kind: Deploymentmetadata:name: ollamalabels:app: ollamaspec:selector:matchLabels:app: ollamareplicas: 1template:metadata:labels:app: ollamaspec:containers:- name: ollamaimage: ollama/ollama:latestimagePullPolicy: IfNotPresentcommand: ["ollama", "serve"]env:- name: OLLAMA_HOSTvalue: ":11434"resources:requests:cpu: 2000mmemory: 2Ginvidia.com/gpu: "1"limits:cpu: 4000mmemory: 4Ginvidia.com/gpu: "1"ports:- containerPort: 11434name: ollamavolumeMounts:- name: datamountPath: /root/.ollamavolumes:- name: datapersistentVolumeClaim:claimName: ai-modelrestartPolicy: Always---apiVersion: v1kind: Servicemetadata:name: ollamaspec:selector:app: ollamatype: ClusterIPports:- name: serverprotocol: TCPport: 11434targetPort: 11434
apiVersion: apps/v1kind: Deploymentmetadata:name: ollamalabels:app: ollamaspec:selector:matchLabels:app: ollamareplicas: 1template:metadata:labels:app: ollamaannotations:eks.tke.cloud.tencent.com/gpu-type: V100spec:containers:- name: ollamaimage: ollama/ollama:latestimagePullPolicy: IfNotPresentcommand: ["ollama", "serve"]env:- name: OLLAMA_HOSTvalue: ":11434"resources:requests:cpu: 2000mmemory: 2Ginvidia.com/gpu: "1"limits:cpu: 4000mmemory: 4Ginvidia.com/gpu: "1"ports:- containerPort: 11434name: ollamavolumeMounts:- name: datamountPath: /root/.ollamavolumes:- name: datapersistentVolumeClaim:claimName: ai-modelrestartPolicy: Always---apiVersion: v1kind: Servicemetadata:name: ollamaspec:selector:app: ollamatype: ClusterIPports:- name: serverprotocol: TCPport: 11434targetPort: 11434
1. Ollama 的模型数据存储在
/root/.ollama 目录下,因此需要将已经下载好 AI 大模型的 CFS 类型 PVC 挂载到该路径。2. Ollama 监听 11434 端口暴露 API,并定义 Service 以便后续被 OpenWebUI 调用。
3. Ollama 默认监听的是回环地址(
127.0.0.1),通过指定 OLLAMA_HOST 环境变量,强制对外暴露 11434 端口。注意:
运行大模型需要使用 GPU,因此在 requests/limits 中指定了
nvidia.com/gpu 资源,以便让 Pod 调度到 GPU 机型并分配 GPU 卡使用。如果希望大模型运行在超级节点,可以通过 Pod 注解
eks.tke.cloud.tencent.com/gpu-type 指定 GPU 类型,可选 V100、T4、A10*PNV4、A10*GNV4,具体可参考 GPU 规格。步骤6:配置 GPU 弹性伸缩
如果需要对 GPU 资源实施弹性伸缩,可参照以下步骤进行配置。GPU 的 Pod 提供多种监控指标,详情请参见 GPU 监控指标,您可以根据这些指标配置 HPA 以实现 GPU Pod 的弹性伸缩。例如,基于 GPU 利用率的配置示例如下:
apiVersion: autoscaling/v2kind: HorizontalPodAutoscalermetadata:name: vllmspec:minReplicas: 1maxReplicas: 2scaleTargetRef:apiVersion: apps/v1kind: Deploymentname: vllmmetrics: # 更多 GPU 指标参考 https://www.tencentcloud.com/document/product/457/38929?from_cn_redirect=1#gpu- pods:metric:name: k8s_pod_rate_gpu_used_request # GPU利用率 (占 Request)target:averageValue: "80"type: AverageValuetype: Podsbehavior:scaleDown:policies:- periodSeconds: 15type: Percentvalue: 100selectPolicy: MaxstabilizationWindowSeconds: 300scaleUp:policies:- periodSeconds: 15type: Percentvalue: 100- periodSeconds: 15type: Podsvalue: 4selectPolicy: MaxstabilizationWindowSeconds: 0
注意:
由于 GPU 资源通常比较紧张,缩容后可能无法重新获取。如果不希望触发缩容操作,可以通过以下代码给 HPA 配置禁止缩容:
behavior:scaleDown:selectPolicy: Disabled
如果使用原生节点或普通节点,还需要对节点池启动弹性伸缩,否则 GPU Pod 扩容后将因缺乏可用 GPU 节点导致 Pod 一直处于 Pending 状态。节点池启用弹性伸缩的方法如下:
1. 登录 容器服务控制台,在集群管理页面,选择集群 ID,进入集群的基本信息页面。
2. 选择左侧菜单栏中的节点管理,在节点池页面选择节点池右侧的编辑。本文以普通节点池为例。

3. 在调整节点池配置中,勾选开启弹性伸缩,并设置节点数量范围。
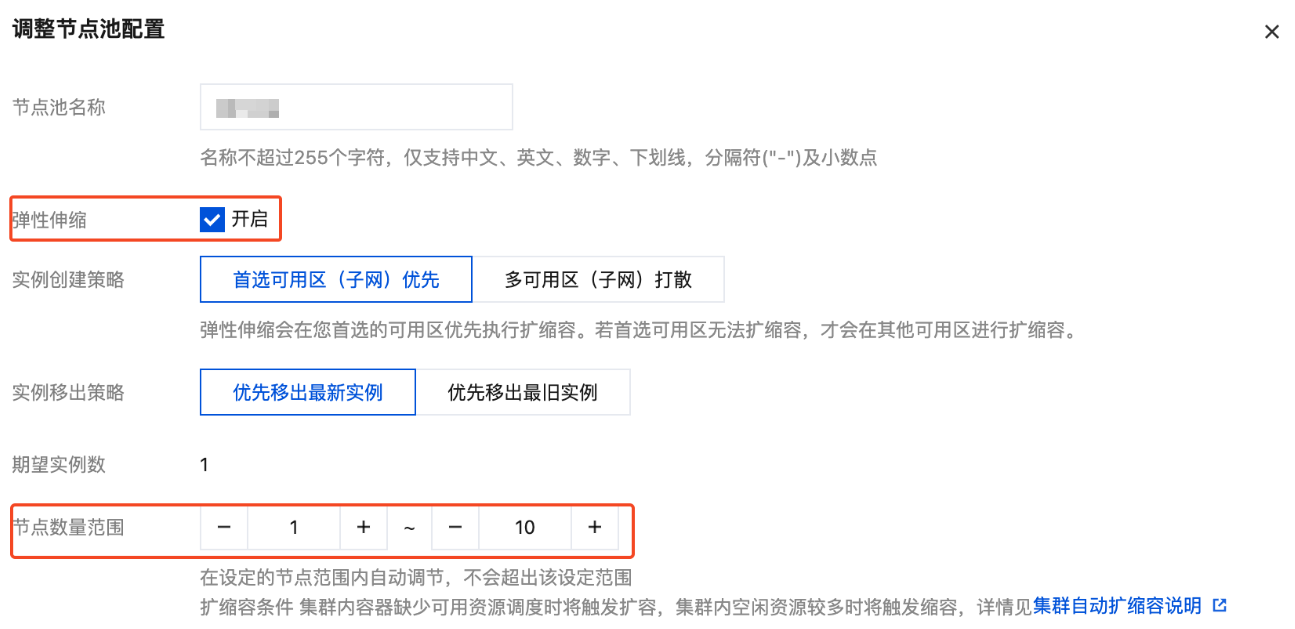
4. 单击确定。
步骤7:部署 OpenWebUI
使用 Deployment 部署 OpenWebUI,并定义 Service 方便后续对外暴露访问。后端 API 可以由 vLLM、SGLang 和 Ollama 提供,以下是各种场景下的 OpenWebUI 部署示例:
apiVersion: apps/v1kind: Deploymentmetadata:name: webuispec:replicas: 1selector:matchLabels:app: webuitemplate:metadata:labels:app: webuispec:containers:- name: webuiimage: imroc/open-webui:main # docker hub 中的 mirror 镜像,长期自动同步,可放心使用env:- name: OPENAI_API_BASE_URLvalue: http://vllm-api:8000/v1 # vllm 的地址- name: ENABLE_OLLAMA_API # 禁用 Ollama API,只保留 OpenAI APIvalue: "False"tty: trueports:- containerPort: 8080resources:requests:cpu: "500m"memory: "500Mi"limits:cpu: "1000m"memory: "1Gi"volumeMounts:- name: webui-volumemountPath: /app/backend/datavolumes:- name: webui-volumepersistentVolumeClaim:claimName: webui---apiVersion: v1kind: Servicemetadata:name: webuilabels:app: webuispec:type: ClusterIPports:- port: 8080protocol: TCPtargetPort: 8080selector:app: webui
apiVersion: apps/v1kind: Deploymentmetadata:name: webuispec:replicas: 1selector:matchLabels:app: webuitemplate:metadata:labels:app: webuispec:containers:- name: webuiimage: imroc/open-webui:main # docker hub 中的 mirror 镜像,长期自动同步,可放心使用env:- name: OPENAI_API_BASE_URLvalue: http://sglang:30000/v1 # sglang 的地址- name: ENABLE_OLLAMA_API # 禁用 Ollama API,只保留 OpenAI APIvalue: "False"tty: trueports:- containerPort: 8080resources:requests:cpu: "500m"memory: "500Mi"limits:cpu: "1000m"memory: "1Gi"volumeMounts:- name: webui-volumemountPath: /app/backend/datavolumes:- name: webui-volumepersistentVolumeClaim:claimName: webui---apiVersion: v1kind: Servicemetadata:name: webuilabels:app: webuispec:type: ClusterIPports:- port: 8080protocol: TCPtargetPort: 8080selector:app: webui
apiVersion: apps/v1kind: Deploymentmetadata:name: webuispec:replicas: 1selector:matchLabels:app: webuitemplate:metadata:labels:app: webuispec:containers:- name: webuiimage: imroc/open-webui:main # docker hub 中的 mirror 镜像,长期自动同步,可放心使用env:- name: OLLAMA_BASE_URLvalue: http://ollama:11434 # ollama 的地址- name: ENABLE_OPENAI_API # 禁用 OpenAI API,只保留 Ollama APIvalue: "False"tty: trueports:- containerPort: 8080resources:requests:cpu: "500m"memory: "500Mi"limits:cpu: "1000m"memory: "1Gi"volumeMounts:- name: webui-volumemountPath: /app/backend/datavolumes:- name: webui-volumepersistentVolumeClaim:claimName: webui---apiVersion: v1kind: Servicemetadata:name: webuilabels:app: webuispec:type: ClusterIPports:- port: 8080protocol: TCPtargetPort: 8080selector:app: webui
说明:
OpenWebUI 的数据存储在
/app/backend/data 目录(如账号密码、聊天历史等数据),本文将 PVC 挂载到该路径。步骤8:暴露 OpenWebUI 并与模型对话
本地测试
如果只是进行本地测试,可以使用
kubectl port-forward 命令来暴露服务:说明:
kubectl port-forward service/webui 8080:8080
然后在浏览器中访问
http://127.0.0.1:8080 即可。通过 Ingress 或 Gateway API 暴露服务
您还可以通过 Ingress 或 Gateway API 来暴露服务。以下是相关示例:
注意:
使用 Gateway API 需要确保您的集群中装有 Gateway API 的实现,如 TKE 应用市场中的 EnvoyGateway。具体 Gateway API 用法请参见 Gateway API 官方文档。
apiVersion: gateway.networking.k8s.io/v1kind: HTTPRoutemetadata:name: aispec:parentRefs:- group: gateway.networking.k8s.iokind: Gatewaynamespace: envoy-gateway-systemname: ai-gatewayhostnames:- "ai.your.domain"rules:- backendRefs:- group: ""kind: Servicename: webuiport: 8080
说明:
1.
parentRefs 引用定义好的 Gateway(通常一个 Gateway 对应一个 CLB)。2.
hostnames 替换为您自己的域名,确保域名能正常解析到 Gateway 对应的 CLB 地址。3.
backendRefs 指定 OpenWebUI 的 Service。apiVersion: networking.k8s.io/v1kind: Ingressmetadata:name: webuispec:rules:- host: "ai.your.domain"http:paths:- path: /pathType: Prefixbackend:service:name: webuiport:number: 8080
说明:
1.
host 字段需填写您的自定义域名,确保域名能正常解析到 Ingress 对应的 CLB 地址。2.
backend.service 则需指定为 OpenWebUI 的 Service。完成配置后,在浏览器中访问相应的地址即可进入 OpenWebUI 页面。
首次登录
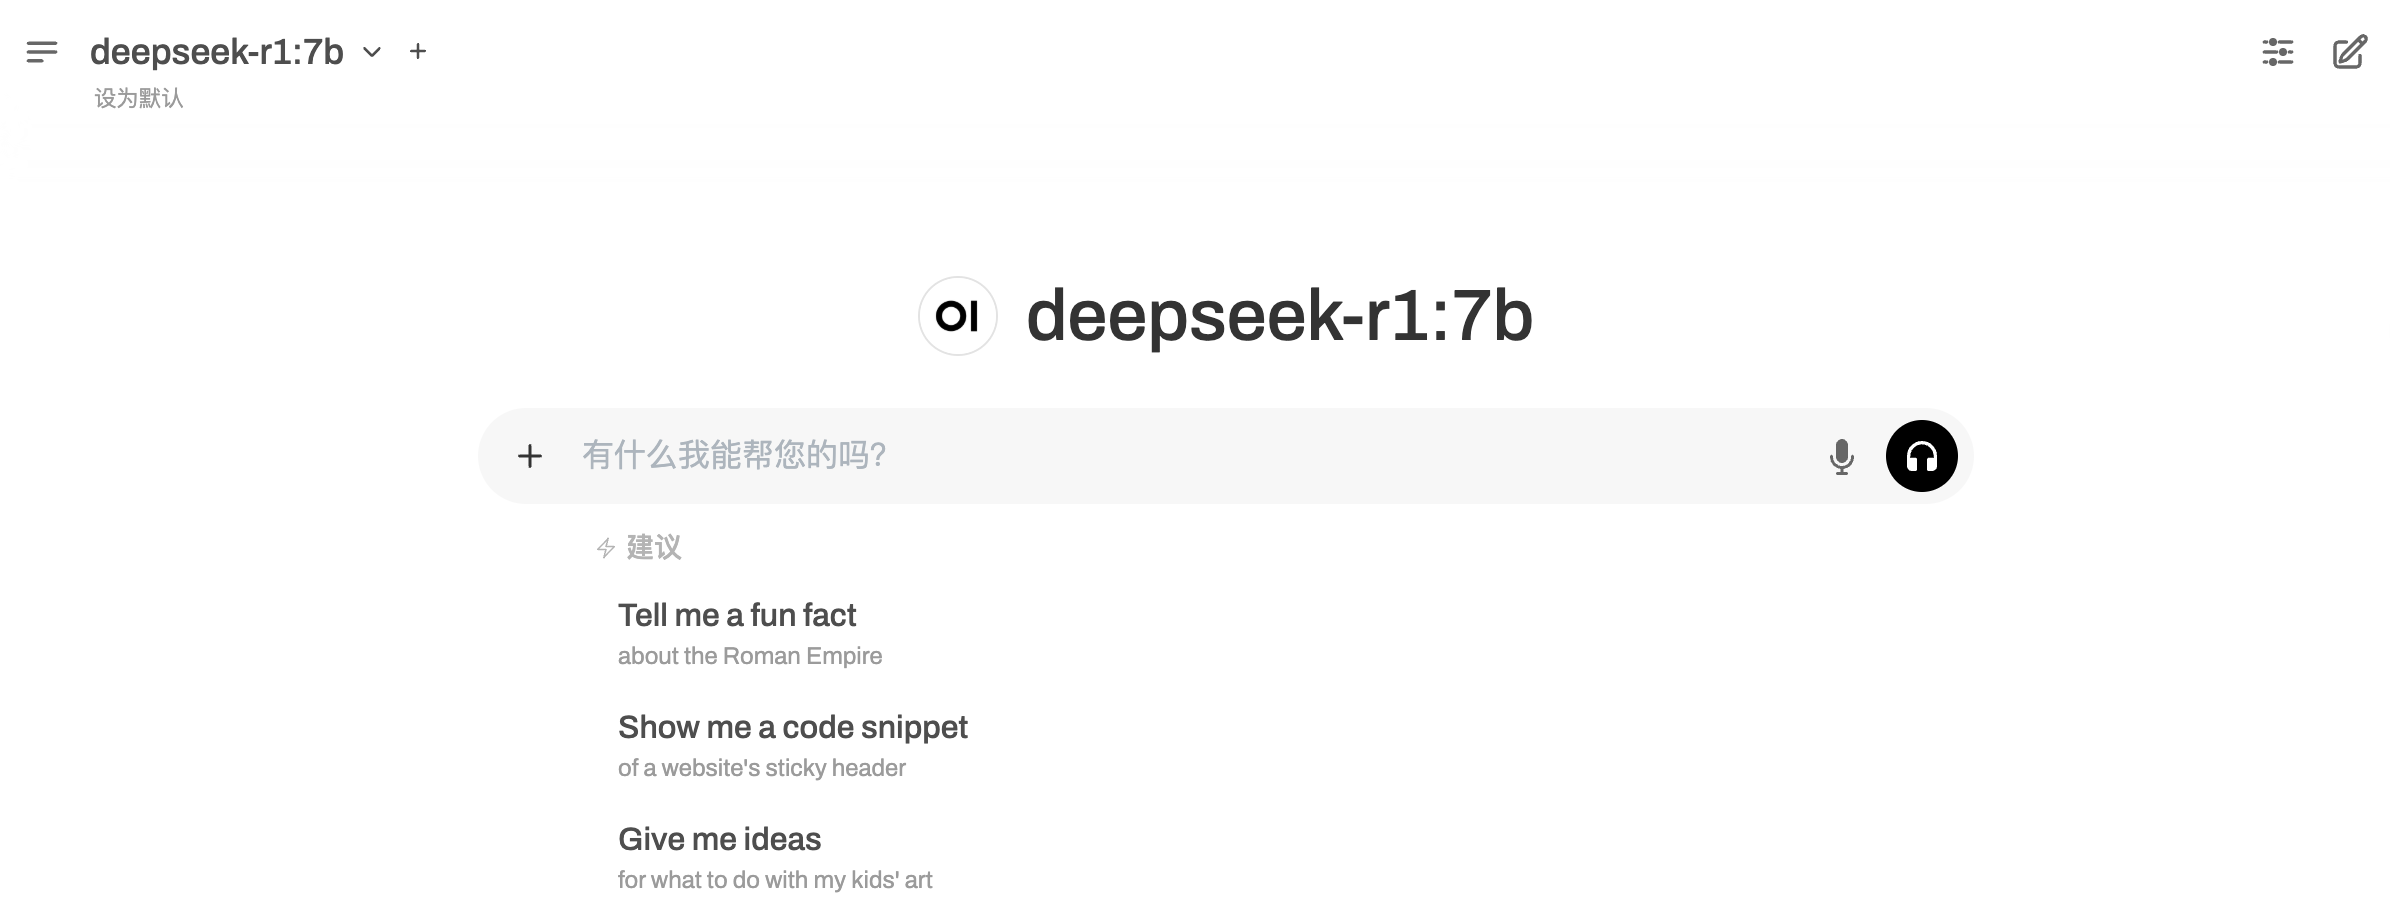
首次进入 OpenWebUI 会提示创建管理员账号密码,创建完毕后即可登录,然后默认会加载之前部署的大语言模型进行对话。
文档反馈