- Release Notes and Announcements
- Product Introduction
- Purchase Guide
- Getting Started
- Access Management
- Preparations
- Data Migration
- Databases Supported by Data Migration
- Cross-Account TencentDB Instance Migration
- Migrating to MySQL
- Migrating to MariaDB
- Migrating to TDSQL-C for MySQL
- Migrating to TDSQL MySQL
- Migrating to PostgreSQL
- Migrating to MongoDB
- Migrating to SQL Server
- Migrating to TencentDB for Redis
- Offline Migration of MySQL Data
- Advanced Migration Operations
- Task Management
- Data Sync
- Databases Supported by Data Sync
- Cross-Account TencentDB Instance Sync
- Synchronize to PostgreSQL
- Sync into Tencent Cloud
- Sync from Tencent Cloud
- Advanced Sync Operations
- Task Management
- Task Status Description
- Viewing Task
- Starting Task
- Retrying Task (MySQL)
- Verifying Task
- Stopping Task
- Pausing Task
- Resuming Task
- Resetting Task
- Deleting Task
- Changing Configuration
- Transition from Pay-as-You-Go to Monthly Subscription
- Terminating/Returning Instance
- Renewing Task
- Deisolating Task
- Deleting Instance
- Viewing Log
- Deleting Task
- Data Subscription (Kafka Edition)
- Databases Supported by Data Subscription
- Creating Data Subscription Task
- Data Consumption
- Creating Consumer Group
- Managing Consumer Group
- Consuming MySQL Data
- Consuming MongoDB Data
- Consuming TDSQL for PostgreSQL Data
- Consuming Subscribed Data with Kafka Client (Protobuf)
- Consuming Subscribed Data with Kafka Client (Avro)
- Consuming Subscribed Data with Kafka Client (JSON)
- Consuming Subscribed Data with Flink Client (Avro)
- Consuming Data with Flink
- Advanced Subscription Operations
- Task Management
- Data Migration (OldDTS)
- Data Subscription (OldDTS)
- Fix for Verification Failure
- Check Item Overview
- Check Items of MySQL/MariaDB/Percona/TDSQL-C for MySQL/TDSQL for MySQL
- MongoDB Check Items
- PostgreSQL Check Items
- TDSQL for PostgreSQL
- Redis/Tendis
- SQL Server
- Database Connection Check
- Source Database Existence Check
- Target Database Existence Check
- Peripheral Check
- Migration Network Check
- Version Check
- Source Instance Permission Check
- Account Conflict Check
- Partial Database Parameter Check
- Source Instance Parameter Check
- Source Instance Type (Master or Replica)
- Parameter Configuration Conflict Check
- Target Database Content Conflict Check
- Target Database Space Check
- Target Database Load Check
- Local Disk Space Check
- Binlog Parameter Check
- Oplog Check
- Foreign Key Dependency Check
- View Check
- Advanced Object Check
- Incremental Migration Precondition Check
- Extension/Plugin Compatibility Check
- Source Database Balancer Check
- Source Database Node Role Check
- ShardKey Check
- Warning Item Check
- DLL Ring Sync Check for Single Database/Table Object
- DLL Sync Conflict Check for Single Database/Table Object in the Same Target
- Level-2 Subpartitioned Table Check
- Primary Key Check
- DDL Check for Tables to Be Migrated
- System Database Conflict Check
- Table Structure Check for Source and Target Instances
- InnoDB Table Check
- Migration Object Dependency Check
- Constraint Check
- Cutover Description
- Monitoring and Alarms
- Ops Management
- DTS-DBbridge
- Best Practices
- API Documentation
- History
- Introduction
- API Category
- Making API Requests
- (NewDTS) Data Migration APIs
- DescribeMigrationJobs
- DescribeMigrationDetail
- CreateMigrationService
- ModifyMigrationJob
- CreateMigrateCheckJob
- DescribeMigrationCheckJob
- SkipCheckItem
- StartMigrateJob
- StopMigrateJob
- ResumeMigrateJob
- RecoverMigrateJob
- ModifyMigrateName
- ModifyMigrateJobSpec
- IsolateMigrateJob
- DestroyMigrateJob
- DescribeMigrateDBInstances
- CompleteMigrateJob
- PauseMigrateJob
- ContinueMigrateJob
- Data Sync APIs
- ModifySyncJobConfig
- CreateModifyCheckSyncJob
- DescribeModifyCheckSyncJobResult
- StartModifySyncJob
- DescribeSyncJobs
- CreateSyncJob
- ConfigureSyncJob
- CreateCheckSyncJob
- SkipSyncCheckItem
- DescribeCheckSyncJobResult
- StartSyncJob
- StopSyncJob
- ResumeSyncJob
- ResizeSyncJob
- RecoverSyncJob
- IsolateSyncJob
- DestroySyncJob
- PauseSyncJob
- ContinueSyncJob
- Data Consistency Check APIs
- Data Types
- Error Codes
- DTS API 2018-03-30
- SDK Documentation
- FAQs
- Error Handling (NewDTS)
- Error Handling (OldDTS)
- Service Agreement
Data Migration
Last updated: 2018-06-21 10:06:17
The documentation is not available now.
Data Transfer Service (DTS) provides data migration and continuous data replication from self-built MySQL databases to CDB, allowing users to migrate hot data without interrupting their services. Data migration is supported for local IDCs with public IP/Port or access to Tencent Cloud via direct connect, or MySQL databases in Tencent Cloud CVMs. MySQL 5.7 does not support DTS, and you can import your data by downloading cold backup files.
1. Preparation
1.1 Note
A DTS data migration task involves two steps: cold backup data export and incremental data synchronization. Cold backup data export and migrated data comparison have certain effect on the load of the source database, so it is recommended to perform database migration during off-peak hours or in the standby database.
Only certain database table migration tasks restart target CDB instance at the beginning of incremental synchronization and after migration task is completed. The source database is not affected.
Super permission for the source instance is required
1.2 Super permission for source instance
For accounts to be used for migration, it is recommended to acquire the Super permission for the source instance. The Super permission is required in the following scenarios:
- Before data migration is completed, DTS will check data consistency, which requires the Super permission to change the "session" parameter and "binlog_format".
- If, during binlog synchronization, a user creates an Event in the source instance and an account that is not used for DTS data migration is specified as DEFINER for this event, an error will occur if the Super permission is unavailable.
1.3 Databases supported for migration
Data migration from self-built CVM MySQL databases in basic and VPC networks to CDB instances.
Data migration from MySQL databases with public network IP/Port to CDB instances.
Data migration from MySQL databases with access to Tencent Cloud via VPN or direct connect to CDB instances.
1.4 Check the following in advance
- Check if any database table with the same name as the target CDB instance exists, to avoid conflict.
- Check database version. Cloud migration is supported for MySQL 5.1/5.5/5.6. As MySQL 5.1 is no longer supported by Tencent Cloud CDB, it is recommended that you update MySQL 5.1 to MySQL 5.5 first, then migrate data to CDB for MySQL 5.5. You can also use the DTS data migration tool to directly migrate data from local MySQL 5.1 to Tencent Cloud CDB for MySQL 5.5.
- Check the capacity of the destination CDB instance, which must be larger than that of the source instance;
Create a migration account in the source MySQL database (this is not required if you already have an authorized account for data migration).
    GRANT ALL PRIVILEGES ON *. * TO "migration account" @ "%" IDENTIFIED BY "migration password";

    FLUSH PRIVILEGES;
Confirm source database MySQL variables
UseSHOW GLOBAL VARIABLES LIKE 'XXX';to check MySQL global variables, so as to confirm whether migration can be performed under the current status:
    server_id > 1

    log_bin = ON;

    binlog_format = ROW/MIXED

    binlog_row_image = FULL

    innodb_stats_on_metadata = 0

    It is recommended that wait_timeout is higher than or equal to 3,600 seconds, and it must be lower than 7,200 seconds.

    The same time length is configured for interactive_timeout and wait_timeout.

    If the source instance is slave, confirm the following parameters in the source instance:

    log_slave_updates = 1
Change variable value:
a. Change the source database MySQL configuration file
my.cnf, and restart:log-bin=[custom binlog file name]B. Modify configuration dynamically:
        set global server_id = 99;

        set global binlog_format=ROW;

        set global binlog_row_image=FULL;

        set global innodb_stats_on_metadata = 0;
2. Steps
2.1 Create DTS data migration service
Log in to the console, go to the Data Migration page and click New Task.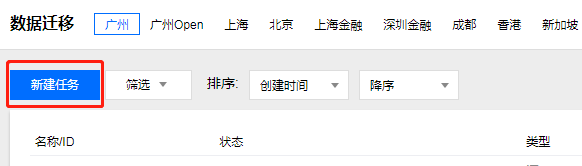
2.2 Enter configuration
On the page you are redirected to, complete task configuration, source database configuration, and destination database configuration. Details:
Task configuration
- Task name: Specify a name for the task.
- Execution schedule: Specify a start time for your migration task.

Source database information
- Source database type: MySQL with public IP, Self-built MySQL on CVM, MySQL with access to Tencent Cloud via direct connect and MySQL with access via VPN are supported.
MySQL with public IP: MySQL databases that can be accessed via public IP.
Required information: - CVM address of MySQL
- Port of MySQL
- Account of MySQL
- Password of MySQL

Self-built MySQL on CVM: CVM-based self-built MySQL databases in both basic networks and VPCs. You need to specify the ID of the CVM instance and the network environment where it is located.
Required information:
- Region: Data migration is only supported when the CVM-based self-built MySQL and the destination CDB are in the same region. If the CVM and CDB are located in different regions, you need to choose MySQL with Public IP and perform migration using CVM public network.
- CVM network: Both basic networks and VPCs are supported.
- VPC: If you select a VPC, you need to select the VPC and subnet to which the instance belongs.
- CVM instance ID
- Port of MySQL
- Account of MySQL
- Password of MySQL

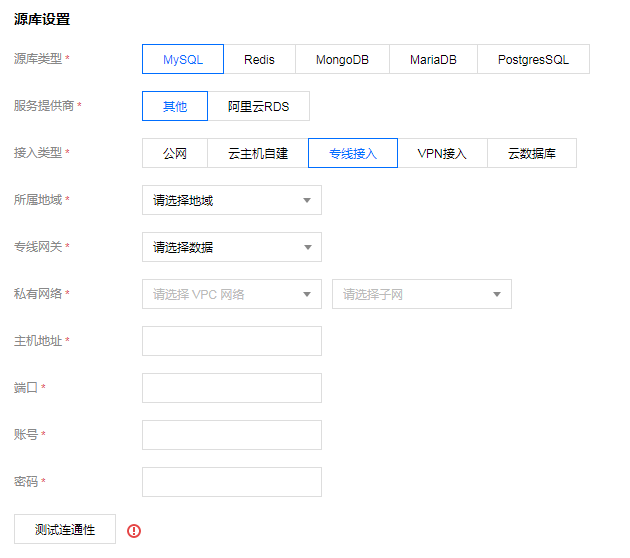
MySQL connected via Direct Connect: You can migrate data to Tencent Cloud using DTS for local IDC self-built MySQL databases connected to Tencent Cloud through the Direct Connect (DC) service. Required information:
- Direct Connect Gateway: The direct connect gateway used by the database server to connect to Tencent Cloud. About Direct Connect Gateway
- VPC: The VPC where the direct connect gateway belongs to.
- CVM address of MySQL: The CVM address of MySQL in the IDC. DTS accesses the CVM by mapping with the IP through the direct connect gateway.
- Port of MySQL
- Account of MySQL
- Password of MySQL
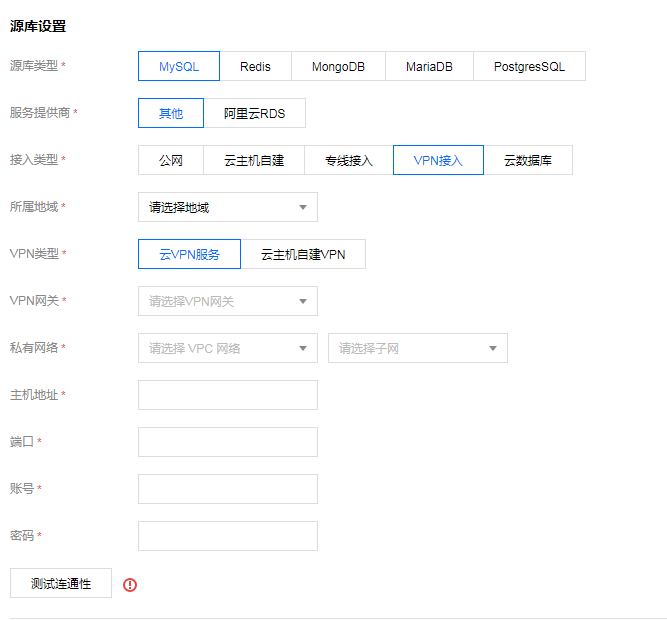
MySQL with access via VPN: You can migrate data to Tencent Cloud using DTS for local IDC self-built MySQL databases connected to Tencent Cloud through VPN Connection or a self-built VPN service in CVM.
Required information:
- Region: VPN services are only supported if they are in the same region.
- VPN type: Cloud VPN Service or self-built VPN on CVM.
- VPN gateway: This information is only required for Cloud VPN Service. About VPN
- VPC: The VPC where the VPN service belongs.
- CVM address of MySQL: The CVM address of MySQL in the IDC. DTS accesses the CVM by mapping with the IP through the direct connect gateway.
- Port of MySQL
- Account of MySQL
- Password of MySQL
2.3 Select the database to migrate
Select the database to migrate (you can choose to migrate the entire database or only certain tables), create migration task and check task information.
Note:
- The character_set_server and lower_case_table_names configuration items are migrated only when the whole instance is migrated.
- If the character set configuration of migrated tables for the source instance is different from that of the destination instance, the character set configuration of the source instance is retained.

Data migration: Export data from the selected database and import it to CDB for MySQL.
Incremental synchronization: After performing data export and import, configure CDB for MySQL as the slave database for source database to achieve incremental synchronization between master and slave.
Overwrite root account: Since the root account is used for security verification for cloud databases, subsequent CDB operations will be affected if no root account exists in the source database. Therefore, if the entire instance is migrated, you should specify whether to overwrite the destination database root account with the source database root account. Choose Yes if you want to use the root account of the source database or if no root account is configured for the destination database. Choose No if you want to retain the root account for the destination database.
2.4 Data consistency test
Select a data test type. (Choose from whole test, partial test, or no test.)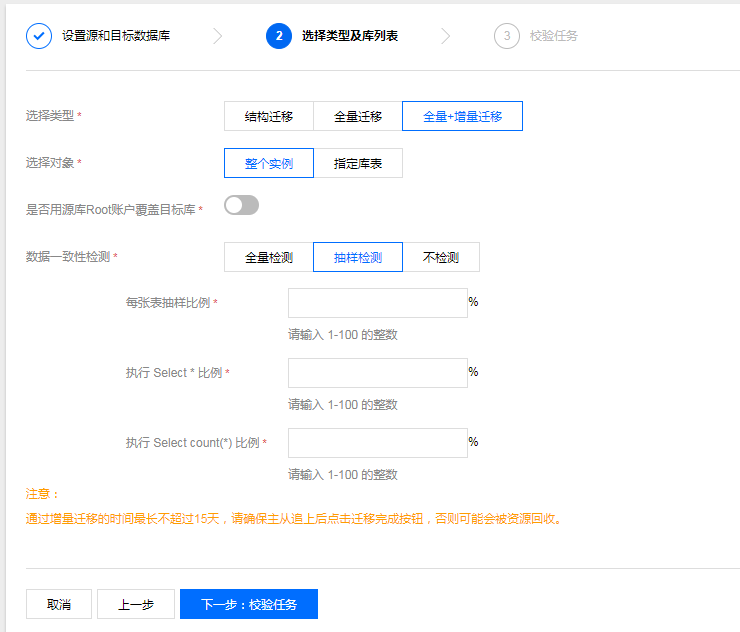
Note:
The test ratio fields are required for certain test items.
2.5 Verify migration task information
After a migration task is created, verify the task information. Click Next Step: Verification Task to verify it. You cannot start the task until all the verification items pass. Click Start to complete the process.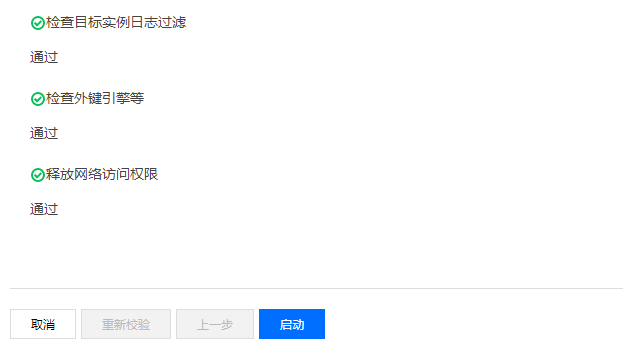
There are 3 statuses for task verification:
- Pass: This means verification is fully passed.
- Warning: This means that the verification fails. Database operation may be affected during or after data migration, but the migration task can still be executed.
- Failed: This means that the verification fails, and the migration task cannot be executed. If the verification fails, check and modify the migration task information according to the error entries and then retry the verification. To view the cause of failure, please see "Verification Failure Description".
2.6 Start migration
Once the verification passes, you can click Start Migration to start the migration right away. Note that if you have set a specified time for a migration task, the task will be queued and executed at the specified time. Otherwise, it will be executed immediately.
When the migration is started, you can see the corresponding migration progress information under the migration task. Required migration steps and the current stage will be displayed if you move your cursor over the exclamation mark following the steps.
Note:
Due to system design limitations, multiple migration tasks submitted or queued at the same time will be performed serially based on the queuing time.
2.7 Incremental Synchronization
When creating a migration task, the incremental synchronization option is selected by default. When data migration is completed, the target CDB for MySQL will be set as the slave database for the source database, and new data of the source database during migration will be synced to the destination CDB for MySQL via master/slave synchronization. In this case, any changes made to the source database will be synced to the destination CDB for MySQL.
After migration, click the Stop button to terminate the synchronization relationship between source and destination databases, then switch the service to the destination the CDB for MySQL instance to complete migration.
Note:
Before terminating synchronization, do not write data into the destination database instance as this may cause data inconsistency between the source and destination databases, which will cause data comparison to fail, resulting in a failed migration.
2.8 Stop migration
To cancel an in-progress migration task, click the Cancel button.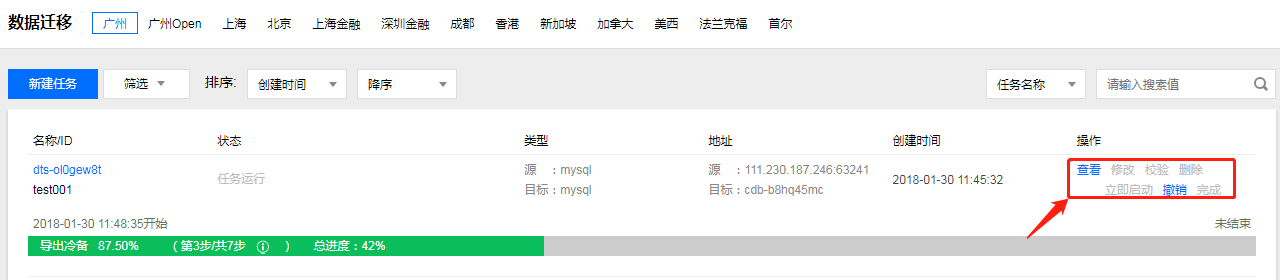
Note:
- Restarting the task may cause the verification or task to fail. You may need to manually clear all conflicting databases or tables in the destination database to start the migration task again.
- When migrating a single table, make sure that tables relied on by foreign keys of all tables are migrated.
2.9 Complete migration
When the migration is 100% complete, click the Finish button on the right to complete the migration.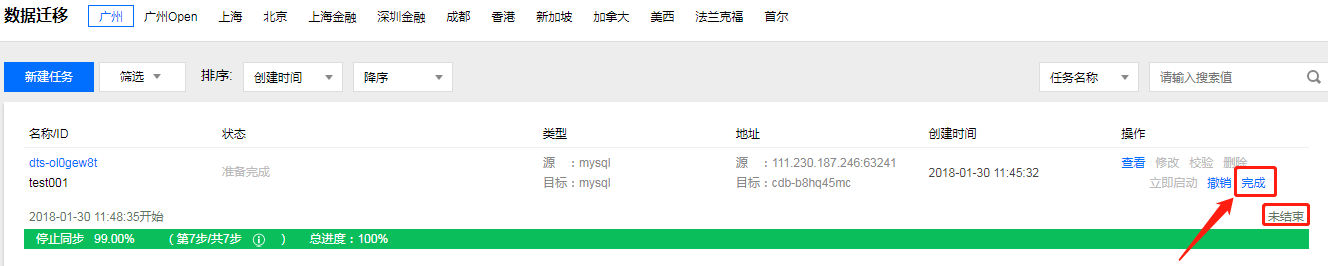
Note:
While the migration is in a status of Unfinished, the migration task will continue, so will the database data synchronization.

 Yes
Yes
 No
No
Was this page helpful?