This document details how to use the CFS (Cloud File Storage) system on a Windows client. This guide uses Windows Server 2019 as an example. For other versions of the operating system, such as Windows Server 2016 and Windows Server 2022, the operation methods are the same.
Prerequisites
Before creating the file system, confirm that there are available VPC and subnet. It is recommended to set the Windows CVM and CFS file system in the same AZ to reduce network latency and achieve a better user experience. If there is no VPC or subnet, see Quick Configuration of VPC to configure it.
Before creating the file system, confirm that there is an available Windows CVM. If not, see Quick Configuration of Windows CVM to purchase and configure it. To log in to the CVM, use the administrator account (uniformly Administrator) and the password set during purchase.
The Turbo series file system does not support mounting on Windows CVM and only supports mounting on Linux CVM. For more information, see Using CFS Turbo File System on a Linux Client.
Operation Steps
Step 1: Creating a File System and Its Mount Point
Before mounting, verify whether the network connectivity between the client and the file system is established. Enable the Telnet service on the Windows client and verify using the telnet command (for example, telnet 192.168.1.1 445). The ports that need to be opened for different file protocols are listed in the table below:
File System Protocol
Open Port
Verify network connectivity
NFS 3.0
111,892,2049
telnet <file system IP address> 111
telnet <file system IP address> 892
telnet <file system IP address> 2049
CIFS/SMB
445
telnet <file system IP address> 445
Note:
Windows temporarily does not support using NFSv4 mount. If the connection fails, please check the client security group configuration to ensure that the inbound and outbound traffic for the ports corresponding to the file system IP address is allowed. For more information, see Adding Security Group Rules.
Step 4: Mounting a File System
Note:
It is recommended that Windows clients use the SMB protocol to mount file systems, and Linux clients use the NFS protocol to mount file systems.
Mount SMB file system
Mount via the CFS console
Mount via command line
Mount via the graphical interface
You can install the SMB client on the CVM and mount the corresponding file systems via the CFS console. For specific steps, see Mounting File Systems Using the Console.
1. Allow Guest access to SMB protocol file systems. If this is your first time mounting and your operating system is Win10, Windows Server 2019 or later, run the following as administrator using cmd or PowerShell to modify the registry. Wait for the service to fully restart before proceeding to Step 2. If your operating system is Windows Server 2016 or earlier, proceed directly to Step 2.
Ensure there is a space between the shared directory name and the mount target's public IP address.
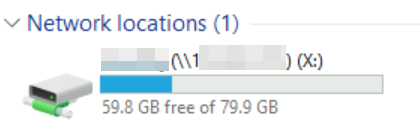
3. Verify the correctness of read and write operations. View File Explorer > This PC, when Network locations is displayed as shown in the figure below, indicating that it is connected to the CFS file system. Enter the file system to create a new file and verify the correctness of read and write operations.
1. Click
to go to the Start menu.
2. Search for "This PC", right-click, and select Map network drive.
3. In the pop-up window, select the drive letter, in the "Folder" field, fill in \\\\<mount target IP address>\\<mount target ID>, and click Finish.
It is recommended to select "Reconnect at sign-in" to avoid disconnection after machine restart or relogin.
4. View File Explorer > This PC. When Network locations is displayed as shown in the figure below, it indicates that the connection to the CFS file system has been established. Enter the file system to create a new file, write data, and verify the correctness of read and write operations.
Mounting an NFS File System
Mount via the CFS console
Mount via command line
Mount via the graphical interface
You can install the NFS client on the CVM and mount the corresponding file system through the CFS console. For specific steps, see Mounting File Systems Using the Console.
1. Enable the NFS service. Run the following command using PowerShell as an administrator to enable the NFS service.
Install-WindowsFeature -Name NFS-Client
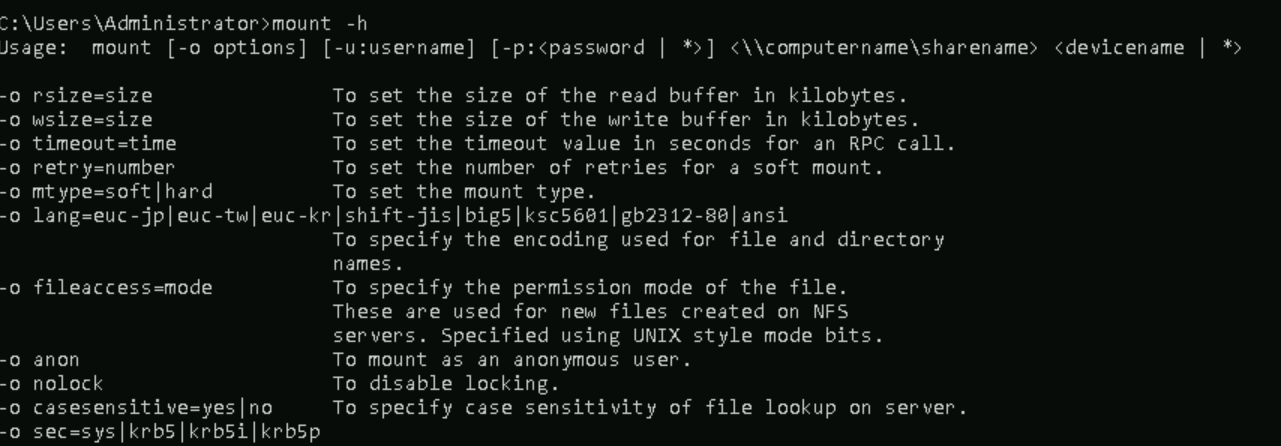
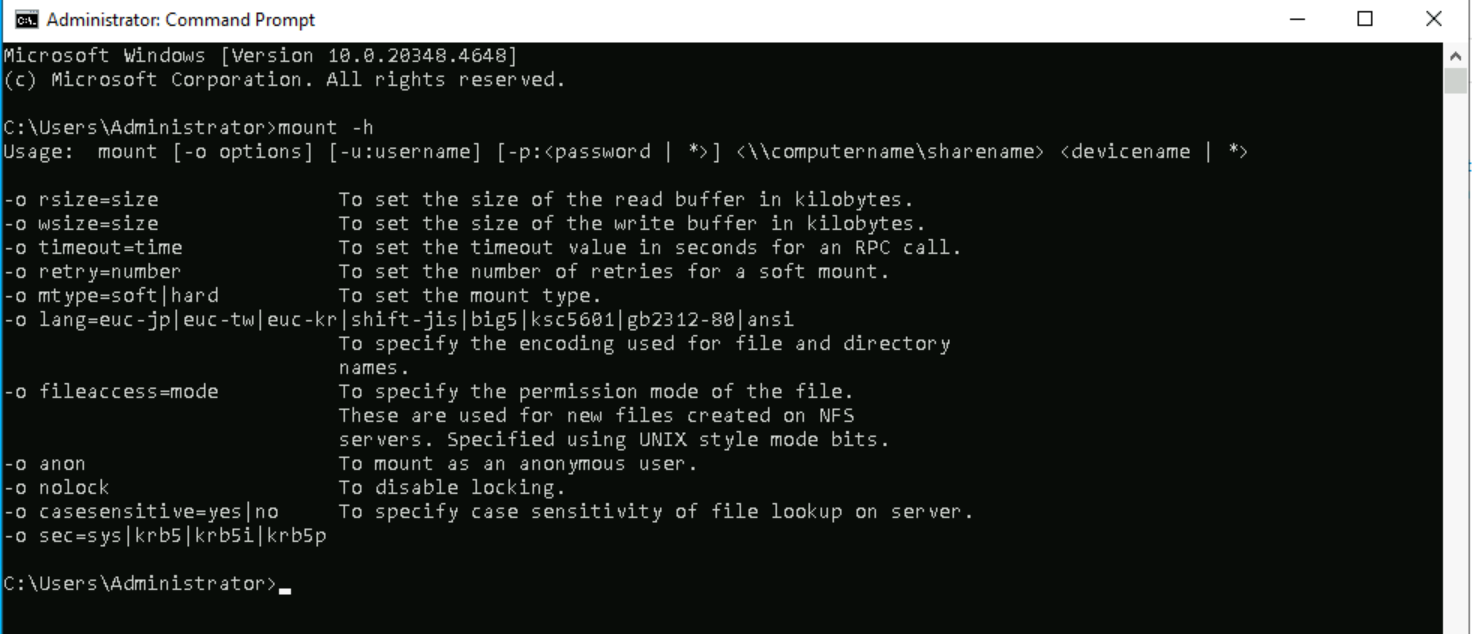
2. Verify whether the NFS service is enabled. Use cmd to execute mount -h to verify whether the service is enabled. If NFS-related information is returned, it indicates that the NFS client is running normally.
3. Add anonymous users and user groups. Run cmd as an administrator and run the following command to modify the registry to allow anonymous users/user groups to access and set the mount Lock parameter to 1.
4. Take effect of the registry. Run the following command to restart the NFS client service for the modified registry to take effect. Alternatively, you can restart the Windows system to make the registry modifications effective.
net stop nfsclnt && net stop nfsrdr && net start nfsrdr && net start nfsclnt
Note:
Restarting the service may cause the registry to not be fully updated and take effect due to inherent issues in the Windows operating system. It is recommended that you restart the machine.
5. Mount the file system. Open the Command Prompt tool as administrator and use the following command to mount the file system.
mount -o nolock mtype=hard <Mount target IP address>:/<Mount target ID> <Drive letter to be mounted>:
:: mount -o nolock mtype=hard 10.xxx.xxx.xxx:/abcdefgh x:
6. Verify read/write correctness. Go to File Explorer > This PC. When Network locations is displayed as shown in the following figure, it indicates that the connection to the CFS file system has been established. Access the file system to create new files and test read/write correctness.
1. Enable the NFS service. Log in to the CVM, click
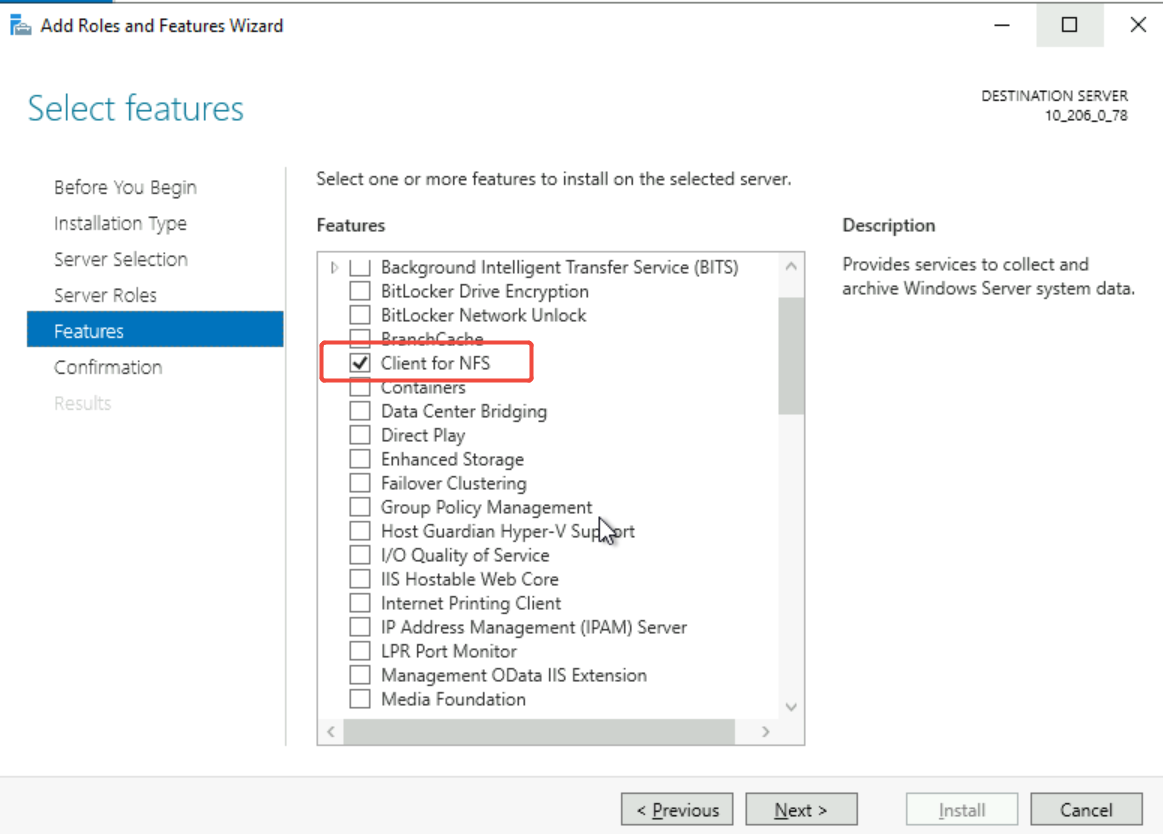
, choose Control Panel > Programs > Turn Windows Features on or off > Add Roles and Features. In the pop-up Add Roles and Features Wizard window, keep the default configuration, click Next until the Features page, select NFS Client, click Next. On the Confirmation page, click Install.
Note:
Windows Home does not include an NFS client option, so you can use the Windows Server operating system or Windows Professional.
If you have previously enabled the NFS service, you can skip this step.
2. Verify whether the NFS service is enabled. Use the Command Prompt to execute mount -h to verify whether the NFS service is started. If it returns information about NFS, the NFS client is running properly.
3. Add anonymous users and user groups. Run cmd as an administrator and run the following command to modify the registry to allow anonymous users/user groups to access and set the mount Lock parameter to 1.
4. Take effect of the registry. Run the following command to restart the NFS client service for the modified registry to take effect. Alternatively, you can restart the Windows system to make the registry modifications effective.
net stop nfsclnt && net stop nfsrdr && net start nfsrdr && net start nfsclnt
Note:
Restarting the service may cause the registry to not be fully updated and take effect due to inherent issues in the Windows operating system. It is recommended that you restart the machine.
5. In the pop-up window, select a drive letter, enter \\\\<mount target IP address>\\<mount target ID> in the "Folder" field, and click Finish.
Note:
\\\\<mount target IP address>\\<mount target ID> can be obtained by logging in to CFS Console > File System ID > File System Mount Point, requiring minor adjustments in format. For example, when the mount command is mount -o nolock mtype=hard 10.xxx.xxx.xxx:/abcdefgh x:, the mount target IP address is 10.xxx.xxx.xxx, the mount target ID is abcdefgh, then, after concatenation, the "Folder" field should be filled with \\\\10.xxx.xxx.xxx\\abcdefgh.
It is recommended to select "Reconnect at logon" to avoid disconnection after machine restart or relogin.
6. Verify the correctness of read and write operations. View File Explorer > This PC. When Network locations is displayed as shown in the figure below, indicating that it is connected to the CFS file system. Enter the file system to create a new file and verify the correctness of read and write operations.
Step 5: Uninstall the file system
Uninstall via command line
Uninstall via the graphical interface
If you need to unmount the file system, run the following command in Command Prompt as an administrator. The "directory name" can be either the mounted drive letter (such as "x:") or the full path of the file system.
Unmount SMB File System:
net use x: /del
Unmount NFS File System:
sudo umount x:
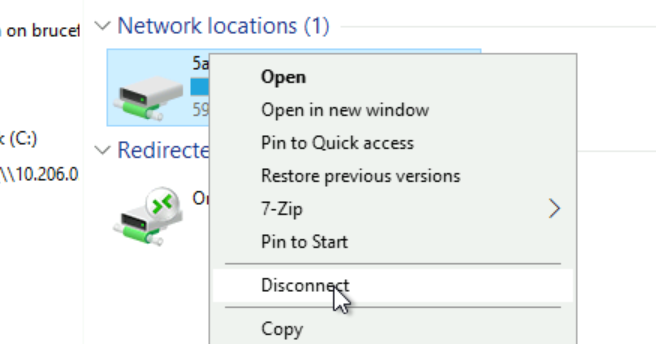
If you need to unmount the file system and disconnect, simply right-click the corresponding drive, then click Disconnect in the menu to disconnect the file system.
Step 6: Delete Resources
Note:
After a file system is deleted, the resources cannot be recovered. It is recommended that you back up resources using snapshots before deleting the file system.
You can delete file systems from the Tencent Cloud console. Go to the Tencent Cloud CFS console, select the file system that needs to be deleted, click Delete and Confirm to delete the file system.
FAQs
'telnet' is not recognized as an internal or external command, operable program, or batch file
Cause: The Telnet service is not enabled.
Solution: Log in to the CVM, click , choose Control Panel > Programs > Turn Windows Features on or off > Add Roles and Features. In the pop-up Add Roles and Features Wizard window, keep the default configuration, click Next until the Features page, select Telnet Client, click Next. On the Confirmation page, click Installte.
A system error occurred while mounting the NFS/SMB file system: 53
Cause: The network path was not found.
Network not connected.
The registry is not configured correctly for Workstation or Lanmanworkstation.
Solution:
Execute ping <file system IP address> to determine whether the network is connected, and execute telnet <file system IP address> {specific ports: NFS: 111, 892, 2049; SMB: 445} to determine whether the NFS/SMB service is available.
If the network is not connected, check whether the CVM and file system instance are in the same VPC, and whether bidirectional access is allowed in the VPC route tables and subnet ACL rules.
If the port is not connected, check whether the security group of the CVM and the permission group of the CFS instance allow bidirectional access to the corresponding port.
After ruling out network issues, check the Registry Editor:
To mount an SMB protocol file system, navigate to HKEY_LOCAL_MACHINE\\SYSTEM\\CurrentControlSet\\Services\\LanmanWorkstation\\Parameters. The value for AllowInsecureGuestAuth should be set to 1; the value for RequireSecuritySignature should be set to 0. If not, modify these values and restart the machine if necessary for the registry changes to take effect.
To mount an NFS protocol file system, navigate to HKEY_LOCAL_MACHINE\\SOFTWARE\\Microsoft\\ClientForNFS\\CurrentVersion\\Users\\Default\\Mount. The value for Locking should be set to 1; the values for AnonymousGID and AnonymousUID should be set to 0. If not, modify these values and restart the machine if necessary for the registry changes to take effect.
If none of the above issues are present, check whether the Windows firewall is blocking access. Ensure network security is maintained, then disable the firewall and retry the mount.
Mounting NFS/SMB file system, a system error occurred: 85
Cause: The local device name (target drive letter) is already in use.
Solution: Please change the target drive letter and remount.
When an attempt is made to mount NFS/SMB file systems, a system error: 1272 occurs or creating files in the file system prompts an access denied error
Cause: For Windows 10 or Windows Server 2019 and later versions of the operating system, Guest access to SMB/NFS needs to be allowed.
Solution: Refer to System Error 53 to check whether the registry changes have taken effect. If not, modify the registry.
After manually mounting the NFS file system, the mount succeeds but displays a red X, access is extremely slow, and the connection cannot be disconnected
Cause: Windows Explorer periodically checks the status of network drives. If the NFS response latency is too long, it may mistakenly determine that the connection is disconnected.
Solution:
It is recommended to mount SMB protocol file systems on Windows. If you must use NFS protocol file systems, remount them via the console.
The disconnection issue can be resolved by restarting the machine.