tencent cloud

Game Multimedia Engine

Release Notes
Product Introduction
Overview
Strengths
Features
Scenarios
Compliance
User Tutorial
Billing
Free Plan
Purchase Guide
SDK Download Guide
Product Feature Demo
Basic Feature Demo
Scenario-Specific Demo
Console Guide
Usage Querying
Activating Services
Getting Started
Quick Integration of SDK
Quick Integration of Sample Project
Basic Feature Development Guide
Authentication Key
Voice Chat Role Configuration
Sound Quality
Advanced Feature Development Guide
Server-Side Recording
Range Voice
3D Sound Effect
Sound Effect and Accompaniment
Network Audio Stream Forwarding Routing
Custom Message Channel
How to deal with the restrictions of corporate firewall
Language Parameter Reference List
Integrating GME Chat Room Management
Client API
SDK for Unity
SDK for Unreal Engine
Cocos2D SDK
SDK for Windows
SDK for iOS
SDK for Android
SDK for macOS
H5 SDK
Electron SDK
SDK for Flutter
SDK Version Upgrade Guide
Error Codes
Toolchain
Server APIs
History
Introduction
API Category
Usage APIs
Recording APIs
Making API Requests
Voice Chat APIs
Application APIs
Data Types
Error Codes
FAQ
Product Features
Troubleshooting Guide
Billing
Sample Project Usage
General
Authentication
Voice Chat Room Entry Failure
Sound and Audio
Network
Speech-to-text Conversion
Program Export
Service Agreement
Service Level Agreement
Contact Us
Glossary
GME Policy
Data Privacy and Security Agreement
Privacy Policy

Quick Run of Unreal Engine Sample Project

PDF
Focus Mode
Font Size
Last updated: 2024-01-18 11:53:35
This document describes how to quickly run GME Unreal Engine sample project and integrate the sample code to a project.

Running the Unreal Engine Sample Project

Environment requirements

Unreal Engine 4.22 or later
Microsoft Visual Studio
A configuration environment that can run Unreal Engine projects

Prerequisites

You need to activate the voice chat and voice messaging services of GME and get the AppId and Key in advance. For more information on how to apply for GME services, see Activating Services. appId is the AppID and authKey is the permission key in the console.

Directions

Step 1. Download the project

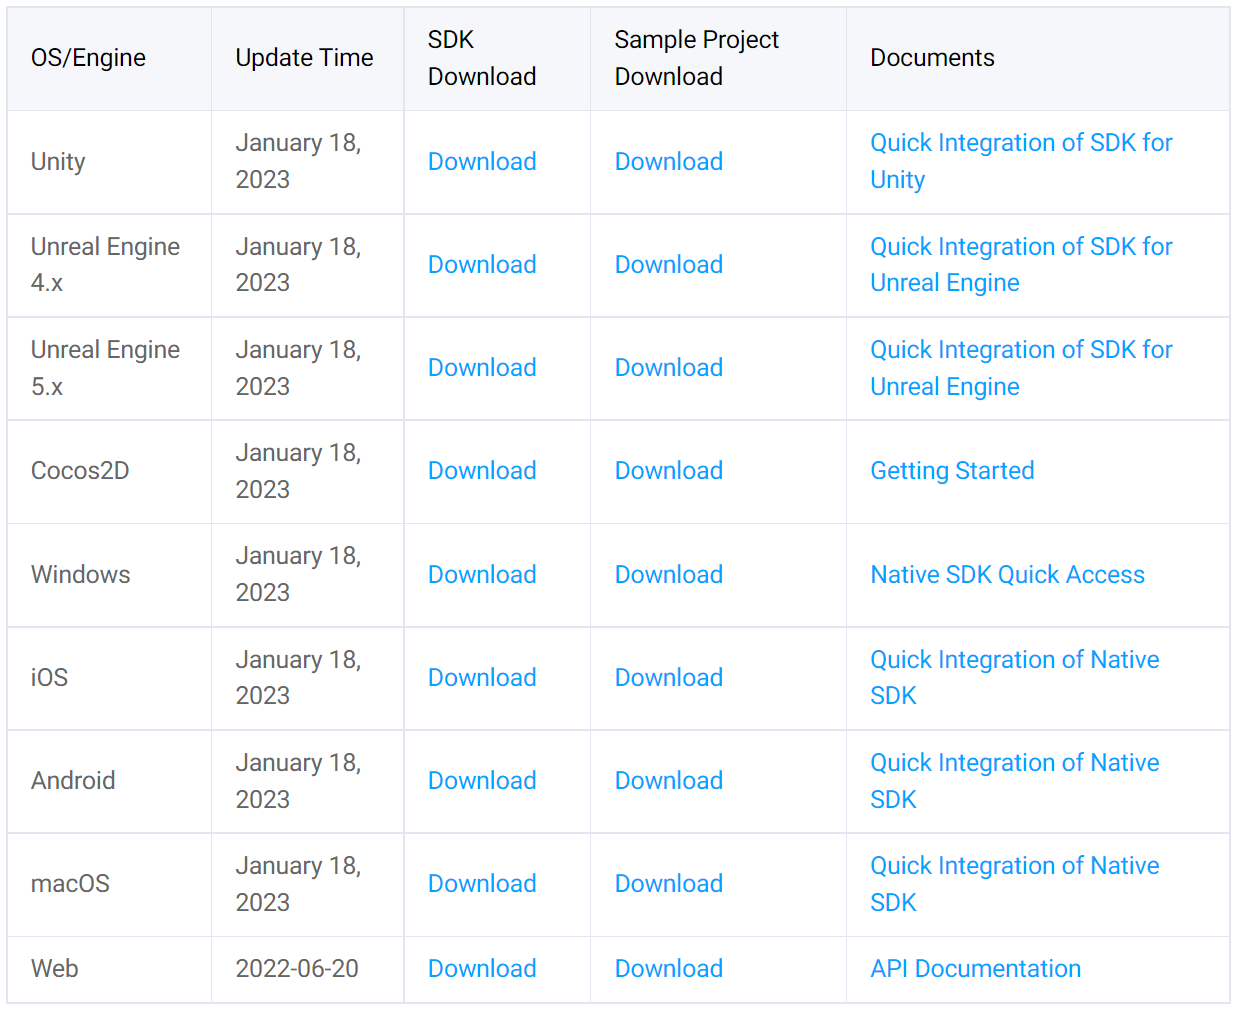
Download the Unreal Engine sample project as instructed in SDK Download Guide. As the demo configurations for UE5 and UE4 are different, you need to download the sample project for the corresponding engine version.


Step 2. Configure the project

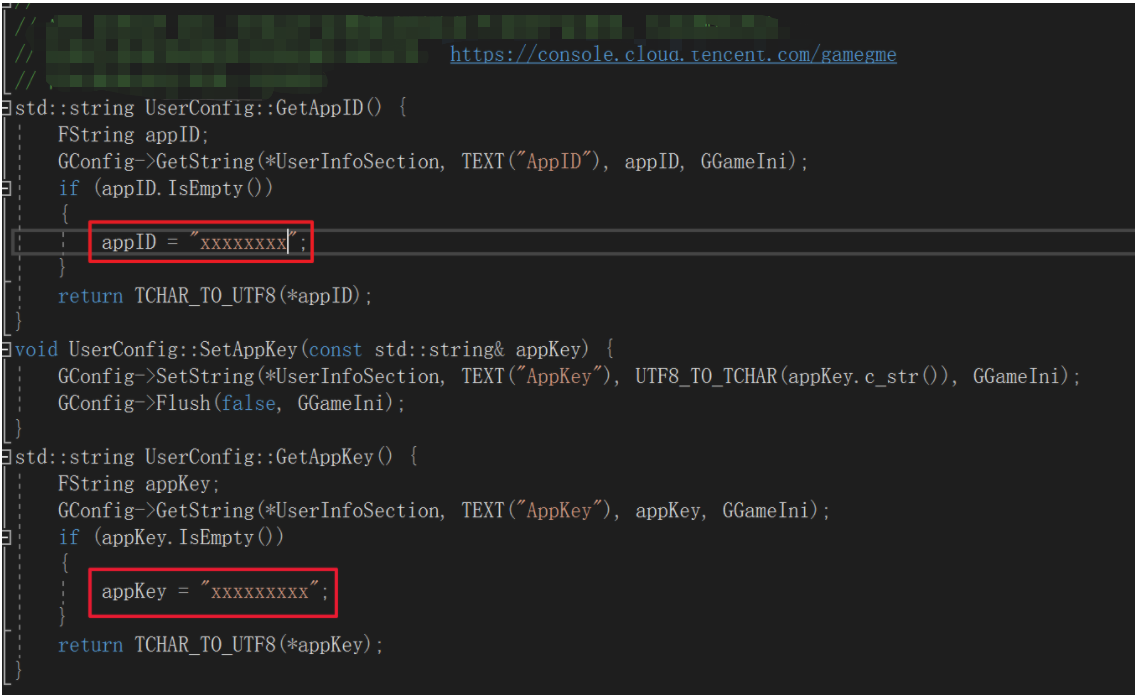
After downloading, open the project directory, find UserConfig.cpp in the Source\\UEDemo1 path, and change the appID and appKey in the red box as shown below to the AppID and permission key applied for in Service Management > Application Settings in the GME console.


Step 3. Compile and run the demo

1. Run the program
Click

in the Editor to run the program.


2. Initialize
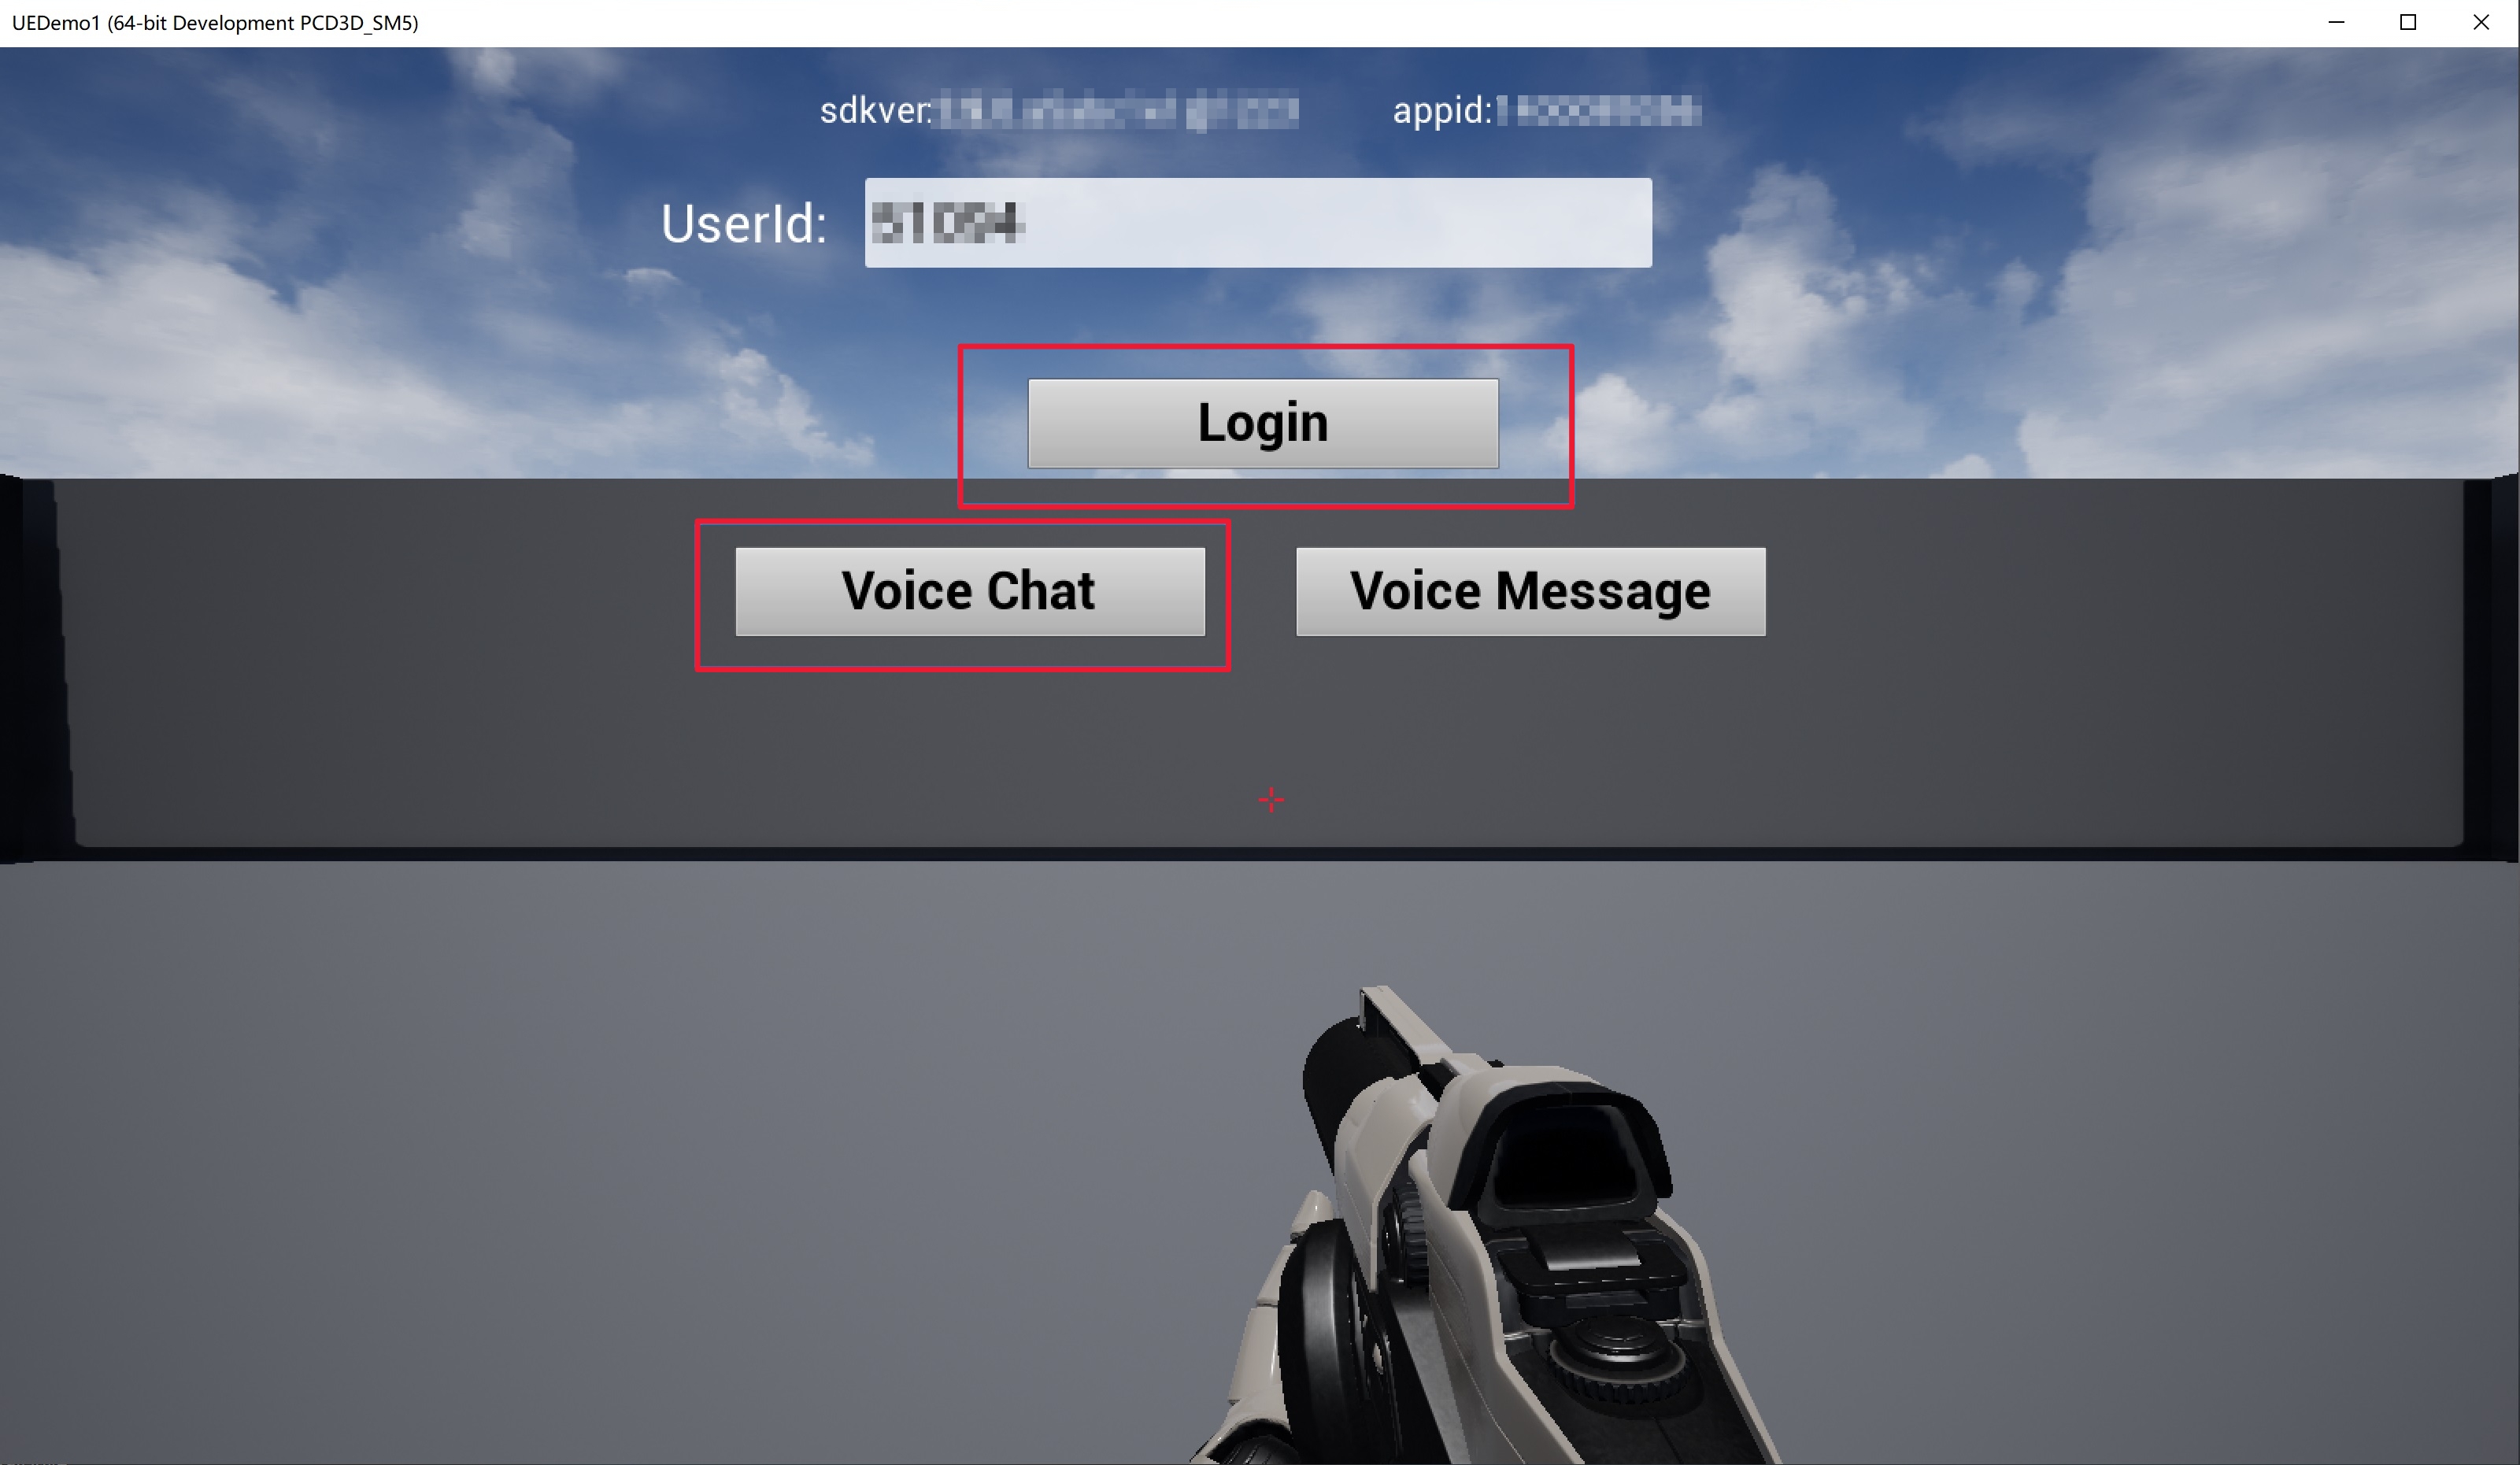
UserID: It is equivalent to openID, which is the unique identifier of a user in the application. The openID value must be unique on each terminal.
Voice Chat: voice chat feature UI.
Voice Messaging: voice messaging feature UI.
Click Login to initialize, and then click Voice Chat to enter the voice chat room configuration page.


3. Enter a voice chat room
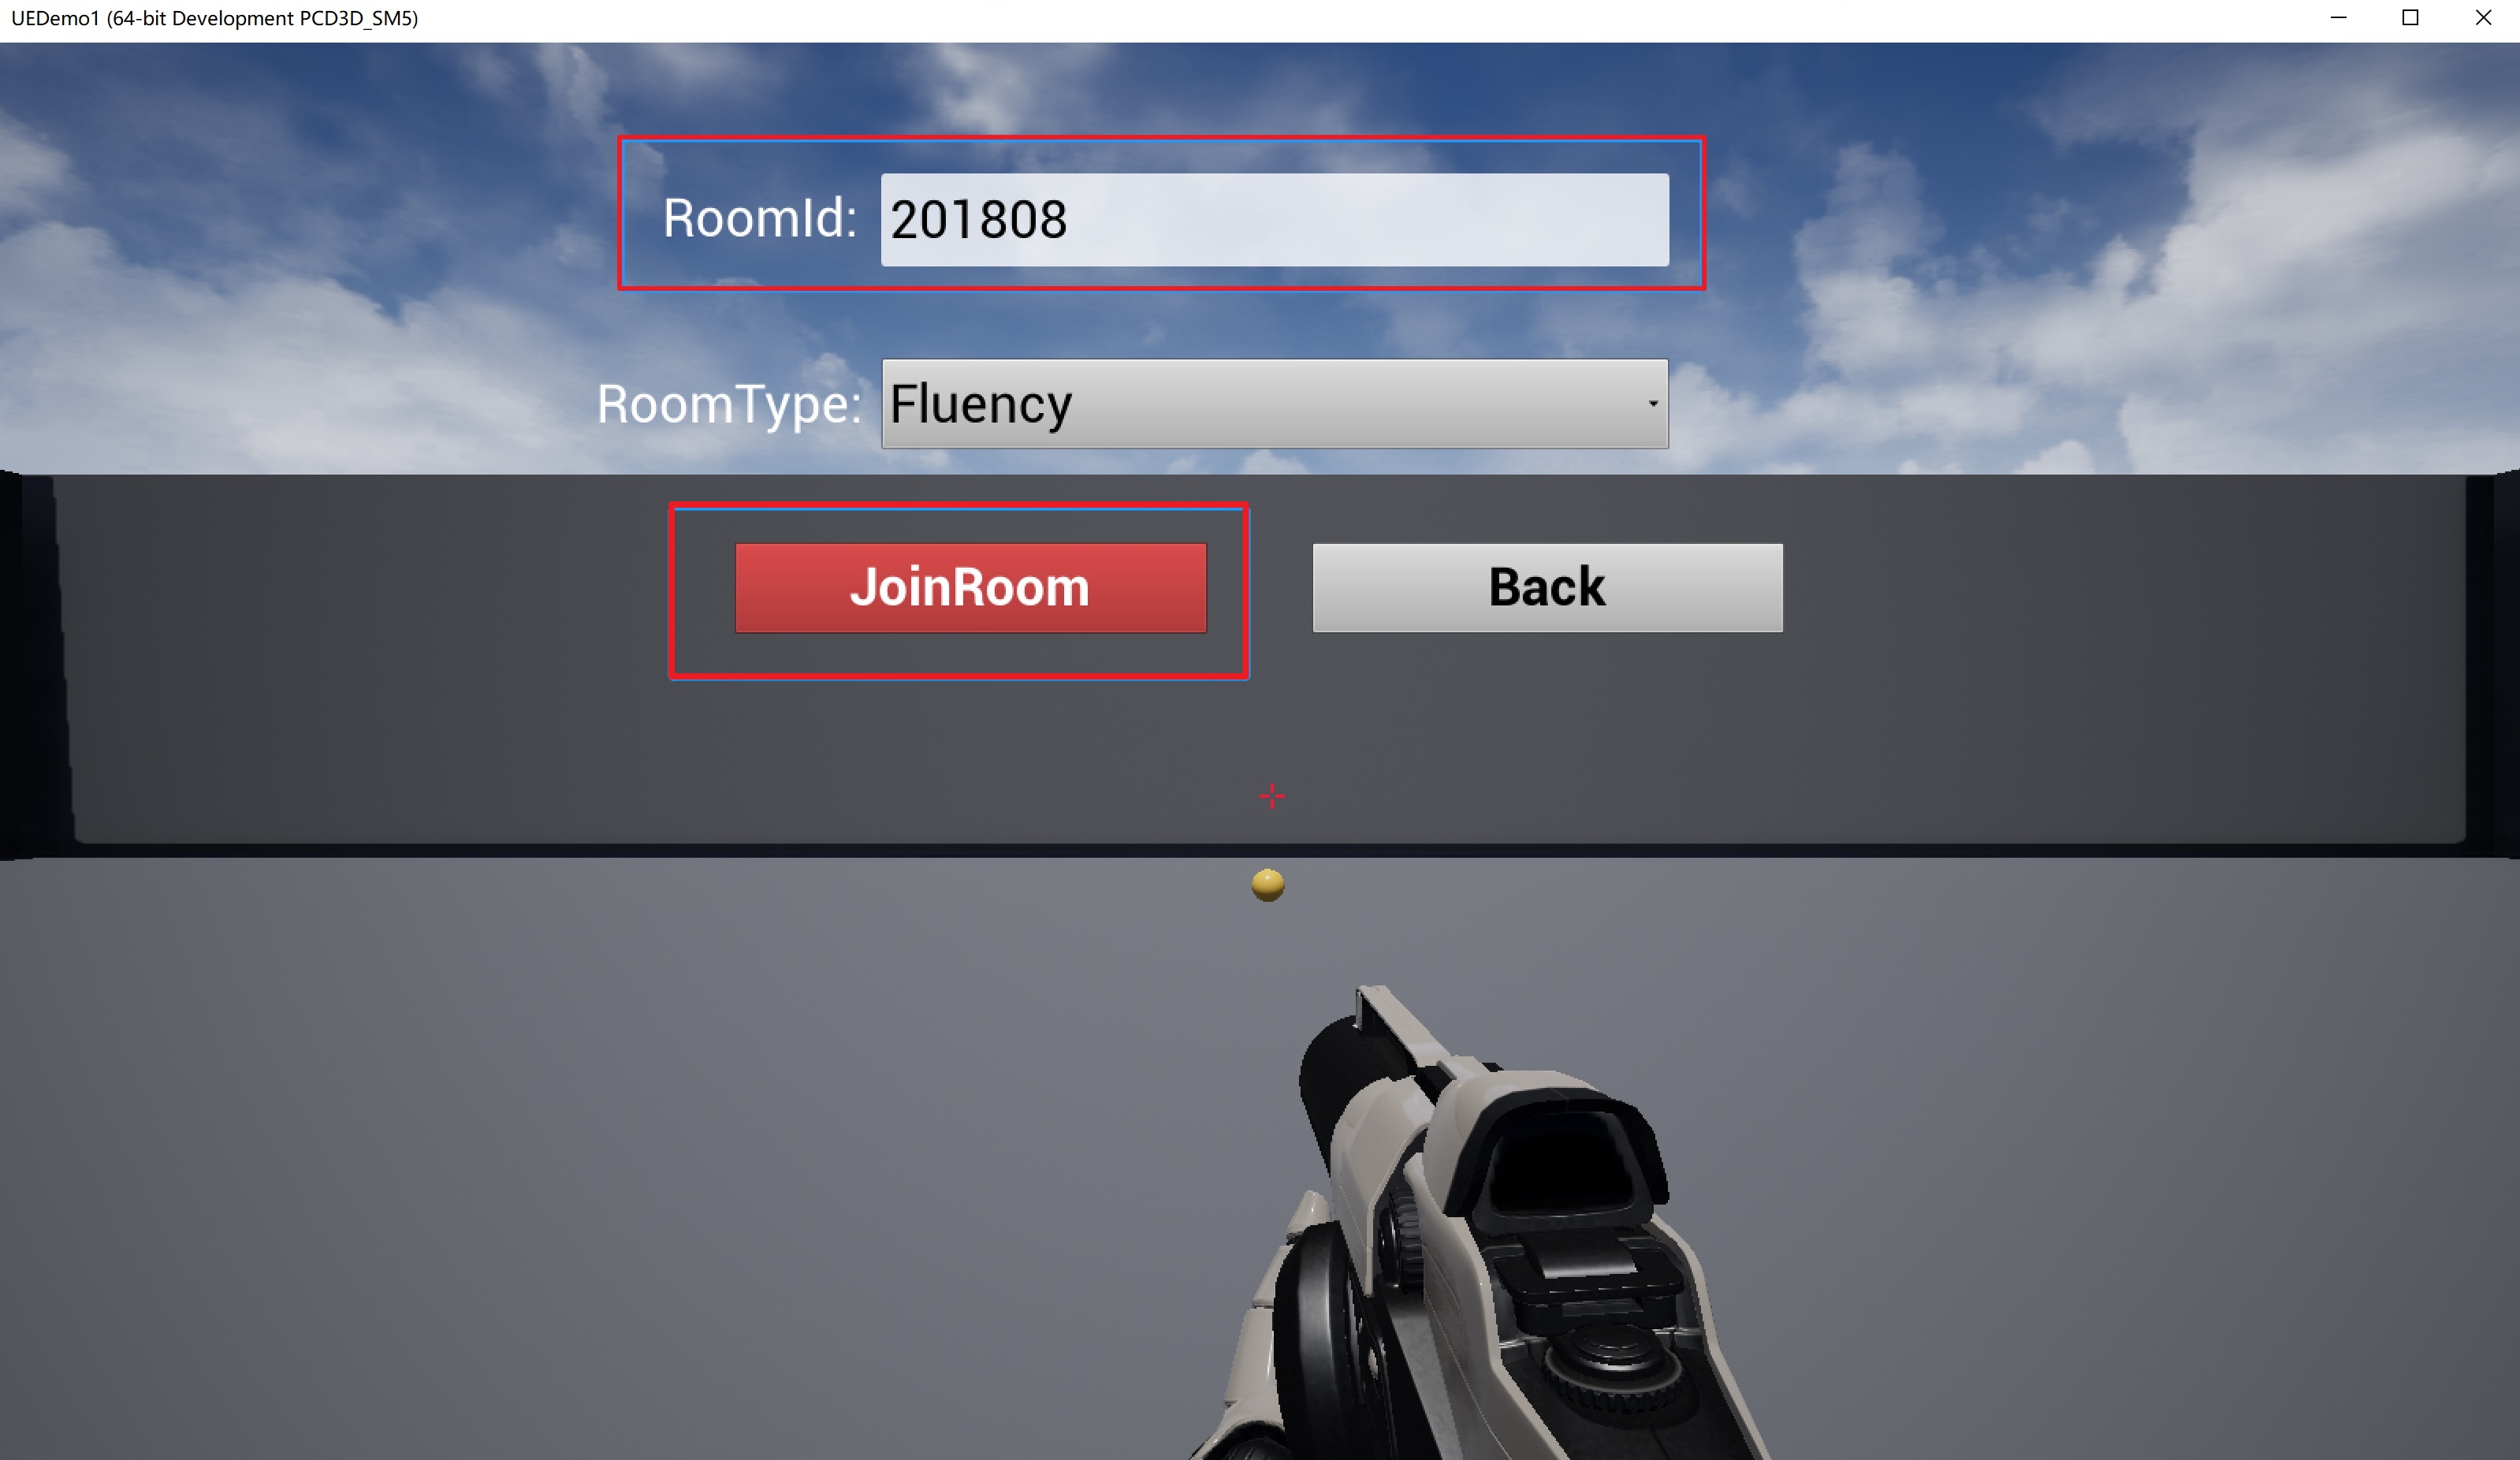
RoomId: Room ID. Users in the same room can communicate with each other by voice.
RoomType: Use Fluency to enter the room.
JoinRoom: Enter the voice room.
Back: Go back to the previous page.
After configuring the voice chat room ID, click JoinRoom to enter the room.
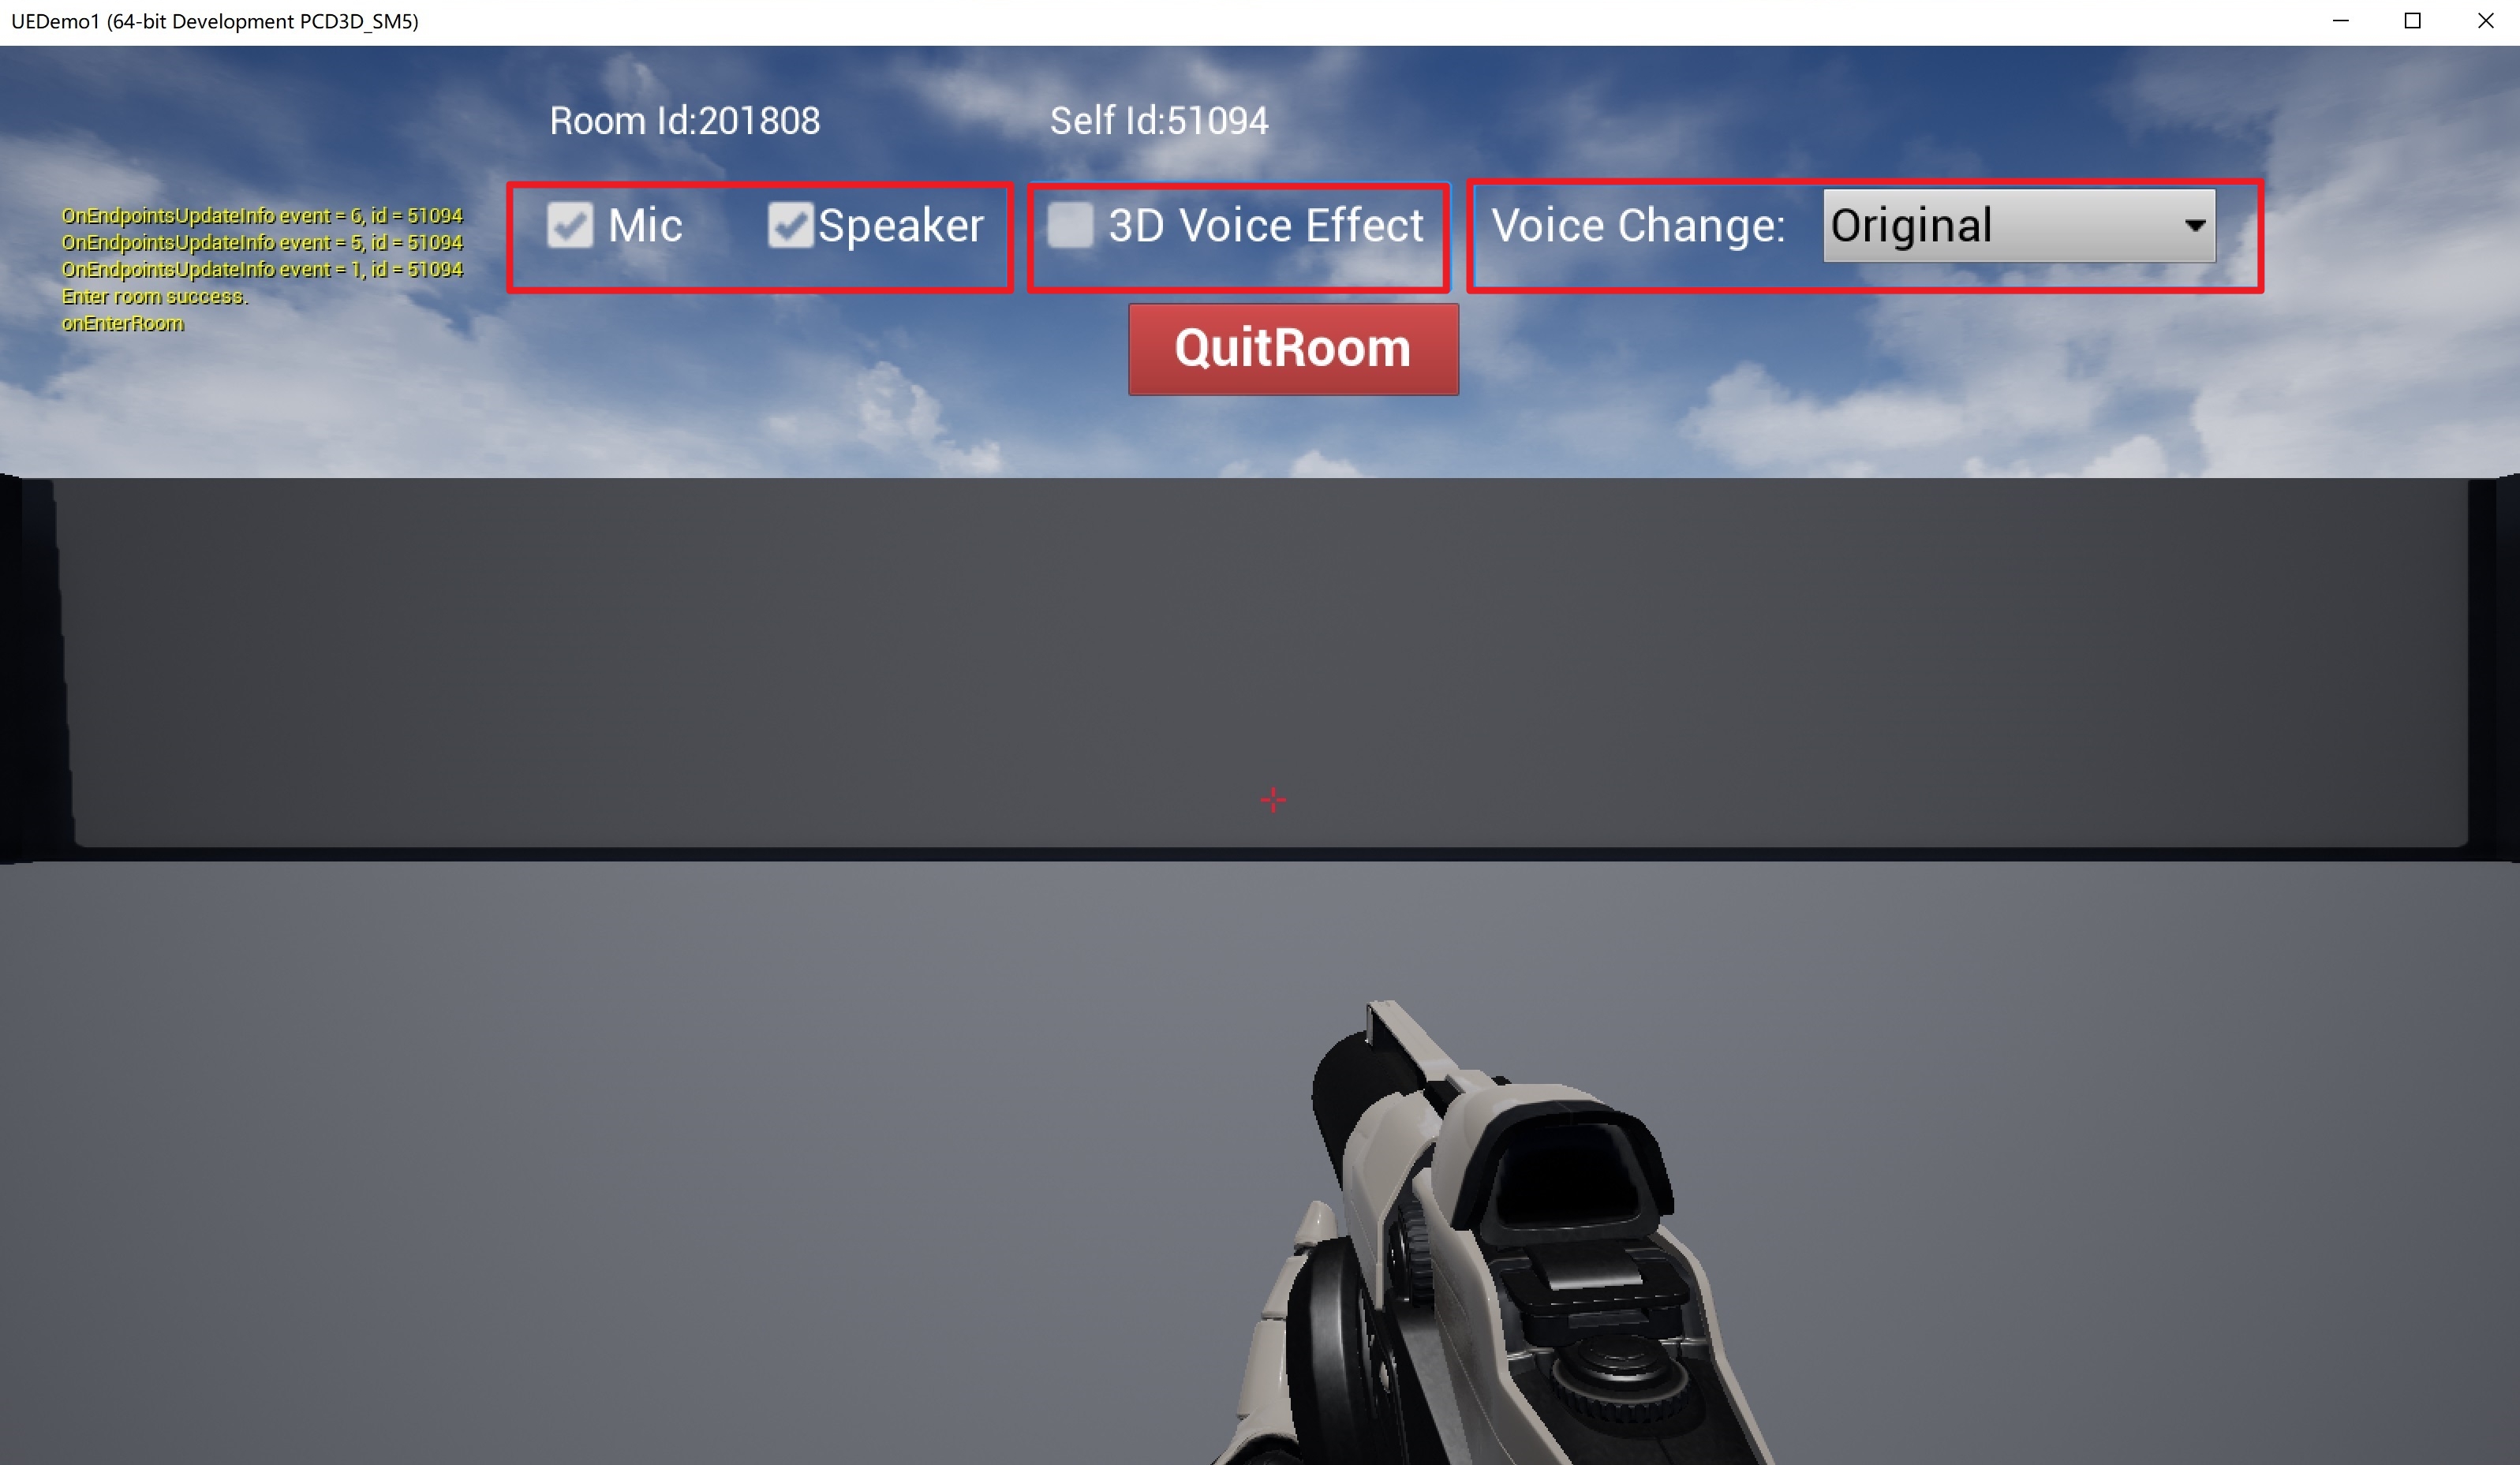


4. Use voice chat
The page will display the RoomID for room entry and the local openID.
Mic: Select to turn on the mic.
Speaker: Select to turn on the speaker.
3D Voice Effect: Select to enable 3D sound effects.
Voice Chang: Select to enable voice changing effects.
After the mic and speaker are selected locally, repeat the above steps on another device to enter the same room and turn on the mic and speaker, so that communication can be implemented. If 3D Voice Effect is selected on both terminals, use the A, S, D, and W keys to move around and experience the directional 3D stereo effect.


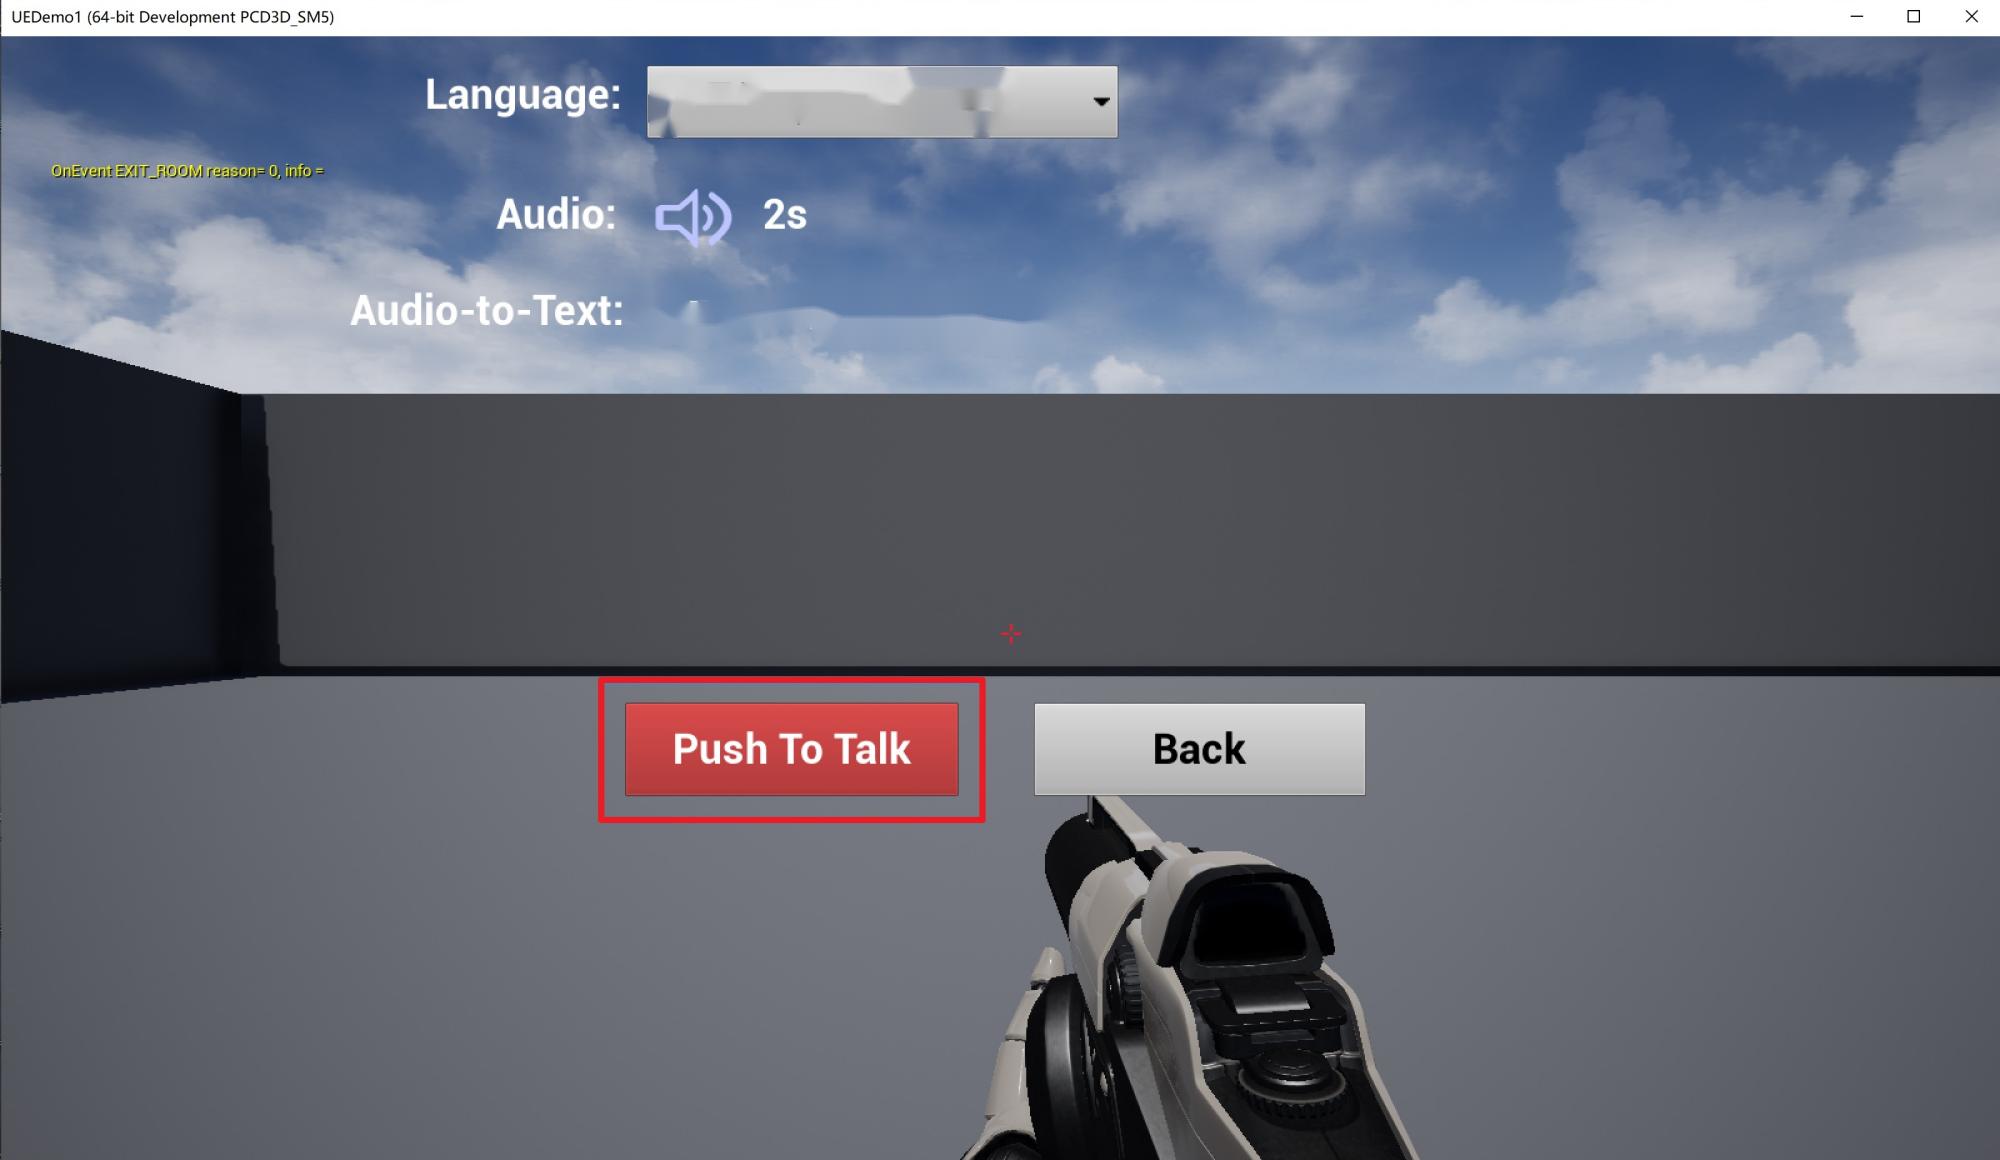
5. Use voice messaging
Language: Select the target language for text conversion. For example, if you speak Chinese, choose Mandarin.
Audio: Click to listen after recording.
Audio-to-Text: Text content of the voice message.
Push To Talk: Press and hold to record.
Back: Go back to the previous page.
Press and hold Push to Talk and speak into the mic. After you release the button, your voice message will be converted into text and displayed in the UI.


Sample Project Code Overview

The main process to use GME voice chat is Init > EnterRoom > EnableMic > EnableSpeaker. The main code of the sample project is in BaseViewController.cpp and ExperientialDemoViewController.cpp.

Initialization

The initialization code is in the InitGME function in the BaseViewController.cpp file. It includes initialization, authentication initialization for voice message, and TMGDelegate callback settings.
int UBaseViewController::InitGME(std::string sdkAppId, std::string sdkAppKey, std::string userId) {

int nAppid = atoi(sdkAppId.c_str());
int ret = ITMGContextGetInstance()->Init(sdkAppId.c_str(), userId.c_str());
ITMGContextGetInstance()->SetTMGDelegate(this);

int RetCode = (int) ITMGContextGetInstance()->CheckMicPermission();
FString msg = FString::Printf(TEXT("check Permission retcode =%d"), RetCode);
GEngine->AddOnScreenDebugMessage(INDEX_NONE, 10.0f, FColor::Yellow, *msg);

char strSig[128] = {0};
unsigned int nLength = 128;
nLength = QAVSDK_AuthBuffer_GenAuthBuffer(nAppid, "0", userId.c_str(), sdkAppKey.c_str(), (unsigned char *)strSig, nLength);
ITMGContextGetInstance()->GetPTT()->ApplyPTTAuthbuffer(strSig, nLength);

m_appId = sdkAppId;
m_appKey = sdkAppKey;
m_userId = userId;
m_isEnableTips = false;
m_tipsMark = 0;
return ret;
}
Using GME requires periodic calls to the Poll function in Tick in the UEDemoLevelScriptActor.cpp script.
void AUEDemoLevelScriptActor::Tick(float DeltaSeconds) {
Super::Tick(DeltaSeconds);

m_pTestDemoViewController->UpdateTips();
m_pCurrentViewController->UpdatePosition();
ITMGContextGetInstance()->Poll();
}

Room entry

The room entry code is in the EnterRoom function in the BaseViewController.cpp file.
void UBaseViewController::EnterRoom(std::string roomID, ITMG_ROOM_TYPE roomType) {
int nAppid = atoi(m_appId.c_str());
UserConfig::SetRoomID(roomID);

char strSig[128] = {0};
unsigned int nLength = 128;
nLength = QAVSDK_AuthBuffer_GenAuthBuffer(nAppid, roomID.c_str(), m_userId.c_str(), m_appKey.c_str(), (unsigned char *)strSig, nLength);
GEngine->AddOnScreenDebugMessage(INDEX_NONE, 10.0f, FColor::Yellow, TEXT("onEnterRoom"));
ITMGContextGetInstance()->EnterRoom(roomID.c_str(), roomType, strSig, nLength);
}
The room entry callback is in the OnEvent function in the same script.
if (eventType == ITMG_MAIN_EVENT_TYPE_ENTER_ROOM) {
int32 result = JsonObject->GetIntegerField(TEXT("result"));
FString error_info = JsonObject->GetStringField(TEXT("error_info"));
if (result == 0) {
GEngine->AddOnScreenDebugMessage(INDEX_NONE, 20.0f, FColor::Yellow, TEXT("Enter room success."));
}
else {
FString msg = FString::Printf(TEXT("Enter room failed. result=%d, info = %ls"), result, *error_info);
GEngine->AddOnScreenDebugMessage(INDEX_NONE, 20.0f, FColor::Yellow, *msg);
}
onEnterRoomCompleted(result, error_info);

Device enablement

Device enablement code after successful room entry is in ExperientialDemoViewController.cpp.
void UExperientialDemoViewController::onCheckMic(bool isChecked) {
//GEngine->AddOnScreenDebugMessage(INDEX_NONE, 10.0f, FColor::Yellow, L"onCheckMic");
ITMGContext *pContext = ITMGContextGetInstance();
if (pContext) {
ITMGAudioCtrl *pTmgCtrl = pContext->GetAudioCtrl();
if (pTmgCtrl) {
pTmgCtrl->EnableMic(isChecked);
}
}
}

void UExperientialDemoViewController::onCheckSpeaker(bool isChecked) {
//GEngine->AddOnScreenDebugMessage(INDEX_NONE, 10.0f, FColor::Yellow, L"onCheckSpeaker");
ITMGContext *pContext = ITMGContextGetInstance();
if (pContext) {
ITMGAudioCtrl *pTmgCtrl = pContext->GetAudioCtrl();
if (pTmgCtrl) {
pTmgCtrl->EnableSpeaker(isChecked);
}
}
}

3D sound effect

For the connection of 3D sound effect, see 3D Sound Effect. In the project, initialize the 3D sound effect feature first with the code in ExperientialDemoViewController.cpp.
void UExperientialDemoViewController::onCheckSpatializer(bool isChecked) {
char buffer[256]={0};
// snprintf(buffer, sizeof(buffer), "%s3d_model", getFilePath().c_str());
snprintf(buffer, sizeof(buffer), "%sgme_2.8_3d_model.dat", getFilePath().c_str());
int ret1 = ITMGContextGetInstance()->GetAudioCtrl()->InitSpatializer(buffer);
int ret2 = ITMGContextGetInstance()->GetAudioCtrl()->EnableSpatializer(isChecked, false);
FString msg = FString::Printf(TEXT("InitSpatializer=%d, EnableSpatializer ret=%d"), ret1, ret2);
GEngine->AddOnScreenDebugMessage(INDEX_NONE, 10.0f, FColor::Yellow, msg);
}
Call the UpdatePosition function in Tick in the UEDemoLevelScriptActor.cpp script .
void AUEDemoLevelScriptActor::Tick(float DeltaSeconds) {
Super::Tick(DeltaSeconds);

m_pTestDemoViewController->UpdateTips();
m_pCurrentViewController->UpdatePosition();
ITMGContextGetInstance()->Poll();
}


void UBaseViewController::UpdatePosition() {
if (!m_isCreated)
return;

ITMGRoom *pTmgRoom = ITMGContextGetInstance()->GetRoom();
if (!pTmgRoom)
{
return;
}

int nRange = GetRange();
pTmgRoom->UpdateAudioRecvRange(nRange);

FVector cameraLocation = UGameplayStatics::GetPlayerCameraManager(m_pActor->GetWorld(), 0)->GetCameraLocation();
FRotator cameraRotation = UGameplayStatics::GetPlayerCameraManager(m_pActor->GetWorld(), 0)->GetCameraRotation();

FString msg = FString::Printf(TEXT("location(x=%.2f,y=%.2f,z=%.2f), rotation(pitch=%.2f,yaw=%.2f,roll=%.2f)"),
cameraLocation.X, cameraLocation.Y, cameraLocation.Z, cameraRotation.Pitch, cameraRotation.Yaw, cameraRotation.Roll);

int position[] = { (int)cameraLocation.X,(int)cameraLocation.Y, (int)cameraLocation.Z };
FMatrix matrix = ((FRotationMatrix)cameraRotation);
float forward[] = { matrix.GetColumn(0).X,matrix.GetColumn(1).X,matrix.GetColumn(2).X };
float right[] = { matrix.GetColumn(0).Y,matrix.GetColumn(1).Y,matrix.GetColumn(2).Y };
float up[] = { matrix.GetColumn(0).Z,matrix.GetColumn(1).Z,matrix.GetColumn(2).Z };


pTmgRoom->UpdateSelfPosition(position, forward, right, up);
SetPositionInfo(msg);
}

Enable 3D effects in ExperientialDemoViewController.cpp.
void UExperientialDemoViewController::onCheckSpatializer(bool isChecked) {
char buffer[256]={0};
// snprintf(buffer, sizeof(buffer), "%s3d_model", getFilePath().c_str());
snprintf(buffer, sizeof(buffer), "%sgme_2.8_3d_model.dat", getFilePath().c_str());
int ret1 = ITMGContextGetInstance()->GetAudioCtrl()->InitSpatializer(buffer);
int ret2 = ITMGContextGetInstance()->GetAudioCtrl()->EnableSpatializer(isChecked, false);
FString msg = FString::Printf(TEXT("InitSpatializer=%d, EnableSpatializer ret=%d"), ret1, ret2);
GEngine->AddOnScreenDebugMessage(INDEX_NONE, 10.0f, FColor::Yellow, msg);
}


Help and Support

Was this page helpful?

Help us improve! Rate your documentation experience in 5 mins.

Feedback