- Release Notes and Announcements
- Product Introduction
- Purchase Guide
- Getting Started
- Operation Guide
- Instance Management
- Service Management
- Creating API
- API Creation Overview
- Creating APIs Connecting to the Public URL/IP Backend
- Creating APIs Connecting to the VPC Resource Backend
- Creating APIs Connecting to the SCF Backend
- Creating API for Interconnecting Backend with COS
- Creating APIs Connecting to the Mock Backend
- Creating APIs Connecting to the TSF Backend
- Importing APIs
- API Management
- Calling API
- Release and Access
- Custom Domain Name and Certificate
- Usage Plan
- Backend Upstream
- Verification and Security
- Log Statistics
- Access Monitoring
- API Doc Generator
- Application Management
- Permission Management
- Precautions
- Private IP Ranges and Public VIPs of API Gateway Regions
- Plugin Usage
- Best Practices
- Making Serverless Service Available quickly through API Gateway
- Integrating WAF to API Gateway for Security Protection
- Accessing Resources in IDC via API Gateway Dedicated Instance
- Quick Access to TEM Application via API Gateway
- Integrating ECDN to API Gateway for Acceleration
- API Gateway Providing the Access Capability for TKE
- Migrating from Region A to Region B
- Development Guide
- API Documentation
- Legacy Features
- FAQs
- Service Level Agreement
- Contact Us
- Glossary
Creating General API
Last updated: 2020-12-04 11:21:18
This document is currently invalid. Please refer to the documentation page of the product.
Overview
This document describes how to create a general API in the API Gateway Console and configure the frontend, backend, and response result in detail.
Step 1. Create a general API
- Log in to the API Gateway Console and click Service on the left sidebar.
- In the service list, click the name of the target service to view it.
- In the service details, click the Manage API tab and choose to create a general API based on the backend business type.
- Click Create for subsequent configuration.
Step 2. Configure the frontend
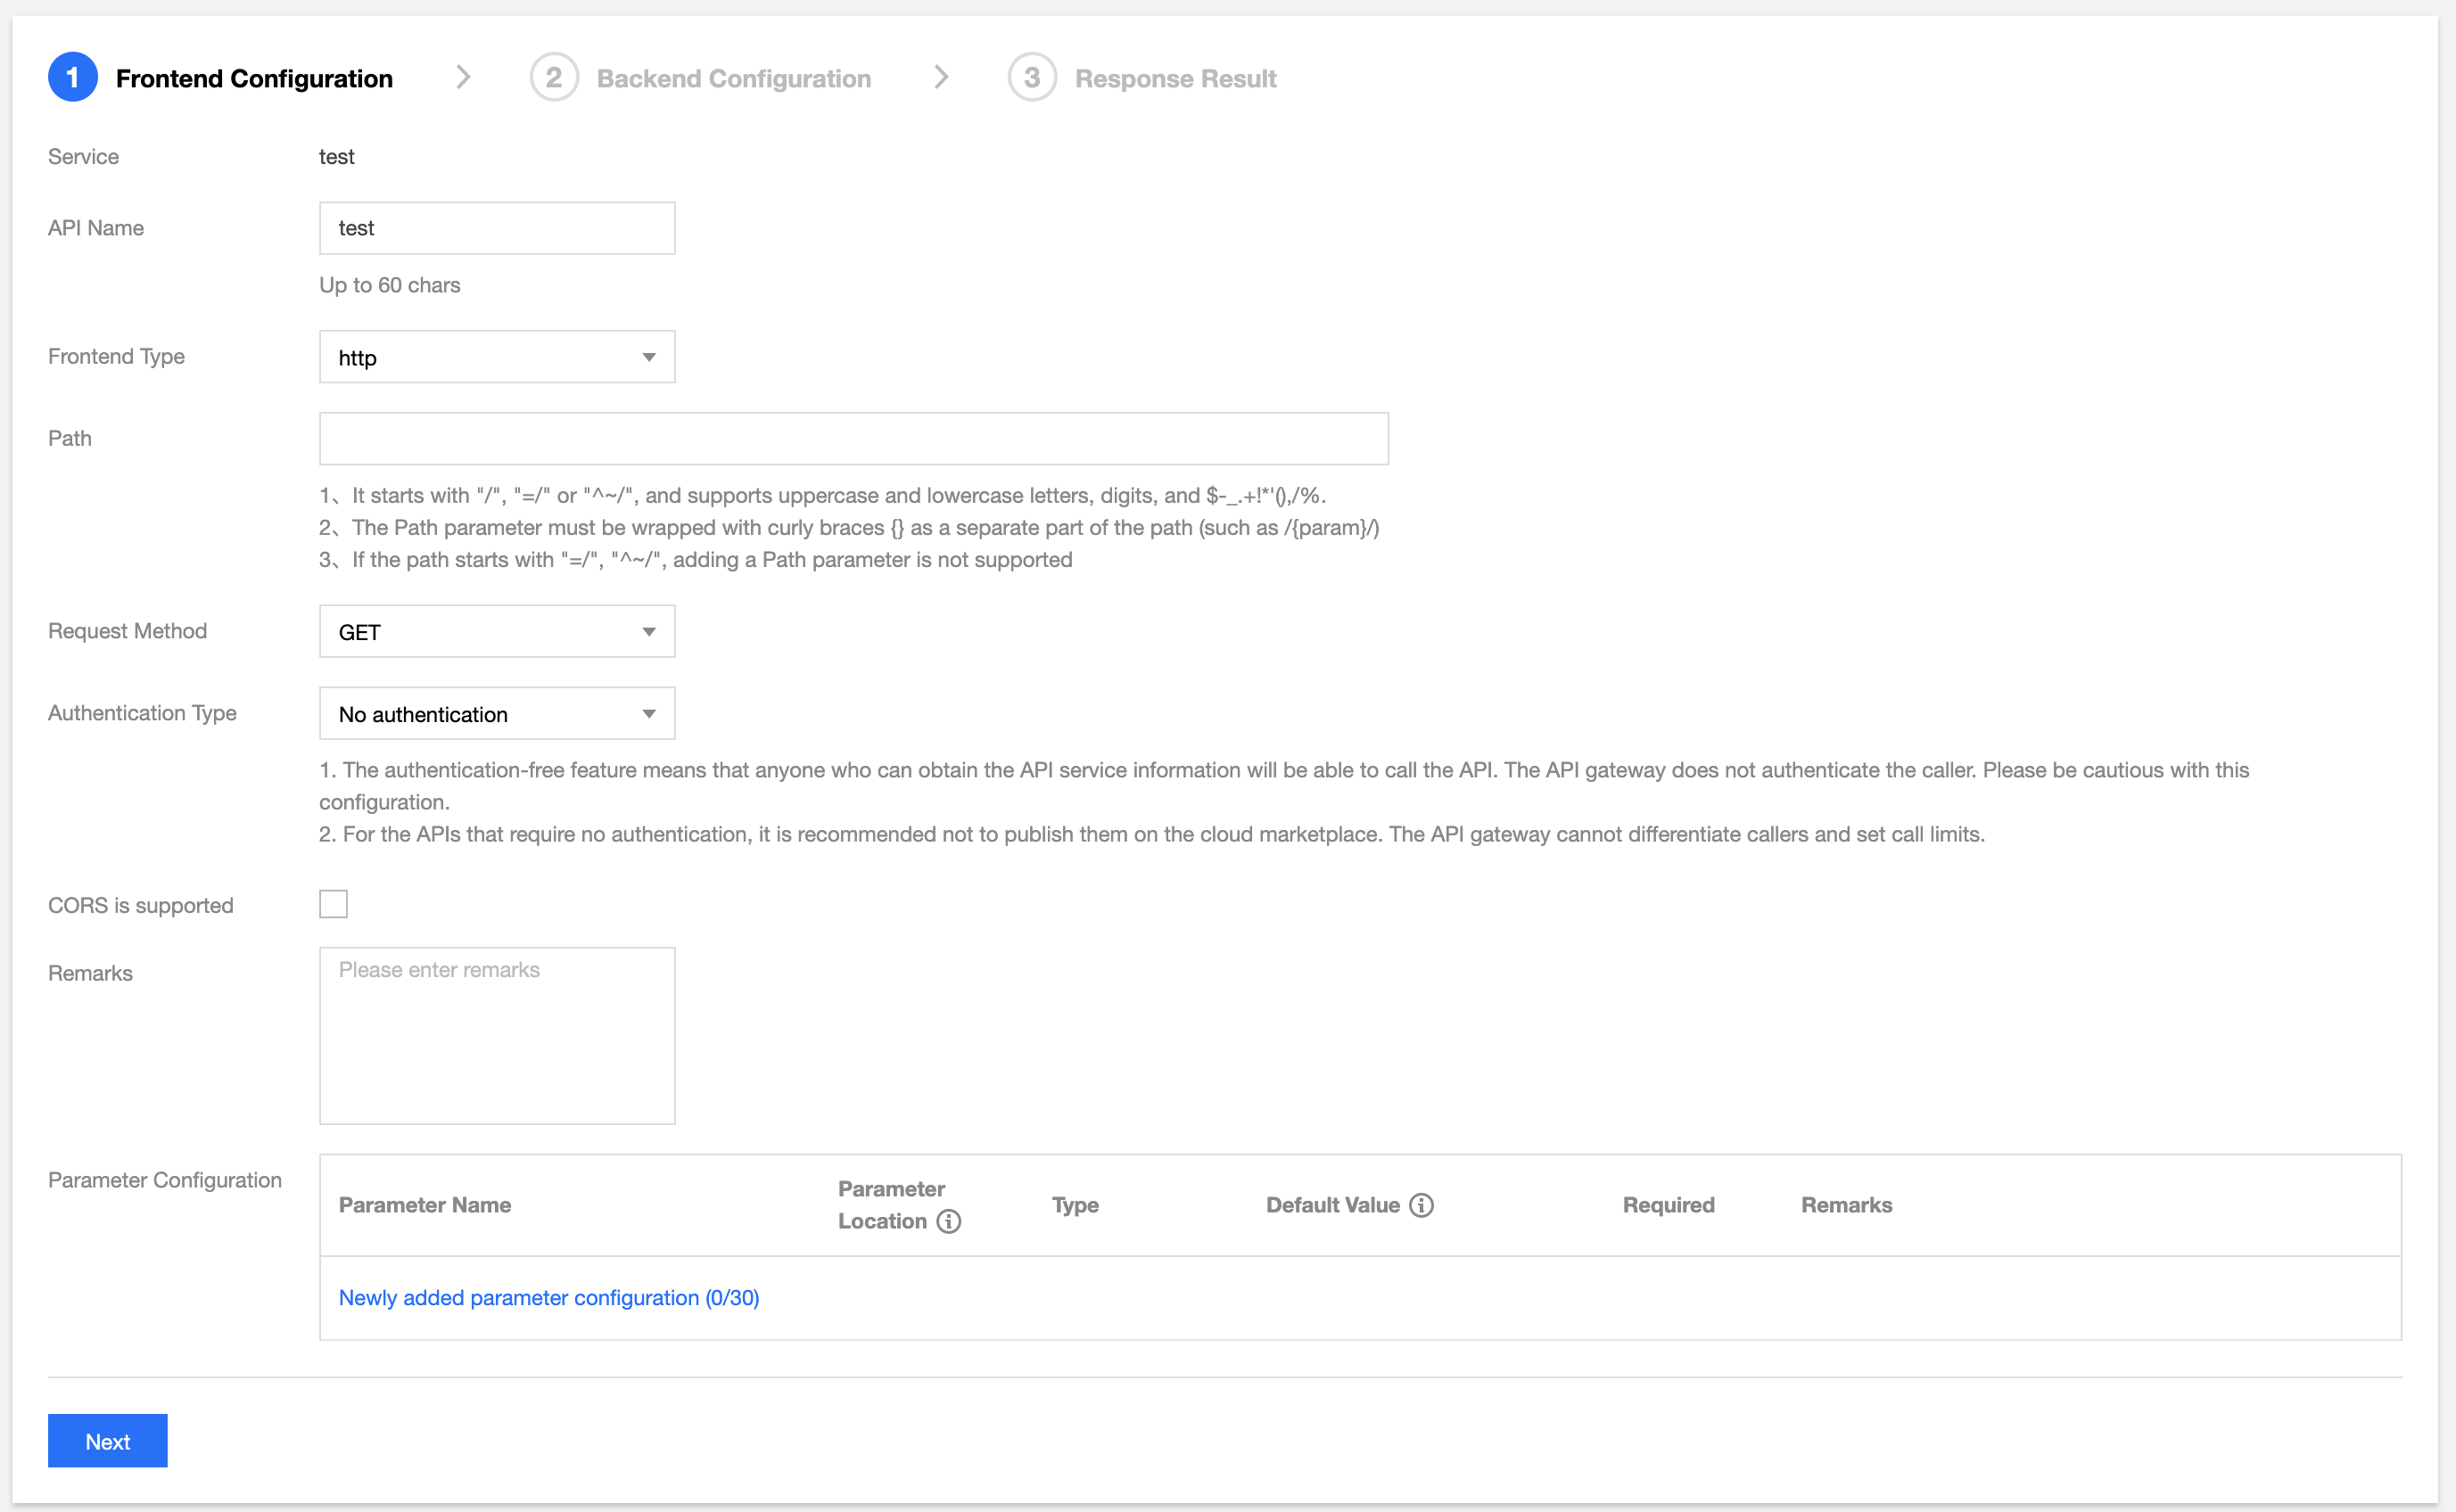
The frontend configuration of an API refers to the configuration provided for external access, including the API name, frontend type, request protocol, HTTP method, URL path, and definitions of input parameters.
Configuring basic frontend information
- API name: name of the API you create, which must be unique within the current service and can contain up to 60 characters.
- Frontend type: API Gateway supports two frontend types: HTTP and WebSocket.
- HTTP: suitable for situations where the backend is connected with HTTP, Mock, or a cloud function.
- WebSocket: suitable for situations where WebSocket is used for the business and the backend is connected with WebSocket or a cloud function.
- URL path: you can write a valid URL path as needed. If you need to configure a dynamic parameter in the path, please use
{}to enclose the parameter name. For example, the/user/{userid}path declares theuseridparameter in the path, which must be defined as a path-type input parameter. A query parameter does not need to be defined in the URL path. - Regular expression match is supported. Taking
/useras an example of the path:=/user: indicates exact match. When there are multiple APIs with/user, APIs configured with=/userhave the highest matching priority.^~/user: indicates matching theuserprefix. When there are multiple APIs with/user, APIs configured with^~/userhave the second highest matching priority./user/{id}: indicates that there is a dynamic parameter in the path. When there are multiple APIs with/user, APIs configured with a dynamic parameter have the third highest matching priority./user: indicates access by exact match or prefix match./user,/usertest, and/user/test/aall can access APIs with the path of/user.- Standard regular expressions are supported; for example, the asterisk (*) matches the preceding subexpression zero or more times, while the question mark (?) matches the preceding subexpression zero or one time.
- HTTP request method: you can select GET, POST, PUT, DELETE, or HEAD.
- Authentication type: you can select No Authentication, Key Pair Authentication, and OAuth 2.0.
- CORS support: cross-origin resource sharing (CORS). If CORS is enabled, the response header will contain
Access-Control-Allow-Origin : *by default.
Configuring frontend parameters
Input parameters: the input parameters include parameters from the header, query, and path, where a path parameter corresponds to a dynamic parameter defined in the URL path. For any parameter, the parameter name, parameter type, and parameter data type must be specified, and whether it is required, its default value, sample data, and description can be specified optionally. With these configuration items, API Gateway helps you with documentation and preliminary verification of input parameters.
Note:
- If the request protocol is HTTPS, a request must carry SNI. In order to ensure request security, API Gateway will reject requests without SNI.
- SNI (Server Name Indication) is an extension to TLS used to address situations where a server has multiple domain names, which is supported by the protocol since TLSv1.2. Previous SSL handshake messages didn't carry the destination address to be accessed by the client. If a server has multiple virtual hosts, each of which has a unique domain name and uses a unique certificate, then it will not be able to determine which certificate to return to the client. SNI addresses this issue by providing the host information in
Client Hello.
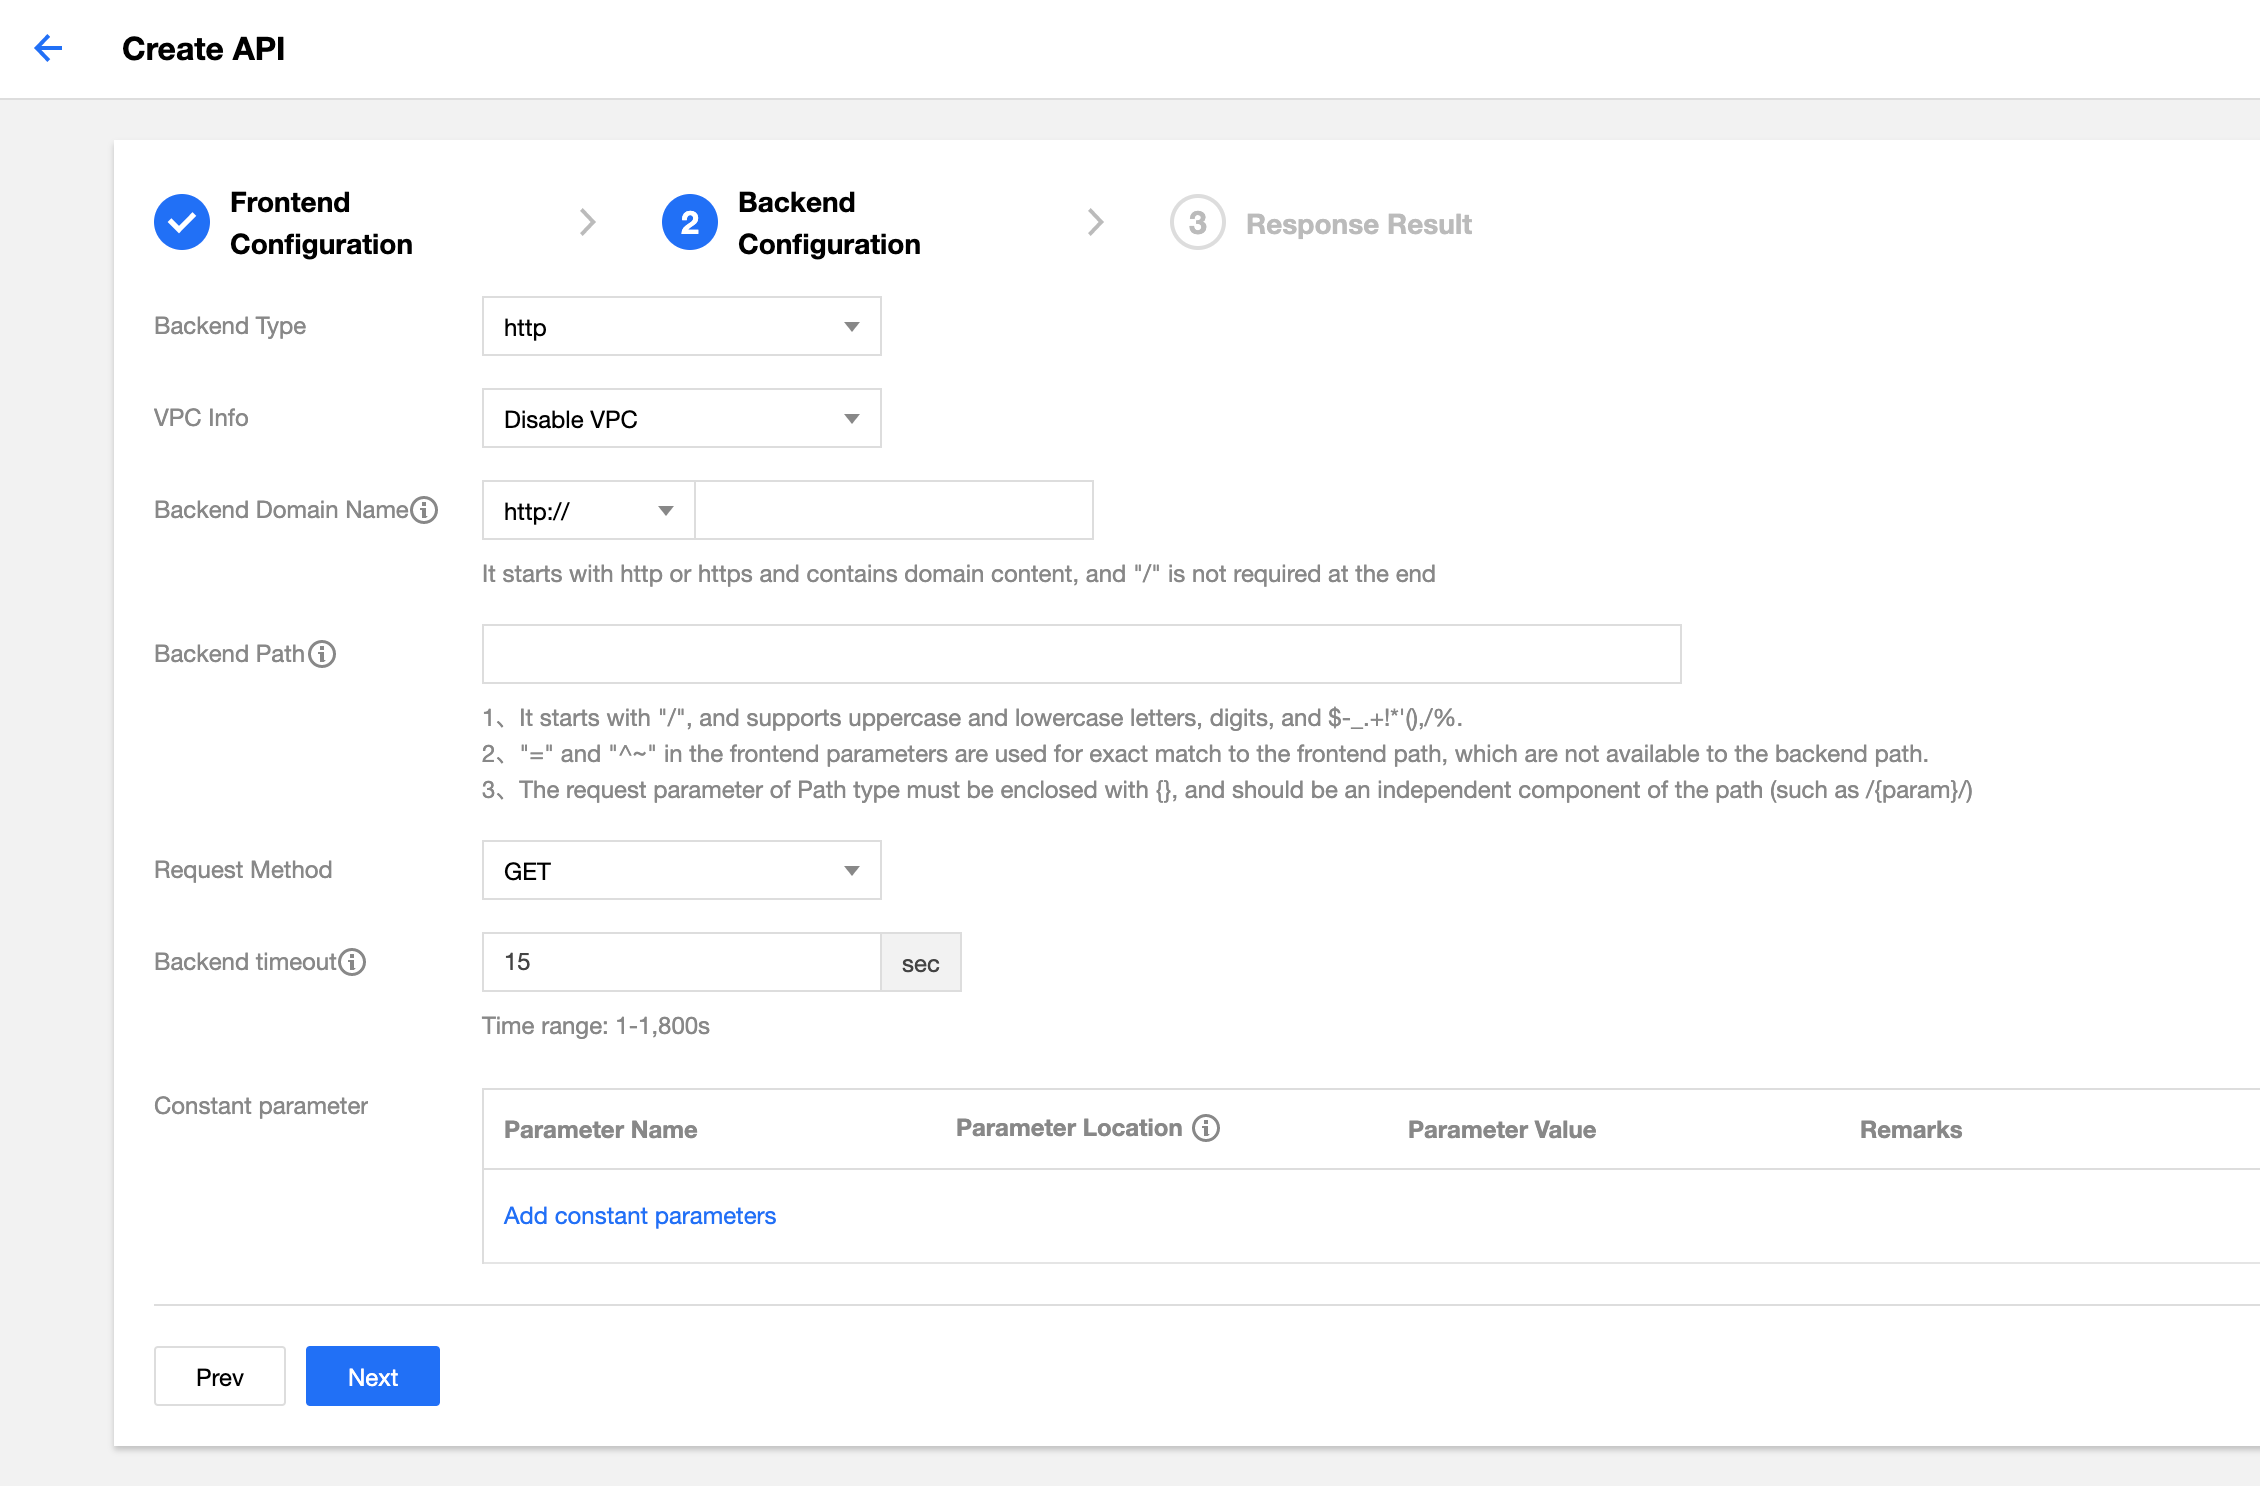
Step 3. Configure the backend
The backend configuration of an API refers to the configuration that actually provides the service. API Gateway converts a frontend request based on the backend configuration and forwards the call to the actual service.
The backend configuration provided by API Gateway varies slightly by frontend type as described below:
- If the frontend type is HTTP, the backend configuration includes connecting with HTTP, connecting with SCF, and connecting with Mock.
- If the frontend type is WebSocket, the backend configuration includes connecting with WebSocket and connecting with SCF.
Connecting with HTTP
If your business is deployed in another cloud or on your local server and is opened with HTTP, select the HTTP connection for the backend.
Configuration instructions:
- To connect with HTTP, you must select HTTP as the backend type.
- Choose whether to enable VPC. To enable VPC, select VPC resources as prompted in the console.
- Enter the backend domain name which begins with
http://orhttps://excluding the path, such ashttp://api.myservice.comorhttp://108.160.162.30. - Enter the backend path beginning with
/, such as/pathor/path/{petid}. - Select the request method. The request methods for the frontend and the backend can be different.
- Set the backend timeout period (up to 30 minutes). During a call, if there is no response after the timeout period elapses, API Gateway will terminate the call and return the corresponding error message.
- Set the backend parameters that map the frontend.
- Click Next and configure the response result.
API Gateway backend connection with CLB resources in VPC
If you want to connect the backend with CLB in VPC, the frontend can be configured in the same way as other APIs, and the backend should be configured in the following way:
- In the backend configuration, select the VPC to be connected with.
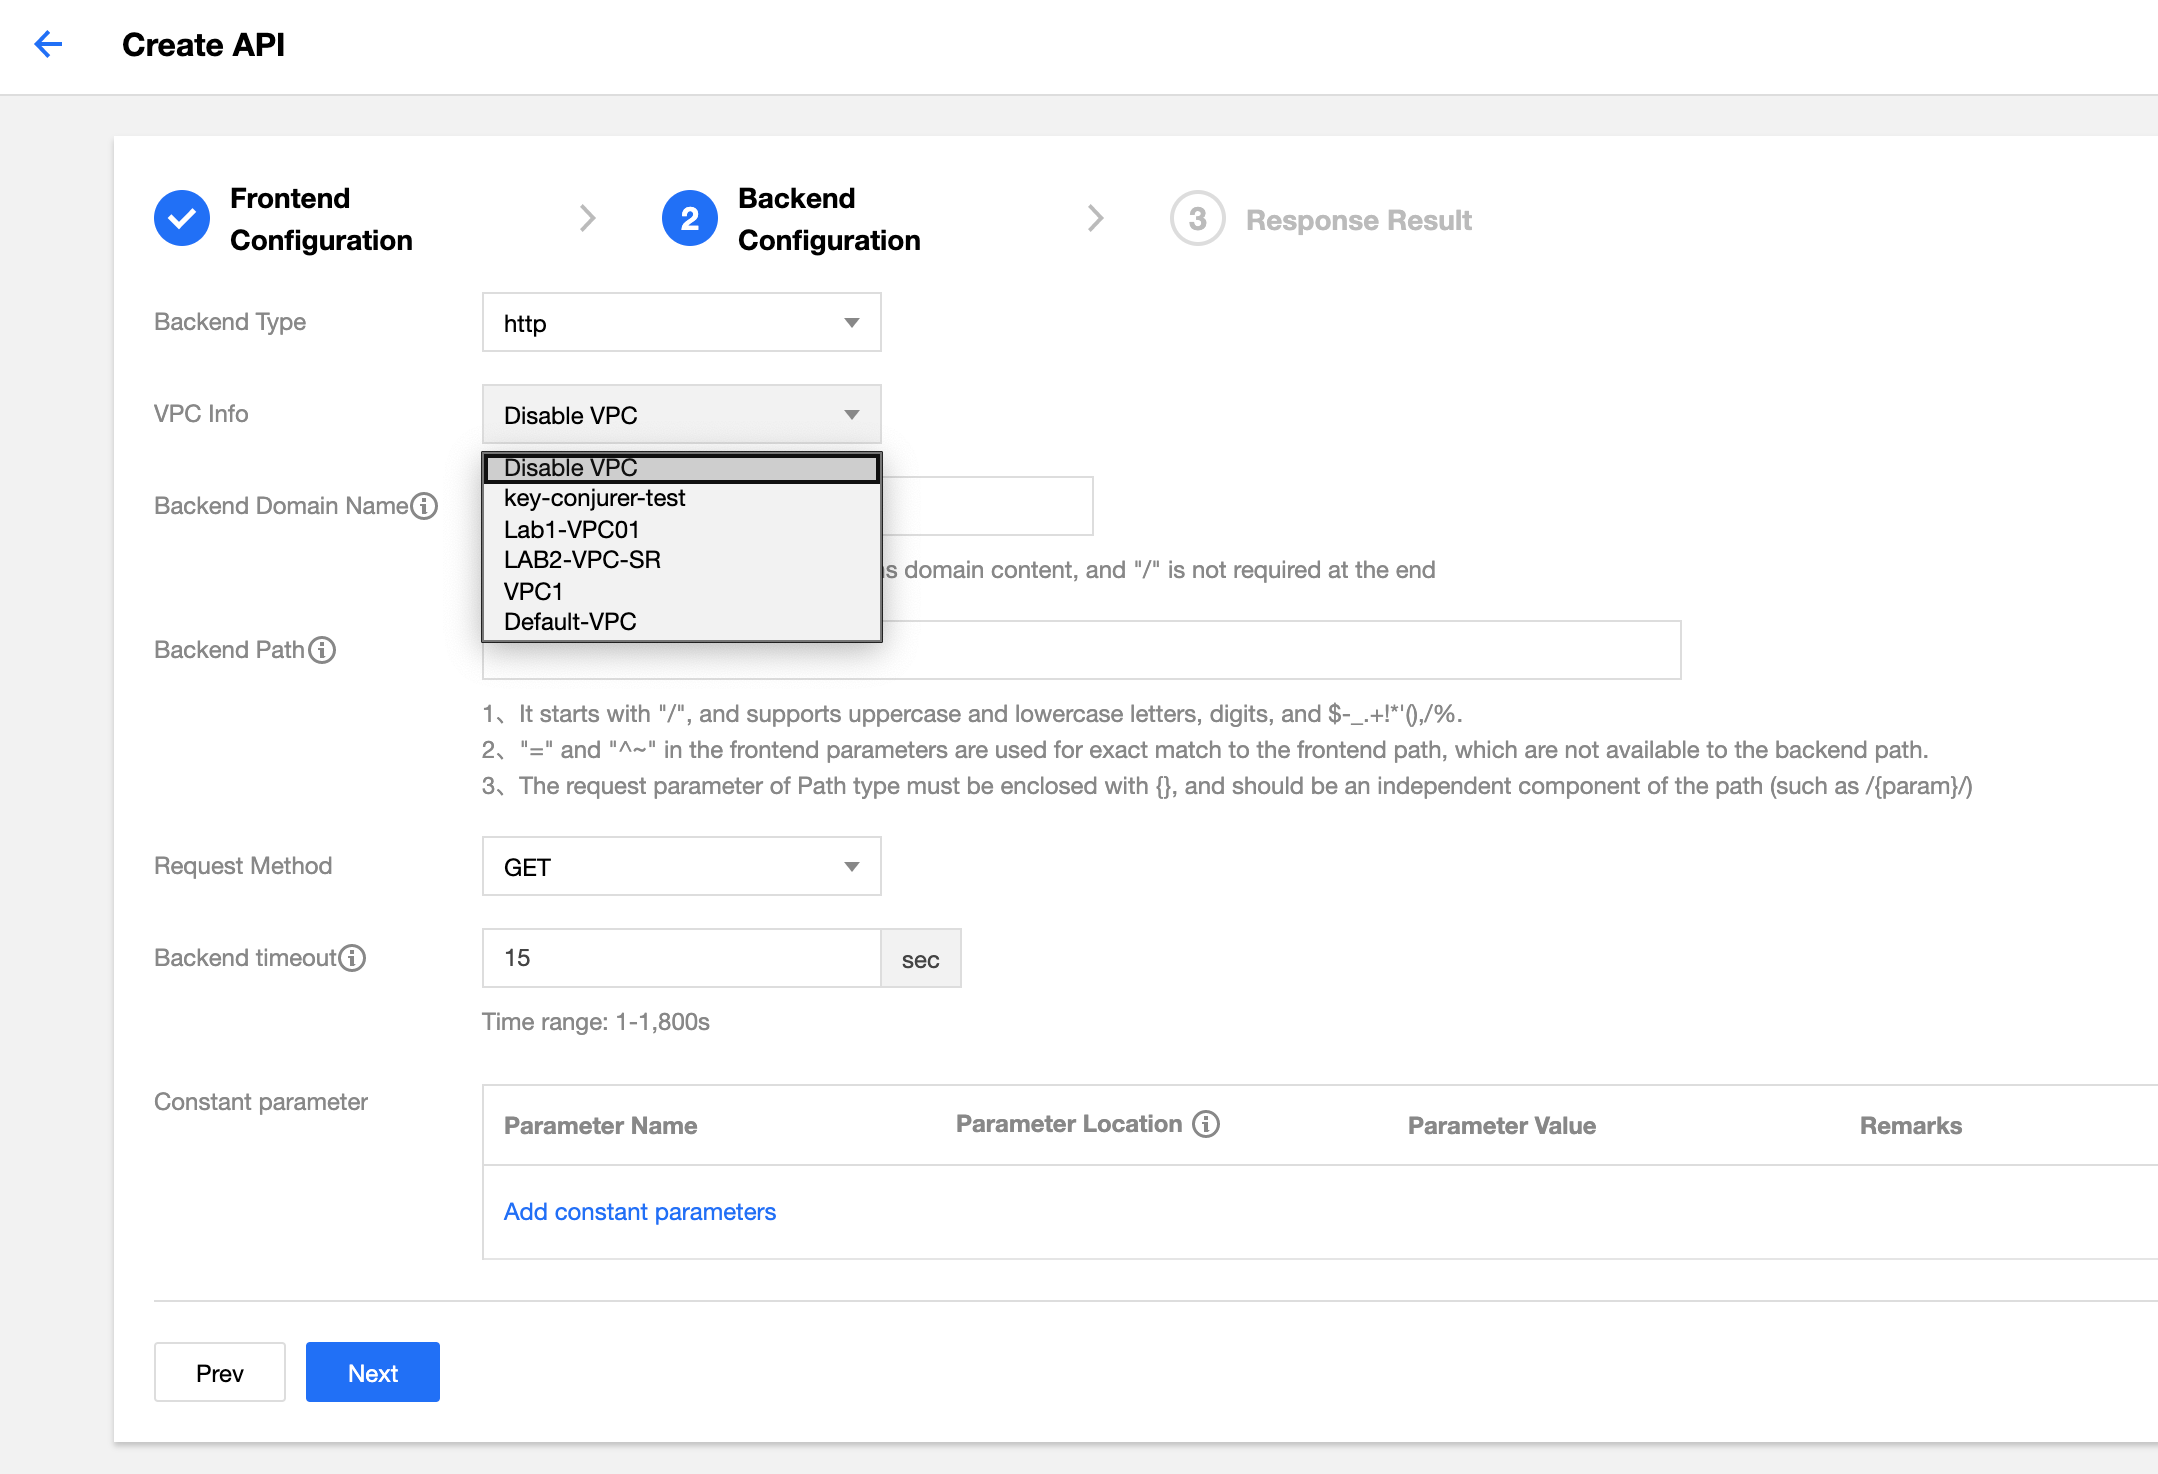
- Select CLB as the VPC resource.
API Gateway only supports connection CLB in a VPC. Other cloud resources in the VPC will be supported soon. - Select the CLB instance of the backend domain name and the corresponding listener.
If you choose HTTP or HTTPS listener, please make sure that the backend CVM instance has enabled the public network bandwidth; otherwise, network request failure may occur (traffic generated by this policy is not included in the outbound traffic of the public network). - Enter
http://vip+portorhttps://vip+portas the backend domain name. The requests sent to CLB will be HTTP requests or HTTPS requests depending on the content you enter. The VIP here is the VIP of the private network CLB instance, which can be viewed in its basic information (as shown in the screenshot in step 1). - Enter the backend path.
- If you select the CLB listener type of HTTP/HTTPS, you should configure the backend path as the path configured in the CLB listener.
Domain name and path configured in the CLB listener:
The backend path in API Gateway must be the same as that in CLB.
You also need to configure a parameter namedhostas a constant parameter and place it in the header, whose value should be the domain name configured in the CLB listener.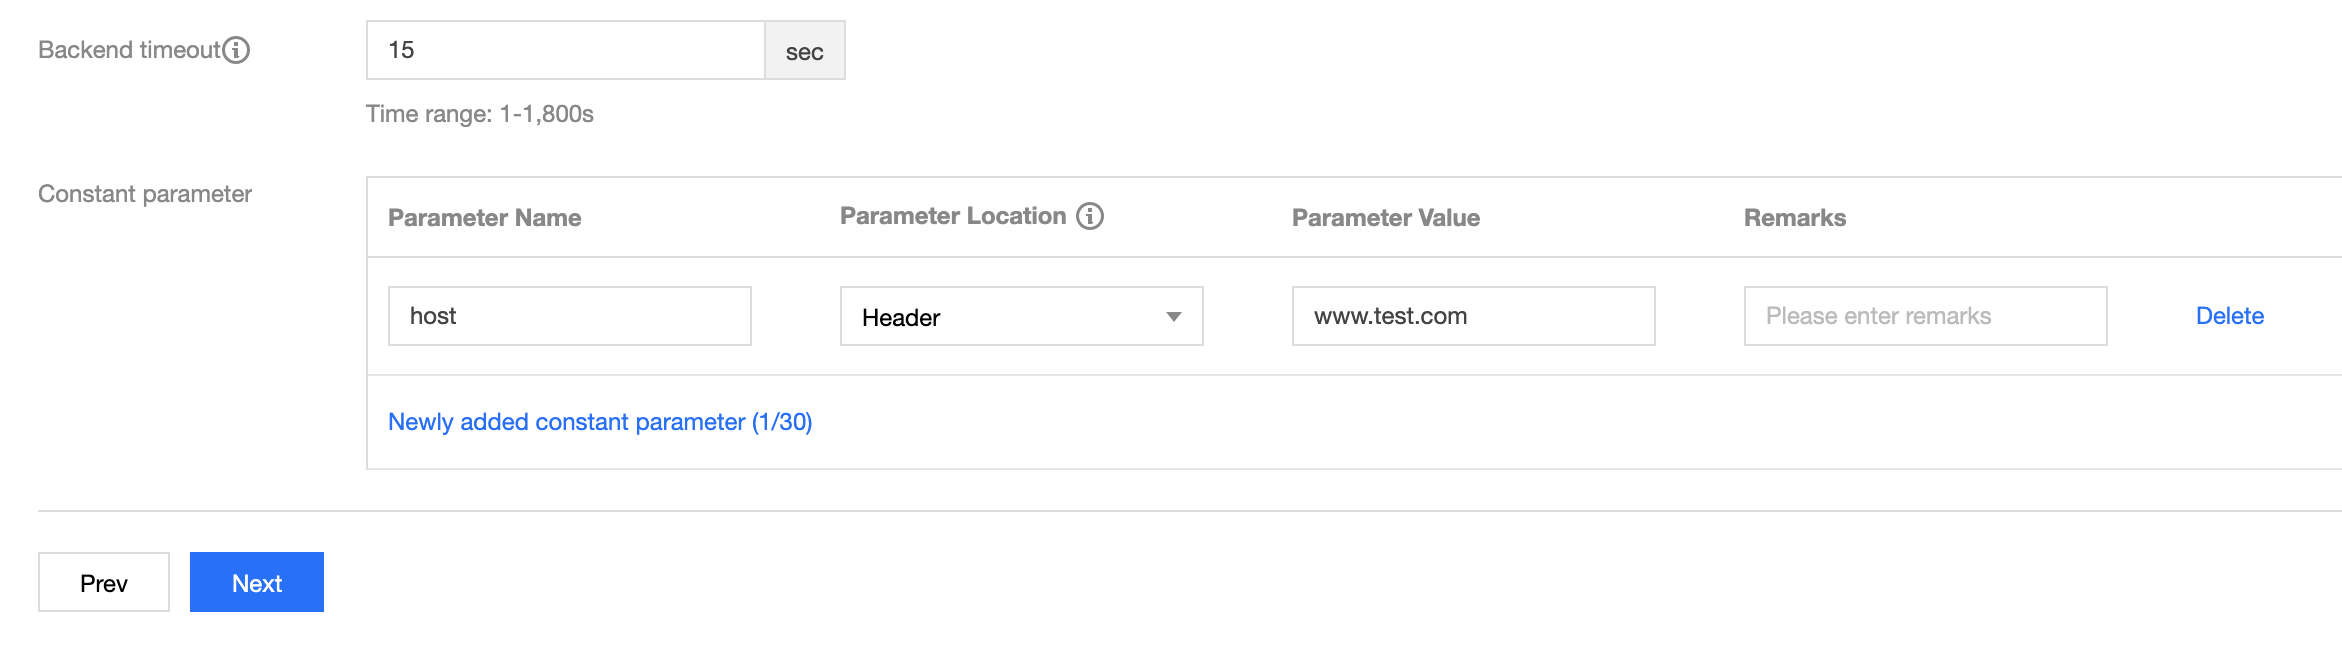
- If you select the CLB listener type of TCP/UDP, you should configure the backend path as the path required by the business in the real CVM instance of the CLB instance.
If you have configured host verification in CVM, you need to configure a parameter namedhostas a constant parameter and select the address to place it based on your actual business needs, just like with a layer-7 listener. Subsequent configuration is the same as that of other APIs.Note:
When the backend is connected with CLB, security groups on the real CVM instance should open the IP ranges of
100.64.0.0/10and9.0.0.0/8.
- If you select the CLB listener type of HTTP/HTTPS, you should configure the backend path as the path configured in the CLB listener.
Connecting with SCF
If your business is implemented in SCF and you want to open up your service capabilities through API Gateway, you can select SCF as the backend connection type.
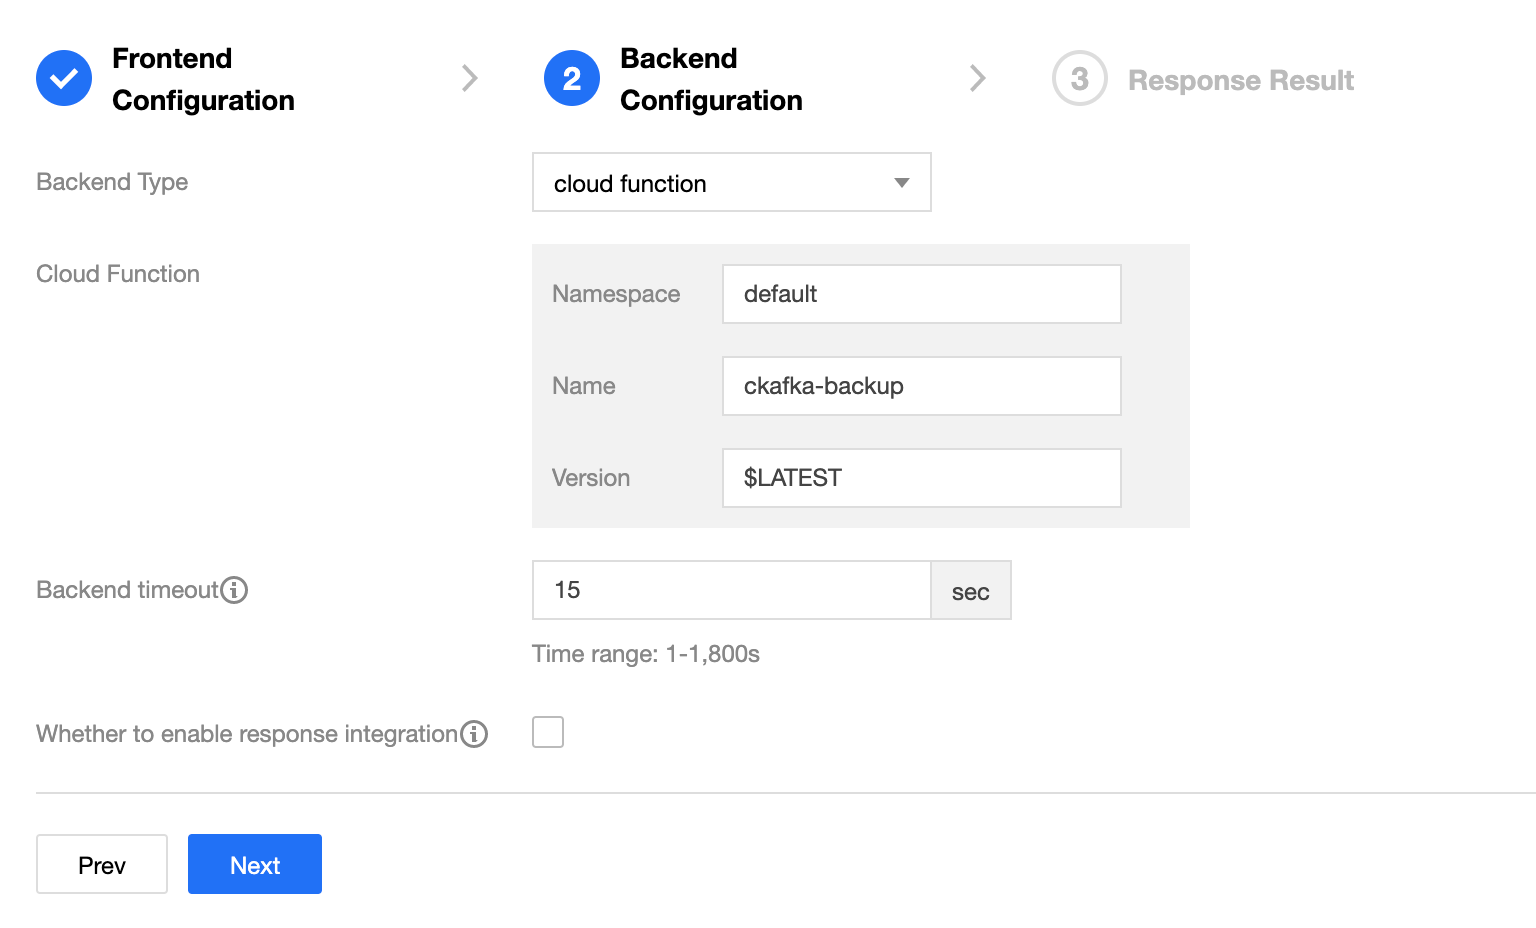
When connecting to SCF on the backend, you need to enter the following parameters:
| No. | Parameter Name | Parameter Description |
|---|---|---|
| 1 | Namespace | Namespace of the connected function, which is default by default |
| 2 | Name | Name of the connected function |
| 3 | Version | Version of the connected function, which is $LATEST by default |
| 4 | Response time | Response time, which is 15 seconds by default |
| 5 | Response integration | See below |
Response integration description:
Request method is the method to process request sent from API Gateway to SCF, and response method is the method to process the returned value sent from SCF to API Gateway. Both request and response methods can be planned and implemented by means of passthrough and integration.
- If response integration is not enabled, the passthrough mode will be used. The request information will be combined in a fixed structure when API Gateway sends a request to SCF, and the fixed structure will be received by SCF. The response will be passed through without being processed and can only be in JSON format.
- If response integration is enabled, the integration mode will be used. The request information will be combined in a fixed structure when API Gateway sends a request to SCF, and the content returned by SCF should also be in a fixed structure. API Gateway will then map the content returned by SCF to
statusCode,header, andbodyand return it to the client.
If response integration is enabled, you must configure the SCF to return data in the following format to API Gateway for parsing:
{
        "isBase64Encoded": false, // Whether Base64 encoding is used. The value is `true` or `false`
        "statusCode": 200, // HTTP request status code
        "headers": {"Content-Type":"text/html"}, // `Content-Type` can contain only strings but not arrays
        "body": "<html><body><h1>Heading</h1><p>Paragraph.</p></body></html>"
}
The structure sent by API Gateway to SCF is in the following format:
{
  "requestContext": {
    "serviceId": "service-f94sy04v",
    "path": "/test/{path}",
    "httpMethod": "POST",
    "identity": {
      "secretId": "abdcdxxxxxxxsdfs"
    },
    "sourceIp": "10.0.2.14",
    "stage": "release"
  },
  "headers": {
    "Accept-Language": "en-US,en,cn",
    "Accept": "text/html,application/xml,application/json",
    "Host": "service-3ei3tii4-251000691.ap-guangzhou.apigateway.myqloud.com",
    "User-Agent": "User Agent String",
    "x-api-requestid": "c6af9ac6-7b61-11e6-9a41-93e8deadbeef"
  },
  "body": "{\"test\":\"body\"}",
  "pathParameters": {
    "path": "value"
  },
  "queryStringParameters": {
    "foo": "bar"
  },
  "headerParameters":{
    "Refer": "10.0.2.14"
  },
  "stageVariables": {
    "stage": "release"
  },
  "path": "/test/value",
  "queryString": {
    "foo" : "bar",
    "bob" : "alice"
  },
  "httpMethod": "POST"
}
Note:
You can implement backend web services by writing SCF functions and providing services through API Gateway which will pass the request content as parameters to the function and return the result from the function back to the requester as the response. For more information, please see API Gateway Trigger Overview.
Connecting with Mock
Mock returns a response that has a fixed configuration to an API request. It is typically used for development testing. API configuration and response can be completed in advance before the backend service is completed. To connect with Mock, you only need to configure your returned data and click Complete.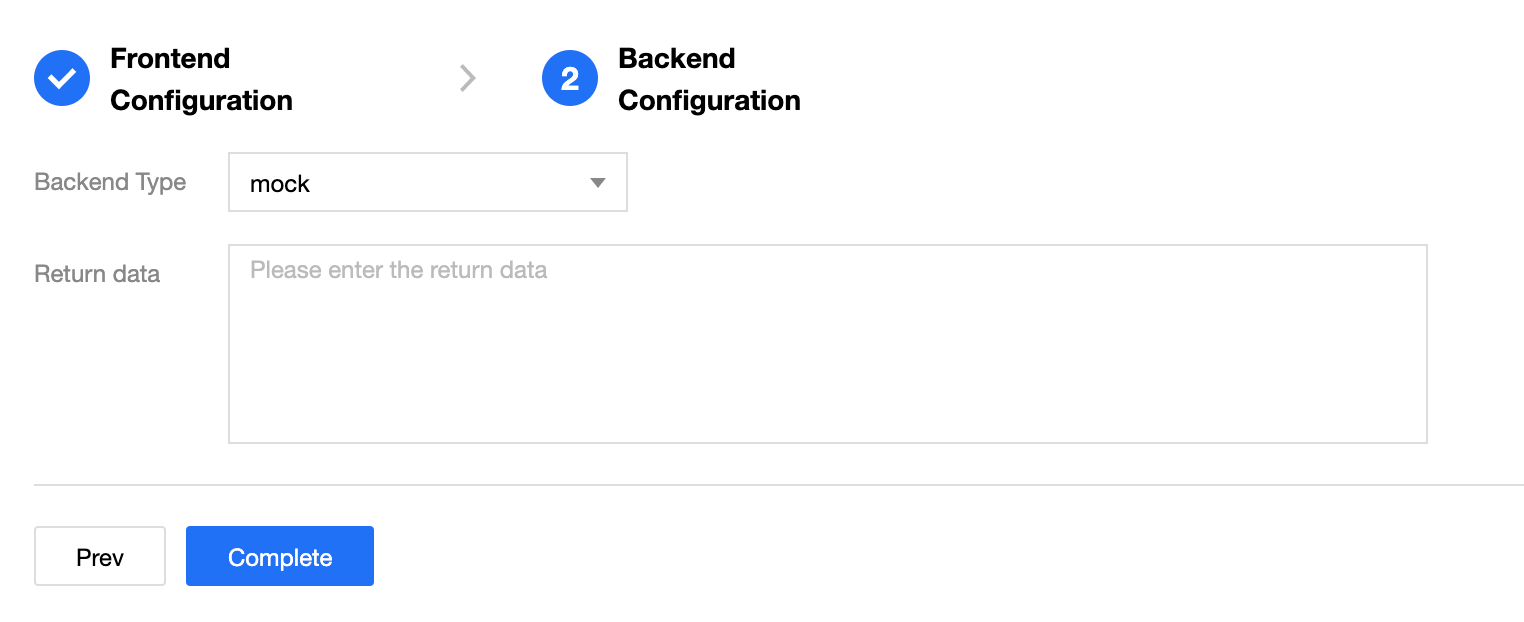
Connecting with WebSocket
If WebSocket is used for your business, you can connect WebSocket with your backend service in generally the same way as connecting with HTTP, except that the backend domain name should begin with ws:// or wss:// excluding the path.
Step 4. Configure the response
API response configuration includes the configuration of API response data and API error codes.
API response data configuration: indicates the type of returned data, including data samples of successful and failed calls.
API error code definition: indicates additional error code, error message, and description.
Note:
Currently, API Gateway does not process the response result and directly passes it through to the requester. When SDK documentation is generated, the entered response sample will also be displayed in the document, which will help users better understand the meanings of the APIs.

 Yes
Yes
 No
No
Was this page helpful?