- Release Notes and Announcements
- Release Notes
- TRTC Conference Official Editions Launched
- The commercial version of Conference is coming soon
- Terms and Conditions Applicable to $9.9 Starter Package
- Rules for the "First Subscription $100 Discount" Promotion
- Announcement on the Start of Beta Testing for Multi-person Audio and Video Conference
- TRTC Call Official Editions Launched
- License Required for Video Playback in New Version of LiteAV SDK
- TRTC to Offer Monthly Packages
- Product Introduction
- Purchase Guide
- Billing Overview
- RTC-Engine Packages
- TRTC Call Monthly Packages
- TRTC Conference Monthly Packages
- Pay-As-You-Go
- Billing Explanation for Subscription Package Duration
- Billing of On-Cloud Recording
- Billing of MixTranscoding and Relay to CDN
- Free Minutes
- FAQs
- Billing of Monitoring Dashboard
- Billing of Recording Delivery
- Overdue and Suspension Policy
- Refund Policies
- User Tutorial
- Free Demo
- Video Calling (Including UI)
- Overview (TUICallKit)
- Activate the Service(TUICallKit)
- Integration (TUICallKit)
- UI Customization (TUICallKit)
- Offline Call Push (TUICallKit)
- On-Cloud Recording (TUICallKit)
- Additional Features(TUICallKit)
- Server APIs (TUICallKit)
- Client APIs (TUICallKit)
- ErrorCode
- Release Notes (TUICallKit)
- FAQs(TUICallKit)
- Multi-Participant Conference (with UI)
- Live Streaming (Including UI)
- Voice Chat Room (with UI)
- Integration (No UI)
- SDK Download
- API Examples
- Integration Guide
- Client APIs
- Advanced Features
- Relay to CDN
- Enabling Advanced Permission Control
- RTMP Streaming with TRTC
- Utilizing Beautification Effects
- Testing Hardware Devices
- Testing Network Quality
- On-Cloud Recording
- Custom Capturing and Rendering
- Custom Audio Capturing and Playback
- Sending and Receiving Messages
- Event Callbacks
- Access Management
- How to push stream to TRTC room with OBS WHIP
- Server APIs
- Console Guide
- Solution
- FAQs
- Legacy Documentation
- Protocols and Policies
- TRTC Policy
- Glossary
Chat Salon (Android)
Last updated: 2022-03-18 23:02:38
Demo UI
You can download and install the demo app we provide to try out TRTC features in the chat salon scenario, including audio chat, mic on/off, low-latency audio interaction, etc.
| Room Owner | Listener |
|---|---|
 |
 |
To quickly enable the chat salon feature, you can modify the demo app we provide and adapt it to your needs. You may also use the TUIChatSalon component and customize your own UI.
Using the App’s UI
Step 1. Create an application
- Log in to the TRTC console and select Development Assistance > Demo Quick Run.
- Enter an application name such as
TRTCChatSalonand click Create. - Click Next.
Note:This feature uses two basic PaaS services of Tencent Cloud, namely TRTC and IM. When you activate TRTC, IM will be activated automatically. IM is a value-added service. See Pricing for its billing details.
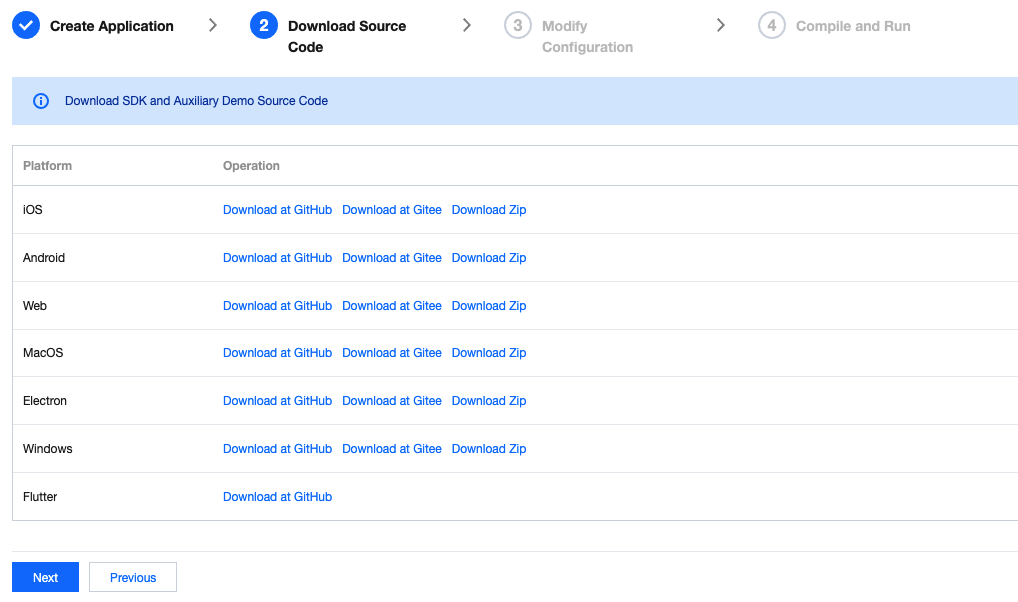
Step 2. Download the application source code
Click TUIChatSalon to clone or download the source code.
Step 3. Configure application project files
In the Modify Configuration step, select your platform.
Find and open
Android/Debug/src/main/java/com/tencent/liteav/debug/GenerateTestUserSig.java.Set parameters in
GenerateTestUserSig.java:- SDKAPPID: a placeholder by default. Set it to the actual `SDKAppID`.
- SECRETKEY: a placeholder by default. Set it to the actual key.
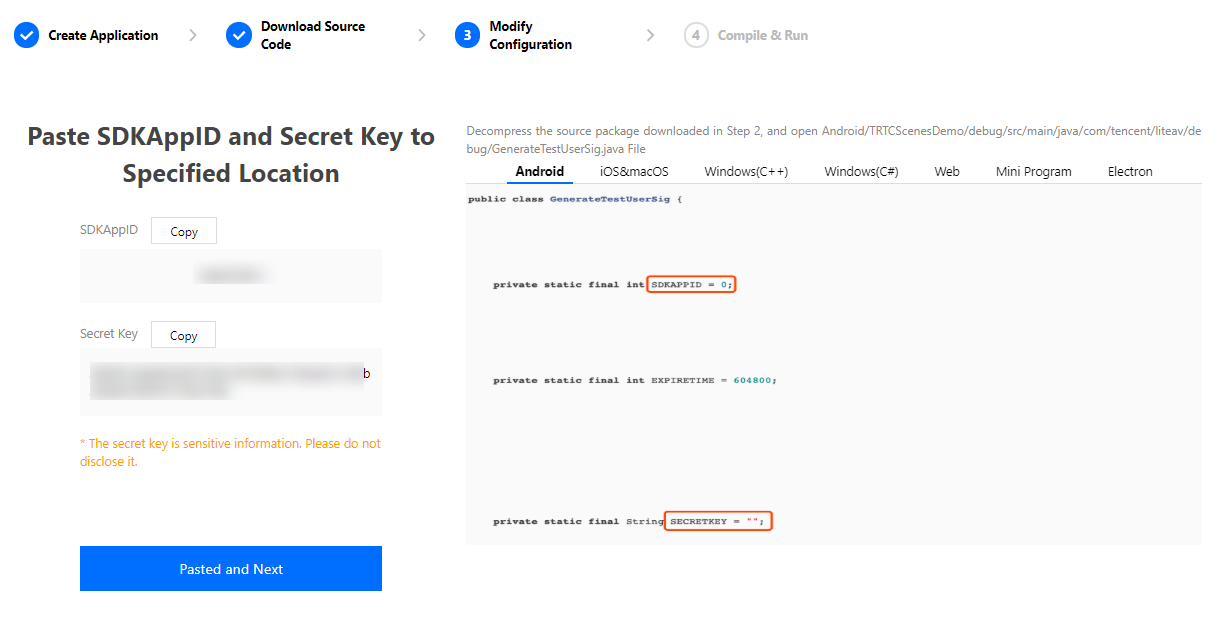
Click Next to complete the creation.
After compilation, click Return to Overview Page.
Note:
- The method for generating
UserSigdescribed in this document involves configuringSECRETKEYin client code. In this method,SECRETKEYmay be easily decompiled and reversed, and if your key is disclosed, attackers can steal your Tencent Cloud traffic. Therefore, this method is suitable only for the local execution and debugging of the app.- The correct
UserSigdistribution method is to integrate the calculation code ofUserSiginto your server and provide an application-oriented API. WhenUserSigis needed, your application can send a request to the business server for a dynamicUserSig. For more information, see How do I calculate UserSig on the server?.
Step 4. Run the application
Open the source code project TUIChatSalon with Android Studio (version 3.5 or above) and click Run.
Step 5. Modify the app’s source code
The Source folder in the source code contains two subfolders: ui and model. The ui subfolder contains UI code. The table below lists the files (folders) and the UI views they represent. You can refer to it when making UI changes.
| File or Folder | Description |
|---|---|
| base | Basic classes used by the UI |
| list | Room creation page. |
| room | The main room views for room owner and listener |
| widget | Common controls |
Tryout
Note:You need at least two devices to try out the application.
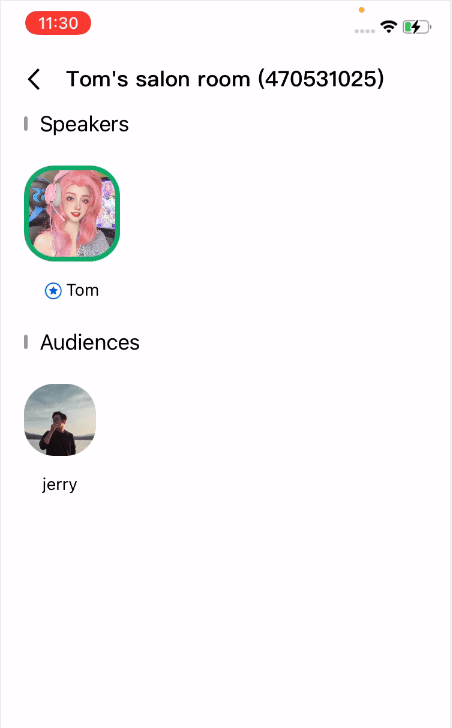
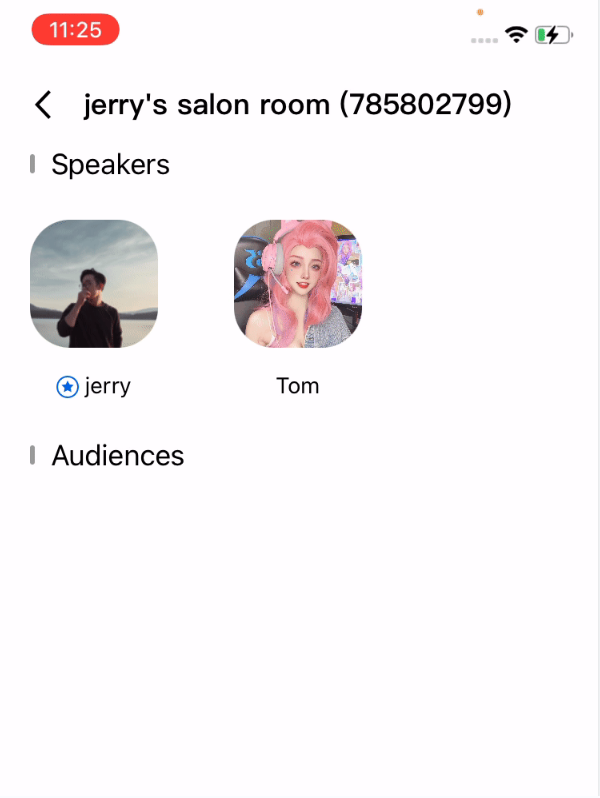
User A
Enter a username (which must be unique) and log in.
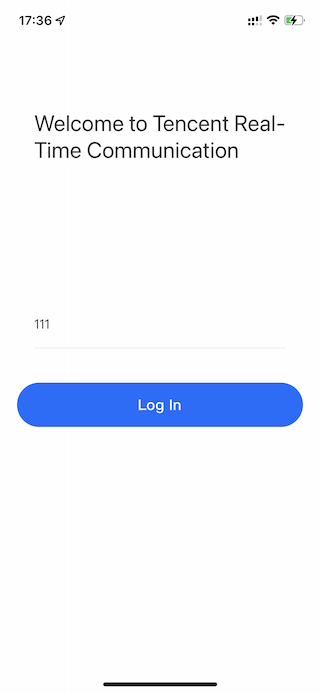
Tap Create Room.
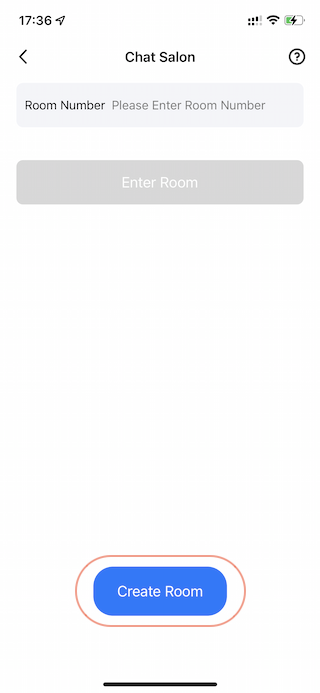
Type a subject for the room and tap Let’s go.
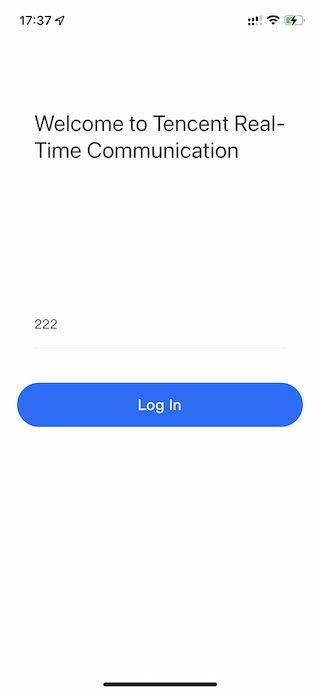
User B
Enter a username (which must be unique) and log in.
Enter the number of the room created by user A and tap Enter Room.
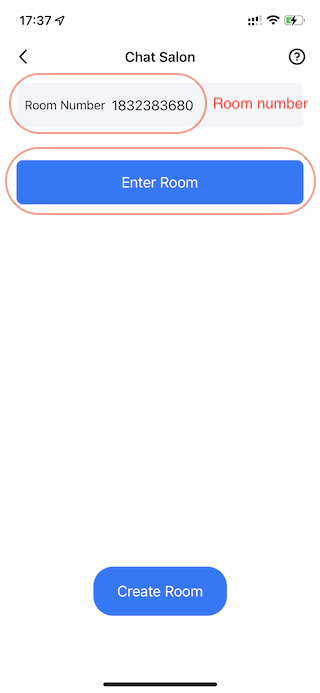
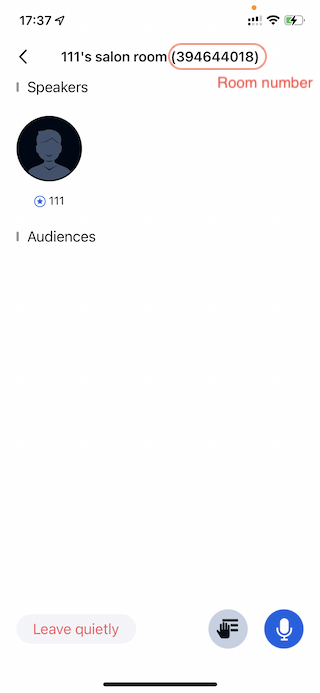
Note:You can find the room number at the top of user A’s room view.
Customizing Your Own UI
The Source folder in the source code contains two subfolders: ui and model. The model subfolder contains the reusable open-source component TRTCChatSalon. You can find the component’s APIs in TRTCChatSalon.java and use them to customize your own UI.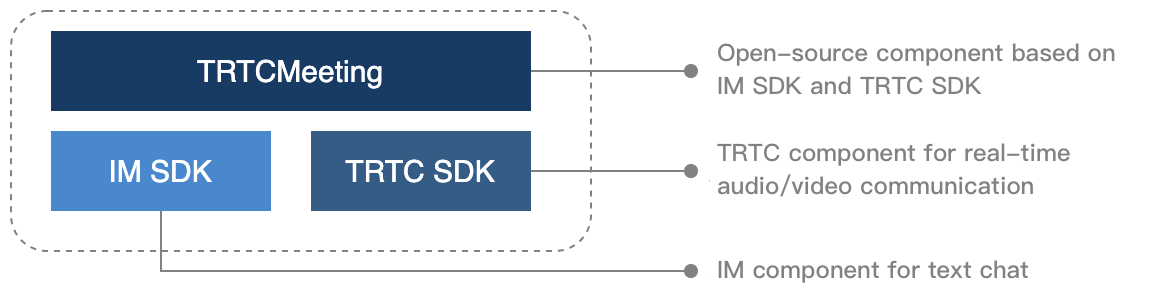
Step 1. Integrate the SDKs
The chat salon component's Source depends on the TRTC SDK and IM SDK. Follow the steps below to integrate them into your project.
Method 1: adding dependencies via Maven
Add the TRTC SDK and IM SDK dependencies to
dependencies.dependencies {
complie "com.tencent.liteav:LiteAVSDK_TRTC:latest.release"
complie 'com.tencent.imsdk:imsdk:latest.release'
compile 'com.google.code.gson:gson:2.3.1'
}In
defaultConfig, specify the CPU architecture to be used by your application.defaultConfig {
ndk {
abiFilters "armeabi-v7a"
}
}Click Sync Now to automatically download the SDKs and integrate them into your project.
Method 2: adding dependencies through local AAR files
If your access to the Maven repository is slow, you can download the ZIP files of the SDKs and manually integrate them into your project as instructed in the documents below.
| SDK | Download Page | Integration Guide |
|---|---|---|
| TRTC SDK | Download | Integration document |
| IM SDK | Download | Integration document |
Step 2. Configure permission requests and obfuscation rules
Configure permission requests for your app in AndroidManifest.xml. The SDKs need the following permissions (on Android 6.0 and above, the read storage permissions must be requested at runtime):
<uses-permission android:name="android.permission.INTERNET">
<uses-permission android:name="android.permission.ACCESS_NETWORK_STATE">
<uses-permission android:name="android.permission.ACCESS_WIFI_STATE">
<uses-permission android:name="android.permission.WRITE_EXTERNAL_STORAGE">
<uses-permission android:name="android.permission.READ_EXTERNAL_STORAGE">
<uses-permission android:name="android.permission.RECORD_AUDIO">
<uses-permission android:name="android.permission.MODIFY_AUDIO_SETTINGS">
<uses-permission android:name="android.permission.BLUETOOTH">
<uses-permission android:name="android.permission.READ_PHONE_STATE">
In the proguard-rules.pro file, add the SDK classes to the "do not obfuscate" list.
-keep class com.tencent.** { *;}Step 3. Import the TRTCChatSalon component
Copy all the files in the directory below to your project:
Source/src/main/java/com/tencent/liteav/trtcchatsalon/modelStep 4. Create an instance and log in
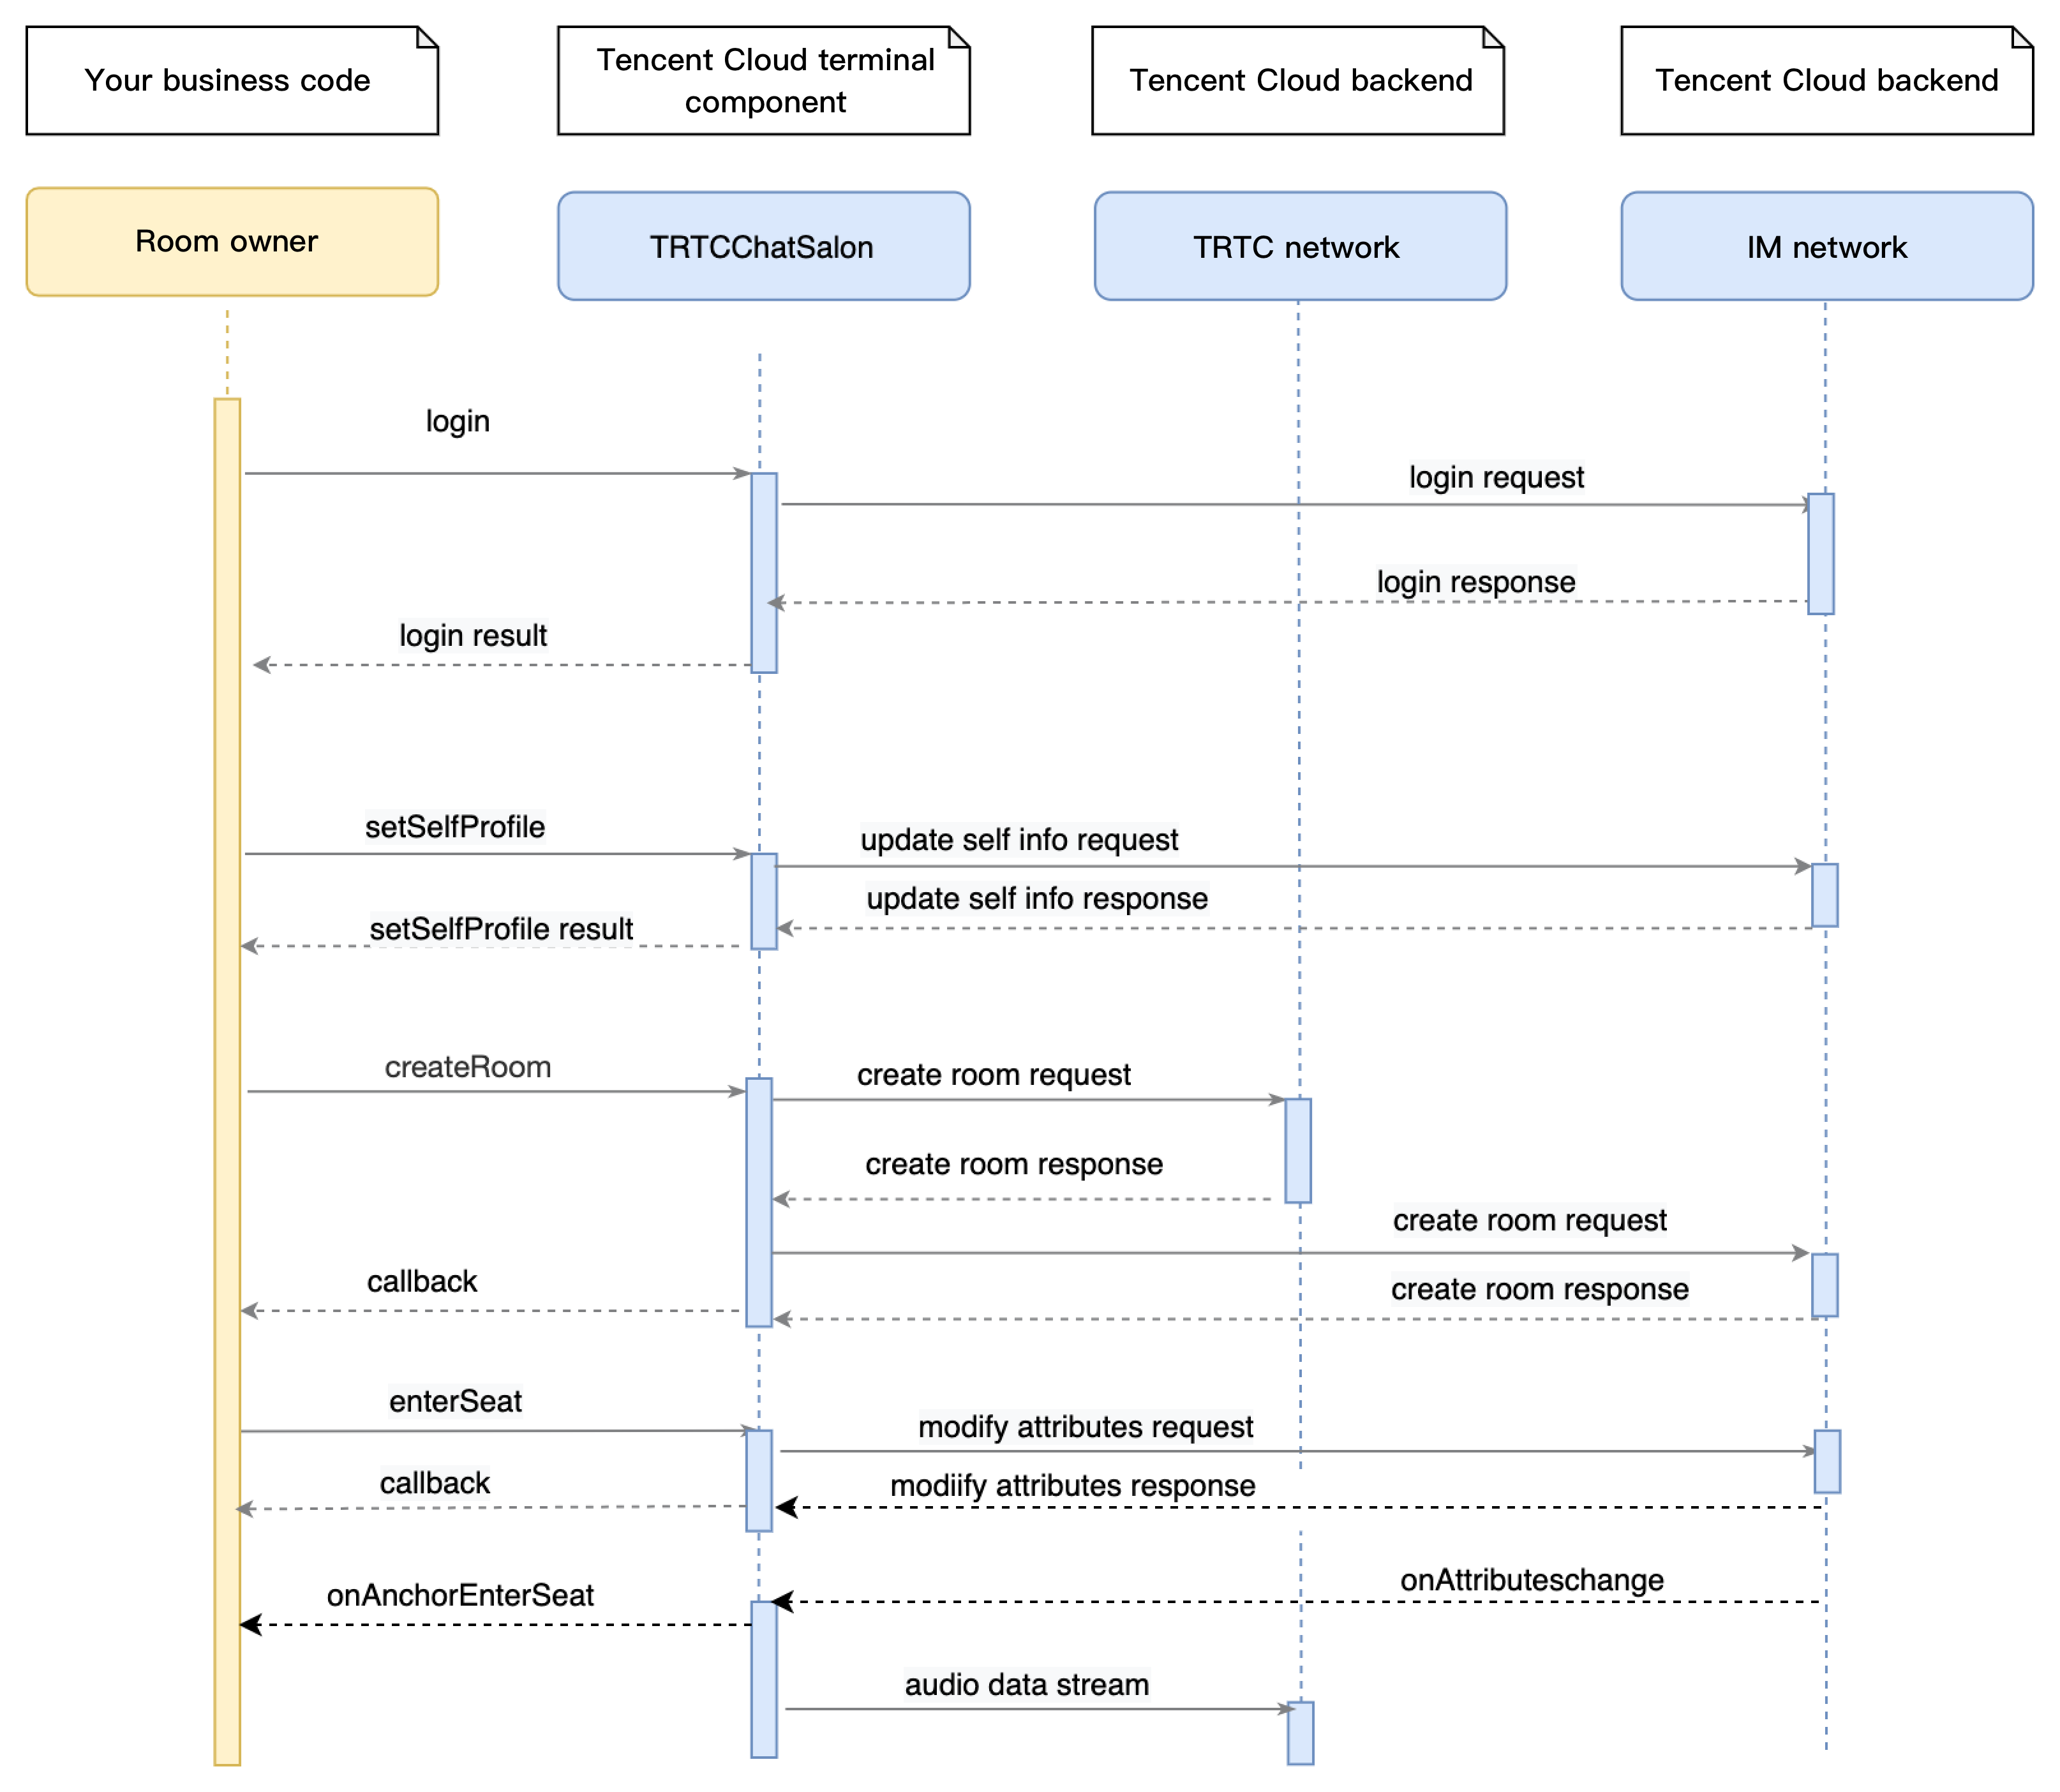
- Call the
sharedInstanceAPI to create an instance of theTRTCChatSaloncomponent. - Call the
setDelegateAPI to register event callbacks of the component. - Call the
loginAPI to log in to the component, and set the key parameters as described below.Parameter Description SDKAppID You can view `SDKAppID` in the TRTC console. userId ID of the current user, which is a string that can contain letters (a-z and A-Z), digits (0-9), hyphens (-), and underscores (_). We recommend you set it based on your business account system. userSig Tencent Cloud's proprietary security signature. To obtain one, see UserSig. callback Login callback. The code is `0` if login is successful. TRTCChatSalon mTRTCChatSalon = TRTCChatSalon.sharedInstance(this);
mTRTCChatSalon.setDelegate(this);
mTRTCChatSalon.login(SDKAPPID, userId, userSig, new TRTCChatSalonCallback.ActionCallback() {
@Override
public void onCallback(int code, String msg) {
if (code == 0) {
// Logged in
}
}
});
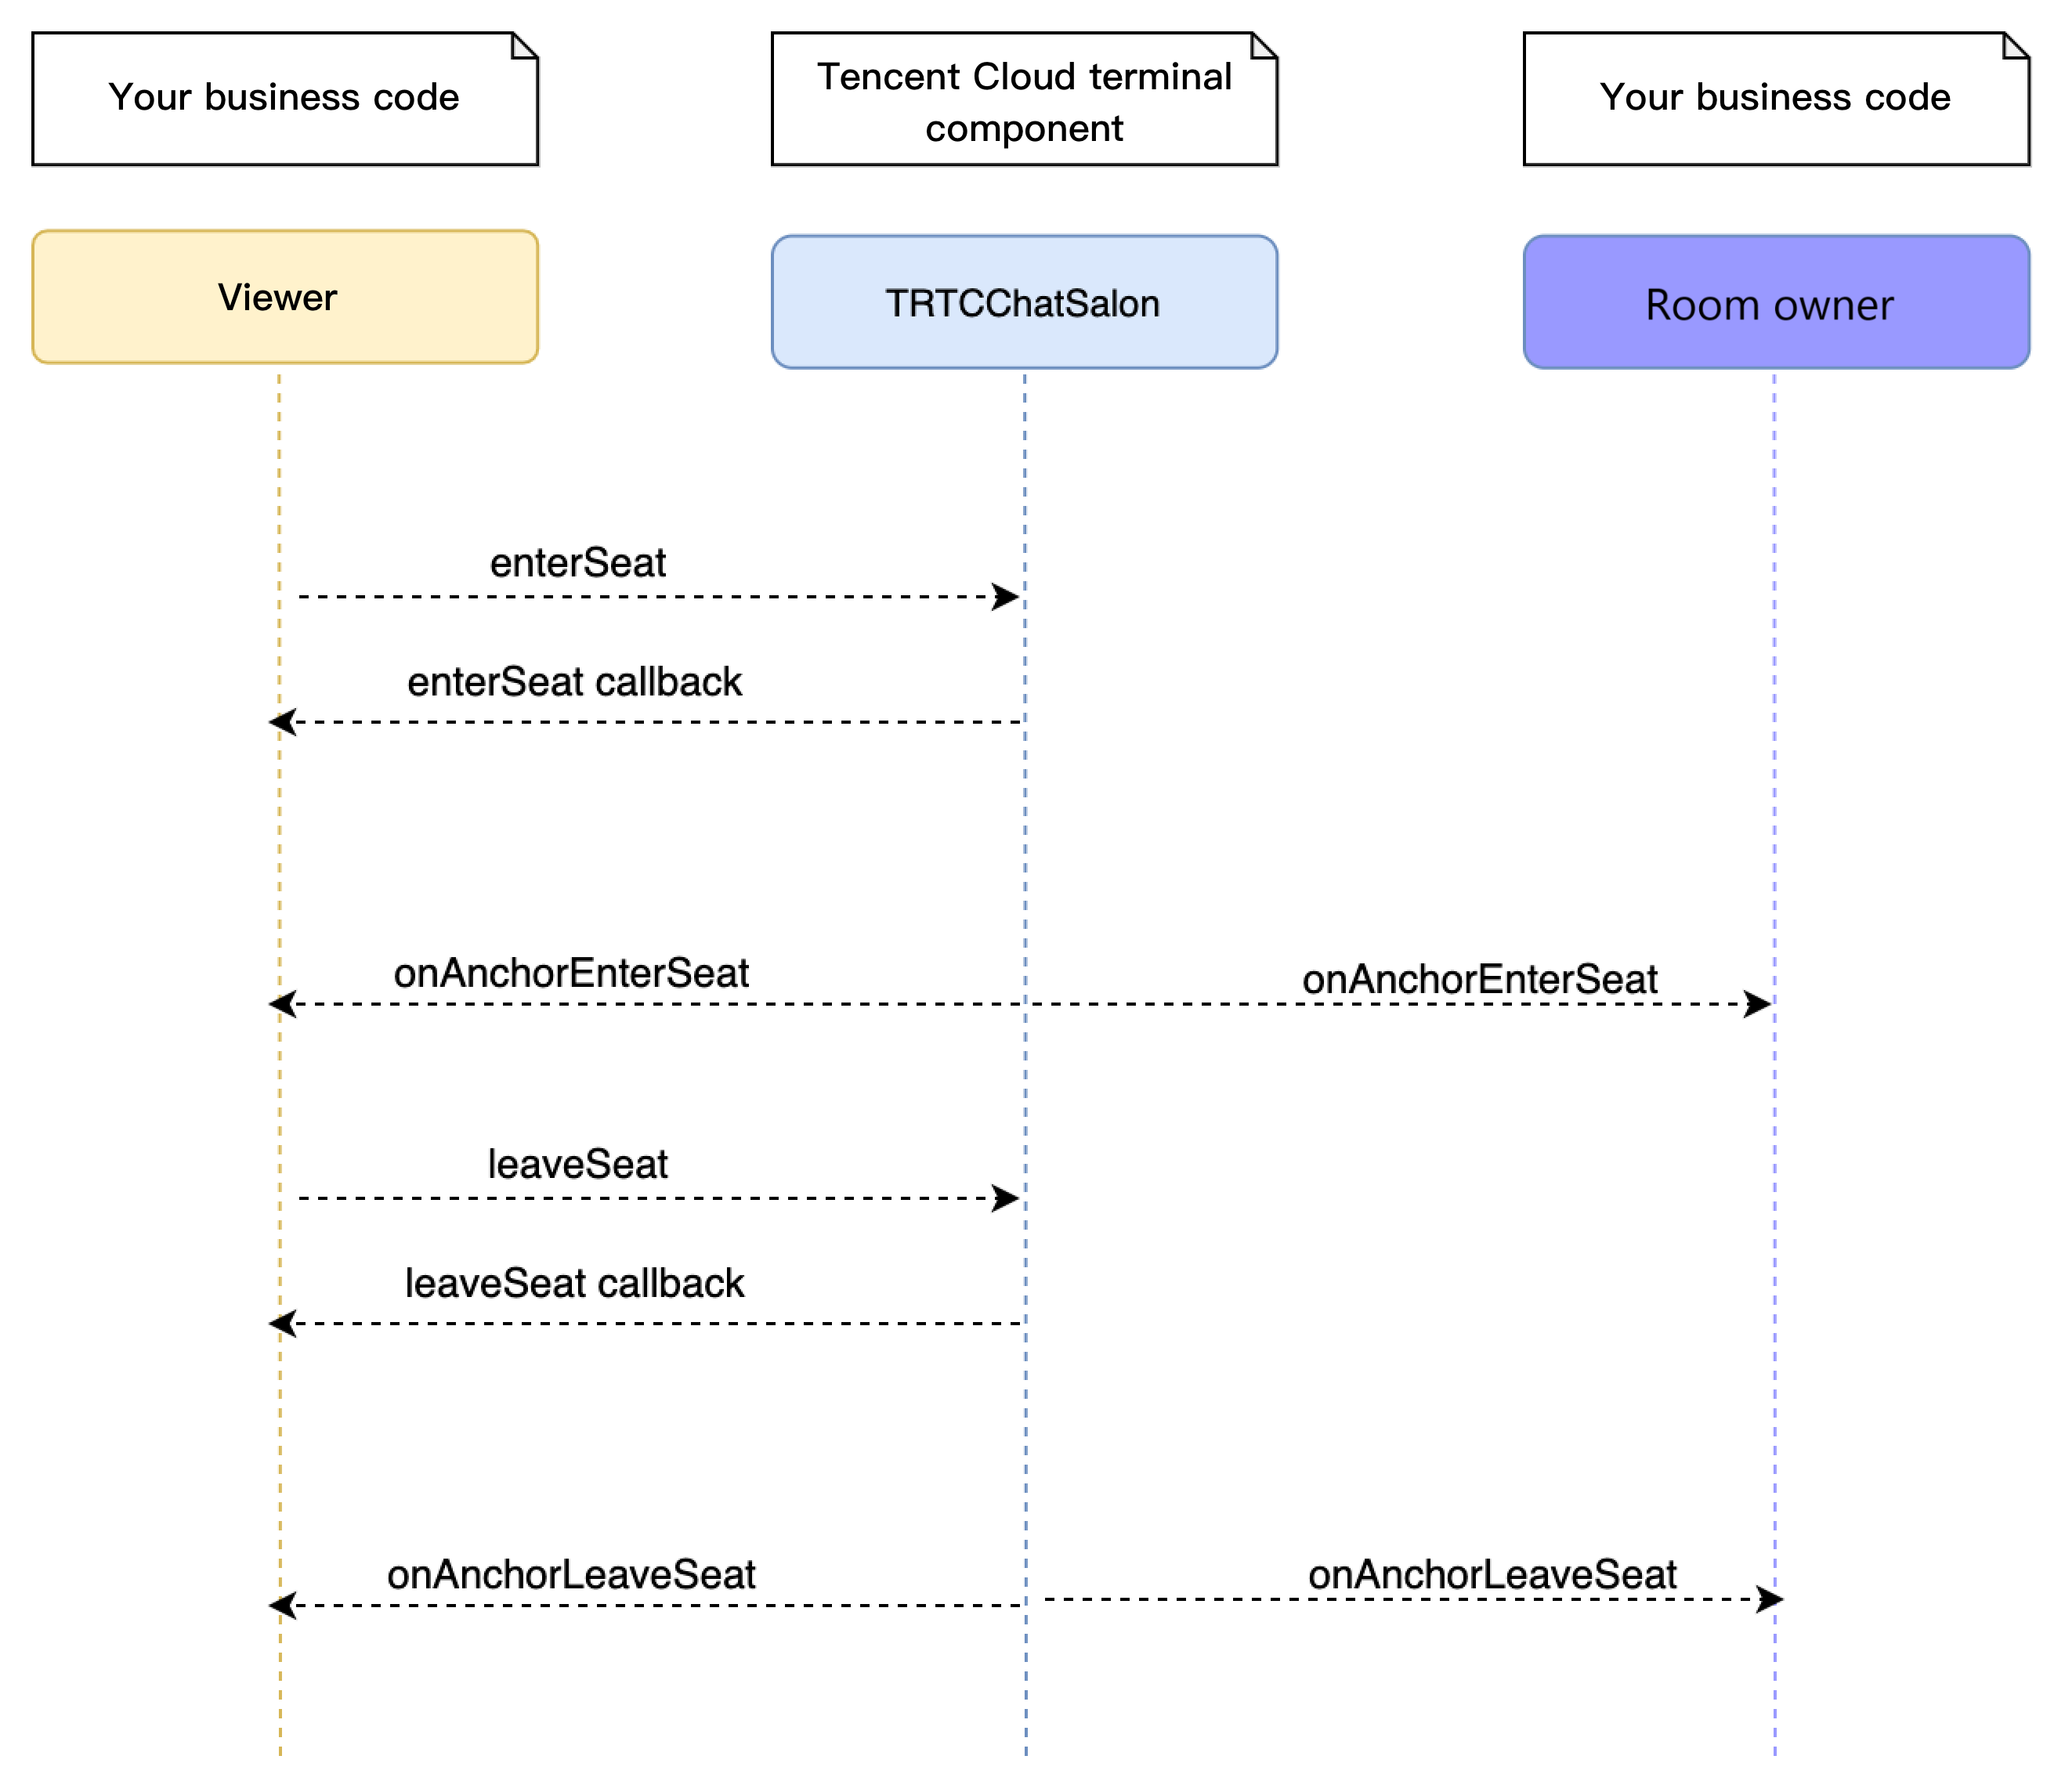
Step 5. Create a room and become a speaker
- After performing step 4 to log in, call
setSelfProfileto set your nickname and profile photo. - Call
createRoomto create a chat salon, passing in room-related parameters such as room ID, whether your consent is required for listeners to speak, and the room type. - You will receive an
onAnchorEnterSeatnotification that someone becomes a speaker, and mic capturing will be enabled automatically.
// 1. Set your nickname and profile photo.
mTRTCChatSalon.setSelfProfile("my_name", "my_face_url", null);

// 2. Call `createRoom` to create a room
final TRTCChatSalonDef.RoomParam roomParam = new TRTCChatSalonDef.RoomParam();
roomParam.roomName = "Room name";
roomParam.needRequest = true; // Whether your consent is required for listeners to speak
roomParam.coverUrl = "URL of room cover image";
mTRTCChatSalon.createRoom(mRoomId, roomParam, new TRTCChatSalonCallback.ActionCallback() {
    @Override
    public void onCallback(int code, String msg) {
        if (code == 0) {
            // 3. Become a speaker
            mTRTCChatSalon.enterSeat(new TRTCChatSalonCallback.ActionCallback() {
                @Override
                public void onCallback(int code, String msg) {
                    if (code == 0) {
                    }
                }
            });
        }
    }
});

// 4. You receive an `onAnchorEnterSeat` notification after becoming a speaker
@Override
public void onAnchorEnterSeat(TRTCChatSalonDef.UserInfo userInfo) {
}
Step 6. Enter a room as a listener
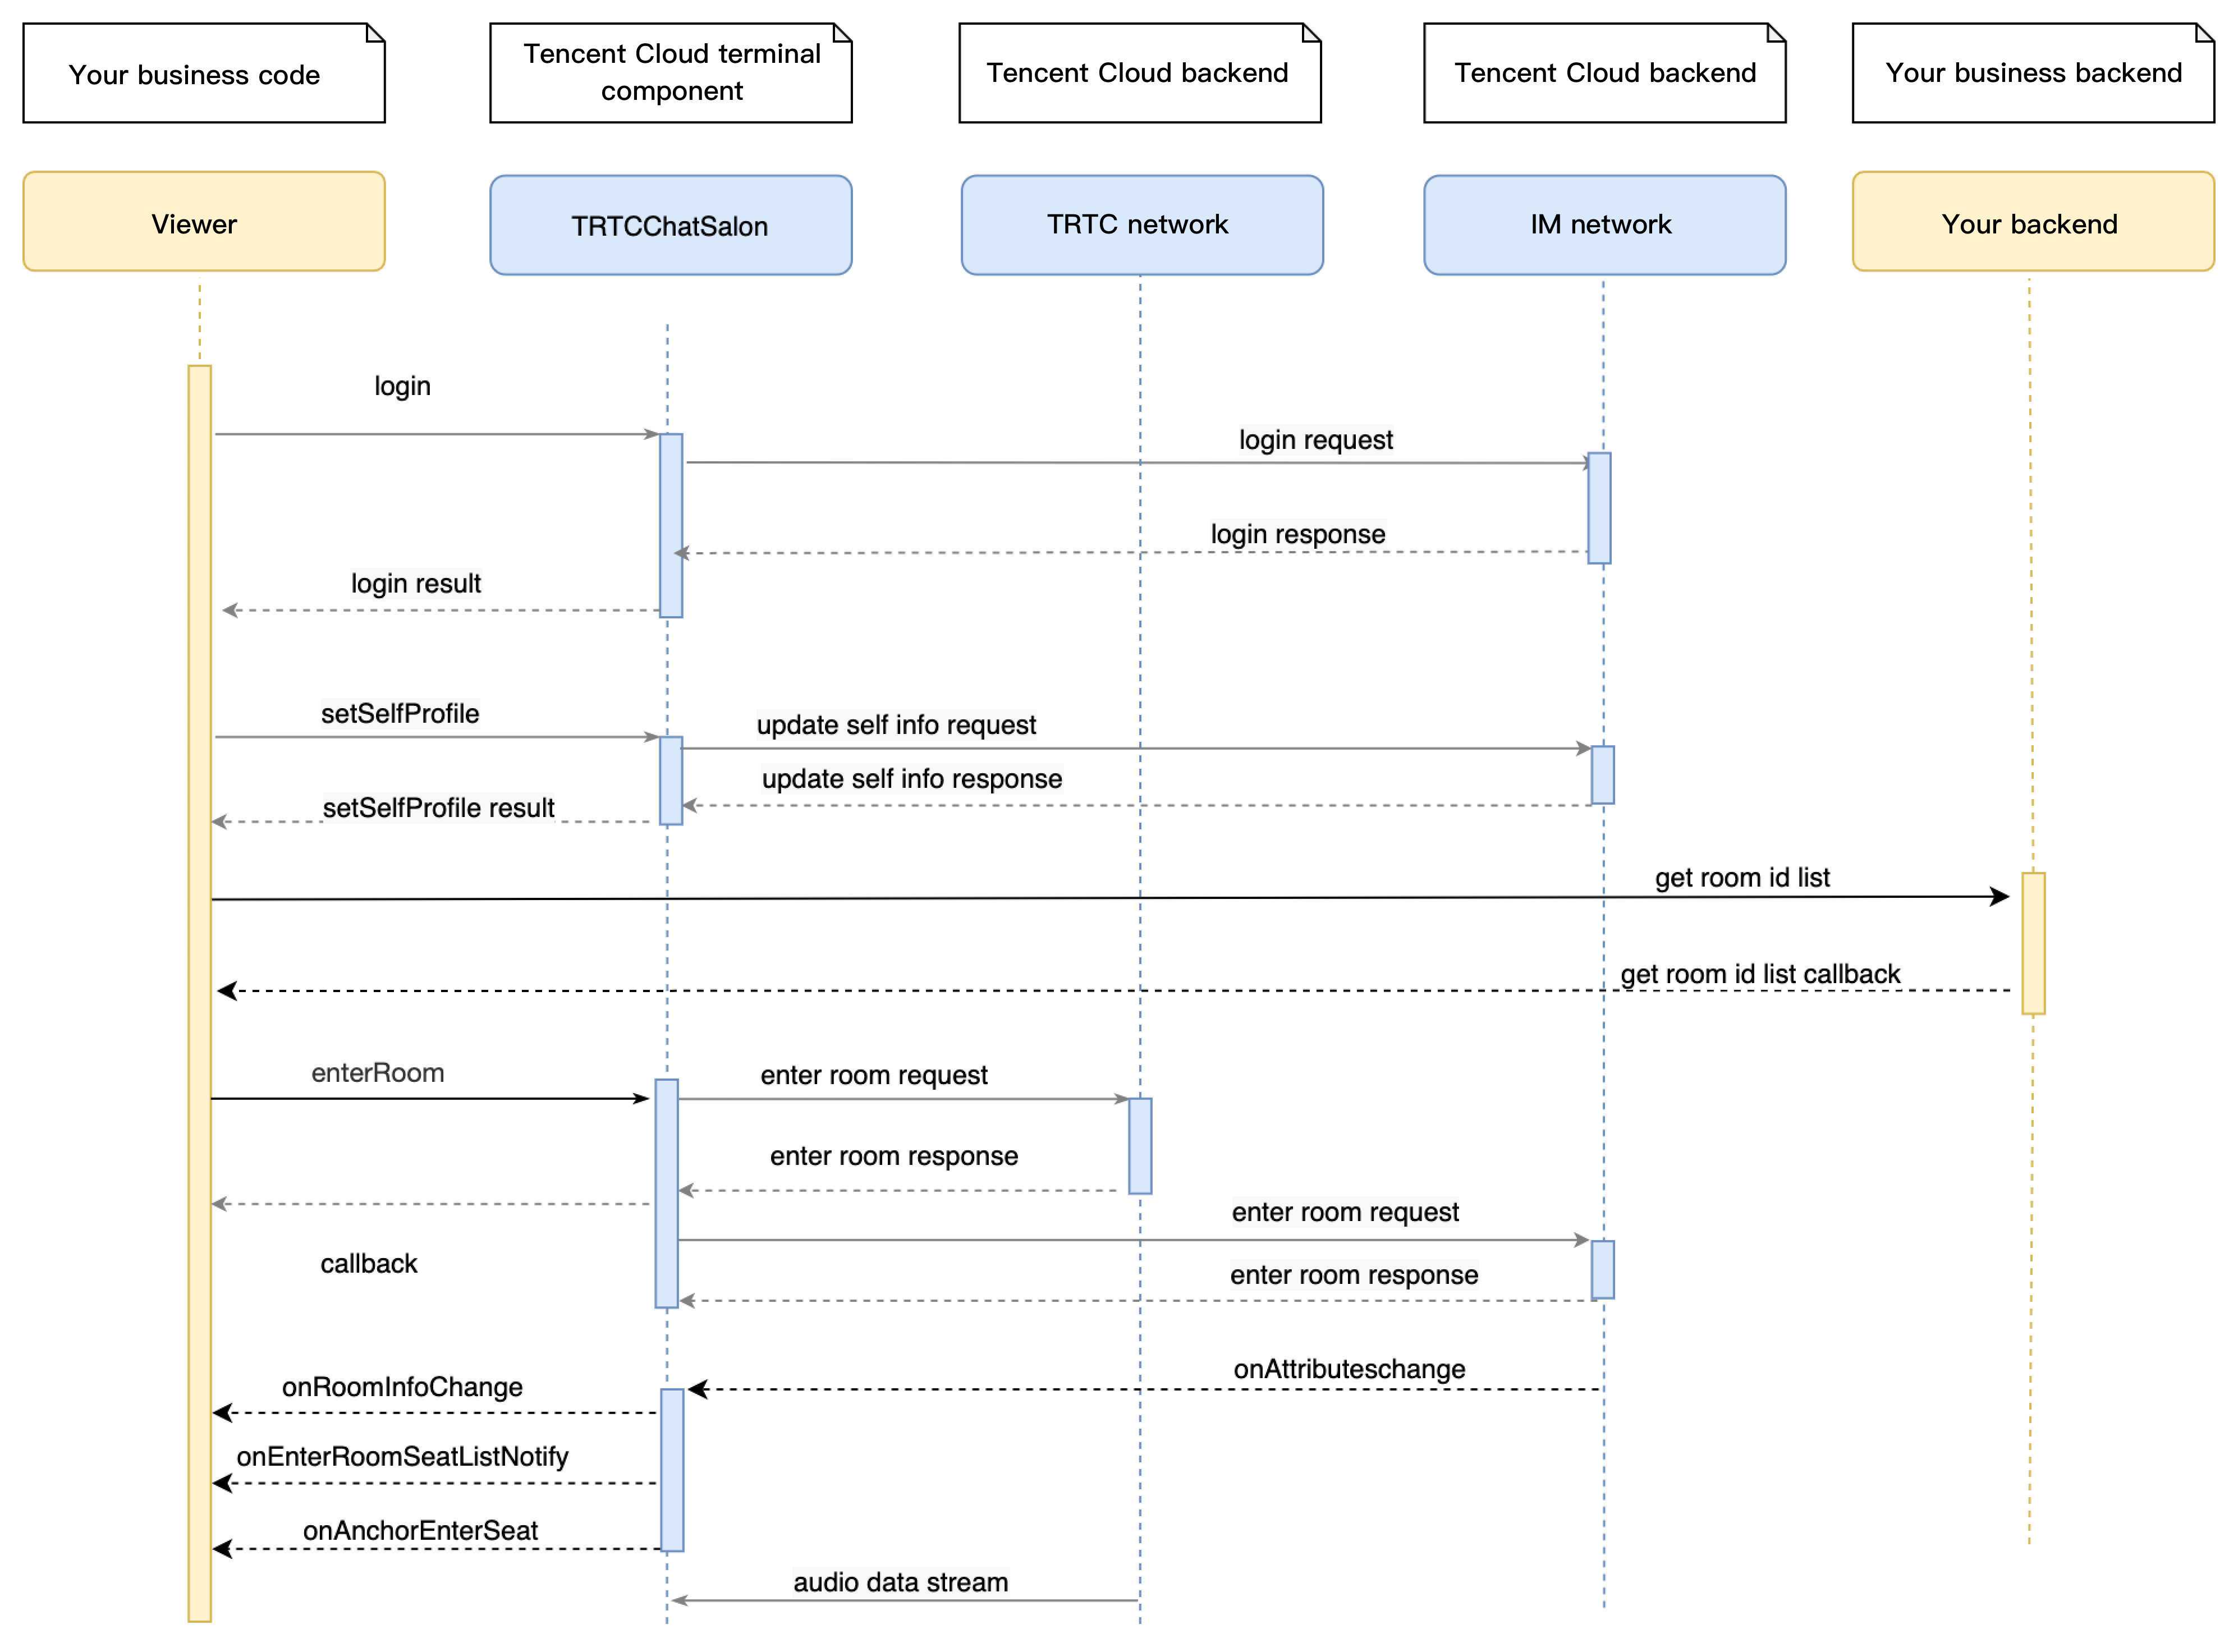
- After performing step 4 to log in, call
setSelfProfileto set your nickname and profile photo. - Get the latest chat salon room list from the backend.
Note:
The chat salon list in the demo app is for demonstration only. The business logic of the chat salon list varies significantly. Tencent Cloud does not provide list management services for the time being. Please manage the list by yourself.
- Call
getRoomInfoListto get short descriptions of the rooms, which are provided by room owners when they callcreateRoom.Note:If your chat salon list already contains enough room information, you can skip the step of calling
getRoomInfoList. - Select a chat salon, and call
enterRoomwith the room ID passed in to enter. - After entering the room, you will receive an
onRoomInfoChangenotification about room change from the component. Record the room information, including room name, whether the room owner’s consent is required for listeners to speak, etc., and update it to the UI. - You will also receive an
onAnchorEnterSeatnotification that someone becomes a speaker.
// 1. Set your nickname and profile photo.
mTRTCChatSalon.setSelfProfile("my_name", "my_face_url", null);

// 2. Get the room list from the backend. Suppose it is `roomList`.
List<integer> roomList = GetRoomList();

// 3. Call `getRoomInfoList` to get details of the rooms.
mTRTCChatSalon.getRoomInfoList(roomList, new TRTCChatSalonCallback.RoomInfoCallback() {

    @Override
    public void onCallback(int code, String msg, List<trtcchatsalondef.roominfo> list) {
        if (code == 0) {
            // Refresh the room list on your UI
        }
    }

});

// 4. Pass in `roomId` to enter a room.
mTRTCChatSalon.enterRoom(roomId, new TRTCChatSalonCallback.ActionCallback() {
        @Override
        public void onCallback(int code, String msg) {
            if (code == 0) {
                // Entered room successfully
            }
        }
});

// 5. After successful room entry, you receive an `onRoomInfoChange` notification.
@Override
public void onRoomInfoChange(TRTCChatSalonDef.RoomInfo roomInfo) {
    mNeedRequest = roomInfo.needRequest;
    mRoomName = roomInfo.roomName;
    // The UI can display the title and other information
}

// 6. You receive an `onAnchorEnterSeat` notification.
@Override
public void onAnchorEnterSeat(TRTCChatSalonDef.UserInfo userInfo) {
}
Step 7. Mic on/off
- A room owner can make a listener speaker by passing in the
userIdof the listener topickSeat. All members in the room will receive anonAnchorEnterSeatnotification. - A room owner can remove a speaker by passing in the speaker’s
userIdtokickSeat. All members in the room will receive anonAnchorLeaveSeatnotification.
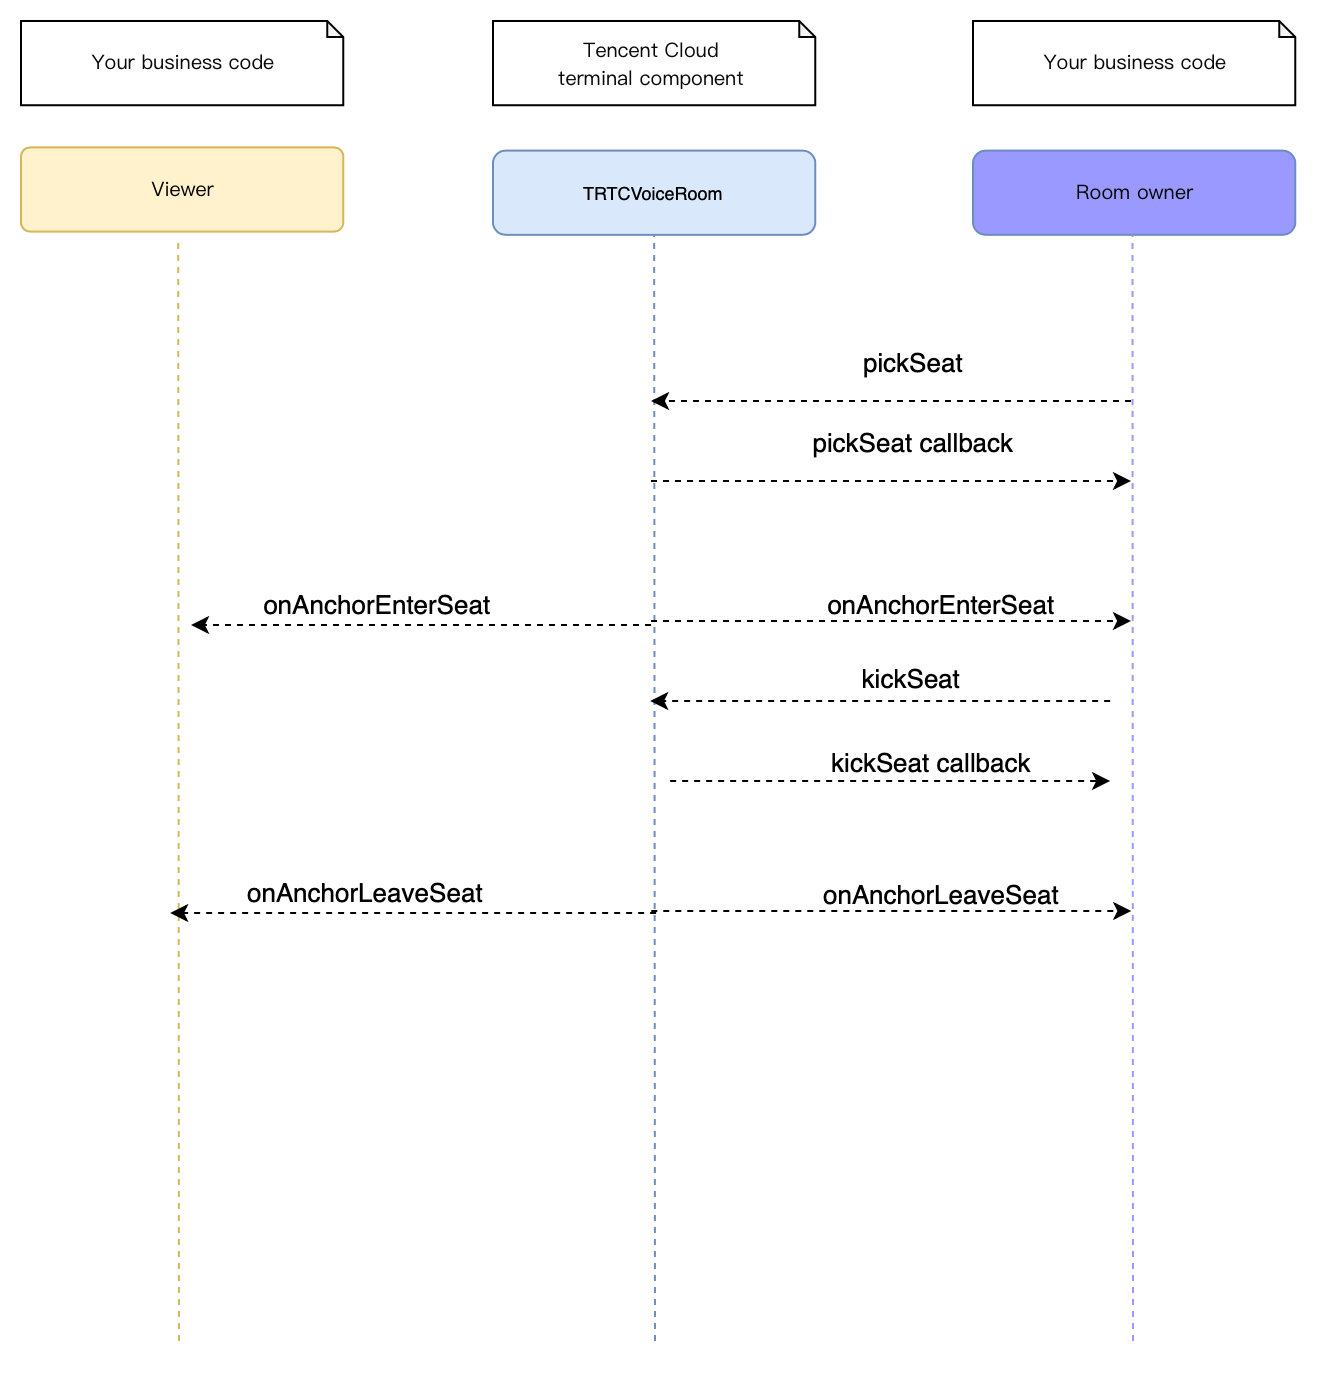
After a speaker list operation, the order in which different notifications are sent is: callbacks > independent events such as onAnchorEnterSeat.
// 1. The room owner makes a listener speaker.
mTRTCChatSalon.pickSeat("123", new TRTCChatSalonCallback.ActionCallback() {
    @Override
    public void onCallback(int code, String msg) {
        // 2. A callback is returned.
        if (code == 0) {
        }
    }
});

// 3. The room owner receives a notification that someone became a speaker, and can determine whether it is the listener he or she intended to make speaker.
public void onAnchorEnterSeat(TRTCChatSalonDef.UserInfo user) {
}
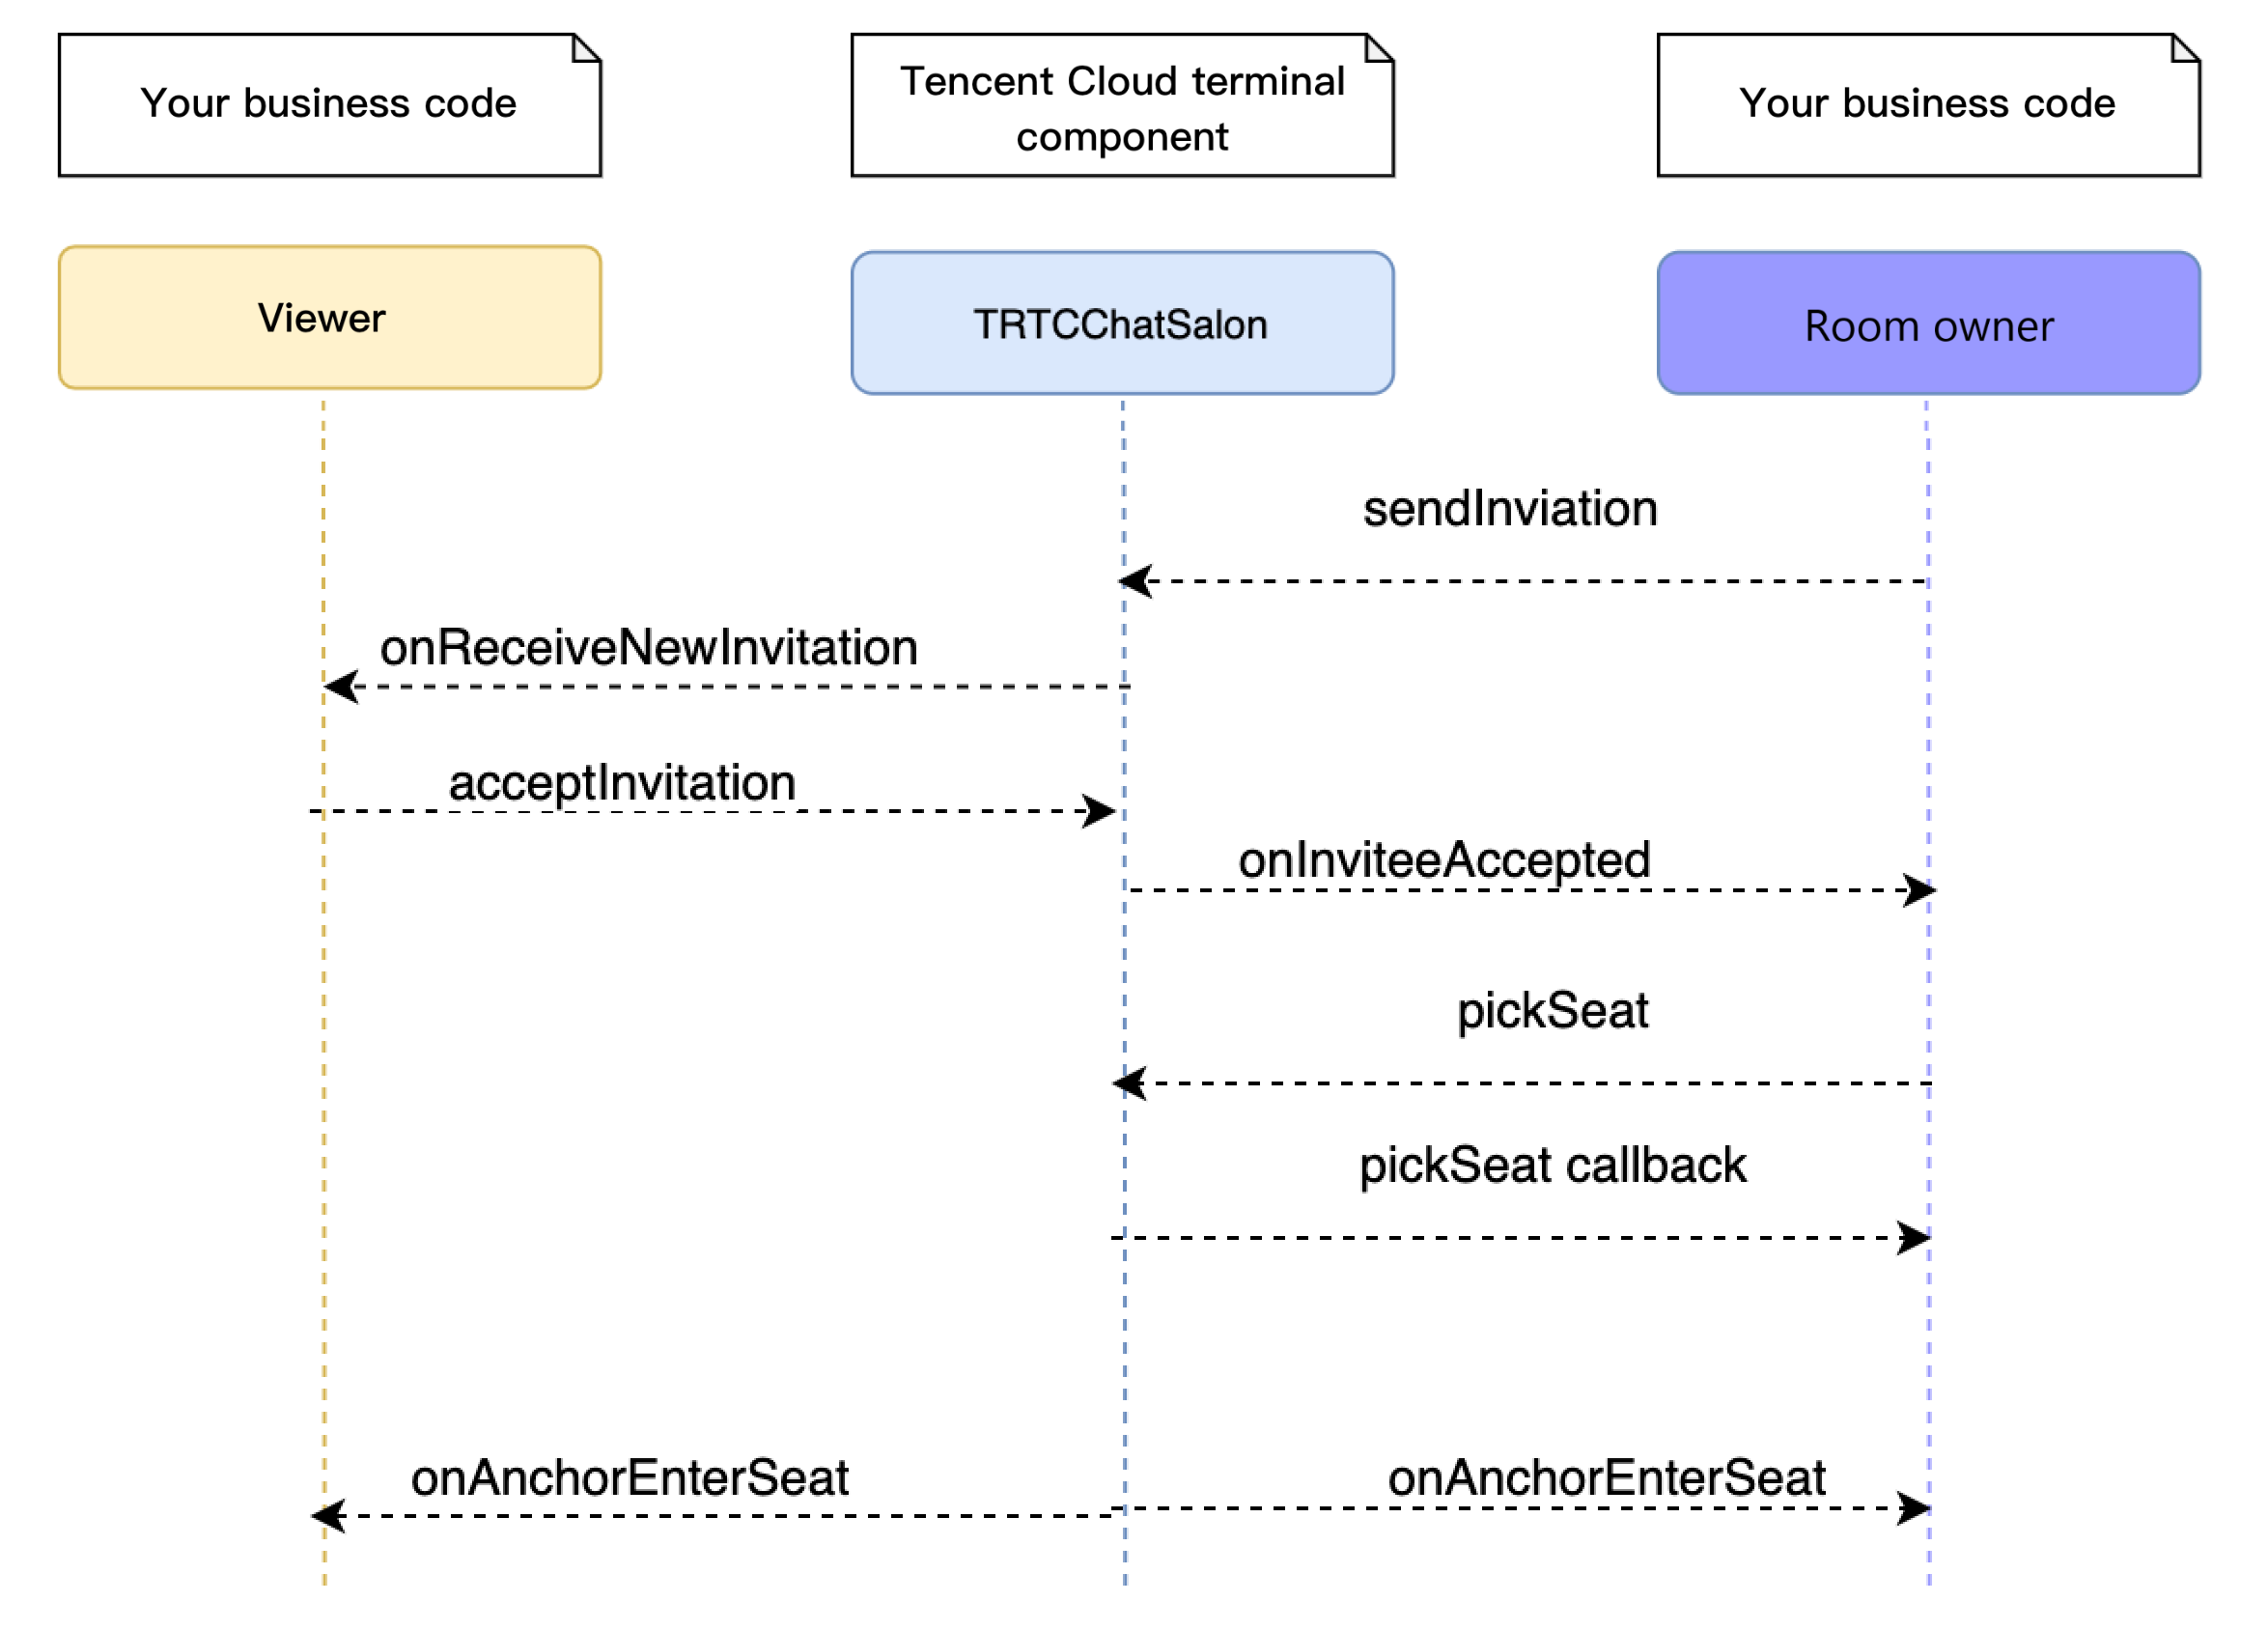
Step 8. Use signaling for invitations
If you want listeners and room owners to obtain each other’s consent before performing the above actions in your application, you can use signaling for invitation sending.
- A listener calls
sendInvitation, passing in information including the room owner’suserIdand custom command words. The API will return aninviteId, which should be recorded. - The room owner receives an
onReceiveNewInvitationnotification, and a window pops up on the UI asking the room owner whether to accept the request. - The room owner calls
acceptInvitationwith theinviteIdpassed in to accept the request. - The listener receives an
onInviteeAcceptednotification and callsenterSeatto become a speaker.
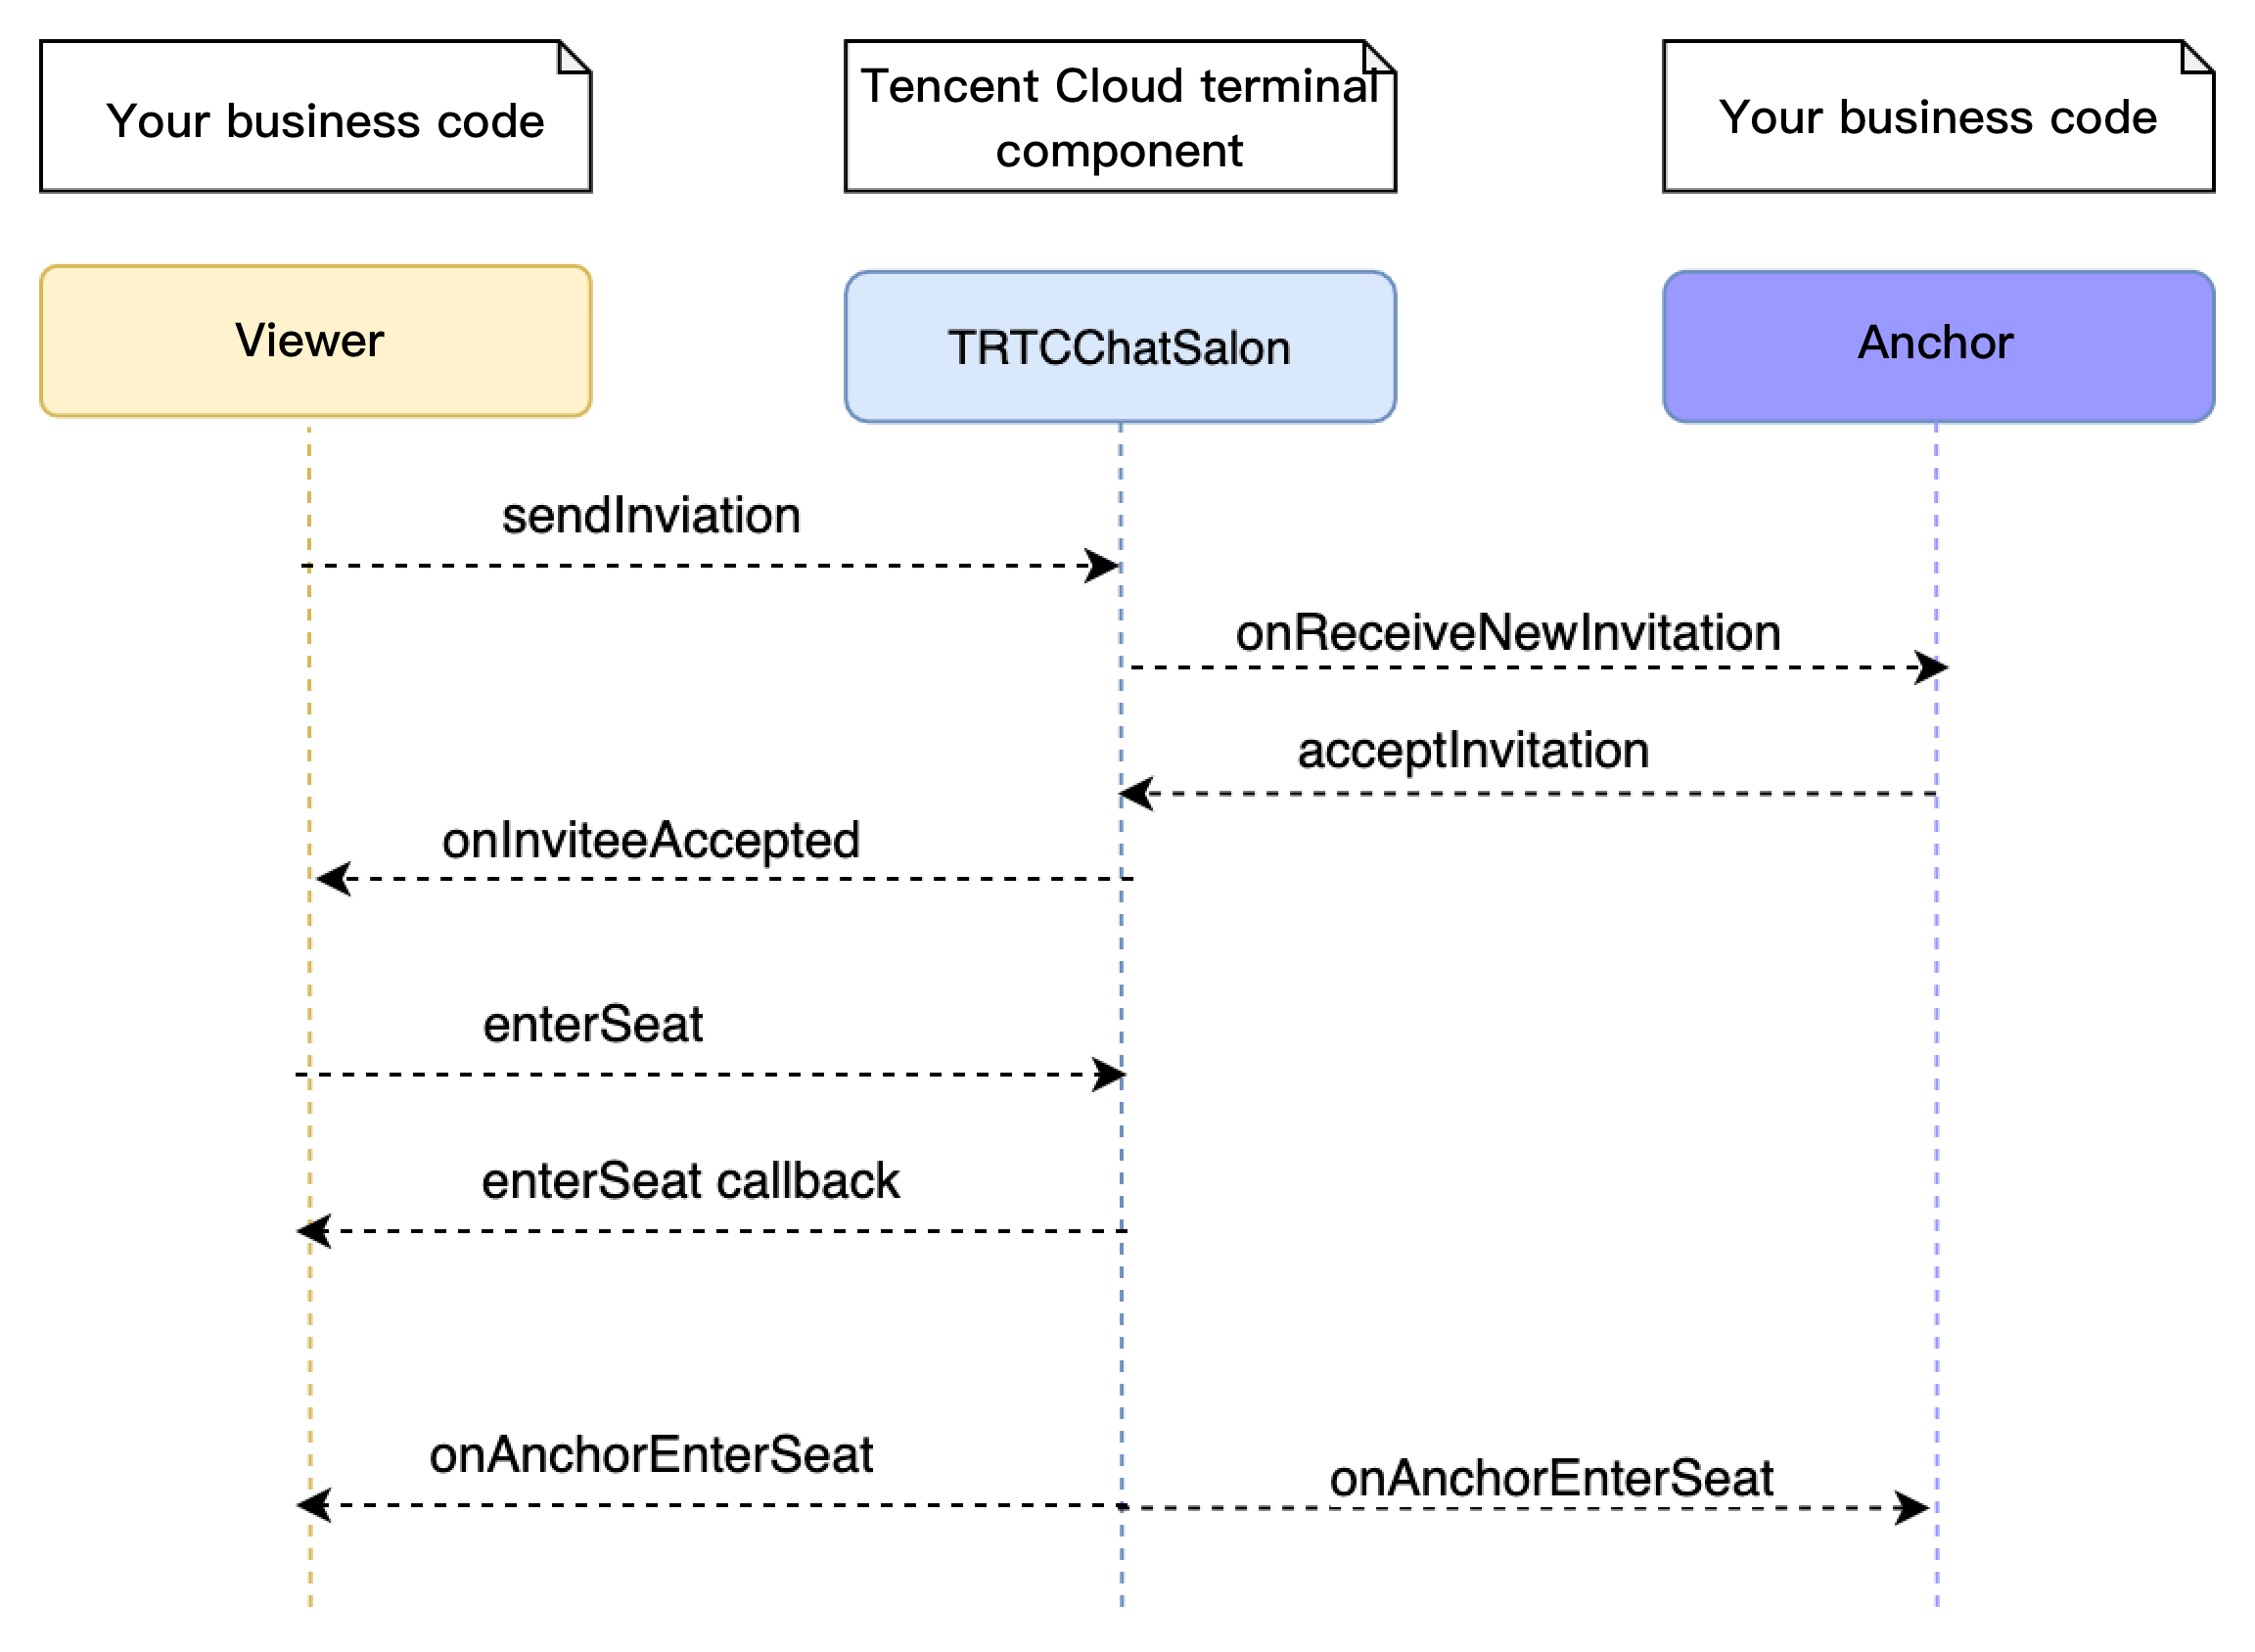
// Listener
// 1. A listener calls sendInvitation to request to speak.
String inviteId = mTRTCChatSalon.sendInvitation("ENTER_SEAT", ownerUserId, "123", null);

// 2. Place the user in the seat after the invitation is accepted
@Override
public void onInviteeAccepted(String id, String invitee) {
    if(id.equals(inviteId)) {
        mTRTCChatSalon.enterSeat(null);
    }
}

// Room owner
// 1. The room owner receives the request.
 @Override
public void onReceiveNewInvitation(final String id, String inviter, String cmd, final String content) {
    if (cmd.equals("ENTER_SEAT")) {
        // 2. The room owner accepts the request.
         mTRTCChatSalon.acceptInvitation(id, null);
    }
}
Step 9. Enable text chat and on-screen comments
- Call
sendRoomTextMsgto send common text messages. All users in the room will receive anonRecvRoomTextMsgcallback.
IM has its default content moderation rules. Text messages that contain restricted terms will not be forwarded by the cloud.// Sender: send text messages
mTRTCChatSalon.sendRoomTextMsg("Hello Word!", null);
// Recipient: listen for text messages
mTRTCChatSalon.setDelegate(new TRTCChatSalonDelegate() {
@Override
public void onRecvRoomTextMsg(String message, TRTCChatSalonDef.UserInfo userInfo) {
Log.d(TAG, "Received a message from" + userInfo.userName + ": " + message);
}
}); - Call
sendRoomCustomMsgto send custom (signaling) messages. All users in the room will receive anonRecvRoomCustomMsgcallback.
Custom messages are often used to transfer custom signals, e.g., to give and broadcast likes.// A sender can customize CMD to distinguish on-screen comments and likes.
// For example, use "CMD_DANMU" to indicate on-screen comments and "CMD_LIKE" to indicate likes.
mTRTCChatSalon.sendRoomCustomMsg("CMD_DANMU", "Hello world", null);
mTRTCChatSalon.sendRoomCustomMsg("CMD_LIKE", "", null);
// Recipient: listen for custom messages
mTRTCChatSalon.setDelegate(new TRTCChatSalonDelegate() {
@Override
public void onRecvRoomCustomMsg(String cmd, String message, TRTCChatSalonDef.UserInfo userInfo) {
if ("CMD_DANMU".equals(cmd)) {
// An on-screen comment is received.
Log.d(TAG, "Received an on-screen comment from" + userInfo.userName + ": " + message);
} else if ("CMD_LIKE".equals(cmd)) {
// A like is received.
Log.d(TAG, userInfo.userName + "liked you.");
}
}
});

 Yes
Yes
 No
No
Was this page helpful?