To quickly enable the interactive live video streaming feature, you can modify the demo we provide and adapt it to your needs. You can also use the TRTCLiveRoom component and customize your own UI.
Note
All TUIKit components are based on two basic PaaS services of Tencent Cloud, namely TRTC and Chat. When you activate TRTC, the Chat SDK trial edition (which supports up to 100 DAUs) will be activated automatically. For Chat billing details, see Pricing.
Using the Demo UI
Step 1. Create an application
1. Log in to the TRTC console and select Development Assistance > Demo Quick Run.
2. Enter an application name such as TestLive and click Create.
Note
This feature uses two basic PaaS services of Tencent Cloud, namely TRTC and Chat. When you activate TRTC, Chat will be activated automatically. Chat is a value-added service. See Value-added Service Pricing for its billing details.
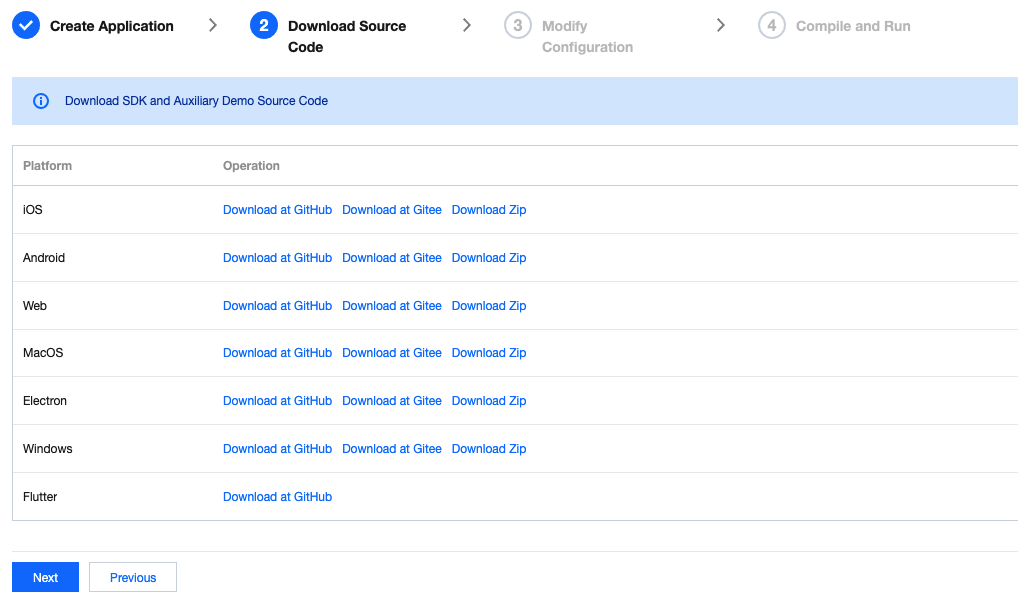
Step 2. Download the SDK and demo source code
1. Download the SDK and demo source code.
2. Click Next.
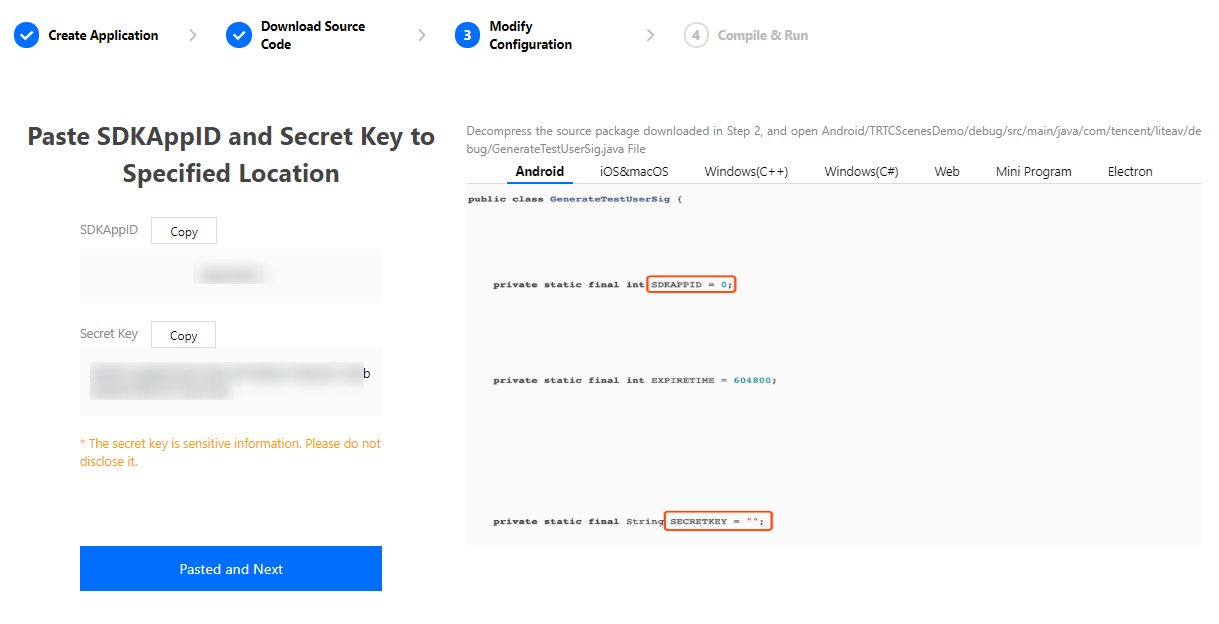
Step 3. Configure the demo project file
1. In the Modify Configuration step, select your platform.
2. Find and open /example/lib/debug/GenerateTestUserSig.dart.
3. Set parameters in GenerateTestUserSig.dart as follows.
SDKAPPID: A placeholder by default. Set it to the actual `SDKAppID`.
SECRETKEY: A placeholder by default. Set it to the actual secret key.
4. Click Next to complete the creation.
5. After compilation, click Return to Overview Page.
Note
In this document, the method to obtain UserSig is to configure the secret key in the client code. In this method, the secret key is vulnerable to decompilation and reverse engineering. Once your secret key is leaked, attackers can steal your Tencent Cloud traffic. Therefore, this method is only suitable for locally running a demo project and debugging.
The best practice is to integrate the calculation code of UserSig into your server and provide an application-oriented API. When UserSig is needed, your application can send a request to your server for a dynamic UserSig. For more information, see How do I calculate UserSig during production?.
Step 4. Compile and run the demo
Note
An Android project must be run on a real device rather than a simulator.
1. Run flutter pub get.
2. Compile, run, and test the project.
Android
iOS
1. Run flutter run.
2. Open the demo project with Android Studio (3.5 or above), and click Run.
1. Open \\ios project in the source code directory with Xcode (11.0 or above).
2. Compile and run the demo project.
Step 5. Modify the demo source code
The TRTCLiveRoom folder in the source code contains two subfolders: ui and model. The ui subfolder contains UI code. The table below lists the files (folders) and the UI views they represent. You can refer to it when making UI changes.
File or Folder
Description
base
Basic classes used by the UI
list
The list and room creation views
room
Main room views for anchors and audience members
Customizing UI
The TRTCLiveRoom folder in the source code contains two subfolders: ui and model. The model subfolder contains the reusable open-source component TRTCLiveRoom. You can find the component's APIs in TRTCLiveRoom.dart and use them to customize your own UI.
Step 1. Integrate the SDK
The interactive live streaming component TRTCLiveRoom depends on the TRTC SDK and Chat SDK. You can configure pubspec.yaml to download their updates automatically.
Add the following dependencies to pubspec.yaml of your project.
dependencies:
tencent_trtc_cloud: latest version number
tencent_im_sdk_plugin: latest version number
Step 2. Configure permission requests and obfuscation rules
iOS
Android
Add request for mic permission in Info.plist:
<key>NSMicrophoneUsageDescription</key>
<string>Audio calls are possible only with mic access.</string>
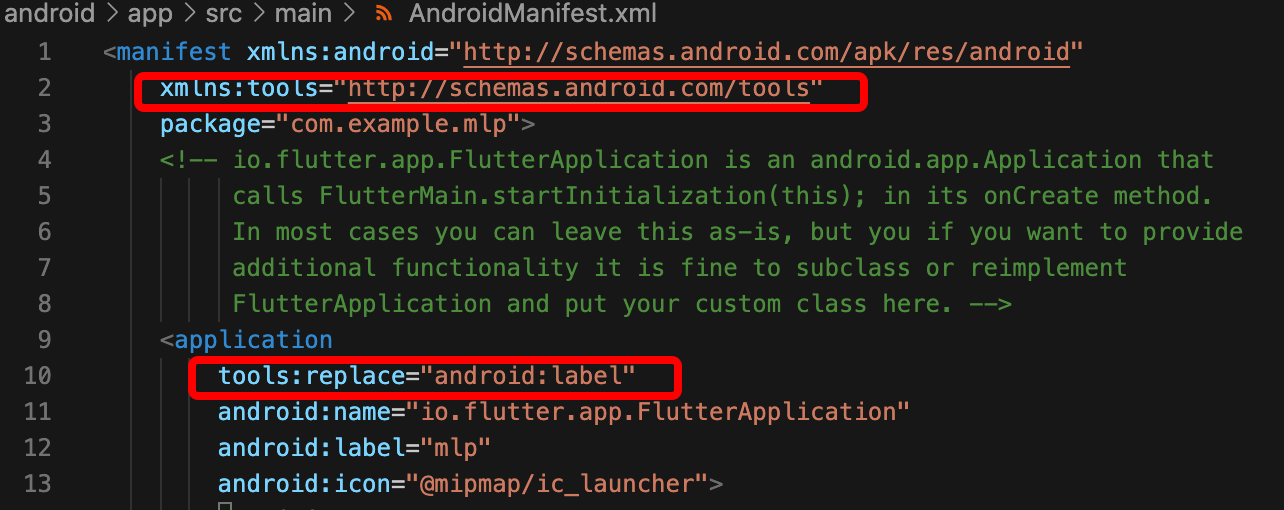
1. Open /android/app/src/main/AndroidManifest.xml.
2. Add xmlns:tools="http://schemas.android.com/tools" to manifest.
3. Add tools:replace="android:label" to application.
ID of the current user, which is a string that can contain letters (a-z and A-Z), digits (0-9), hyphens (-), and underscores (_). We recommend you set it based on your business account system.
userSig
Tencent Cloud's proprietary security signature. To obtain one, see UserSig.
useCDNFirst
Specifies the way the audience watches live streams. `true` means that the audience watches live streams over CDNs, which is cost-efficient but has high latency. `false` means that the audience watches live streams in the low latency mode, the cost of which is between that of CDN live streaming and co-anchoring, but the latency is within 1 second.
CDNPlayDomain
Specifies the domain name for CDN live streaming, which takes effect only if `useCDNFirst` is set to `true`. You can set it in CSS console > Domain Management.
Step 5. Create a room and push streams
1. After performing step 4 to log in, call setSelfProfile to set your nickname and profile photo.
2. Before streaming, you can call startCameraPreview to enable camera preview, add beauty filter buttons to the UI, and set beauty filters through getBeautyManager.
Note
Only the enterprise edition SDK supports face changing and stickers.
3. After setting beauty filters, call createRoom to create a live streaming room.
4. Call startPublish to start streaming. To enable CDN live streaming, specify useCDNFirst and CDNPlayDomain in the TRTCLiveRoomConfig parameter, which is passed in during login, and specify streamID for playback when calling startPublish.
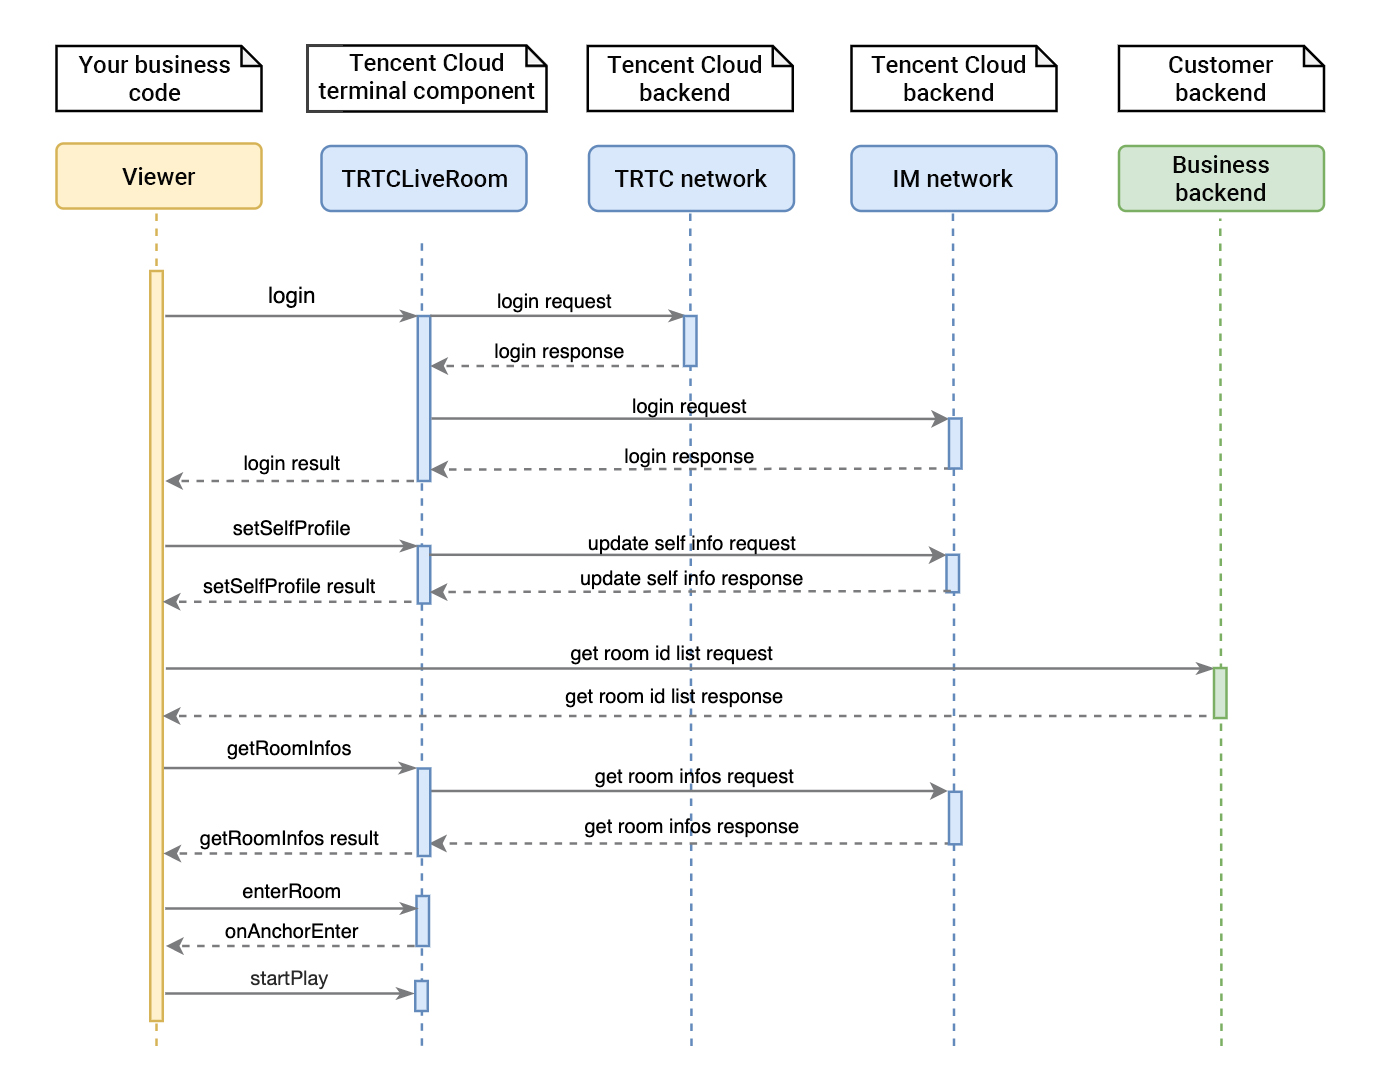
Step 6. Play back streams
1. After performing step 4 to log in, you can call setSelfProfile to set your nickname and profile photo.
2. Get the latest room list from the backend.
Note
The room list in the demo is for demonstration only. The business logic of live streaming room lists vary significantly. Tencent Cloud does not provide list management services for the time being. Please manage the list by yourself.
3. Call getRoomInfos to get short descriptions of the rooms, which are provided by anchors when they call createRoom to create the rooms.
Note
If your room list already displays enough information, you can skip the step of calling getRoomInfos.
4. Select a room, call enterRoom, with the room ID passed in to enter the room.
5. Call startPlay, with the anchor’s userId passed in to start playback.
If the room list displays the userId of the anchor, you can call startPlay, passing in the anchor’s userId to start playback.
If you do not know the anchor's userId, you can find it in the onAnchorEnter event callback, which you will receive after entering the room. You can then call startPlay to start playback.
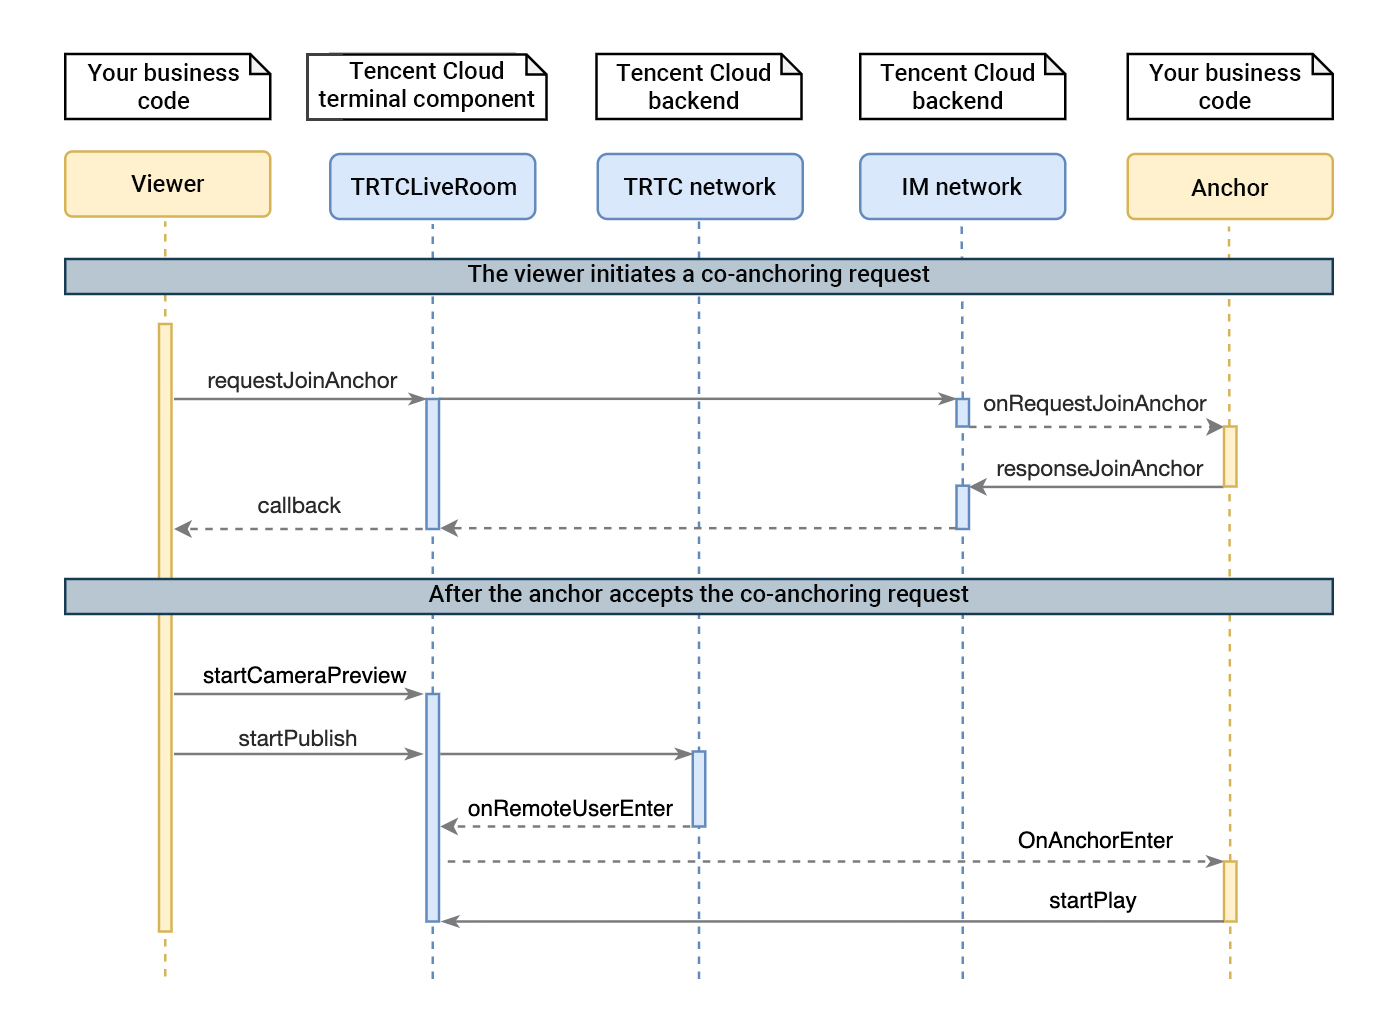
Step 7. Co-anchor
1. The audience member calls requestJoinAnchor to send a co-anchoring request to the anchor.
2. The anchor receives a notification (TRTCLiveRoomDelegate#onRequestJoinAnchor) about the co-anchoring request.
3. The anchor calls responseJoinAnchor to accept or decline the co-anchoring request.
4. The audience receives the onAnchorAccepted event notification, which carries the anchor's response.
5. If the anchor accepts the co-anchoring request, the audience can call startCameraPreview to turn the local camera on and then startPublish to push streams.
6. The anchor receives a notification (TRTCLiveRoomDelegate#onAnchorEnter) that a new stream is available, which carries the audience member’s userId.
7. The anchor calls startPlay to play the audience member's video.
Step 8. Compete across rooms
1. Anchor A calls requestRoomPK to send a cross-room communication request to anchor B.
2. Anchor B receives the TRTCLiveRoomDelegate onRequestRoomPK notification.
3. Anchor B calls responseRoomPK to accept or decline the cross-room communication request.
4. Anchor B accepts the request and, after receiving the TRTCLiveRoomDelegate onAnchorEnter notification, calls startPlay to play anchor A's video.
5. Anchor A receives the onRoomPKAccepted notification, which specifies whether the cross-room communication request is accepted.
6. The request is accepted, and after receiving the TRTCLiveRoomDelegate onAnchorEnter notification, anchor A calls startPlay to play anchor B's video.
Step 9. Enable text chat and on-screen comments
Call sendRoomTextMsg to send common text chat messages. All users in the room will receive the onRecvRoomTextMsg callback.
Chat has its default content moderation rules. Text chat messages that contain restricted words will not be forwarded by the cloud.
// Sender: Sends text chat messages
trtcLiveCloud.sendRoomTextMsg("Hello Word!");
// Receiver: Listens for text chat messages
onListenerFunc(type, params) async {
switch (type) {
case TRTCLiveRoomDelegate.onRecvRoomTextMsg:
// Group text chat messages are received. This feature can be used to enable text chat rooms.
break;
}
}
Call sendRoomCustomMsg to send custom (signaling) messages. All users in the room will receive an onRecvRoomCustomMsg callback.
Custom messages are often used to transfer custom signals, e.g., to give and broadcast likes.


 Yes
Yes
 No
No
Was this page helpful?