tencent cloud

Tencent Real-Time Communication

Release Notes and Announcements
Release Notes
Recent Product Announcement
TRTC Live (TUILiveKit) Product Launch Announcement
TRTC Conference Official Editions Launched
The commercial version of Conference is coming soon
Terms and Conditions Applicable to $9.9 Starter Package
Rules for the "First Subscription $100 Discount" Promotion
Announcement on the Start of Beta Testing for Multi-person Audio and Video Conference
TRTC Call Official Editions Launched
License Required for Video Playback in New Version of LiteAV SDK
TRTC to Offer Monthly Packages
Product Introduction
Overview
Concepts
Features
Strengths
Use Cases
Performance Statistics
Tencent RTC Quickplay: Experience Ultimate Real-Time Audio and Video Interaction!
Purchase Guide
Billing Overview
Free Minutes
Monthly subscription
Pay-as-you-go
TRTC Overdue and Suspension Policy
FAQs
Refund Instructions
User Tutorial
Free Demo
Call
Overview
Activate the Service
Run Demo
Integration
Offline Call Push
Conversational Chat
On-Cloud Recording
AI Noise Reduction
UI Customization
Calls integration to Chat
Additional Features
No UI Integration
Server APIs
Client APIs
Solution
ErrorCode
Release Notes
FAQs
Conference
Overview(TUIRoomKit)
Activate the Service (TUIRoomKit)
Run Demo(TUIRoomKit)
Integration(TUIRoomKit)
Screen Sharing (TUIRoomKit)
Schedule a meeting (TUIRoomKit)
In-meeting Call (TUIRoomKit)
UI Customization(TUIRoomKit)
Virtual Background (TUIRoomKit)
Conference Control (TUIRoomKit)
Cloud Recording (TUIRoomKit)
AI Noise Reduction (TUIRoomKit)
In-Conference Chat (TUIRoomKit)
Robot Streaming (TUIRoomKit)
Enhanced Features (TUIRoomKit)
Client APIs (TUIRoomKit)
Server APIs (TUIRoomKit)
FAQs (TUIRoomKit)
Error Code (TUIRoomKit)
SDK Update Log (TUIRoomKit)
Live
Billing of Video Live Component
Overview
Activating the Service (TUILiveKit)
Run Demo
No UI Integration
UI Customization
Live Broadcast Monitoring
Video Live Streaming
Voice Chat Room
Advanced Features
Client APIs
Server APIs
Error Codes
Release Notes
FAQs
RTC Engine
Activate Service
SDK Download
API Examples
Usage Guidelines
API Reference Manual
Advanced Features
AI Integration
Overview
Configure MCP Server
Install Skills
Integration Guide
FAQ
RTC RESTFUL API
History
Introduction
API Category
Room Management APIs
Stream mixing and relay APIs
On-cloud recording APIs
Data Monitoring APIs
Pull stream Relay Related interface
Web Record APIs
AI Service APIs
Cloud Slicing APIs
Cloud Moderation APIs
Making API Requests
Call Quality Monitoring APIs
Usage Statistics APIs
Data Types
Appendix
Error Codes
Console Guide
Application Management
Package Management
Usage Statistics
Monitoring Dashboard
Development Assistance
Solution
Real-Time Chorus
FAQs
Migration Guide
Billing
Features
UserSig
Firewall Restrictions
How to Downsize Installation Package
Android and iOS
Web
Flutter
Electron
TRTCCalling for Web
Audio and Video Quality
Others
Legacy Documentation
RTC RoomEngine SDK(Old)
Integrating TUIRoom (Web)
Integrating TUIRoom (Android)
Integrating TUIRoom (iOS)
Integrating TUIRoom (Flutter)
Integrating TUIRoom (Electron)
TUIRoom APIs
On-Cloud Recording and Playback (Old)
RTC Analytics Monthly Packages (Previous Version)
Protocols and Policies
Compliance
Security White Paper
Notes on Information Security
Service Level Agreement
Apple Privacy Policy: PrivacyInfo.xcprivacy
TRTC Policy
Privacy Policy
Data Processing And Security Agreement
Glossary

Integrating TUIRoom (Electron)

PDF
Focus Mode
Font Size
Last updated: 2024-09-14 16:38:21

Overview

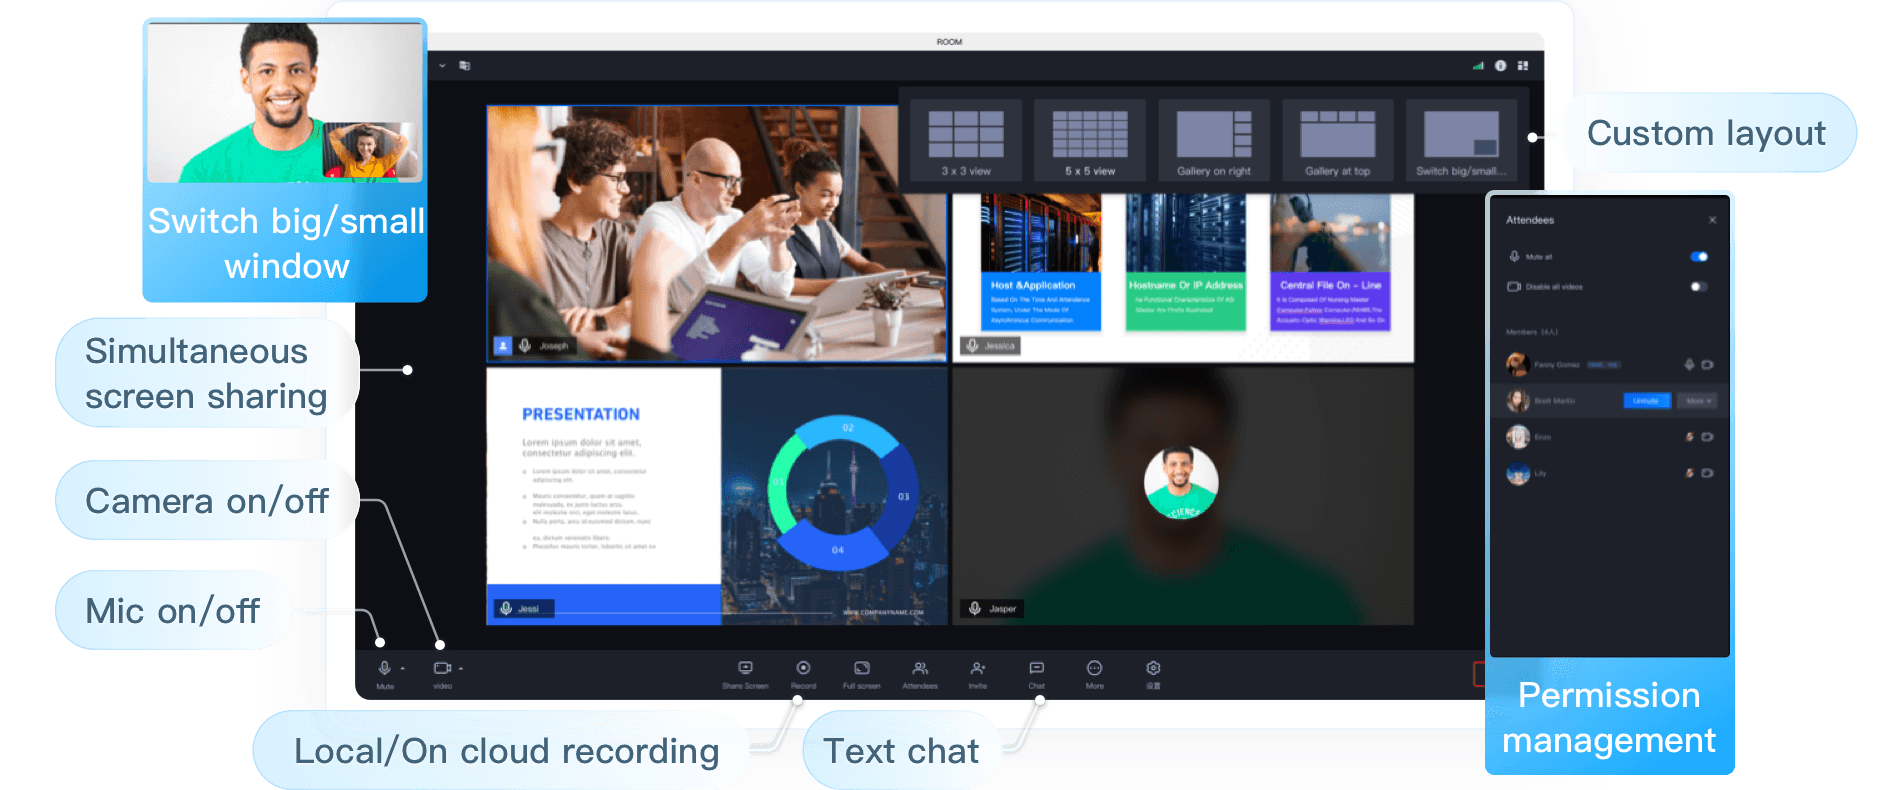
TUIRoom is an open-source audio/video component that comes with a UI kit. It allows you to quickly implement features including audio/video room, screen sharing, and chat messages into your project.
Note:
All components of TUIKit use two basic PaaS services of Tencent Cloud, namely TRTC and Chat. When you activate TRTC, Chat and the trial edition of the Chat SDK (which supports up to 100 DAUs) will be activated automatically. For the billing details of Chat, see Pricing.


You can download the macOS or Windows edition of our TUIRoom Electron demo to try out more features. You can also download the code for TUIRoom and refer to this document to quickly implement a TUIRoom demo project. This document shows you how to integrate the TUIRoom Electron component into your existing project.

Integration

The TUIRoom component is developed using Vue 3 + TypeScript + Pinia + Element Plus + SCSS, so your project must be based on Electron + Vue 3 + TypeScript.

Step 1. Activate the TRTC service

TUIRoom is based on TRTC and Chat.
1. Create a TRTC application
Sign up for a Tencent Cloud account and complete identity verification.
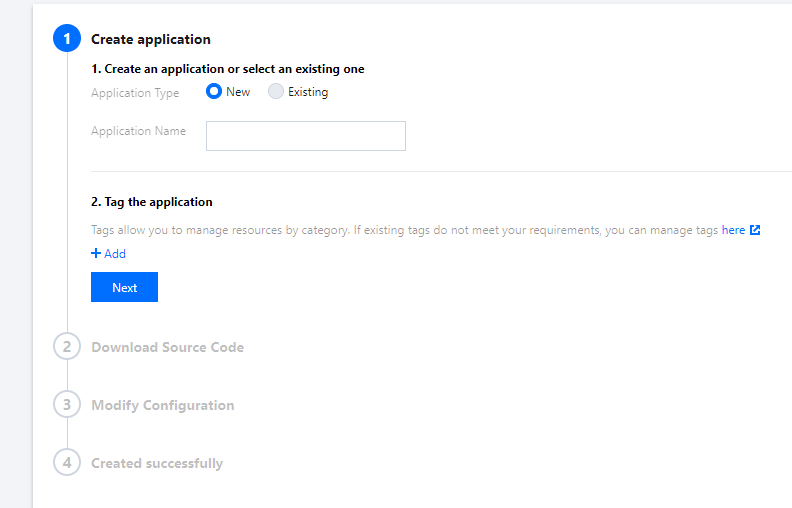
In the TRTC console, click Application Management on the left sidebar and then click Create Application.


2. Get the SDKAppID and key
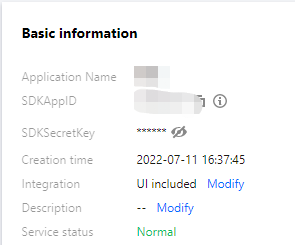
2.1 On the Application Management page, find the application you created, and click Application Info to view its SDKAppID (different applications cannot communicate with each other).


2.2 Select the Quick Start tab to view the application's secret key. Each SDKAppID corresponds to a secret key. They are used to generate the signature (UserSig) required to legitimately use TRTC services.


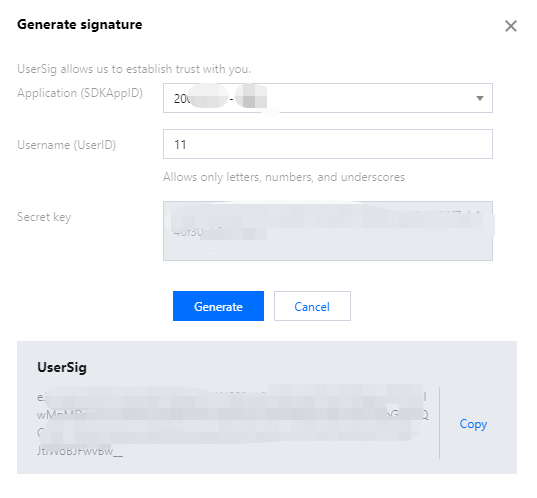
2.3 Generate UserSigUserSig is a security signature designed by Tencent Cloud to prevent attackers from accessing your Tencent Cloud account. It is required when you initialize the TUIRoom component.

Step 2. Download and copy the TUIRoom component

1. Open an existing Electron + Vue3 + TypeScript project. If you don’t have one, you can use this sample to create a project.
Note:
The steps in this document are based on electron-vite-vue 1.0.0.
We have updated the directory structure of electron-vite-vue. If you use the latest version, some of the paths and configuration described in this document may not apply.
2. After the template project is successfully generated, run the following script:
cd electron-vite-vue
npm install
npm run dev
3. Clone or download the TUIRoom code, and copy the TUIRoom/Electron/packages/renderer/src/TUIRoom folder to packages/renderer/src/ of your project.

Step 3. Import the TUIRoom component

Import the TUIRoom component into your webpage, such as App.vue.
The TUIRoom component classifies users as hosts and participants and offers APIs including init, createRoom, and enterRoom.
Hosts and participants can call init to initialize application and user data. Hosts can call createRoom to create and enter rooms. Participants can call enterRoom to join the rooms created by hosts.
<template>
<room ref="TUIRoomRef"></room>
</template>

<script setup lang="ts">
import { ref, onMounted } from 'vue';
// Import the TUIRoom component. Be sure to use the correct import path.
import Room from './TUIRoom/index.vue';
// Get the TUIRoom component elements used to call the component’s APIs
const TUIRoomRef = ref();

onMounted(async () => {
// Initialize the TUIRoom component
// A host needs to initialize the TUIRoom component before creating a room
// A participant needs to initialize the TUIRoom component before entering a room
await TUIRoomRef.value.init({
// Get the `SDKAppID` (see step 1)
sdkAppId: 0,
// The user's unique ID in your business
userId: '',
// For local development and debugging, you can quickly generate a `UserSig` at https://console.tencentcloud.com/trtc/usersigtool. Each `UserID` corresponds to a `UserSig`.
userSig: '',
// The user's username in your business
userName: '',
// The URL of the user's profile photo in your business
userAvatar: '',
// The user's unique ID used for screen sharing. It must be in the format of `share_${userId}`. You don’t need to pass this parameter if you don’t need the screen sharing feature.
shareUserId: '',
// Refer to steps 1-3 above and use the `SDKAppID` and `shareUserId` to generate `shareUserSig`
shareUserSig: '',
})
// By default, a room is created at this point. During actual implementation, you can specify when to call `handleCreateRoom()`.
await handleCreateRoom();
})

// The host creates a room. Call this API only when you need to create a room.
async function handleCreateRoom() {
// `roomId` is the ID of the room to enter, which must be a number.
// The valid values of `roomMode` are `FreeSpeech` (free speech mode) and `ApplySpeech` (request-to-speak mode). The default value is `FreeSpeech`, which is the only supported mode currently.
// `roomParam` specifies whether to turn on the mic/camera upon room entry, as well as the default media device ID to use
const roomId = 123456;
const roomMode = 'FreeSpeech';
const roomParam = {
isOpenCamera: true,
isOpenMicrophone: true,
}
await TUIRoomRef.value.createRoom(roomId, roomMode, roomParam);
}

// The participant enters a room. This API is called by a participant to join an existing room.
async function handleEnterRoom() {
// `roomId` is the ID of the room to enter, which must be a number.
// `roomParam` specifies whether to turn on the mic/camera upon room entry, as well as the default media device ID to use
const roomId = 123456;
const roomParam = {
isOpenCamera: true,
isOpenMicrophone: true,
}
await TUIRoomRef.value.enterRoom(roomId, roomParam);
}
</script>

<style>
html, body {
width: 100%;
height: 100%;
margin: 0;
}

#app {
width: 100%;
height: 100%;
}
</style>
Note:
Copy the above code to your webpage and replace the parameter values for the APIs with the actual values.

Step 4. Set up the development environment

After the TUIRoom component is imported, to ensure that the project can run successfully, complete the following configuration:
1. Install dependencies
Install development environment dependencies:
npm install sass typescript unplugin-auto-import unplugin-vue-components -S -D
Install production environment dependencies:
npm install element-plus events mitt pinia trtc-electron-sdk tim-js-sdk tsignaling -S
2. Register Pinia.
TUIRoom uses Pinia for room data management. You need to register Pinia in the project entry file packages/renderer/src/main.ts.
// `src/main.ts` file
import { createPinia } from 'pinia';

const app = createApp(App);
// Register Pinia
createApp(App)
.use(createPinia())
.mount('#app')
.$nextTick(window.removeLoading)
3. Import Element Plus components
TUIRoom uses Element Plus UI components, which you need to import in packages/renderer/vite.config.ts. You can manually import only the components you need.
Note:
Add the code below in the file. Do not delete the existing configuration.
// vite.config.ts
import AutoImport from 'unplugin-auto-import/vite';
import Components from 'unplugin-vue-components/vite';
import { ElementPlusResolver } from 'unplugin-vue-components/resolvers';
const path = require('path');

export default defineConfig({
// ...
plugins: [
AutoImport({
resolvers: [ElementPlusResolver()],
}),
Components({
resolvers: [ElementPlusResolver({
importStyle: 'sass',
})],
}),
],
css: {
preprocessorOptions: {
scss: {
additionalData: `
@use '${path.resolve(__dirname, 'src/TUIRoom/assets/style/element.scss')}' as *;
`,
},
},
},
});
Meanwhile, in order to ensure that Element Plus UI components can display styles properly, you need to load Element Plus component styles in the entry file `packages/renderer/src/main.ts`.
// src/main.ts
import 'element-plus/theme-chalk/el-message.css'
import 'element-plus/theme-chalk/el-message-box.css'
4. Import trtc-electron-sdk In order to import trtc-electron-sdk using the import statement at the UI layer, you need to configure packages/renderer/vite.config.ts as follows (otherwise, you will have to use the require statement):
Note:
Replace the configuration in resolve with the following:
// vite.config.ts

export default defineConfig({
// ...
plugins: [
resolve(
{
"trtc-electron-sdk": `
const TRTCCloud = require("trtc-electron-sdk");
const TRTCParams = TRTCCloud.TRTCParams;
const TRTCAppScene = TRTCCloud.TRTCAppScene;
const TRTCVideoStreamType = TRTCCloud.TRTCVideoStreamType;
const TRTCScreenCaptureSourceType = TRTCCloud.TRTCScreenCaptureSourceType;
const TRTCVideoEncParam = TRTCCloud.TRTCVideoEncParam;
const Rect = TRTCCloud.Rect;
const TRTCAudioQuality = TRTCCloud.TRTCAudioQuality;
const TRTCScreenCaptureSourceInfo = TRTCCloud.TRTCScreenCaptureSourceInfo;
const TRTCDeviceInfo = TRTCCloud.TRTCDeviceInfo;
const TRTCVideoQosPreference = TRTCCloud.TRTCVideoQosPreference;
const TRTCQualityInfo = TRTCCloud.TRTCQualityInfo;
const TRTCStatistics = TRTCCloud.TRTCStatistics;
const TRTCVolumeInfo = TRTCCloud.TRTCVolumeInfo;
const TRTCDeviceType = TRTCCloud.TRTCDeviceType;
const TRTCDeviceState = TRTCCloud.TRTCDeviceState;
const TRTCBeautyStyle = TRTCCloud.TRTCBeautyStyle;
const TRTCVideoResolution = TRTCCloud.TRTCVideoResolution;
const TRTCVideoResolutionMode = TRTCCloud.TRTCVideoResolutionMode;
const TRTCVideoMirrorType = TRTCCloud.TRTCVideoMirrorType;
const TRTCVideoRotation = TRTCCloud.TRTCVideoRotation;
const TRTCVideoFillMode = TRTCCloud.TRTCVideoFillMode;
export {
TRTCParams,
TRTCAppScene,
TRTCVideoStreamType,
TRTCScreenCaptureSourceType,
TRTCVideoEncParam,
Rect,
TRTCAudioQuality,
TRTCScreenCaptureSourceInfo,
TRTCDeviceInfo,
TRTCVideoQosPreference,
TRTCQualityInfo,
TRTCStatistics,
TRTCVolumeInfo,
TRTCDeviceType,
TRTCDeviceState,
TRTCBeautyStyle,
TRTCVideoResolution,
TRTCVideoResolutionMode,
TRTCVideoMirrorType,
TRTCVideoRotation,
TRTCVideoFillMode,
};
export default TRTCCloud.default;
`,
}
),
]
// ...
});
5. Configure env.d.ts
Configure the env.d.ts file in packages/renderer/src/env.d.ts as follows:
Note:
Add the code below in env.d.ts. Do not delete the existing configuration in the file.
// env.d.ts

declare module 'tsignaling/tsignaling-js' {
import TSignaling from 'tsignaling/tsignaling-js';
export default TSignaling;
}

declare module 'tim-js-sdk' {
import TIM from 'tim-js-sdk';
export default TIM;
}

6. If there are dynamic imports in your project, you need to modify the build configuration to generate an ES module.
Modify the configuration in packages/renderer/vite.config.ts as follows.
Note:
Add the code below in the file. Do not delete the existing Vite configuration. Skip this step if your project does not have dynamic imports.
// vite.config.ts

export default defineConfig({
// ...
build: {
rollupOptions: {
output: {
format: 'es'
}
}
},
});

Step 5. Run your project in the development environment

In the console, execute the development environment script. Then, open the page integrated with the TUIRoom component with a browser. If you used the script in step 2 to generate an Electron + Vue3 + TypeScript project, follow the steps below:
1. Run the development environment command.
npm run dev
Note:
Because Element Plus components are imported manually, it may take a relatively long time for the page to load in the development environment for the first time. This will not be an issue after building.
2. Try out the features of the TUIRoom component.

Step 6. Create an installer and run it

Run the following command in a terminal window to generate an installer in the release directory.
npm run build
Note:
You need macOS to create a macOS installer and Windows to create a Windows installer.

Appendix: TUIRoom APIs

TUIRoom APIs

init

This API is used to initialize TUIRoom data. Anyone using TUIRoom needs to call this API.
TUIRoomRef.value.init(roomData);
The parameters are described below:
Parameter
Type
Description
roomData
object

roomData.sdkAppId
number
The SDKAppID.
roomData.userId
string
The unique user ID.
roomData.userSig
string
The UserSig.
roomData.userName
string
The username.
roomData.userAvatar
string
The user’s profile photo.
roomData.shareUserId
string
The UserID used for screen sharing, which must be in the format of share_${userId}. You don’t need to pass this parameter if you don’t need the screen sharing feature.
roomData.shareUserSig
string
The UserSig used for screen sharing, which is optional.

createRoom

This API is used by a host to create a room.
TUIRoomRef.value.createRoom(roomId, roomMode, roomParam);
The parameters are described below:
Parameter
Type
Description
roomId
number
The room ID.
roomMode
string
The speech mode, including FreeSpeech (free speech) and ApplySpeech (request-to-speak). The default value is FreeSpeech, which is the only supported mode currently.
roomParam
Object
Optional
roomParam.isOpenCamera
string
Whether to turn on the camera upon room entry. This parameter is optional and the default is no.
roomParam.isOpenMicrophone
string
Whether to turn on the mic upon room entry. This parameter is optional and the default is no.
roomParam.defaultCameraId
string
The ID of the default camera, which is optional.
roomParam.defaultMicrophoneId
string
The ID of the default mic, which is optional.
roomParam.defaultSpeakerId
String
The ID of the default speaker, which is optional.

enterRoom

This API is used by a participant to enter a room.
TUIRoomRef.value.enterRoom(roomId, roomParam);
The parameters are described below:
Parameter
Type
Description
roomId
number
The room ID.
roomParam
Object
Optional
roomParam.isOpenCamera
string
Whether to turn on the camera upon room entry. This parameter is optional and the default is no.
roomParam.isOpenMicrophone
string
Whether to turn on the mic upon room entry. This parameter is optional and the default is no.
roomParam.defaultCameraId
string
The ID of the default camera, which is optional.
roomParam.defaultMicrophoneId
string
The ID of the default mic, which is optional.
roomParam.defaultSpeakerId
String
The ID of the default speaker, which is optional.

TUIRoom events

onRoomCreate

A room was created.
<template>
<room ref="TUIRoomRef" @on-room-create="handleRoomCreate"></room>
</template>

<script setup lang="ts">
// Import the TUIRoom component. Be sure to use the correct import path.
import Room from './TUIRoom/index.vue';

function handleRoomCreate(info) {
if (info.code === 0) {
console.log('Room created successfully')
}
}
</script>

onRoomEnter

A user entered the room.
<template>
<room ref="TUIRoomRef" @on-room-enter="handleRoomEnter"></room>
</template>

<script setup lang="ts">
// Import the TUIRoom component. Be sure to use the correct import path.
import Room from './TUIRoom/index.vue';

function handleRoomEnter(info) {
if (info.code === 0) {
console.log('Entered room successfully')
}
}
</script>

onRoomDestory

The host closed the room.
<template>
<room ref="TUIRoomRef" @on-room-destory="handleRoomDestory"></room>
</template>

<script setup lang="ts">
// Import the TUIRoom component. Be sure to use the correct import path.
import Room from './TUIRoom/index.vue';

function handleRoomDestory(info) {
if (info.code === 0) {
console.log('The host closed the room successfully')
}
}
</script>

onRoomExit

A participant left the room.
<template>
<room ref="TUIRoomRef" @on-room-exit="handleRoomExit"></room>
</template>

<script setup lang="ts">
// Import the TUIRoom component. Be sure to use the correct import path.
import Room from './TUIRoom/index.vue';

function handleRoomExit(info) {
if (info.code === 0) {
console.log('The participant exited the room successfully')
}
}
</script>


Help and Support

Was this page helpful?

Help us improve! Rate your documentation experience in 5 mins.

Feedback