A cluster is the basic unit where ES provides hosted Elasticsearch services and you use and manage such services. This document describes how to quickly create an Elasticsearch cluster in the Tencent Cloud Console.
Log in to the ES Console and click Create to enter the creation and purchase page.
Creating cluster
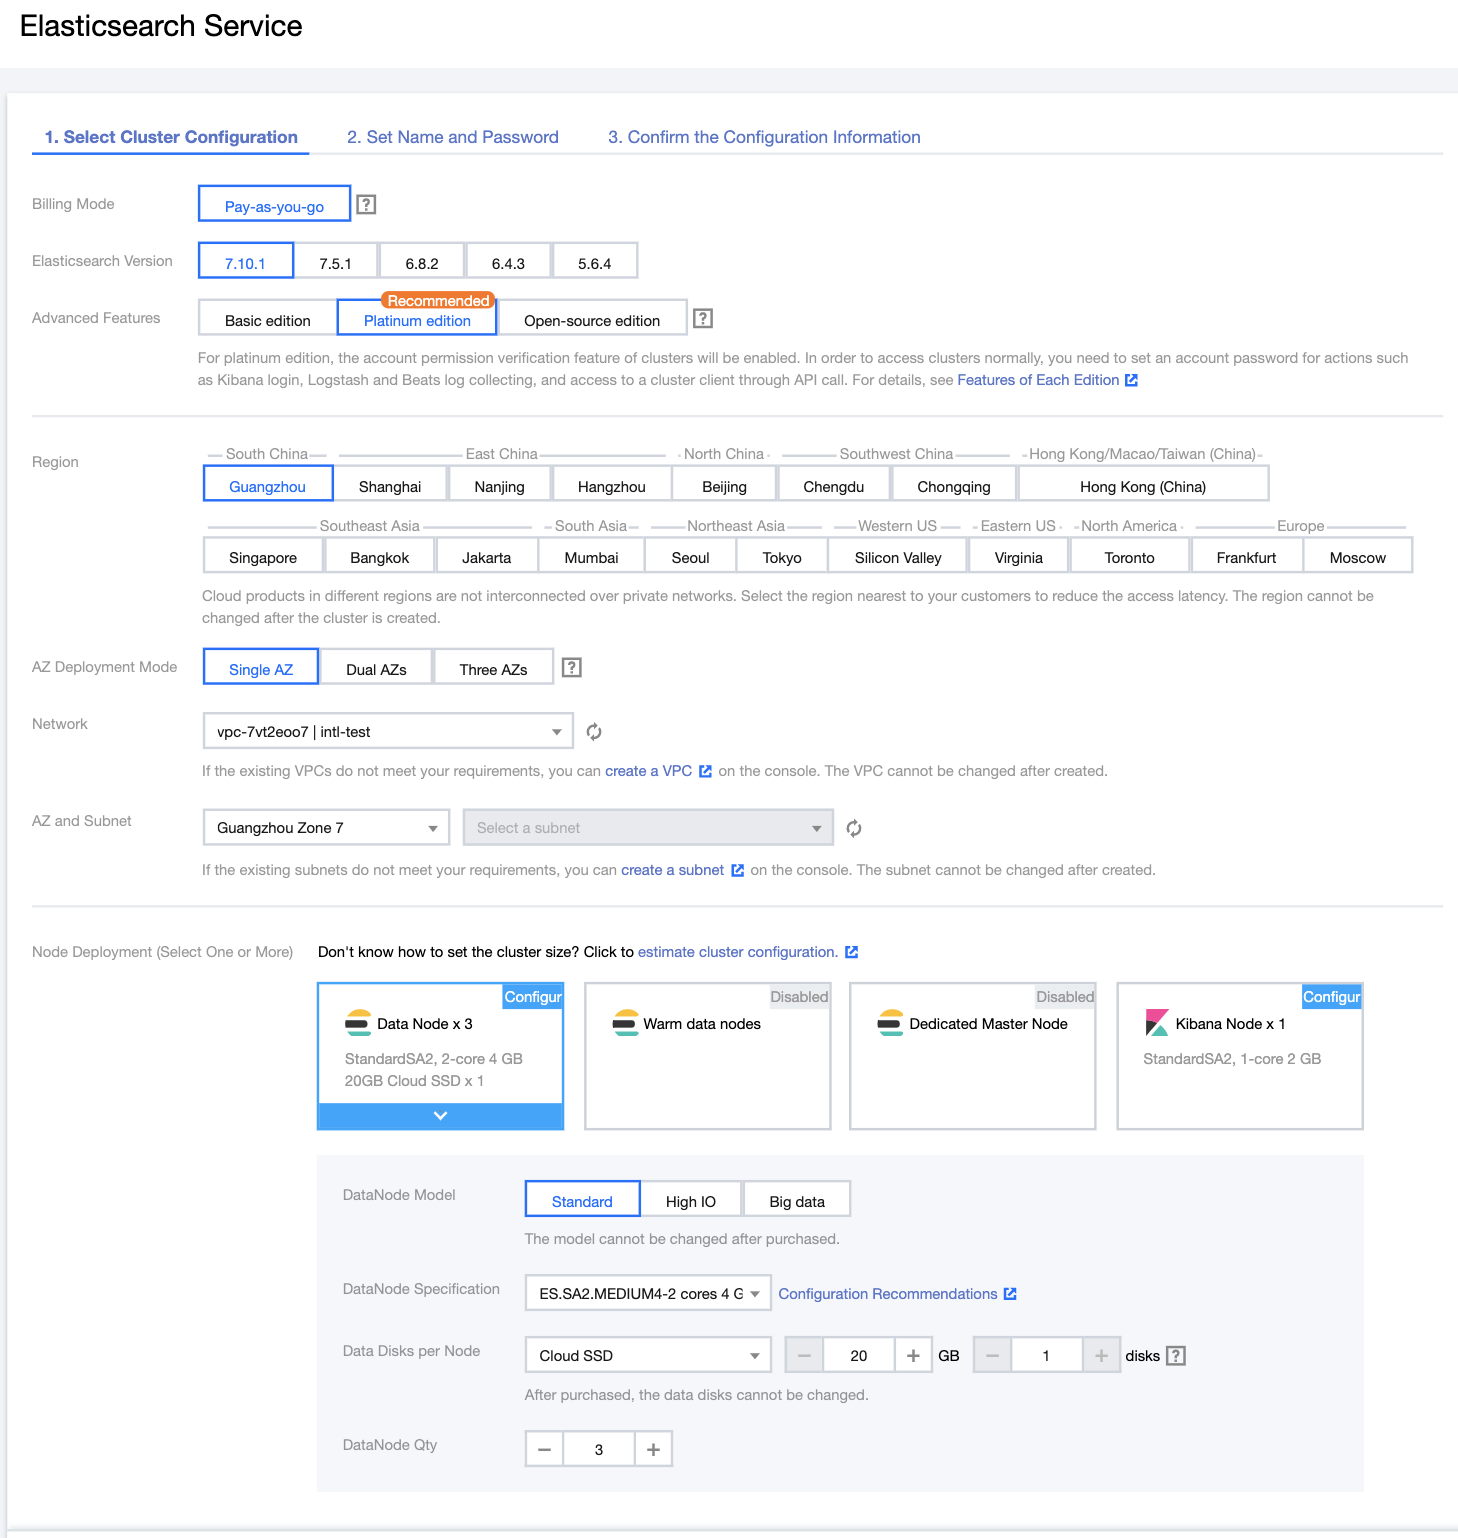
1. Select cluster configuration
Billing Mode: pay-as-you-go billing is supported.
Region: currently, ES has been launched in multiple regions in and outside Mainland China.
Elasticsearch Version: v5.6.4, v6.4.3, v6.8.2, and v7.5.1 are supported.
X-Pack: Elasticsearch's official commercial features, including capabilities such as data permission management, SQL JDBC, alerting, and machine learning. The features available vary by edition: the Platinum Edition has all the advanced features, the Basic Edition has some advanced features, and the Open Source Edition does not have advanced features. For more information, please see X-Pack.
Note:
The Basic Edition supports ES cluster user authentication starting from v6.8, which greatly improves the cluster security and is therefore recommended to be enabled. If you do not enable it when purchasing your cluster, you need to fully restart the cluster when enabling it subsequently, which will affect your online businesses. This feature is enabled in the Platinum Edition by default and is not supported in the Open Source Edition.
Network/AZ and Subnet: ES is deployed in VPCs. An ES cluster can only be accessed from servers in the same VPC. Therefore, to ensure smooth access to the ES cluster over the private network, you are recommended to select a VPC in the region where your existing cloud-based businesses reside. In multi-AZ deployment mode, you should also select the same VPC. Subnets in different AZs in the same VPC can communicate with each other.
Note:
The VPC cannot be changed or adjusted once the ES cluster is created.
Special notes on network selection
Cross-VPC Access: if you need to access an ES cluster from a CVM instance located in another VPC in the same region, consider the peering connection scheme which can interconnect two different VPCs in the same region.
Basic Network Access: if your business is deployed in the basic network and you have never used a VPC, you can bind the CVM instance located in the basic network to the VPC where the ES cluster resides through Classiclink. For more information, please see Classiclink. Classiclink only supports VPCs in the IP range of 10.[0–47].0.0/16. If you need to access the ES cluster from the basic network, please select a VPC in this range when creating the cluster.
AZ Deployment Mode: single-AZ is a mode where the ES cluster is deployed in one AZ, while multi-AZ is a mode where the cluster is deployed in two AZs in the same region. The multi-AZ mode can improve the disaster recovery capability of the cluster and ensure the stability of online businesses. For more information, please see Multi-AZ Cluster Deployment.
Data Node Deployment Mode: single mode or hot/warm mode. In hot/warm mode, a cluster can have both warm and hot nodes where hot data that has high requirements for read/write performance can be stored on hot nodes, while indices that have high requirements for storage capacity and relatively low requirements for read/write performance can be stored on warm nodes. This ensures read/write performance of the hot data while reducing storage costs. For more information, please see Hot/Warm Architecture and Index Lifecycle Management.
Node Model: specifications of each node model in the cluster. The core quantity and memory size available vary by model. For more information on the node models supported by ES and how to select an appropriate type, please see Node Type and Storage Configuration.
Node Storage Type: premium or SSD cloud disk.
Single-Node Storage: disk capacity configured for each node. The storage capacity of the entire cluster is the single-node storage multiplied by the number of nodes.
Dedicated Master Node: if the cluster is large, you can configure dedicated master nodes to further ensure the cluster stability.
Dedicated Master Node Model: a dedicated master node can use a different model from that of the data nodes.
Number of Dedicated Master Nodes: 3 or 5. An odd number of nodes ensures high availability and prevents the risk of split-brain.
Kibana Node: it is provided free of charge with the 1-core 2 GB MEM specification. Currently, it cannot be modified.
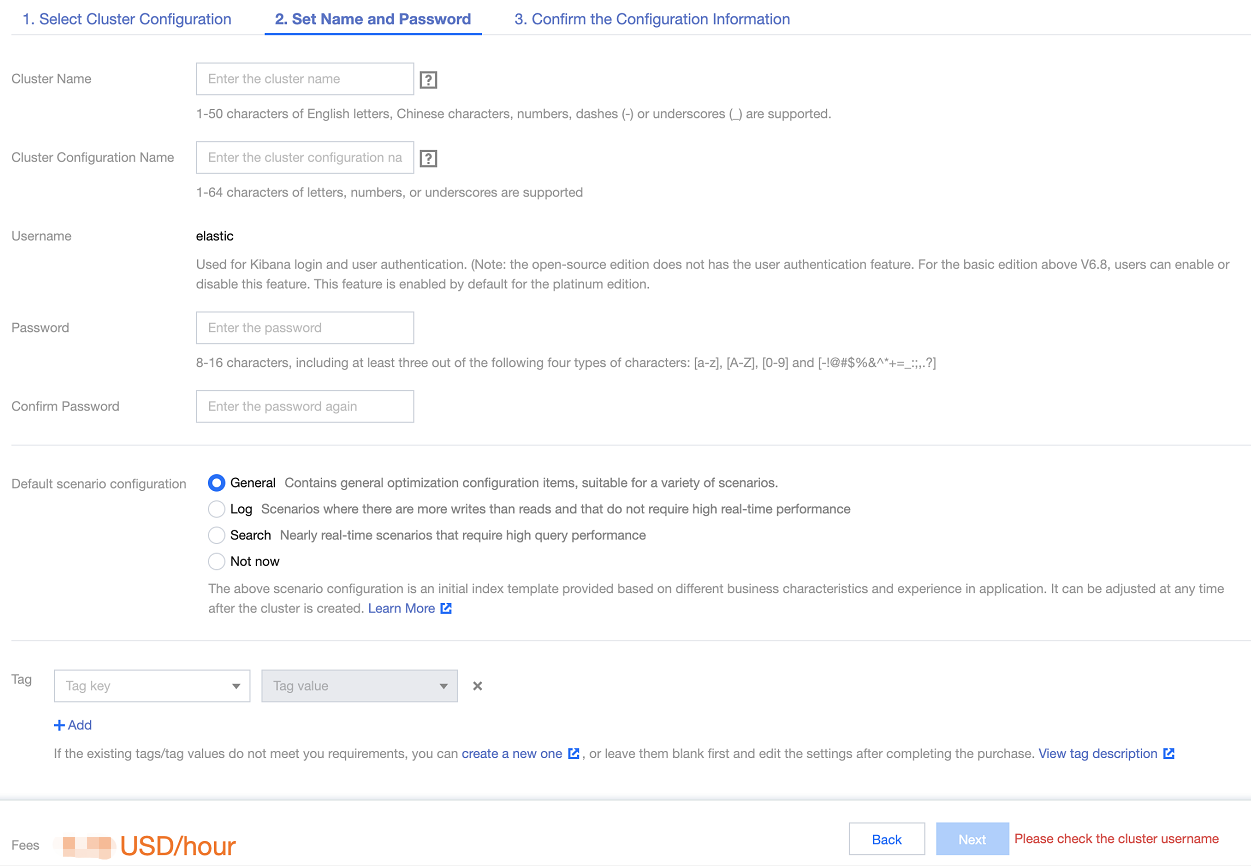
2. Set the name and password
Click Next and set a name and password.
Cluster Name: name the cluster as desired. This name is not a globally unique identifier and can be set as a business-related description.
Username: username used for Kibana page login and ES cluster user authentication. It is elastic by default and cannot be modified.
Password: password corresponding to the aforementioned username. Please set it as required and keep it private. If you forgot it, you can reset it on the details page.
Tag: tag is a unified management service provided by Tencent Cloud and can be used to manage existing Tencent Cloud resources in a categorized manner. You can create or modify tags either before or after ES cluster purchase. For more information, please see Tag.
3. Confirm configuration information
Click Next and confirm configuration information.
Click Activate to create the cluster directly if the pay-as-you-go billing mode is selected. You do not need to confirm the order or pay for it, as your account balance will be deducted on an hourly basis during cluster use.
4. Complete the creation
Once successful activated, the pay-as-you-go cluster just created can be viewed in the console and will be completely created in a matter of minutes.
ES provides a rich set of monitoring metrics to help you view the status of clusters during use. For more information, please see Viewing Monitoring Metrics.
In the Basic Edition and Platinum Edition, Kibana also offers monitoring metrics on the Monitor page on the left sidebar.
Adjusting cluster configuration
With the increase in volumes of business data and access requests, the cluster configuration can be elastically adjusted. For more information, please see Adjusting Configuration.