- Release Notes and Announcements
- Announcements
- Notification on Service Suspension Policy Change in Case of Overdue Payment for COS Pay-As-You-Go (Postpaid)
- Implementation Notice for Security Management of COS Bucket Domain (Effective January 2024)
- Notification of Price Reduction for COS Retrieval and Storage Capacity Charges
- Daily Billing for COS Storage Usage, Request, and Data Retrieval
- COS Will Stop Supporting New Default CDN Acceleration Domains
- Release Notes
- Announcements
- Product Introduction
- Purchase Guide
- Getting Started
- Console Guide
- Console Overview
- Bucket Management
- Bucket Overview
- Creating Bucket
- Deleting Buckets
- Querying Bucket
- Clearing Bucket
- Setting Access Permission
- Setting Bucket Encryption
- Setting Hotlink Protection
- Setting Origin-Pull
- Setting Cross-Origin Resource Sharing (CORS)
- Setting Versioning
- Setting Static Website
- Setting Lifecycle
- Setting Logging
- Accessing Bucket List Using Sub-Account
- Adding Bucket Policies
- Setting Log Analysis
- Setting INTELLIGENT TIERING
- Setting Inventory
- Domain Name Management
- Setting Bucket Tags
- Setting Log Retrieval
- Setting Cross-Bucket Replication
- Enabling Global Acceleration
- Setting Object Lock
- Object Management
- Uploading an Object
- Downloading Objects
- Copying Object
- Previewing or Editing Object
- Viewing Object Information
- Searching for Objects
- Sorting and Filtering Objects
- Direct Upload to ARCHIVE
- Modifying Storage Class
- Deleting Incomplete Multipart Uploads
- Setting Object Access Permission
- Setting Object Encryption
- Custom Headers
- Deleting Objects
- Restoring Archived Objects
- Folder Management
- Data Extraction
- Setting Object Tag
- Exporting Object URLs
- Restoring Historical Object Version
- Batch Operation
- Monitoring Reports
- Data Processing
- Content Moderation
- Smart Toolbox User Guide
- Data Processing Workflow
- Application Integration
- User Tools
- Tool Overview
- Installation and Configuration of Environment
- COSBrowser
- COSCLI (Beta)
- COSCLI Overview
- Download and Installation Configuration
- Common Options
- Common Commands
- Generating and Modifying Configuration Files - config
- Creating Buckets - mb
- Deleting Buckets - rb
- Tagging Bucket - bucket-tagging
- Querying Bucket/Object List - ls
- Obtaining Statistics on Different Types of Objects - du
- Uploading/Downloading/Copying Objects - cp
- Syncing Upload/Download/Copy - sync
- Deleting Objects - rm
- Getting File Hash Value - hash
- Listing Incomplete Multipart Uploads - lsparts
- Clearing Incomplete Multipart Uploads - abort
- Retrieving Archived Files - restore
- Getting Pre-signed URL - signurl
- FAQs
- COSCMD
- COS Migration
- FTP Server
- Hadoop
- COSDistCp
- Hadoop-cos-DistChecker
- HDFS TO COS
- Online Auxiliary Tools
- Diagnostic Tool
- Best Practices
- Overview
- Access Control and Permission Management
- ACL Practices
- CAM Practices
- Granting Sub-Accounts Access to COS
- Authorization Cases
- Working with COS API Authorization Policies
- Security Guidelines for Using Temporary Credentials for Direct Upload from Frontend to COS
- Generating and Using Temporary Keys
- Authorizing Sub-Account to Get Buckets by Tag
- Descriptions and Use Cases of Condition Keys
- Granting Bucket Permissions to a Sub-Account that is Under Another Root Account
- Performance Optimization
- Data Migration
- Accessing COS with AWS S3 SDK
- Data Disaster Recovery and Backup
- Domain Name Management Practice
- Image Processing
- Audio/Video Practices
- Workflow
- Direct Data Upload
- Content Moderation
- Data Security
- Data Verification
- Big Data Practice
- Using COS in the Third-party Applications
- Use the general configuration of COS in third-party applications compatible with S3
- Storing Remote WordPress Attachments to COS
- Storing Ghost Attachment to COS
- Backing up Files from PC to COS
- Using Nextcloud and COS to Build Personal Online File Storage Service
- Mounting COS to Windows Server as Local Drive
- Setting up Image Hosting Service with PicGo, Typora, and COS
- Managing COS Resource with CloudBerry Explorer
- Developer Guide
- Creating Request
- Bucket
- Object
- Data Management
- Data Disaster Recovery
- Data Security
- Cloud Access Management
- Batch Operation
- Global Acceleration
- Data Workflow
- Monitoring and Alarms
- Data Lake Storage
- Cloud Native Datalake Storage
- Metadata Accelerator
- Metadata Acceleration Overview
- Migrating HDFS Data to Metadata Acceleration-Enabled Bucket
- Using HDFS to Access Metadata Acceleration-Enabled Bucket
- Mounting a COS Bucket in a Computing Cluster
- Accessing COS over HDFS in CDH Cluster
- Using Hadoop FileSystem API Code to Access COS Metadata Acceleration Bucket
- Using DataX to Sync Data Between Buckets with Metadata Acceleration Enabled
- Big Data Security
- GooseFS
- Data Processing
- Troubleshooting
- API Documentation
- Introduction
- Common Request Headers
- Common Response Headers
- Error Codes
- Request Signature
- Action List
- Service APIs
- Bucket APIs
- Basic Operations
- Access Control List (acl)
- Cross-Origin Resource Sharing (cors)
- Lifecycle
- Bucket Policy (policy)
- Hotlink Protection (referer)
- Tag (tagging)
- Static Website (website)
- Intelligent Tiering
- Bucket inventory(inventory)
- Versioning
- Cross-Bucket Replication(replication)
- Log Management(logging)
- Global Acceleration (Accelerate)
- Bucket Encryption (encryption)
- Custom Domain Name (Domain)
- Object Lock (ObjectLock)
- Origin-Pull (Origin)
- Object APIs
- Batch Operation APIs
- Data Processing APIs
- Image Processing
- Basic Image Processing
- Scaling
- Cropping
- Rotation
- Converting Format
- Quality Change
- Gaussian Blurring
- Adjusting Brightness
- Adjusting Contrast
- Sharpening
- Grayscale Image
- Image Watermark
- Text Watermark
- Obtaining Basic Image Information
- Getting Image EXIF
- Obtaining Image’s Average Hue
- Metadata Removal
- Quick Thumbnail Template
- Limiting Output Image Size
- Pipeline Operators
- Image Advanced Compression
- Persistent Image Processing
- Image Compression
- Blind Watermark
- Basic Image Processing
- AI-Based Content Recognition
- Media Processing
- File Processing
- File Processing
- Image Processing
- Job and Workflow
- Common Request Headers
- Common Response Headers
- Error Codes
- Workflow APIs
- Workflow Instance
- Job APIs
- Media Processing
- Canceling Media Processing Job
- Querying Media Processing Job
- Media Processing Job Callback
- Video-to-Animated Image Conversion
- Audio/Video Splicing
- Adding Digital Watermark
- Extracting Digital Watermark
- Getting Media Information
- Noise Cancellation
- Video Quality Scoring
- SDRtoHDR
- Remuxing (Audio/Video Segmentation)
- Intelligent Thumbnail
- Frame Capturing
- Stream Separation
- Super Resolution
- Audio/Video Transcoding
- Text to Speech
- Video Montage
- Video Enhancement
- Video Tagging
- Voice/Sound Separation
- Image Processing
- Multi-Job Processing
- AI-Based Content Recognition
- Sync Media Processing
- Media Processing
- Template APIs
- Media Processing
- Creating Media Processing Template
- Creating Animated Image Template
- Creating Splicing Template
- Creating Top Speed Codec Transcoding Template
- Creating Screenshot Template
- Creating Super Resolution Template
- Creating Audio/Video Transcoding Template
- Creating Professional Transcoding Template
- Creating Text-to-Speech Template
- Creating Video Montage Template
- Creating Video Enhancement Template
- Creating Voice/Sound Separation Template
- Creating Watermark Template
- Creating Intelligent Thumbnail Template
- Deleting Media Processing Template
- Querying Media Processing Template
- Updating Media Processing Template
- Updating Animated Image Template
- Updating Splicing Template
- Updating Top Speed Codec Transcoding Template
- Updating Screenshot Template
- Updating Super Resolution Template
- Updating Audio/Video Transcoding Template
- Updating Professional Transcoding Template
- Updating Text-to-Speech Template
- Updating Video Montage Template
- Updating Video Enhancement Template
- Updating Voice/Sound Separation Template
- Updating Watermark Template
- Updating Intelligent Thumbnail Template
- Creating Media Processing Template
- AI-Based Content Recognition
- Media Processing
- Batch Job APIs
- Callback Content
- Appendix
- Content Moderation APIs
- Submitting Virus Detection Job
- SDK Documentation
- SDK Overview
- Preparations
- Android SDK
- Getting Started
- Android SDK FAQs
- Quick Experience
- Bucket Operations
- Object Operations
- Uploading an Object
- Downloading Objects
- Copying and Moving Objects
- Listing Objects
- Deleting Objects
- Restoring Archived Objects
- Querying Object Metadata
- Generating Pre-Signed URLs
- Configuring Preflight Requests for Cross-origin Access
- Server-Side Encryption
- Single-Connection Bandwidth Limit
- Extracting Object Content
- Remote Disaster Recovery
- Data Management
- Cloud Access Management
- Data Verification
- Image Processing
- Setting Custom Headers
- Setting Access Domain Names (CDN/Global Acceleration)
- Troubleshooting
- C SDK
- C++ SDK
- .NET(C#) SDK
- Getting Started
- .NET (C#) SDK
- Bucket Operations
- Object Operations
- Uploading Objects
- Downloading Objects
- Copying and Moving Objects
- Listing Objects
- Deleting Objects
- Checking Whether Objects Exist
- Restoring Archived Objects
- Querying Object Metadata
- Object Access URL
- Getting Pre-Signed URLs
- Configuring Preflight Requests for Cross-Origin Access
- Server-Side Encryption
- Single-URL Speed Limits
- Extracting Object Content
- Cross-Region Disaster Recovery
- Data Management
- Cloud Access Management
- Image Processing
- Content Moderation
- Setting Custom Headers
- Setting Access Domain Names (CDN/Global Acceleration)
- Troubleshooting
- Backward Compatibility
- SDK for Flutter
- Go SDK
- iOS SDK
- Getting Started
- iOS SDK
- Quick Experience
- Bucket Operations
- Object Operations
- Uploading Objects
- Downloading Objects
- Listing Objects
- Copying and Moving Objects
- Extracting Object Content
- Checking Whether an Object Exists
- Deleting Objects
- Restoring Archived Objects
- Querying Object Metadata
- Server-Side Encryption
- Object Access URL
- Generating Pre-Signed URL
- Configuring CORS Preflight Requests
- Cross-region Disaster Recovery
- Data Management
- Cloud Access Management
- Image Processing
- Content Recognition
- Setting Custom Headers
- Setting Access Domain Names (CDN/Global Acceleration)
- Troubleshooting
- Java SDK
- Getting Started
- FAQs
- Bucket Operations
- Object Operations
- Uploading Object
- Downloading Objects
- Copying and Moving Objects
- Listing Objects
- Deleting Objects
- Checking Whether Objects Exist
- Querying Object Metadata
- Modifying Object Metadata
- Object Access URL
- Generating Pre-Signed URLs
- Restoring Archived Objects
- Server-Side Encryption
- Client-Side Encryption
- Single-URL Speed Limits
- Extracting Object Content
- Uploading/Downloading Object at Custom Domain Name
- Data Management
- Cross-Region Disaster Recovery
- Cloud Access Management
- Image Processing
- Content Moderation
- File Processing
- Media Processing
- AI-Based Content Recognition
- Troubleshooting
- Setting Access Domain Names (CDN/Global Acceleration)
- JavaScript SDK
- Node.js SDK
- PHP SDK
- Python SDK
- Getting Started
- Python SDK FAQs
- Bucket Operations
- Object Operations
- Uploading Objects
- Downloading Objects
- Copying and Moving Objects
- Listing Objects
- Deleting Objects
- Checking Whether Objects Exist
- Querying Object Metadata
- Modifying Object Metadata
- Object Access URL
- Getting Pre-Signed URLs
- Restoring Archived Objects
- Extracting Object Content
- Server-Side Encryption
- Client-Side Encryption
- Single-URL Speed Limits
- Cross-Region Disaster Recovery
- Data Management
- Cloud Access Management
- Content Recognition
- Setting Access Domain Names (CDN/Global Acceleration)
- Troubleshooting
- Image Processing
- React Native SDK
- Mini Program SDK
- Getting Started
- FAQs
- Bucket Operations
- Object Operations
- Uploading an Object
- Downloading Objects
- Listing Objects
- Deleting Objects
- Copying and Moving Objects
- Restoring Archived Objects
- Querying Object Metadata
- Checking Whether an Object Exists
- Object Access URL
- Generating Pre-Signed URL
- Configuring CORS Preflight Requests
- Single-URL Speed Limits
- Server-Side Encryption
- Remote disaster-tolerant
- Data Management
- Cloud Access Management
- Data Verification
- Content Moderation
- Setting Access Domain Names (CDN/Global Acceleration)
- Image Processing
- Troubleshooting
- Error Codes
- FAQs
- Service Level Agreement
- Appendices
- Glossary
Overview
You can upload objects to a bucket through the File List page in the COS console. For more information about objects, please see Object Overview.
Note:
Currently, the MAZ configuration is only available in Beijing, Shanghai, Guangzhou, and Singapore regions. To upload objects to an MAZ storage class such as MAZ_STANDARD, enable MAZ configuration for the bucket in the region first.
Currently, the INTELLIGENT TIERING storage class is only available in Beijing, Nanjing, Shanghai, Guangzhou, Chengdu, Chongqing, Tokyo, and Singapore regions. To upload objects to this storage class, enable INTELLIGENT TIERING for the bucket in the region first.
Currently, the DEEP ARCHIVE storage class is only available in Beijing, Nanjing, Shanghai, Guangzhou, Chengdu, Chongqing, Tokyo, and Singapore regions. To upload objects to this storage class, select a bucket in the region first.
When you upload an object in the console, the upload speed is strongly subject to the current network environment. If the object is large or the network conditions are poor, we recommend you use multipart upload. In multipart upload, a file can be divided into multiple parts and uploaded separately, and the failure to upload a single part will not affect other uploaded parts. You can use the COSCLI tool, APIs, or SDKs for different programming languages to initiate a multipart upload request. Among them, SDKs and COSCLI support checkpoint restart, where incomplete uploads can be resumed from where left off, thereby improving the overall upload success rate.
Prerequisites
Before uploading an object, make sure that you have already created a bucket. If no bucket has been created, please see Creating Buckets.
Directions
1. Log in to the COS console.
2. Click Bucket List on the left sidebar.
3. Click the target bucket to enter the File List page.
4. In File List, click Upload Files.
5. In the pop-up window, click Select Files or Select Folders and select one or multiple local files (or folders) as needed.
Note:
Since some browsers do not support uploading multiple files, we recommend you use popular browsers such as Internet Explorer 10 or later, Firefox, or Chrome.
6. (Optional) Click Configure Parameters and set the object attributes in the Upload Files window.
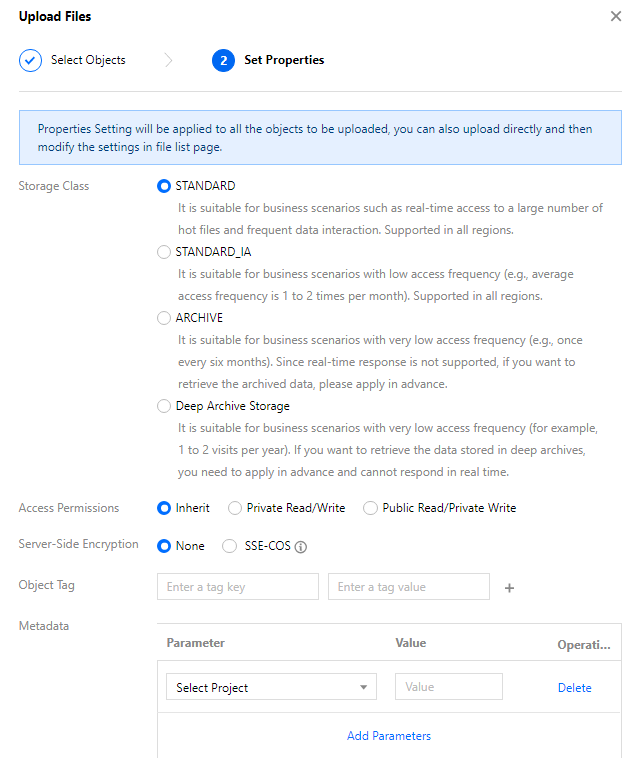
Storage Class: Select the storage class for your object as needed. This field is set to
STANDARD by default. For more information, see Overview.Note:
If your bucket has MAZ configuration enabled, you can only select an MAZ storage class, such as MAZ_STANDARD. If it also has INTELLIGENT TIERING configuration enabled, you can also select MAZ_INTELLIGENT TIERING.
Access Permissions: Select the access permission for your object as needed. This field is set to
Inherit by default (inheriting permissions of the bucket). For more information, please see Basic Concepts of Access Control.Server-Side Encryption: Configure server-side encryption for the object you want to upload. COS will automatically encrypt your data as it is written and decrypt it when you access it. Currently, COS offers two encryption types: SSE-KMS (only available in Beijing, Shanghai, and Guangzhou regions) and SSE-COS. For more information, please see Server-side Encryption Overview.
Object tag: You can add tags to an object to be uploaded. The object tag is composed of a tag key, (=), and a tag value, such as
group = IT. Each object tag is a key-value pair. For more information, see Object Tag Overview.Metadata: Object metadata, or HTTP header, is a string sent by the server over HTTP before it sends HTML data to the browser. By modifying HTTP headers, you can modify how the webpage responds as well as certain configurations, such as caching time. Modifying an object's HTTP headers does not modify the object itself. For more information, please see Custom Headers.
7. Click Upload.
You can check the upload progress in Task Completed in the top-right corner of the page. Once the upload is complete, the uploaded object will appear in File List.

Note:
The task progress in the figure indicates the number of tasks created by the current upload operation. For example, if you perform an upload operation where all 10 files are uploaded successfully, the task progress will be displayed as "Task completed (total: 1; succeeded: 1; failed: 0)".

 Ya
Ya
 Tidak
Tidak
Apakah halaman ini membantu?