Configuring tcr-assistant-oidc for Same-Account Dynamic Password-Free Image Pull
Download
Mode fokus
Ukuran font
Terakhir diperbarui: 2026-08-14 15:18:18
Diterjemahkan oleh AI
Scenarios
When a TKE cluster application needs to pull a private image from a TCR Enterprise Edition instance within the same Tencent Cloud account, the conventional approach involves generating long-term access credentials (username/password) in the TCR console and manually creating an ImagePullSecret in the cluster, which is then associated with the workload. This approach has the following pain points:
Long-term validity of credentials: Passwords must be manually rotated on a regular basis. If compromised, they remain usable indefinitely, posing a security risk.
The tcr-assistant-oidc plugin enables password-free image pulls within the same account by leveraging the OIDC authentication mechanism, CAM roles, and STS dynamic temporary credentials. It is applicable to the following typical business scenarios:
Automated Password-Free Pull: ImagePullSecrets do not need to be explicitly configured in the YAML for TKE cluster workloads. The plugin automatically distributes and rotates them.
Automatic Rotation of Temporary Credentials: This feature must meet compliance requirements and prohibits scenarios where long-term image repository credentials are persistently stored within a cluster.
Image Pull via Custom Domain: The TCR instance is bound to a custom corporate domain (for example, docker.mycompany.com). Images must be pulled using this custom domain.
Compared to the original tcr-assistant plugin, tcr-assistant-oidc offers the following enhanced capabilities in same-account scenarios:
A TKE cluster has been created, and its version is greater than or equal to 1.20. (Kubernetes version 1.20 upgraded the ServiceAccountIssuerDiscovery feature to General Availability.)
A TCR Enterprise Edition instance has been created and is in the "Running" state.
The private network access path between the VPC where the TKE cluster resides and the TCR instance is already interconnected (either within the same VPC or TCR private network access has been configured).
Implementation Principles
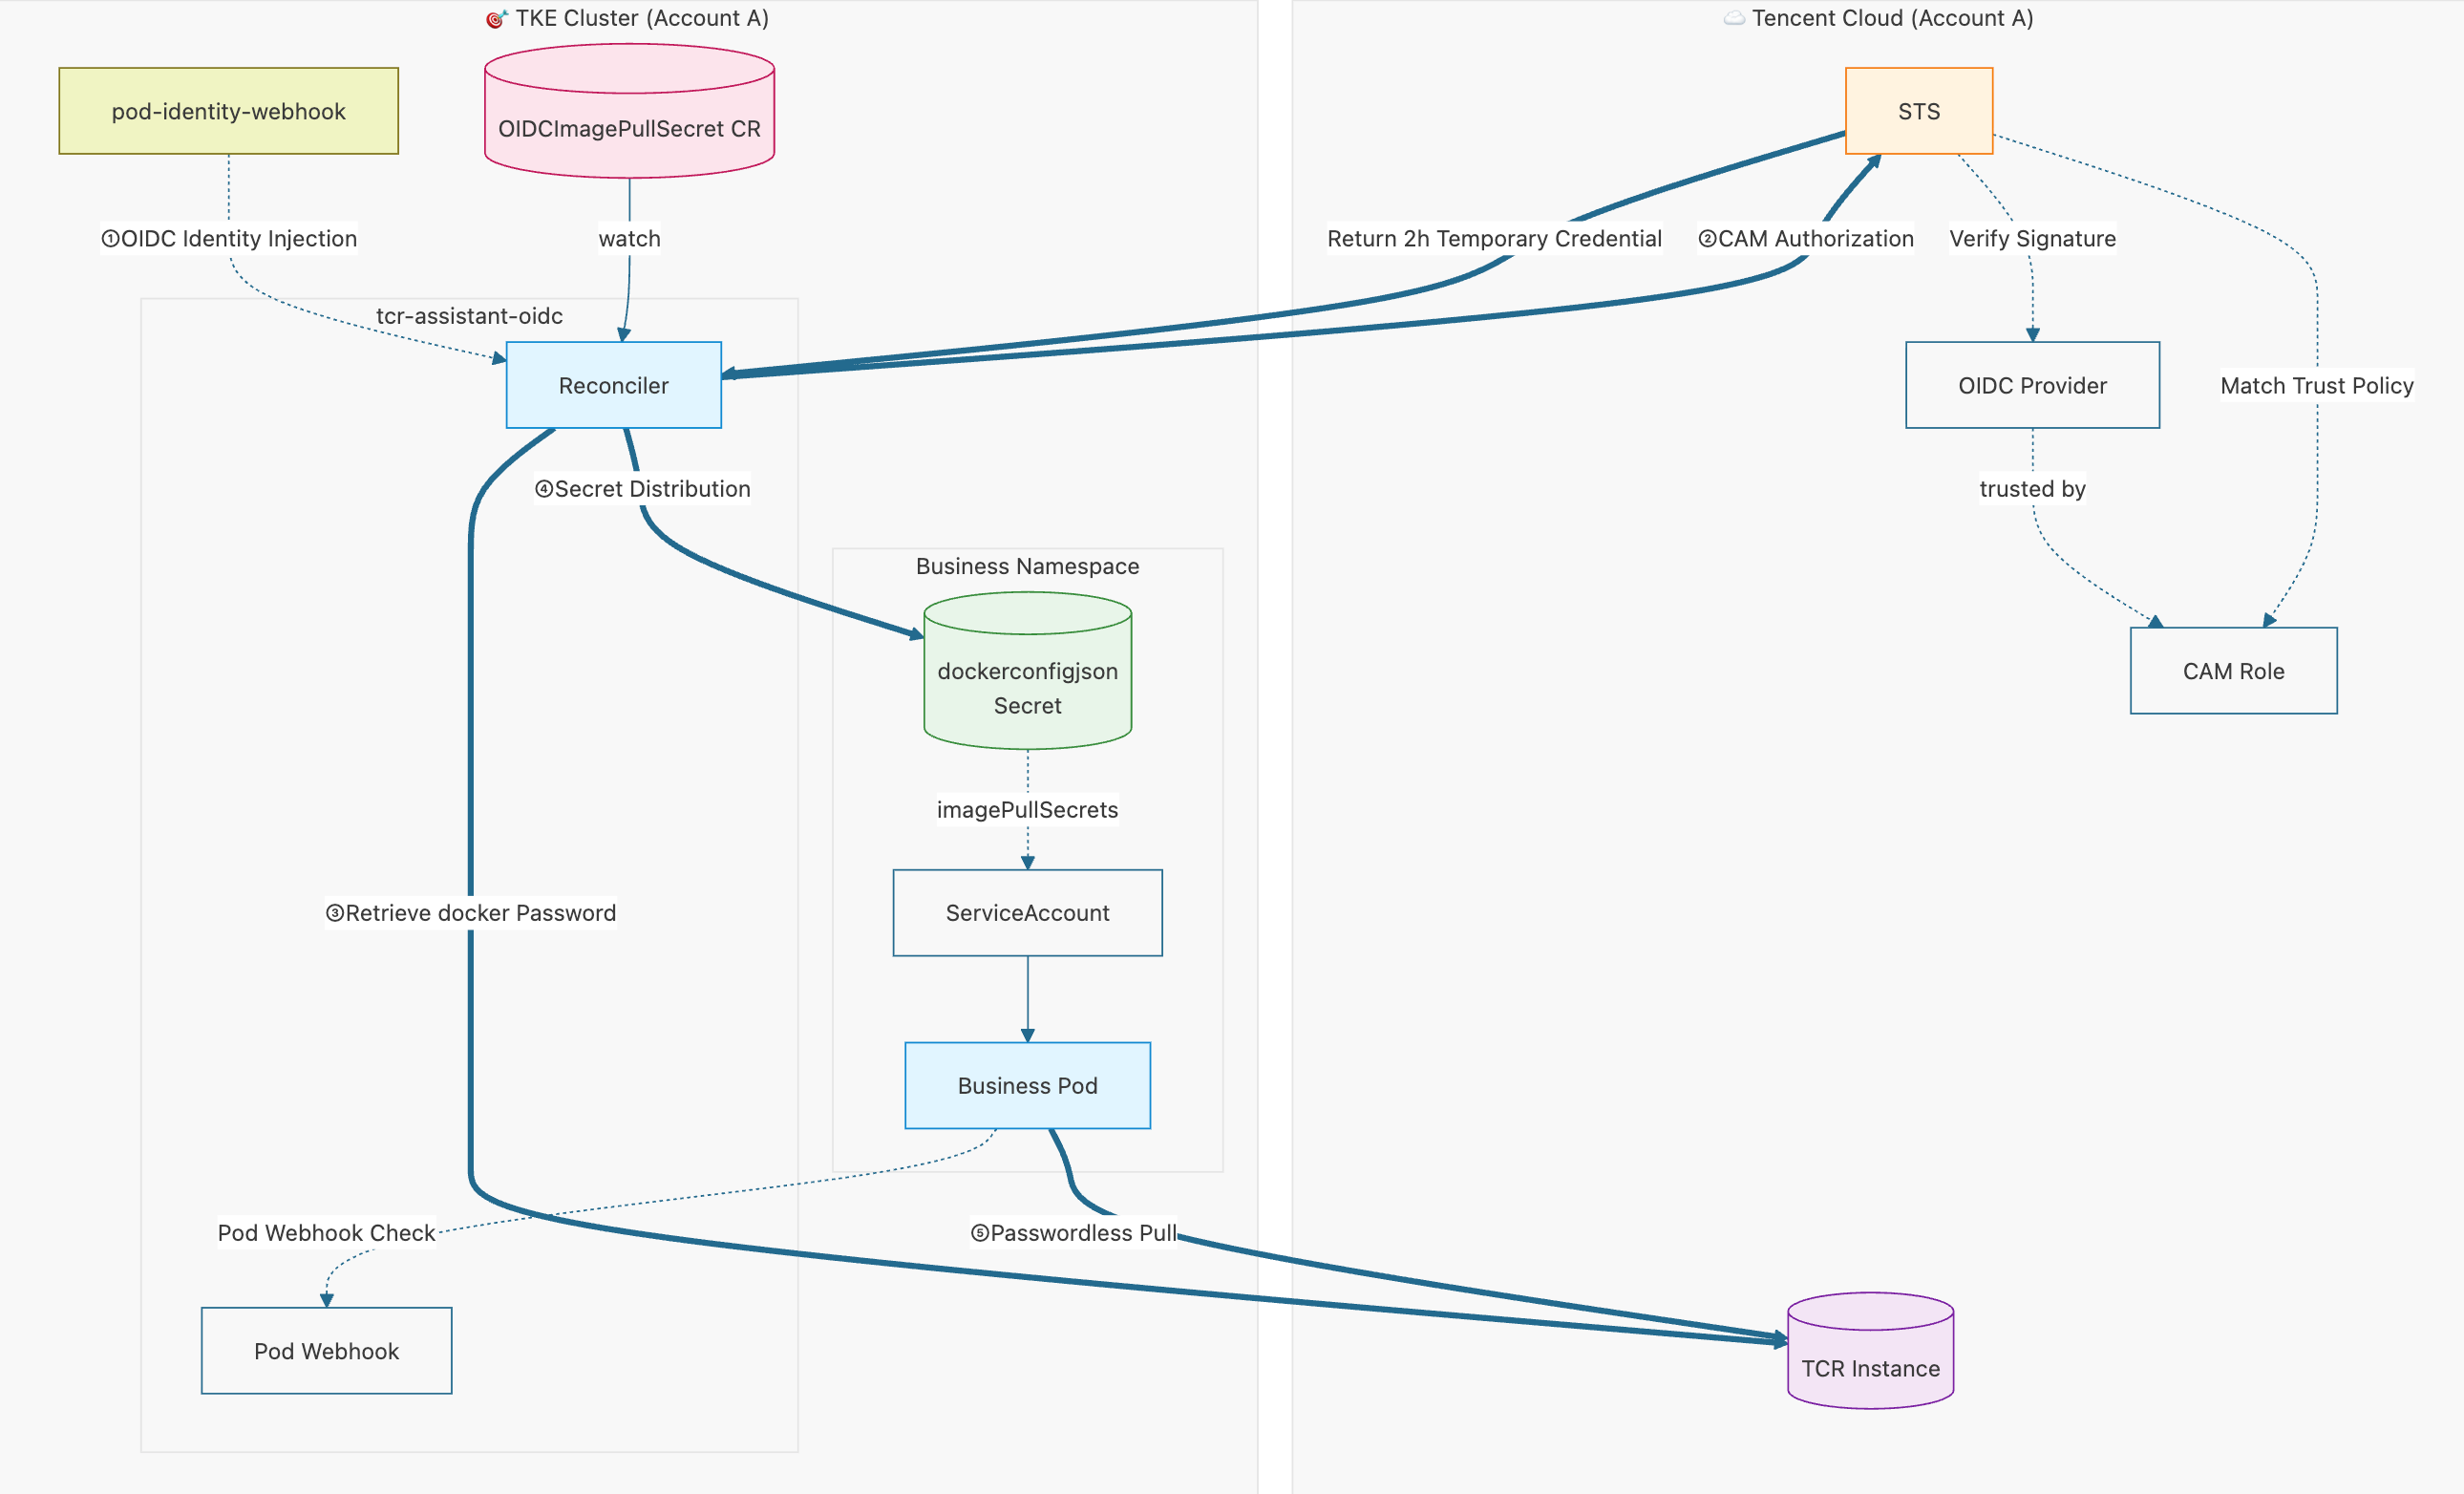
In a same-account scenario, the TKE cluster and the TCR instance belong to the same Tencent Cloud account A, with the trust boundary entirely within the account. The end-to-end call flow can be abstracted as a five-stage collaboration: ① OIDC identity injection → ② CAM authorization to obtain temporary credentials → ③ obtaining the docker login password → ④ Secret distribution → ⑤ password-free image pull by workloads.
Link Interpretation:
Case No.
Phase
Key Action
①
OIDC Identity Injection
pod-identity-webhook mounts the OIDC JWT issued by the TKE cluster to the Controller Pod based on the annotations of the Controller SA.
②
CAM Authorization
The Controller calls the STS with the JWT. The STS verifies the signature using the OIDC Provider under the same account and matches the Role trust policy, then returns a 2-hour temporary credential.
③
Retrieve docker Password
The Controller calls the TCR with the temporary credential to obtain the docker login username/password.
④
Secret Distribution
The Controller renders the dockerconfigjson Secret (tcr.ips.*), distributes it to the target namespaces according to the rules defined in the CR's namespaces/serviceAccounts, and automatically mounts it to the target SA's imagePullSecrets.
⑤
Passwordless Pull
The business Pod completes the docker pull via the imagePullSecrets on the SA. When a new Pod is created, the Pod Webhook performs a final check to ensure the Secret & SA are ready.
Note:
Key Characteristics of Same-Account Scenario: The OIDC Provider is automatically generated when OIDC is enabled on TKE, requiring no manual registration. The iss of the JWT is the TKE cluster itself, and the trust policy of the Role only trusts the OIDC Provider within its own account.
Operation Steps
Step 1: Enabling the OIDC Feature for the TKE Cluster
1. Log in to the TKE console, and select Cluster Management from the left sidebar.
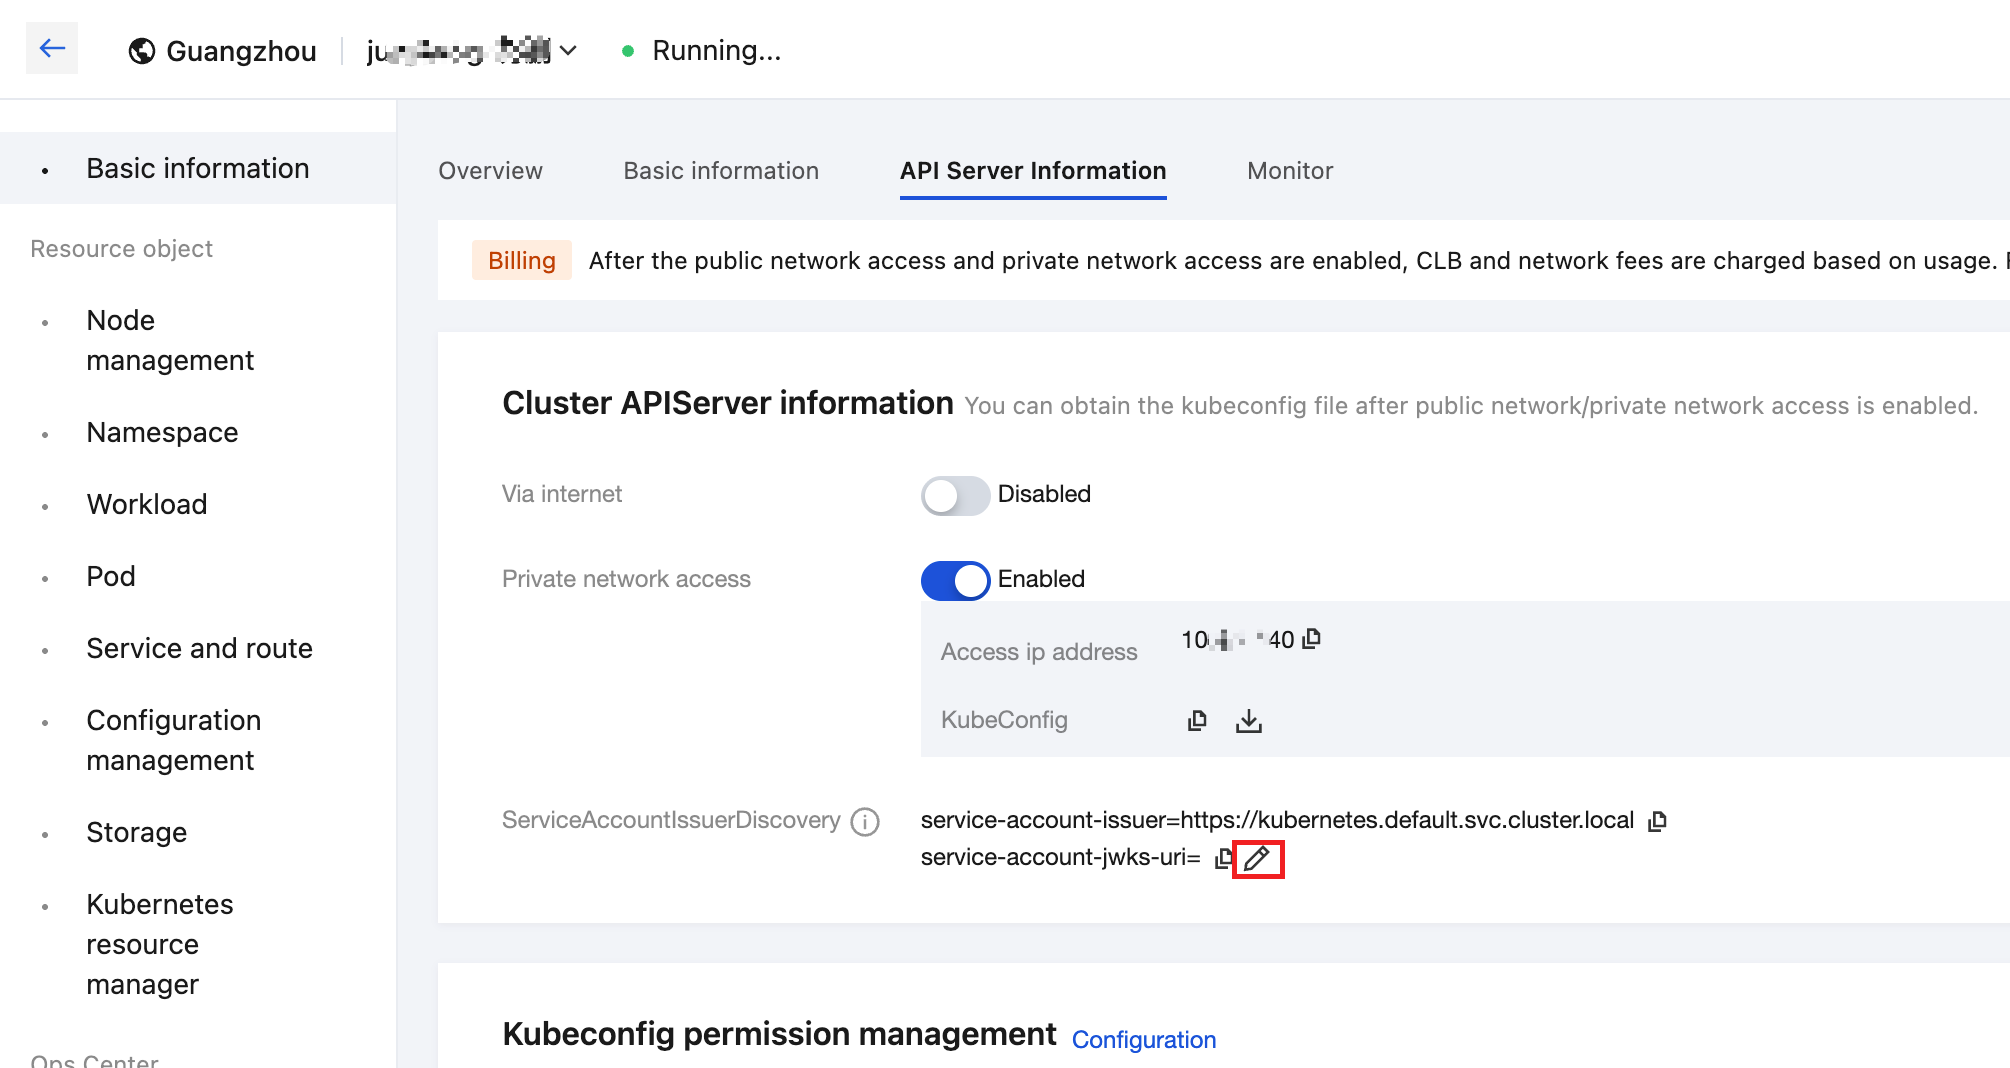
2. Select the target cluster, go to its details page, and choose Basic Information > API Server Information.
3. Click the Edit button to the right of ServiceAccountIssuerDiscovery, as shown below:
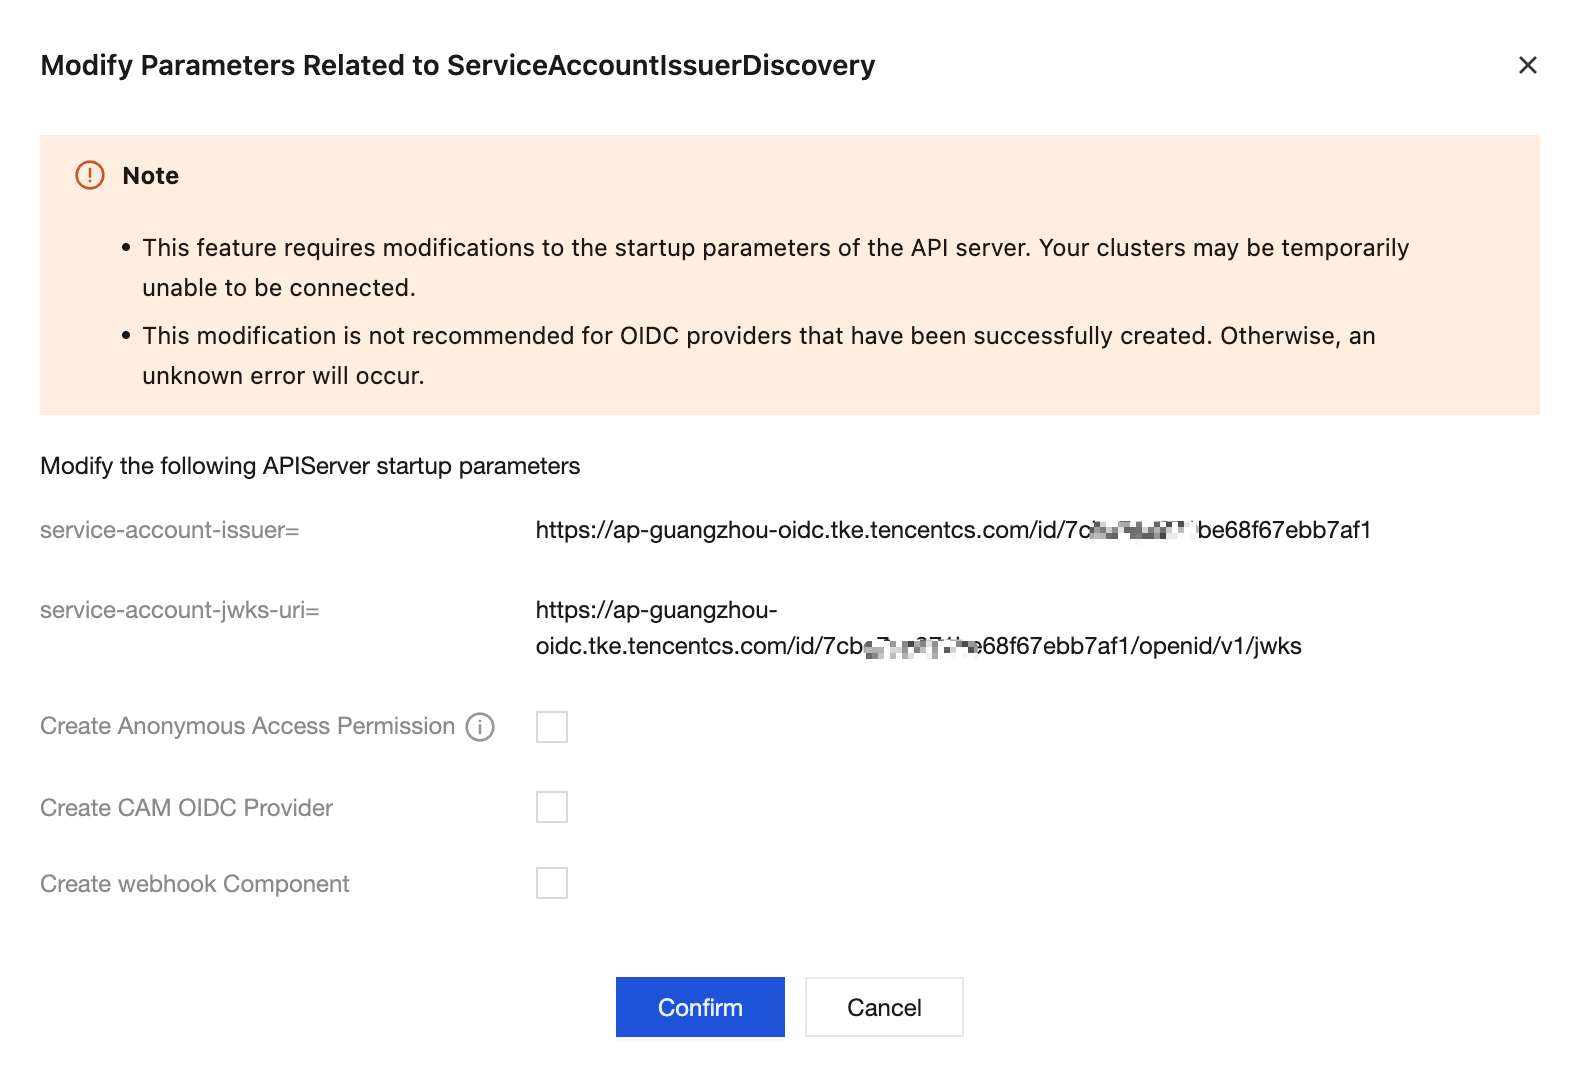
4. Go to the page for modifying ServiceAccountIssuerDiscovery-related parameters. If the system prompts you that the parameters cannot be modified, perform service authorization first.
5. On the Role Management page, locate the authorization policy QcloudAccessForTKERoleInOIDCConfig and click Authorize.
6. After authorization is completed, select Create CAM OIDC Provider and Create webhook Component, enter the Client ID (which is fixed as sts.cloud.tencent.com), and click OK, as shown below:
7. Return to the Basic Information > API Server Information page. When ServiceAccountIssuerDiscovery becomes editable again, it indicates that the process of enabling OIDC resource access control is complete.
Note:
The values of the service-account-issuer and service-account-jwks-uri parameters cannot be edited and use the default rules.
Step 2: Verifying the Successful Creation of the OIDC Identity Provider and Webhook Component
After enabling the OIDC feature, you need to confirm that the CAM OIDC identity provider has been created and the pod-identity-webhook component has been successfully deployed:
1. On the cluster details page, switch to the API Server Information option and click the Edit button to the right of ServiceAccountIssuerDiscovery.
2. Go to the page for modifying ServiceAccountIssuerDiscovery-related parameters. The system will display the message "The identity provider you created already exists. Go to view." Click Go to view to confirm that the CAM OIDC identity provider has been created successfully.
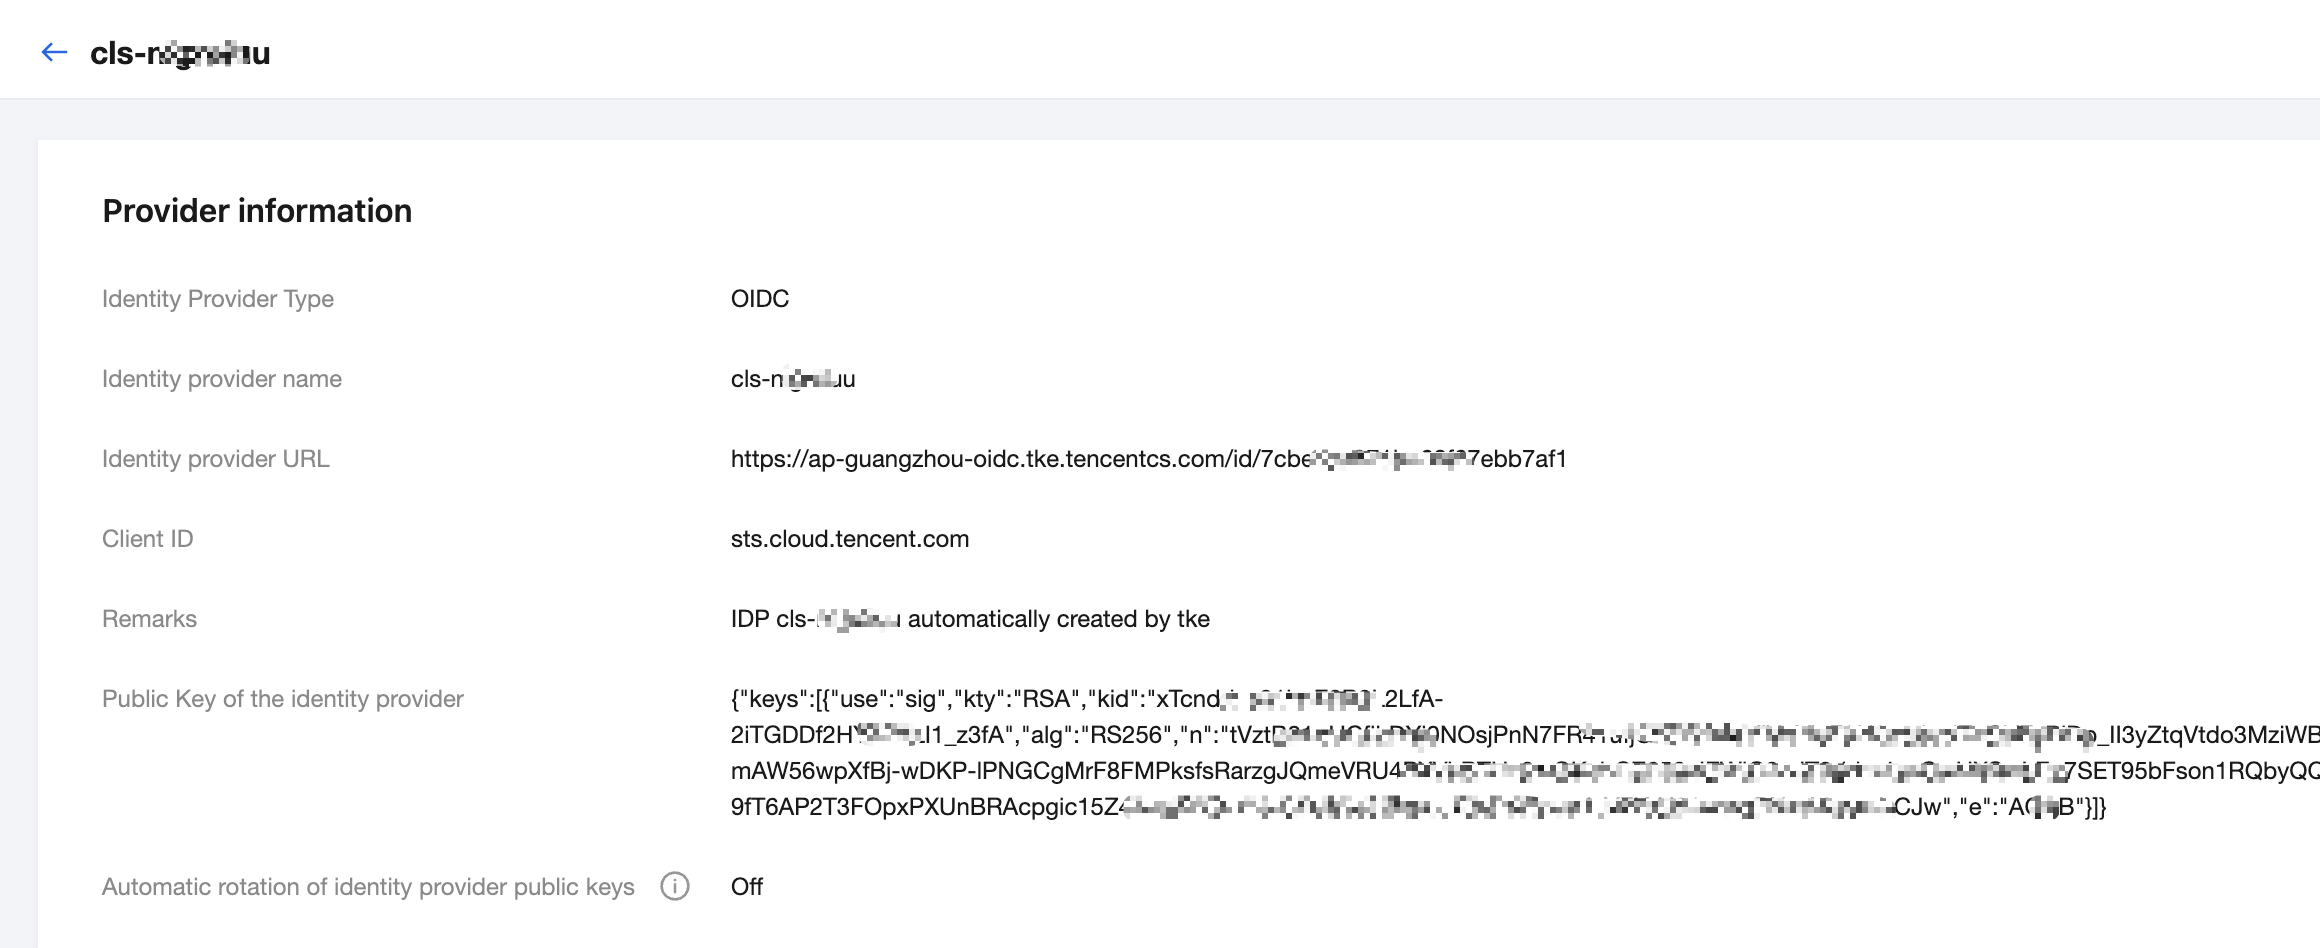
3. View the details of the newly created CAM OIDC identity provider and confirm that the Client ID is configured correctly, as shown below:
4. In Cluster Information > Component Management, confirm that the status of the pod-identity-webhook component in the list is "Success", which indicates that the component has been installed successfully.
5. On the Cluster Details > Workloads > Deployment page, confirm that the status of pod-identity-webhook in the kube-system namespace is Running, which indicates that the installation is successful.
Step 3: Creating a CAM Custom Policy for the TCR Instance
Create custom policies based on your business requirements to control access permissions for TCR instances. These policies support granularity down to the namespace level.
Attention:
Do not add region or uin information to the six-segment resource descriptor. For example, in qcs::tcr:::instance/tcr-5jm4cabc, you only need to replace the final TCR instance ID part.
3. On the Create Custom Role page, configure the settings by referring to the following information.
Identity Provider Type: Select OIDC.
Identity Provider: Select the OIDC provider confirmed in Step 2 that corresponds to the current TKE cluster (the name is in the format cls-xxxxxxxx).
Condition: Set the oidc:aud value to be equal to the client ID of this OIDC provider (that is, sts.cloud.tencent.com).
4. Bind the custom policy created in Step 3, complete the role creation, and record the role ARN (format: qcs::cam::uin/{UIN}:roleName/{ROLE_NAME}).
Note:
In the same-account scenario, the identity provider carrier in the role trust policy is the OIDC identity provider of the current account itself, and no other account carriers need to be configured.
When oidc:aud has multiple values, you can select any one of them.
Step 5: Installing the tcr-assistant-oidc Plugin in the TKE Cluster
The plugin dynamically generates temporary docker login credentials based on OIDC identity for accessing TCR resources within the same account. Select one of the following installation methods based on your actual scenario:
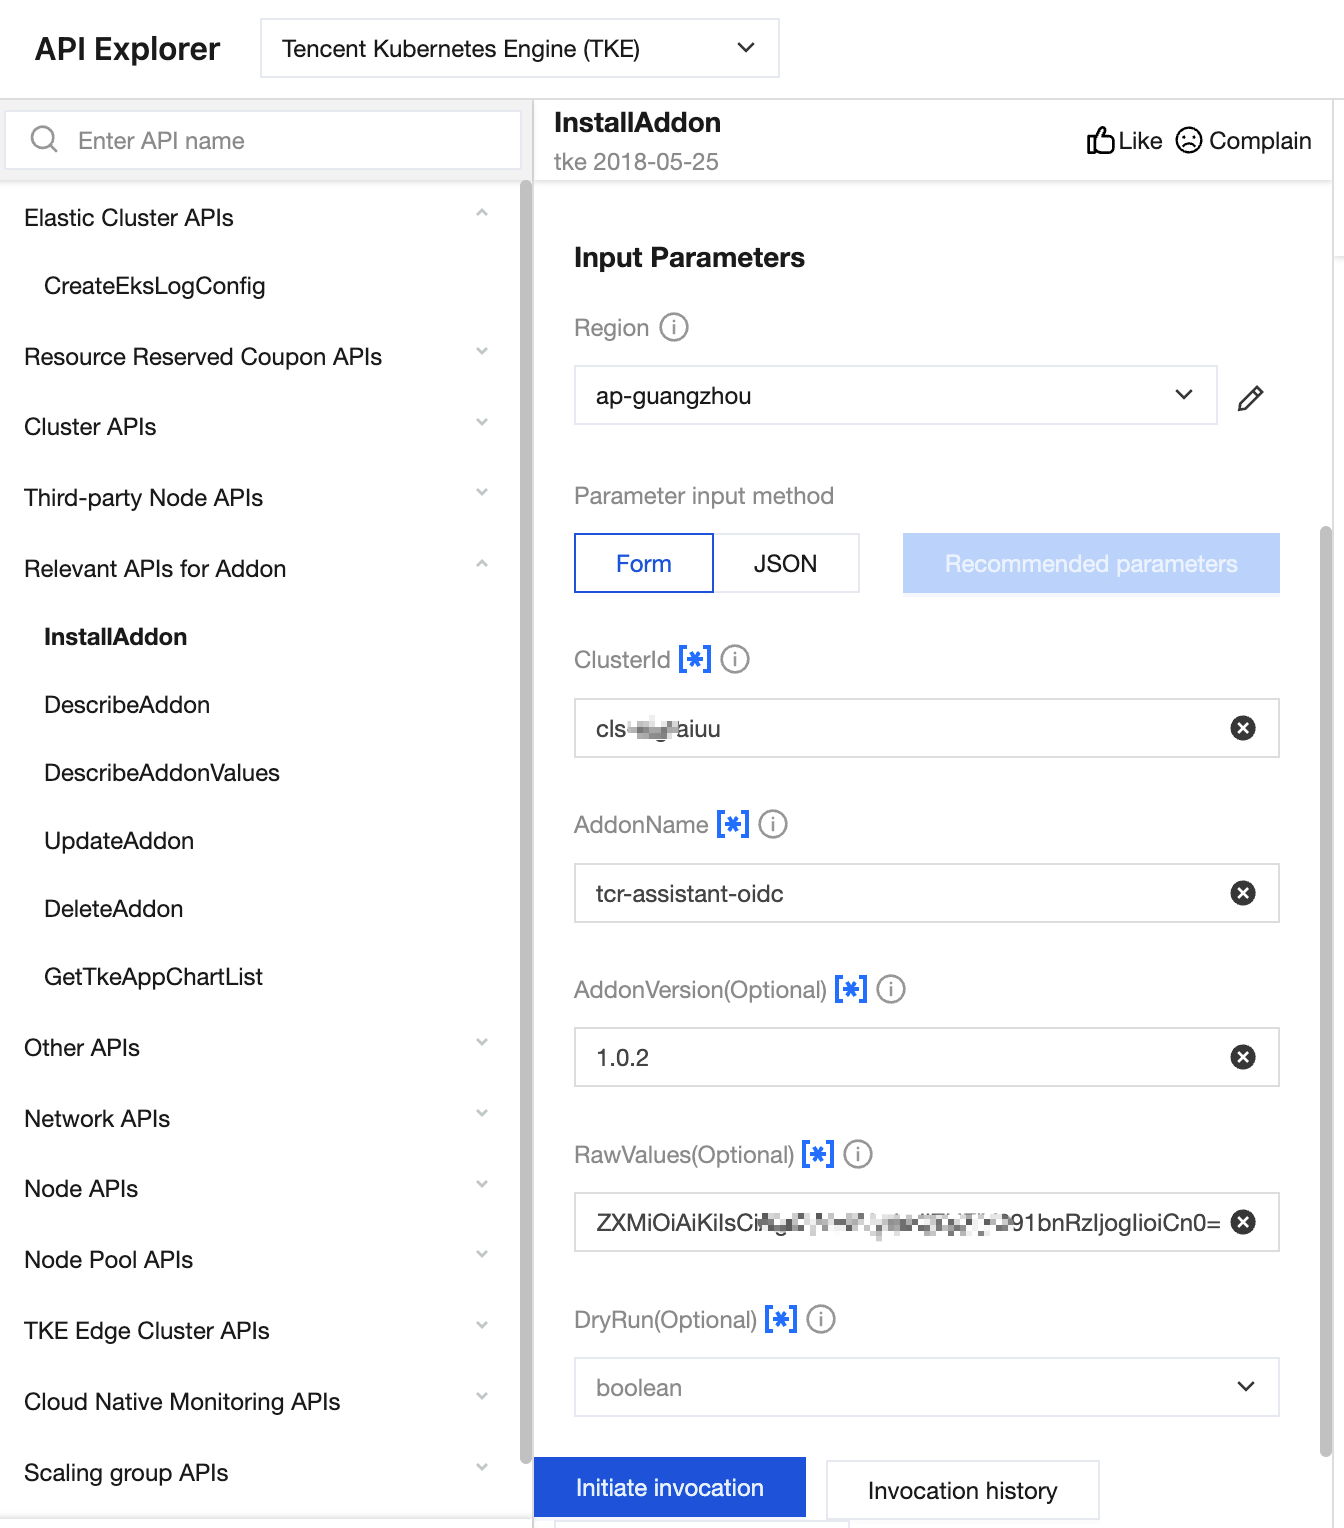
Method 1: Installing via TencentCloud API (Latest Version 1.0.2)
Install the plugin by calling the InstallAddon API via TencentCloud API. As shown in the following figure:
If you need to pull images via a custom domain, you must additionally configure customDomains.
Note: The Values parameter is deprecated. If you need to use it, pass it via RawValues, where the parameter value is the content of a JSON string after base64 encoding. Example:
The expected output should include all domain names of the TCR instance:
[
"your-tcr-registry.tencentcloudcr.com",
"docker.mycompany.com"
]
Typical Use Cases
Scenario 1: Pulling Images via a Custom Domain Name
If a custom domain (for example, docker.mycompany.com) is bound to the TCR instance, and you specify customDomains=["docker.mycompany.com"] during component installation, the cluster can then pull images using that custom domain:
kubectl run nginx --image=docker.mycompany.com/my-namespace/nginx:latest
Scenario 2: Limiting the Scope of Effect (Specifying Namespace and ServiceAccount)
This takes effect only in specific namespaces and ServiceAccounts to avoid globally injecting the ImagePullSecret. Set namespaces="production,staging", serviceAccounts="default,app-sa".
Upgrades and Changes
Upgrading Component Versions
Use UpdateAddon to upgrade the tcr-assistant-oidc component version. You do not need to respecify parameters during the upgrade; only update the component version and the parameter configurations you intend to modify. For the list of target versions for the tcr-assistant-oidc component, refer to Component Version Maintenance Notes.
Note:
During the upgrade, existing Secrets are not interrupted. After the Controller restarts, it automatically resumes reconciliation.
Verifying the Upgrade Result
After the upgrade is complete, verify that the Controller Pod has been updated and is running normally:
# Check the Pod status and image version
kubectl get pods -n tcr-assistant-system -o wide
# Check the CR status
kubectl get oips tcr-oidc-public -ojsonpath='{.status.credentialStatus}'
# Expected output: Ready
Troubleshooting
Pod Image Pull Failures (ImagePullBackOff)
Troubleshooting Steps:
1. Check whether the Secret exists:
kubectl get secret tcr.ips.tcr-oidc-public -n<pod-namespace>
2. Check whether the ServiceAccount has been injected with imagePullSecrets:
kubectl get sa default -n<pod-namespace>-ojsonpath='{.imagePullSecrets}'
The validity period of dynamically generated temporary credentials is fixed at 2 hours (7200 seconds). tokenExpiration controls the rotation interval. If it is set to a value greater than 5400 (>5400), the credentials may expire.
Solution: Ensure that tokenExpiration is within the range of 3600 to 5400.
OIDC Environment Variables Not Injected
If the Controller Pod lacks OIDC-related environment variables (such as TKE_WEB_IDENTITY_TOKEN_FILE), it indicates that the cluster's pod-identity-webhook is not functioning properly.
Solutions:
1. Confirm that the TKE cluster has the OIDC feature enabled.
2. Confirm that the pod-identity-webhook Pod is running normally.
3. Recreate the Controller Pod.
AssumeRole Failures (Insufficient Permissions)
If a failure of AssumeRoleWithWebIdentity is found in the Controller logs, it indicates that the role trust policy or the bound custom policy is misconfigured.
Troubleshooting Steps:
1. Confirm that the identity provider in the role's trust policy is the OIDC Provider corresponding to the current TKE cluster.
2. Confirm that the role is associated with a custom policy that grants TCR access permissions.
3. Confirm that the TCR instance ID in the six-segment resource format of the policy is correct.
Manually Verifying Temporary Keys
Extract credentials from the Secret and manually log in for verification:
# Obtain credentials.
SECRET_JSON=$(kubectl get secret tcr.ips.tcr-oidc-public -n default \\