Best Practices for Connecting Layer 2 Leased Lines to the Cloud
다운로드
포커스 모드
폰트 크기
Related Overview
What Is Layer 2 Leased Line Cloud Connectivity
Layer 2 Direct Connect to Cloud refers to establishing a large Layer 2 network channel between a Tencent Cloud VPC and a user's on-premises IDC using L2GW (Layer 2 Gateway) technology. This enables business hosts in the cloud and the on-premises IDC to reside within the same Layer 2 broadcast domain, thereby achieving direct communication between IP addresses in the same subnet.
Differences from Traditional Layer 3 Leased Lines
Level | Layer 3 Direct Connect (Traditional Solution) | Layer 2 Cloud Access via Direct Connect (L2GW) |
Network layer | Layer 3 (IP routing) | Layer 2 (MAC forwarding + VXLAN tunneling) |
Subnet planning | The CIDR blocks of the cloud and on-premises networks must not overlap. | Supports communication between IP addresses within the same subnet. |
Migration granularity | Subnet granularity | Virtual machine/Pod granularity |
IP address change | IP addresses must be changed for migration to the cloud. | No IP address change required. |
Primary purpose | General hybrid cloud interconnection | Smooth migration of services to the cloud, disaster recovery, and elastic scale-out |
Benefit
Business-unaware migration: It enables communication between cloud and on-premises resources within the same subnet, eliminates the need to modify IP addresses and network configurations, and makes the migration process transparent to applications.
Elastic scaling: It enables the smooth, one-by-one migration of virtual machines from the IDC to the cloud, achieving zero-downtime migration.
Disaster recovery and elasticity: When IDC resources are insufficient, you can elastically scale out part of your workloads to the cloud, sharing the same subnet.
Scenarios
Seamless Data Center Migration to the Cloud
Business Context: Enterprises need to gradually migrate their workloads from self-built data centers to Tencent Cloud. However, constrained by the existing application architecture, a large number of applications rely on fixed IP addresses for communication. Modifying IP addresses would lead to large-scale application reconfiguration and prolonged service downtime.
Solutions:
Establish a large Layer 2 network between the cloud and on-premises environments using L2GW.
Keep the original subnet planning unchanged and migrate CVMs to the cloud VPC one by one.
The cloud CVM is configured with the same subnet IP address as the original servers in the IDC.
Service interruption time is minimized during the migration process.
Typical Customers: Financial industry core system migration and traditional enterprise ERP/OA system migration to the cloud.
Overall Architecture
Architecture Topology
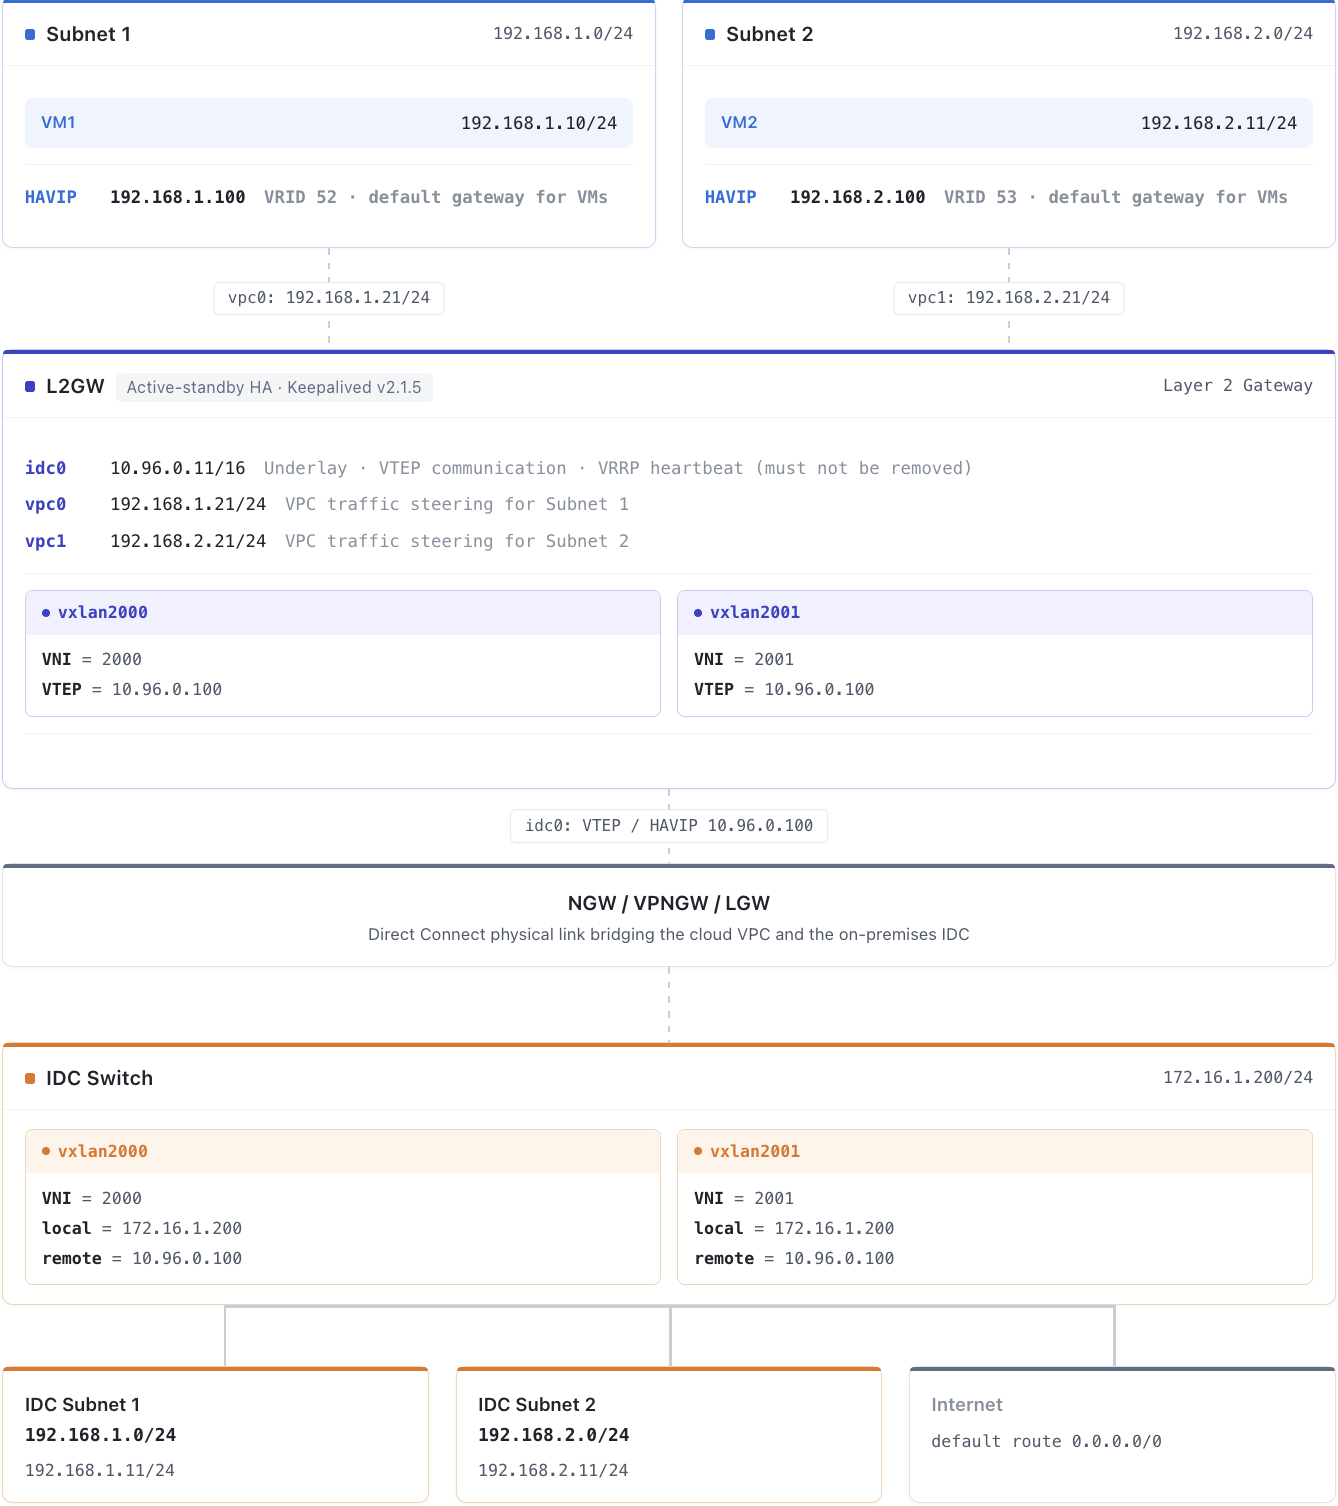
Core Component Description
Component | Role | Description |
L2GW CVM | Layer-2 Gateway Core | A CVM instance deployed in the management VPC, responsible for Layer 2 traffic forwarding and VXLAN tunnel encapsulation/decapsulation. |
Managing Subnets | Ops management plane | The subnet for deploying L2GW CVM, which uses a dedicated subnet and is separated from the service subnet. |
Business Subnet | Business forwarding plane | The service subnet that actually requires Layer 2 interconnection. |
VXLAN Subnet | VXLAN control plane | The subnet for establishing VXLAN tunnels, which uses a dedicated subnet and is separated from the service subnet. |
HAVIP | High-availability traffic steering | A high-availability virtual IP address that serves as the traffic ingress for the VPC subnet and the IDC direction, managed by Keepalived/VRRP. |
VXLAN Tunnel | Layer-2 extension | Establishes a VXLAN Overlay tunnel between the L2GW and the IDC Switch to carry Layer 2 traffic. |
DCGW | Direct Connect gateway | A Tencent Cloud local gateway that enables Layer 3 network interconnection between the L2GW and the IDC. |
Network Plane Isolation Design
The L2GW CVM contains three network planes:
NIC | Purpose | Description |
eth0 (Management Port) | Maintenance | Used only for SSH login and daily Ops. Prohibited from service traffic forwarding. |
vpc0 (VPC Direction) | L2GW > VPC service communication | Binds to an ENI and connects to the user's VPC service subnet. |
idc0 (IDC Direction) | L2GW > IDC service communication | Binds to an ENI, carries VXLAN tunnels and VRRP heartbeat packets, and cannot be deleted. |
Deployment Preparation
Instance Type Selection Recommendations
Recommended instance types: SA3.16XLARGE128 / SA5.16XLARGE256 / SA9.16XLARGE128.
Cluster Scale Estimation:
Take SA5.16XLARGE256 (20G per instance) as an example:
1. Assume that the customer's total bidirectional traffic demand is 120G.
2. A single CVM carries 20G of traffic (inbound + outbound).
3. Available formula:
Number of clusters = Total traffic ÷ Single-node throughput = 120 ÷ 20 = 6.Note:
Throughput definition: Forwarding throughput = VM→IDC + IDC→VM bidirectional traffic total (outbound + inbound). You can check the instance performance metrics in Instance Specifications. The actual number of deployments should be adjusted based on the service traffic model and redundancy requirements. It is recommended to reserve redundancy.
Operating System Requirements
Operating system: TencentOS Server 3.3 (TK4), based on the tlinux5.x kernel + CentOS-compatible environment.
Kernel features: VXLAN tunnel module support is required.
L2GW Deployment Package
Download l2gw_v2.0_20260820_193300.tar.gz to the L2GW instance, extract it to the
/data/ directory, and create a symbolic link:#Download the L2GW deployment package.wget https://iso-1255486055.cos.ap-guangzhou.myqcloud.com/l2gw_v2.0_20260820_193300.tar.gz# Extract it to the /data/ directory.tar -xzf l2gw_v2.0_20260820_193300.tar.gz -C /data/# Create a symbolic link.cd /dataln -s l2gw_v2.0_20260820_193300 l2gw
Attention:
All subsequent shell commands must be executed in the
/data/l2gw directory.Virtual Network Interface Naming Conventions
NICs managed by L2GW are named based on role semantics, decoupled from the underlying system NIC names:
Role | Name | Description |
Management port | eth0 (unchanged) | Not included in the l2gw namespace. Used only for SSH management login. |
Cloud VPC side | vpc0 / vpc1 / ... | VPC traffic steering NIC (corresponding to underlying system eth2/eth3 and so on). |
On-premises IDC side | idc0 / idc1 / ... | Underlay/VTEP + VRRP heartbeat NIC (corresponding to underlying system eth1 and so on). |
Naming background:
The underlying system NIC names are determined by the cloud platform/kernel. For example, Tencent Cloud ENIs appear as eth1/eth2/... within the instance. The sequence numbers may drift after a restart or NIC replacement, making them unstable.
When L2GW manages an interface through
l2gw_install_interface.sh, it moves the underlying NIC into the l2gw namespace and renames it uniformly to vpcN / idcN (the sequence number N is explicitly provided by the user and does not depend on the system).The route table numbers are also determined by N (
vpc_idx drives 2xxx/3xxx/4xxx, and idc_idx drives 5xxx), fully decoupled from system NIC names.Each NIC can have an English description of up to 128 bytes attached (written to the kernel ifalias), making it easier for Ops to identify its purpose.
Note:
Confirm the NIC by MAC address: After the interface is renamed to
vpcN/idcN, the original system name is no longer visible. During troubleshooting, confirm the NIC mapping by MAC address. You can run ip -d link show <vpcN/idcN> to view the MAC address and compare it with the MAC address of the cloud platform ENI.MTU/MSS Configuration (l2gw.conf)
The MTU and TCP MSS of L2GW VXLAN tunnel interfaces are centrally controlled by
l2gw.conf in the deployment package. You only need to configure one item, EXTRA_TUNNEL_OVERHEAD (extra tunnel overhead). The MTU and MSS are then calculated automatically and jointly, eliminating the need for manual separate configuration:# l2gw.conf# Extra tunnel overhead (bytes):# 0 → Direct Connect (default)# 101 → Carried over VPNGW (IPsec)EXTRA_TUNNEL_OVERHEAD=0
Value mapping:
Bearing Path | EXTRA_TUNNEL_OVERHEAD | Tunnel MTU | TCP MSS |
Direct Connect / LGW (default) | 0 | 1412 | 1372 |
Through VPNGW (IPsec) | 101 | 1312 | 1272 |
Note:
During installation,
l2gw_install_global.sh verifies that l2gw.conf exists and has a valid configuration. Otherwise, the installation fails.Keepalived
Keepalived version: v2.1.5.
Attention:
Keepalived is not included in the L2GW deployment package. Ops personnel must download and install it on the L2GW sub-machine in advance (version v2.1.5), and then configure it after installation. For configuration details, see "Deployment Best Practices > Step 5: Configure Keepalived and Bring It Online."
Network planning
IP Address Planning Table
Subnet | CIDR | Gateway | Purpose |
Managing Subnets | 10.0.0.0/24 | - | L2GW management port eth0 (not connected to the l2gw namespace) |
Underlay | 10.96.0.0/16 | - | VTEP communication + VRRP heartbeat + VXLAN bearer network |
Subnet 1 | 192.168.1.0/24 | 192.168.1.1 | VM1 in the cloud + on-premises IDC (Layer 2 interconnection) |
Subnet 2 | 192.168.2.0/24 | 192.168.2.1 | VM2 in the cloud (Layer 2 subnet 2) |
IDC-Subnet 1 | 192.168.1.0/24 | - | On-premises IDC servers (same network segment as subnet 1, Layer 2 interconnection) |
IDC-Subnet 2 | 192.168.2.0/24 | - | On-premises IDC servers (same network segment as subnet 2, Layer 2 interconnection) |
Internet | 8.8.8.8/32 | - | Public network egress (default route 0.0.0.0/0) |
Attention:
The Underlay subnet and the Layer 2 business subnets (subnet 1, subnet 2, and so on) must be planned as different subnets and must not be the same or overlap, to prevent VTEP communication and VRRP heartbeats from affecting Layer 2 business traffic.
HAVIP Planning
HAVIP | IP | Bound NIC | Subnet | VRID | Purpose |
HAVIP-underlay | 10.96.0.100 | idc0 | Underlay | 51 | VTEP source IP address (primary/secondary failover to keep tunnels uninterrupted) + VRRP heartbeat peer |
HAVIP-l2-1 | 192.168.1.100 | vpc0 | Subnet 1 | 52 | Subnet 1 VPC traffic steering (default gateway for VM1) |
HAVIP-l2-2 | 192.168.2.100 | vpc1 | Subnet 2 | 53 | Subnet 2 VPC traffic steering |
L2GW Node IP Address Allocation
Node | eth0 (Management Port) | idc0(Underlay) | vpc0 (Subnet 1) | vpc1 (Subnet 2) |
L2GW Primary | 10.0.0.100 | 10.96.0.11 | 192.168.1.21/24 | 192.168.2.21/24 |
L2GW Secondary | 10.0.0.101 | 10.96.0.12 | 192.168.1.22/24 | 192.168.2.22/24 |
Reference peer address: IDC-Switch 172.16.1.200/24, with VTEP tunnel address 10.96.0.21.
Network Segment Planning Principles
1. Separation of management and service subnets: The management interface eth0 is not added to the l2gw namespace and does not carry service traffic.
2. Same network segment for service subnets on cloud and on-premises: Subnet 1 and subnet 2 must use the same CIDR as the corresponding IDC service subnets to achieve Layer 2 communication.
3. Independent Underlay planning: The Underlay must not overlap with any Layer 2 service subnets, and it must have Layer 3 reachability to the VTEP address of the IDC-Switch.
4. Reserve space for expansion: Reserve at least 50% of IP addresses in each subnet. For each new subnet, add one eth interface, one HAVIP, and one VXLAN tunnel.
Resource Inventory
Cloud Resource Application
Resource Type | Requested Resource | Remarks |
User VPC (customer account) | Apply for subnet 1 (for example, 192.168.1.0/24). | Communication between cloud and on-premises environments within the same subnet |
| Create 2 cross-tenant ENIs attached to L2GW + 1 HAVIP in subnet 1. | Used for VPC traffic steering |
| Apply for subnet 2 (for example, 192.168.2.0/24). | Connect cloud and on-premises switches through VXLAN. |
| Create 2 cross-tenant ENIs attached to L2GW + 1 HAVIP in subnet 2. | Used for Direct Connect/LGW traffic steering |
| Apply for a management subnet (for example, 10.0.0.0/24). | L2GW management port eth0 is not connected to the l2gw namespace. |
| Create 2 L2GW instances and assign management subnet IPs. | You can log in to L2GW through the management subnet. |
User IDC | Create an IDC-Subnet that can communicate with the cloud subnet. | Layer 2 interconnection |
| Create a VXLAN tunnel and assign an IP address. | IDC-Switch VTEP |
Default Resource Requirements
The following are the default resource requirements for the "2 large Layer 2 subnets" topology. When subnets are added, the requirements increase according to the rules in the preceding table:
Resource Item | Quantity | Remarks |
L2GW CVM Instance | 2 units (1 active and 1 standby) | Select specifications based on model selection recommendations, and scale to multiple clusters based on traffic. |
ENI (Underlay-facing) | 2 | One per L2GW instance, managed as idc0. |
ENI (VPC-facing) | 4 | Two for subnet 1 and two for subnet 2, one per subnet for each L2GW instance, managed as vpc0 / vpc1. |
HAVIP | 3 | 10.96.0.100(idc0),192.168.1.100(vpc0),192.168.2.100(vpc1) |
VXLAN Tunnel | 1 per large Layer 2 subnet | Destination port 4789; subnet 1 uses VNI 2000, and subnet 2 uses VNI 2001. |
Keepalived | 1 set per L2GW instance | Version v2.1.5, which must be downloaded and installed by yourself. |
Deployment Best Practices
Deployment Process Overview
Attention:
All shell commands in this chapter must be executed in the
/data/l2gw directory. Before execution, confirm that the L2GW deployment package has been extracted to /data/ and that a symbolic link has been created with ln -s l2gw_v2.0_xxx l2gw.Step 1: Global Initialization
Create the l2gw network namespace and complete sysctl kernel parameter initialization.
cd /data/l2gw./l2gw_install_global.sh
API description:
Item | Description |
Command | ./l2gw_install_global.sh |
Parameter | None |
Return Value | 0 = Success; other = Failure. |
Attention:
You need to manually add
l2gw_install_global.sh to the /etc/rc.local process to ensure that the initialization parameters remain effective after a CVM restart. After deployment, actually restart the CVM to verify whether the parameters have taken effect.During installation, the system verifies that
l2gw.conf exists and has a valid configuration. Otherwise, the installation fails. If the VXLAN Layer 2 network is carried over VPNGW (IPsec), set EXTRA_TUNNEL_OVERHEAD to 101.Step 2: User Plane ETH Interface Initialization
Move the cloud platform ENIs into the l2gw namespace, rename them uniformly to
vpcN / idcN based on their role semantics, and complete the IP address, interface selection table, and policy-based route configuration.User plane ETH interfaces are classified into three types:
Underlay (
idc0): VTEP communication + VRRP heartbeat + VXLAN encapsulation source IP address. It cannot be deleted.Subnet 1 (
vpc0): Used for VPC-side traffic steering and corresponds to the subnet where VM1 resides in the cloud.Subnet 2 (
vpc1): Used for VPC-side traffic steering and corresponds to the subnet where VM2 resides in the cloud.# Initialize the Underlay interface (VTEP communication + VRRP heartbeat)./l2gw_install_interface.sh add idc 0 eth1 10.96.0.11 "idc0: underlay vtep + vrrp heartbeat"# Initialize the Subnet 1 interface (VPC traffic steering)./l2gw_install_interface.sh add vpc 0 eth2 192.168.1.21 "vpc0: cloud subnet1 for VM traffic"# Initialize the Subnet 2 interface (VPC traffic steering)./l2gw_install_interface.sh add vpc 1 eth3 192.168.2.21 "vpc1: cloud subnet2 for VM traffic"
Interface format:
# Add (automatically set to down + rename + move + configure IP/route/alias)./l2gw_install_interface.sh add <role> <idx> <src_dev> <ip_address> [desc]# Delete (only role + idx required)./l2gw_install_interface.sh del <role> <idx>
Parameter description:
Feature:
add: First rename it to <role><idx> in the root ns, then move it into the l2gw ns (ensuring the l2gw ns is clean with no src_dev residue) + configure the IP address (/32) + select the interface table + policy-based route.
del: Clean up the IP address/route + move it back to the root ns (the residual DEV name in the root ns is harmless and will be reused in the next add).
role: vpc (cloud VPC side) or idc (on-premises IDC/underlay side)
idx: A user-specified number (0–999) that determines the route table number, decoupled from the system NIC name.
src_dev: The name of the underlying NIC to be moved in (Tencent Cloud ENI, such as eth1/eth2/eth3). During add, first rename it to <role><idx> in the root ns and then move it in. del does not require this parameter.
ip_address: The /32 IP address of the NIC (no mask required, /32 by default).
desc: Optional. An ASCII description of up to 128 bytes, written to the kernel NIC alias.
Semantics: install is a one-time action. Adding a DEV that has already been moved in will fail (exit 104). del is idempotent (if the DEV is not in the l2gw ns, it is skipped).
Returns: 0 = success; 10 = parameter/validation error; 101 = src_dev does not exist or has already been moved in; 102 = failed to move in; 103 = failed to rename; 104 = idx is already occupied.
Note: The eth0 management interface is not added to the l2gw ns, and this script is not called.
Attention:
The management interface
eth0 is not added to the l2gw namespace, and this script is not called.add is a one-time action. Adding a NIC that has already been moved in again will fail (returning 104). del is idempotent.The Underlay subnet where
idc0 resides and other Layer 2 business subnets (such as subnet 1/subnet 2) must not be planned in the same or overlapping subnets. They must use separate subnets to prevent VTEP communication/VRRP heartbeats from affecting Layer 2 business traffic.After the interface is renamed to
vpcN/idcN, the original system name is no longer visible. During troubleshooting, confirm the NIC mapping by MAC address. You can run ip -d link show <vpcN/idcN> to view the MAC address and compare it with the cloud platform ENI.The subnet applied for the ENI in the user VPC must have Layer 3 connectivity with the IDC-Switch.
Step 3: Configuring VXLAN Tunnels
Create a separate VXLAN tunnel for each Layer 2 subnet to establish Layer 2 connectivity between the cloud and on-premises networks. The script automatically creates the vxlan interface, MAC, MTU (calculated based on
l2gw.conf, default 1412), overlay IP address, policy-based route, and configures proxy_arp=1 and rp_filter=0.# Subnet 1 (VNI=2000)./l2gw_subnet.sh add 2000 idc0 10.96.0.100 10.96.0.21 4789 192.168.1.21 vpc0# Subnet 2 (VNI=2001)./l2gw_subnet.sh add 2001 idc0 10.96.0.100 10.96.0.21 4789 192.168.2.21 vpc1
Interface format:
# Add a subnet (create a tunnel + policy-based route + proxy_arp + rp_filter)./l2gw_subnet.sh add <vni> <idc_eth> <local_vtep_ip> <remote_vtep_ip> <dstport> <vpc_eth_ip> <vpc_eth># Delete a subnet./l2gw_subnet.sh del <vni> <idc_eth> <local_vtep_ip> <vpc_eth>
Parameter description:
Parameter | Example Value | Description |
vni | 2000 | VXLAN network identifier. The value must be consistent between the cloud and on-premises environments. Each large Layer 2 subnet has one VNI. |
idc_eth | idc0 | ETH port on the underlay side, which serves as the VTEP underlay egress. |
local_vtep_ip | 10.96.0.100 | Local VTEP source IP address, which uses the Underlay HAVIP to keep tunnels uninterrupted during primary/secondary failover. |
remote_vtep_ip | 10.96.0.21 | Remote VTEP IP address, which is the tunnel address of the IDC-Switch. |
dstport | 4789 | VXLAN UDP destination port. The standard value is 4789. |
vpc_eth_ip | 192.168.1.21 | overlay IP address configured on the vxlan interface. The value is the subnet IP address corresponding to vpc_eth. |
vpc_eth | vpc0 | ETH port on the VPC side, which determines the directional route table number. |
Return value: 0 = success; 1 = idempotent (the tunnel already exists).
Attention:
The corresponding VTEP tunnel endpoint must also be configured on the peer IDC switch (with the same VNI) for the tunnel to be established.
Step 4: Configuring Large Layer 2 Routing
Configure detailed routes for cloud VMs and route segments for on-premises IDC networks. Layer 2 routes can be distributed in batches before they are brought online, or dynamically added and deleted after they are brought online, without restarting Keepalived.
# Add a route for the cloud VM (to make the VM accessible from the IDC side and send a gratuitous ARP announcement)./l2gw_ipaddr.sh add_vm vpc0 2000 192.168.1.10./l2gw_ipaddr.sh add_vm vpc1 2001 192.168.2.10# Add a route for the local IDC network segment (no gateway, scope link for Layer 2 direct connection, one route covering the entire local network segment)./l2gw_ipaddr.sh add_idc_subnet vpc0 2000 192.168.1.0/24./l2gw_ipaddr.sh add_idc_subnet vpc1 2001 192.168.2.0/24# Add an IDC cross-subnet or default route (with a gateway, via gateway onlink, forwarded by the Switch at Layer 3)./l2gw_ipaddr.sh add_idc_subnet vpc0 2000 0.0.0.0/0 192.168.1.1
Interface format:
./l2gw_ipaddr.sh <action> <vpc_eth> <vni> <parameters...>
Supported actions:
Action | Description | Parameter |
add_vm | Add a cloud VM host route (T_to_VM /32) to make the VM accessible from the IDC side, and send gratuitous ARP advertisements so that the IDC-side Switch refreshes its MAC table to direct traffic to the L2GW. Also used for IDC-to-VM migration. | <vpc_eth> <vni> <vm_ip> |
del_vm | Delete the cloud VM host route. Also used for VM-to-IDC migration. After the /32 route is deleted, the T_to_IDC local subnet route automatically takes over. | <vpc_eth> <vni> <vm_ip> |
add_idc_subnet | Add an on-premises IDC subnet route. gw is optional. If gw is not specified, the route is a directly connected route for the local subnet (scope link dev vxlan), and a single subnet route covers all IDC hosts in the entire local subnet. If gw is specified, the route is a cross-subnet or default route (via <gw> onlink), and packets are forwarded through the Layer 3 gateway on the Switch. The 0.0.0.0/0 default route is supported for Internet access. | <vpc_eth> <vni> <subnet/mask> [gw] |
del_idc_subnet | Delete the on-premises IDC subnet route. | <vpc_eth> <vni> <subnet/mask> |
Return value: 0 = success; 1 = idempotent (already exists); 2 = already exists (File exists).
Note:
The
gw passed to add_idc_subnet must be the gateway on the IDC side of the subnet where the current tunnel resides.On the VPC side, configure subnet routes to steer VM traffic to the L2GW (with the next hop pointing to the HAVIP). You can use 32-bit host routes or subnet routes.
Step 5: Configuring Keepalived and Going Live
L2GW uses the Keepalived (v2.1.5) VRRP primary/secondary architecture, with three HAVIPs floating with the primary node. Keepalived is not included in the L2GW deployment package, so you need to download and install it on both L2GW sub-machines in advance before proceeding with the following configuration.
The deployment package includes a Keepalived configuration file template. You need to manually copy it to the Keepalived configuration directory (such as
/etc/keepalived/keepalived.conf) and modify it according to the actual conditions of the local machine:vrrp_instance VI_L2GW {...interface idc0 # Bind the Underlay NIC (VTEP communication port + VRRP heartbeat port)unicast_src_ip 10.96.0.11 # Local Underlay IP addressunicast_peer {10.96.0.12 # Underlay IP address of the peer device}virtual_ipaddress {10.96.0.100 dev idc0 # Underlay HAVIP (VTEP source IP)192.168.1.100 dev vpc0 # Subnet 1 VPC traffic steering HAVIP192.168.2.100 dev vpc1 # Subnet 2 VPC traffic steering HAVIP}...}
After the configuration is complete, start Keepalived to bring it online:
# Go-live (Start keepalived)./l2gw_online.sh# Decommission (Stop keepalived and switch traffic to the secondary node)./l2gw_offline.sh# Reload the keepalived configuration online (Use after adding or removing a HAVIP. No restart is required.)./l2gw_reload.sh
For details about Keepalived deployment, see Building a high-availability primary/secondary cluster with HAVIP + Keepalived.
Attention:
The VRRP heartbeat interface must use the Underlay NIC
idc0. This NIC cannot be deleted or changed and must be retained.VRRP supports deployment in unicast mode only and does not support multicast.
After the system goes live, you can run
systemctl status keepalived or check the logs to confirm that the primary/secondary status is normal.Step 6: Viewing L2GW Route Configuration
Print all policy rules, route table entries, interfaces, vxlan,
proxy_arp status, and ARP neighbors for post-deployment verification and routine troubleshooting../l2gw_route_show.sh
API description:
Item | Description |
Command | ./l2gw_route_show.sh |
Parameter | None |
Complete Deployment Example
Taking two large Layer 2 subnets (subnet 1/subnet 2) as an example, the complete deployment command sequence is as follows:
cd /data/l2gw# 1. Global initialization./l2gw_install_global.sh# 2. User plane ETH interface initialization (eth0 management interface is not added to the ns and is skipped)./l2gw_install_interface.sh add idc 0 eth1 10.96.0.11 "idc0: underlay vtep + vrrp heartbeat"./l2gw_install_interface.sh add vpc 0 eth2 192.168.1.21 "vpc0: cloud subnet1 for VM traffic"./l2gw_install_interface.sh add vpc 1 eth3 192.168.2.21 "vpc1: cloud subnet2 for VM traffic"# 3. Create VXLAN tunnels./l2gw_subnet.sh add 2000 idc0 10.96.0.100 10.96.0.21 4789 192.168.1.21 vpc0./l2gw_subnet.sh add 2001 idc0 10.96.0.100 10.96.0.21 4789 192.168.2.21 vpc1# 4. Configure Layer 2 routing (can be configured in advance or added dynamically after going live)# Subnet 1 (vpc0 / VNI=2000)./l2gw_ipaddr.sh add_vm vpc0 2000 192.168.1.10./l2gw_ipaddr.sh add_idc_subnet vpc0 2000 192.168.1.0/24 # Directly connected subnet./l2gw_ipaddr.sh add_idc_subnet vpc0 2000 0.0.0.0/0 192.168.1.1 # Default route# Subnet 2 (vpc1 / VNI=2001)./l2gw_ipaddr.sh add_vm vpc1 2001 192.168.2.10./l2gw_ipaddr.sh add_idc_subnet vpc1 2001 192.168.2.0/24 # Directly connected subnet./l2gw_ipaddr.sh add_idc_subnet vpc1 2001 0.0.0.0/0 192.168.2.1 # Default route# 5. Go-live (Start keepalived)./l2gw_online.sh# 6. Verify route tables./l2gw_route_show.sh
Note:
For initial deployment, restart the device after the deployment is complete, verify that the configuration can be automatically restored after the restart, and then bring it online to carry service traffic.
High Availability Design
Primary/Secondary Architecture
L2GW uses a dual-node primary/secondary architecture:
The two L2GW CVMs elect a primary/secondary role through the Keepalived/VRRP protocol.
The primary L2GW holds the HAVIP and is responsible for forwarding all service traffic.
The secondary L2GW monitors VRRP heartbeats and automatically takes over when the primary fails.
Failover Process
1. The primary L2GW fails.
2. The secondary L2GW detects a VRRP heartbeat timeout (which is three times the advertisement interval by default).
3. The secondary L2GW is automatically promoted to primary and binds to the HAVIP.
4. Send gratuitous ARPs to refresh the MAC tables of network devices.
5. Service traffic is switched to the secondary L2GW.
Key Points for High Availability Configuration
1. The VRRP heartbeat NIC cannot be deleted: The
idc0 NIC carries VRRP heartbeat traffic and is permanently retained after creation.2. Dual HAVIP Design: One HAVIP is allocated to the VPC direction and another to the IDC direction, enabling bidirectional traffic steering.
3. Keepalived Non-Preemptive Mode: It is recommended to enable the non-preemptive mode (nopreempt) to avoid frequent switching after the primary recovers from a failure.
4. BFD Linkage: It is recommended to use BFD (Bidirectional Forwarding Detection) to achieve sub-second failure detection.
Scalability Design
When traffic exceeds the capacity of a single cluster, you can adopt horizontal scaling with multiple clusters:
Each cluster consists of two L2GW CVMs in a primary/secondary configuration.
Different clusters manage different large Layer 2 subnets.
It is recommended to reserve 20% - 30% performance headroom.
Ops Best Practices
Daily Operations Guide
After L2GW goes online (with Keepalived started), it supports two types of online changes, neither of which requires restarting Keepalived and both of which are transparent to services:
Layer 2 Route Changes in an Existing Subnet: Add or delete VM detailed routes and IDC network segment routes, and migrate IPs between the cloud and on-premises environments.
Adding or Deleting an Entire Large Layer 2 Subnet: Scale out or scale in a subnet online, which involves adding or deleting the corresponding network interfaces, HAVIPs, and VXLAN tunnels. For details, see "Adding a Large Layer 2 Subnet" and "Deleting a Large Layer 2 Subnet" below.
The commands in this section are unified as
./l2gw_ipaddr.sh <action> <vpc_eth> <vni> <parameters...>. For details about parameters and return values, see "Deployment Best Practices > Step 4: Configure Layer 2 Routing."Adding/Deleting VMs in the Cloud
After a VM is added in the cloud, add the detailed route of the VM to the VM-side route table of L2GW (T_to_VM /32) so that the IDC side can access the VM through L2GW. Meanwhile, L2GW sends a gratuitous ARP announcement to inform the on-premises IDC that the IP address has been migrated to the cloud.
cd /data/l2gw# Add a route for the cloud VM (to make the VM accessible from the IDC side and send a gratuitous ARP announcement)./l2gw_ipaddr.sh add_vm <vpc_eth> <vni> <vm_ip># Delete the cloud VM route./l2gw_ipaddr.sh del_vm <vpc_eth> <vni> <vm_ip># Example: Add VM 192.168.1.20 to subnet 1 (vpc0 / VNI=2000)./l2gw_ipaddr.sh add_vm vpc0 2000 192.168.1.20
Adding and Deleting Routes for On-Premises IDC Network Segments
The network segment routes on the IDC side are managed by
add_idc_subnet and fall into two categories:Direct connection to the local network segment (no gateway):
scope link dev vxlan. One route covers all IDC hosts in the entire local network segment, so there is no need to add /32 routes for each host.Cross-subnet or default route (with a gateway):
via <gw> onlink. Packets are forwarded by the IDC-Switch Layer 3 gateway.# Add a route for the local IDC network segment (covering the entire local network segment, no need to add /32 routes for each host)./l2gw_ipaddr.sh add_idc_subnet <vpc_eth> <vni> <local_subnet/mask># Add an IDC cross-subnet or default route (via a gateway, forwarded by the Switch at Layer 3)./l2gw_ipaddr.sh add_idc_subnet <vpc_eth> <vni> <target_subnet/mask> <gw># Delete the IDC network segment route./l2gw_ipaddr.sh del_idc_subnet <vpc_eth> <vni> <subnet/mask># Example: Direct connection to the local network segment + default route for subnet 2 (vpc1 / VNI=2001)./l2gw_ipaddr.sh add_idc_subnet vpc1 2001 192.168.2.0/24./l2gw_ipaddr.sh add_idc_subnet vpc1 2001 0.0.0.0/0 192.168.2.1
Migrating IPs Between Cloud and On-Premises Environments
To migrate an IP address between the cloud (VM) and on-premises (IDC), directly use
add_vm / del_vm. No dedicated migration command is required:Migration Direction | Command | Principle |
IDC to VM (IP address migration to cloud) | add_vm | Add a /32 host route to T_to_VM with a higher priority than the T_to_IDC subnet route; send gratuitous ARP advertisements so that the IDC-side Switch refreshes its MAC table. |
VM to IDC (IP address migration from cloud) | del_vm | After the /32 host route is deleted from T_to_VM, the T_to_IDC local subnet route automatically takes over. |
# Migrate an IDC IP to a cloud VM (add a T_to_VM /32 route and send a gratuitous ARP announcement)./l2gw_ipaddr.sh add_vm <vpc_eth> <vni> <ip># Migrate a VM IP to an on-premises IDC (delete the T_to_VM /32 route, and the T_to_IDC local network segment route automatically takes over)./l2gw_ipaddr.sh del_vm <vpc_eth> <vni> <ip># Example: 192.168.1.21 is migrated from IDC to the cloud./l2gw_ipaddr.sh add_vm vpc0 2000 192.168.1.21
Bringing L2GW Devices Online and Offline
# Decommission (Stop keepalived and switch traffic to the secondary node)./l2gw_offline.sh# Go-live (Start keepalived)./l2gw_online.sh# Reload the keepalived configuration online (Use after adding or removing a HAVIP)./l2gw_reload.sh
Adding a Large Layer-2 Subnet
To add a large Layer 2 subnet (such as subnet 3), perform online scale-out by following these steps. For each new subnet, add one eth interface, one HAVIP, and one VXLAN tunnel to the corresponding L2GW.
Prerequisites: The CIDR of the new subnet has been planned and does not conflict with existing subnets. The corresponding subnet on the IDC side has been created.
1. Request VPC-side resources and initialize the NIC.
Request two ENIs in the new subnet and bind them to the primary and secondary L2GW instances respectively. Request a HAVIP in this subnet as the default gateway for VMs. Optionally, enable DirectSend (not mandatory). Then, run
./l2gw_install_interface.sh add <role> <idx> <src_dev> <ip> <desc> to complete the initialization../l2gw_install_interface.sh add vpc 2 eth4 192.168.3.21 "vpc2: cloud subnet3 for VM traffic"
2. Request IDC-side resources as needed.
If the Underlay network can already reach the IDC-Switch, no additional ENI is required. If it cannot, add an ENI and run
./l2gw_install_interface.sh add to complete the initialization.3. Create a VXLAN tunnel.
Create a dedicated VXLAN tunnel for the new subnet (with a new VNI, such as 2002).
./l2gw_subnet.sh add 2002 idc0 10.96.0.100 10.96.0.21 4789 192.168.3.21 vpc2
Attention:
The corresponding VTEP tunnel endpoint must also be configured on the peer IDC switch (with VNI=2002) for the tunnel to be established.
4. Configure Layer 2 routing.
Add VM detailed routes and IDC network segment routes for the new subnet.
./l2gw_ipaddr.sh add_vm vpc2 2002 192.168.3.10./l2gw_ipaddr.sh add_idc_subnet vpc2 2002 192.168.3.0/24
5. Update the Keepalived configuration.
Add the new HAVIP (for example,
192.168.3.100 dev vpc2) to the virtual_ipaddress configuration block. Back up the configuration file before making changes. Then, run ./l2gw_reload.sh to apply the changes online without restarting Keepalived.6. Configure VPC routes.
On the VPC side, configure subnet routes to steer VM traffic to the L2GW (with the next hop pointing to the new HAVIP). You can use 32-bit host routes to add each VM individually, or use a subnet route to point the entire subnet to the HAVIP.
Verification: Create a VM in the new subnet, and pinging this VM from the IDC side should succeed.
Deleting a Large Layer-2 Subnet
To scale in a large Layer 2 subnet online, follow the steps below in the reverse order of the addition process.
Prerequisites: All VMs and IDC servers in this subnet have been migrated or taken offline.
1. Delete the VPC routes and LGW traffic steering routes.
First, delete the subnet routes that point to the L2GW on the VPC side (host routes or subnet routes), and delete the LGW traffic steering routes if any.
2. Update the Keepalived configuration.
Remove the HAVIP of this subnet (for example,
192.168.3.100 dev vpc2) from the virtual_ipaddress configuration block. Then, run ./l2gw_reload.sh to apply the changes online.3. Delete the VXLAN tunnel.
./l2gw_subnet.sh del 2002 idc0 10.96.0.100 vpc2
Also remove the corresponding VTEP tunnel endpoint from the peer IDC switch.
4. Delete the NIC.
./l2gw_install_interface.sh del vpc 2
5. Unbind and delete the resources.
On the VPC side, unbind the ENI and delete the HAVIP of this subnet.
Attention:
The Underlay NIC
idc0 used for Keepalived VRRP heartbeat and its HAVIP cannot be unbound or deleted, and must be retained permanently.CVM Restart and Recovery Process
After the L2GW CVM restarts, network configurations are lost (service is not affected due to primary/secondary switchover):
Server Restart│├── Step 1: Execute the commands in the l2gw_history_cmd.log file line by line (to restore network configuration)│Step 2: Execute ./l2gw_online.sh (to bring the gateway online + start keepalived). Do not skip this step!
Procedure:
cd /data/l2gw# 1. View Historical Commandscat l2gw_history_cmd.log# 3. Go-live./l2gw_online.sh
Attention:
Critical reminder: If you only restore the configuration without executing the go-live script, L2GW will not work properly. The
l2gw_online.sh step must not be skipped.Monitoring Recommendations
Monitoring Item | Metric Value | Alarm Threshold |
L2GW CVM Status | CVM running status | abnormal shutdown |
Keepalived Primary/Secondary Status | VRRP role | primary/secondary switchover alarm |
Network connectivity | ping cloud-based CVM/IDC CVM | consecutive packet loss for 3 times |
VXLAN Tunnel Status | Tunnel interface UP/DOWN | interface DOWN |
Elastic Network Interface | NIC binding status | unbinding alarm |
Bandwidth utilization | Outbound + inbound bandwidth | alarm when 80% is exceeded |
HAVIP Binding Status | Floating IP address ownership | HAVIP drift alarm |
Tencent Cloud Official Website FAQs
Direct Connect FAQs
Question 1: What Is the Difference Between Direct Connect and a Common Public Network VPN?
Direct Connect provides dedicated physical network connections that are completely isolated from the public network. Compared to VPN:
Direct Connect: low latency (< 5 ms within the same city), high bandwidth (up to 100 Gbps), and high security (dedicated link).
VPN: It relies on the public network, with unstable latency and bandwidth, and applies to scenarios where network quality requirements are not high.
Reference: Direct Connect Product Overview
Question 2: Does Direct Connect Support Link Aggregation (LACP)?
Currently, Tencent Cloud does not support the LACP Link Aggregation Control Protocol. For higher bandwidth requirements, you can use multiple physical dedicated lines for CLB.
Reference: Direct Connect FAQ
Question 3: Must the Same Subnet Mask Be Used at Both Ends of the Direct Connect?
Yes. The interconnect IP addresses configured at both ends of the dedicated line must belong to the same subnet and be configured with the same subnet mask. Furthermore, the IP addresses at both ends must be unique, and IP address reuse is not allowed.
Reference: Direct Connect Troubleshooting
Question 4: How to Implement Primary/Secondary Redundancy for Direct Connect
Two solutions:
1. Dual Direct Connect backup: You can achieve static route failover by configuring BFD, or use BGP routing for automatic convergence.
2. Direct Connect + VPN primary/secondary: Direct Connect serves as the primary link, and VPN serves as the secondary link. Automatic failover is achieved through VPC route priority.
VPC and Networking
Question 1: How to Point a VPC Subnet Route Table to the HAVIP of an L2GW?
Configure the destination network segment via the VPC route table, with the next hop type set to HAVIP. The current network supports scenarios where the destination network segment overlaps with the VPC CIDR/subnet CIDR block when the subnet route table's next hop is HAVIP.
Question 2: What Is an ENI? What Are Its Limitations?
An ENI (Elastic Network Interface) is a cross-account shared ENI that allows a CVM from one account to bind to a network interface in another account's VPC subnet. In the L2GW scenario, it enables the L2GW CVM of the management account to access the VPC resources of the user account.
Usage restriction: A CVM can be bound to multiple ENIs. The specific number depends on the CVM specification.
Reference: ENI Overview
Question 3: What to Do If the Direct Connect Tunnel Does Not Support VLAN Tags?
If your dedicated line service provider supplies only a single-VLAN physical dedicated line, and you need to access multiple VPCs in the cloud, you can use the CCN (Cloud Connect Network) product to connect one physical dedicated line to multiple VPCs.
Reference: Direct Connect FAQ
L2GW FAQs
Question 1: Why Do I Need to Reconfigure After an L2GW CVM is restarted?
The network configuration of the L2GW CVM (including ETH interface initialization, VXLAN tunnels, IP address routing, and so on) is stored in memory and is lost after the CVM restarts. However, service is not affected because the L2GW operates in a primary/secondary mode, and the secondary L2GW takes over the traffic.
Recovery Steps After Restart:
1. Restore the configuration line by line according to the commands recorded in the
l2gw_history_cmd.log file.2. Execute
./l2gw_online.sh to bring the gateway online.Question 2: Why Can't the VRRP Heartbeat NIC Be Deleted?
The VRRP heartbeat NIC (that is,
idc0) is used for VRRP protocol communication between the primary and secondary L2GW nodes. If this NIC is deleted, the primary and secondary nodes cannot detect each other's liveness, which may lead to a split-brain scenario (both L2GW nodes hold the HAVIP simultaneously), resulting in network loops or packet loss.Troubleshooting
Question 1: Maintenance Boundary
L2GW is essentially a Layer 2 gateway software deployed on a CVM (Cloud Virtual Machine). Its runtime environment (including the operating system, system configuration, network parameters, Keepalived high availability, and so on) is deployed under the customer's cloud account. Therefore, Ops tasks for L2GW, such as daily maintenance, monitoring, failure recovery, and configuration changes, are the responsibility of the customer's Ops team.
Misconception | Actual Situation |
L2GW is a managed service provided by Tencent Cloud. | L2GW is a deployment solution, not a managed service. Tencent Cloud provides deployment guidance and script tools, while Ops is the responsibility of the customer. |
Tencent Cloud monitors the L2GW operational status. | Tencent Cloud monitors only the infrastructure layer (physical dedicated lines, dedicated line/LGW devices), and does not monitor components within the L2GW CVM, such as Keepalived, VXLAN tunnels, and service routes. |
Tencent Cloud is responsible for L2GW version upgrades. | The upgrade of the L2GW deployment package is performed by the customer's Ops team, while Tencent Cloud provides the new version of the deployment package and technical guidance. |
When L2GW encounters issues, you can submit a ticket for Tencent Cloud to fix them. | Tencent Cloud's scope of support covers infrastructure and product defects. Issues at the L2GW configuration level, such as incorrect route configuration or Keepalived configuration exceptions, fall within the customer's Ops responsibility. |
Question 2: What to Do If the Direct Connect Stress Test Results Do Not Meet Expectations?
Troubleshooting steps:
1. Confirm whether the purchased dedicated line bandwidth meets expectations.
2. Test whether there is packet loss when the interconnect IP address is pinged. If packet loss is severe, contact Tencent Cloud after-sales support or report the issue to your carrier.
3. Check whether the duplex mode of the local dedicated line router is set to full-duplex.
4. Use multi-process concurrent stress testing tools such as iperf to rule out application issues.
Reference: Direct Connect FAQ
Question 3: What to Do If a Specific Network Segment of the Direct Connect Is Unreachable via ping?
Troubleshooting steps:
1. Confirm whether the network segment is newly enabled. (New network segments require route configuration on the cloud.)
2. Check whether the route tables in the cloud have the corresponding routes pointing to the dedicated line gateway.
3. Confirm whether the cloud security groups and network ACLs allow traffic.
4. Check whether the client iptables have any blocking rules.
5. Check whether there is any abnormal MAC address learning on the IDC side.
Reference: Direct Connect Troubleshooting
Question 4: How to Handle a Direct Connect Outage?
1. Confirm the interruption cause: check whether the interconnect IP address is reachable via ping and whether the peer MAC address can be received.
2. The dedicated line is owned by Tencent Cloud: contact the Tencent Cloud after-sales service team. (The system will automatically receive the alarm and report the issue to the carrier.)
3. The dedicated line is owned by the user: The user should report the fault to the carrier, and request Tencent Cloud to assist with troubleshooting when necessary.
Reference: Direct Connect FAQ
Troubleshooting Guide
Common Fault Quick Reference
Failure Symptoms | Possible cause | Troubleshooting method | Solution |
Connectivity failure between cloud and on-premises environments | VXLAN Tunnel Abnormal | Check VXLAN tunnel interface status. | Recreate the VXLAN tunnel. |
Frequent primary/secondary switchover | Unstable VRRP Heartbeat | Check the status and network latency of the idc0 NIC. | Optimize the network link or adjust the VRRP timeout parameters. |
Partial IP address connectivity failure | Missing Route Configuration | Compare l2gw_history_cmd.log. | Add the missing IP address route |
HAVIP drift anomaly | Incorrect Keepalived Configuration | Check virtual_ipaddress configuration. | Correct the configuration and run l2gw_reload.sh. |
Service connectivity failure after restart | Failure to Execute the Online Script | Check keepalived process status. | Run ./l2gw_online.sh. |
Log Viewing Guide
Log File | Content | Purpose |
/data/l2gw/l2gw_history_cmd.log | Historical Configuration Commands | Reference for configuration recovery after restart |
/var/log/keepalived.log | Keepalived Primary/Secondary Switchover Logs | Troubleshoot VRRP-related faults. |
/var/log/messages | System Logs | Troubleshoot NIC and kernel abnormalities. |
Daily Inspection Checklist
Check the operational status of each L2GW CVM.
Check the primary/secondary status of Keepalived.
Verify that the HAVIP is bound to the correct L2GW.
Test the connectivity between cloud-based and on-premises CVMs using ping.
Check the status of the VXLAN tunnel interface.
Check the binding status of the ENI.
Monitor the bandwidth utilization to check whether it exceeds 80%.
Verify the integrity of the
l2gw_history_cmd.log file.Confirm that the initialization script in
rc.local is valid.
피드백