Pod Security Group
Download
Modo Foco
Tamanho da Fonte
Pod security groups integrate CVM security groups and Kubernetes Pods. You can use CVM security groups to define rules, so as to allow the inbound and outbound network traffic of Pods running on different TKE nodes.
For TKE clusters, see the Using SecurityGroupPolicy for Pods on TKE document for operations.
For Serverless clusters, see the following content for operations.
Limits
Consider the following limits before using security groups for Pods:
Pods must run in TKE clusters on v1.20 or later.
Pod Security Groups cannot be used with dual-stack clusters.
Super Nodes are supported only in specific regions. For details, see Regions and Availability Zones.
Enabling Security Group Capability for Pods
Installing the add-on
1. Log in to the TKE console.
2. Install the SecurityGroupPolicy (Security Group Policy) component for the cluster.
If you have not created a cluster, you can install the SecurityGroupPolicy component during cluster creation. For details, see Add-On Lifecycle Management.
To enable security group capabilities for Pods in an existing cluster, install the SecurityGroupPolicy component in Component Management. For details, see Add-On Lifecycle Management.
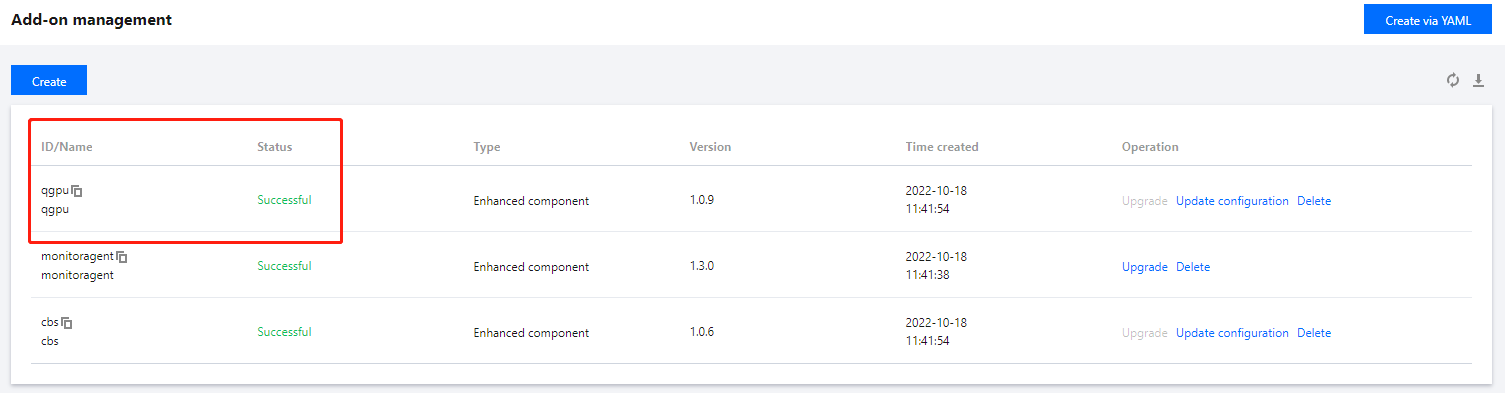
3. On the Add-On Management page, view the add-on status. If the status is Success, the add-on has been deployed, as shown below:
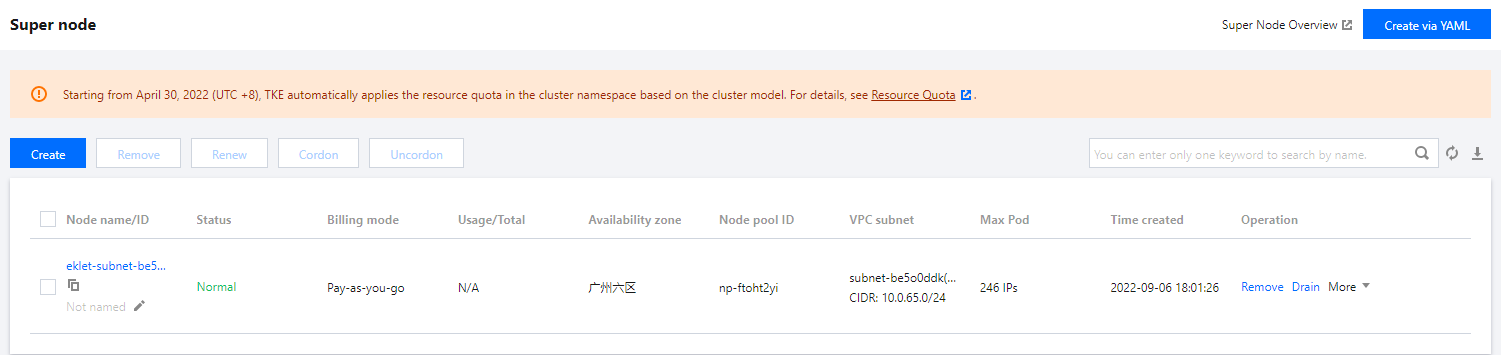
4. On the Super Node page, confirm that your cluster contains Super Nodes. Currently, security group capabilities can be enabled only for Pods scheduled to Super Nodes.
Deploying the Sample Application
To use security groups for Pods, you must deploy SecurityGroupPolicy to your cluster. The following steps show you how to use CloudShell to apply security group policies to Pods. Unless otherwise specified, complete all steps from the same terminal, because variables used in the following steps do not persist across terminals.
Deploying the sample Pod Using a security groups
1. Create a security group for use with your Pods. The following steps guide you through creating a simple security group for demonstration purposes only. In a production cluster, your rules may differ.
1.1 Search for the IDs of the cluster's VPC and cluster security group. You can replace
my-cluster when the command is used.my_cluster_name=my-clustermy_cluster_vpc_id=$(tccli tke DescribeClusters --cli-unfold-argument --ClusterIds $my_cluster_name --filter Clusters[0].ClusterNetworkSettings.VpcId | sed 's/\\"//g')my_cluster_security_group_id=$(tccli vpc DescribeSecurityGroups --cli-unfold-argument --Filters.0.Name security-group-name --Filters.0.Values tke-worker-security-for-$my_cluster_name --filter SecurityGroupSet[0].SecurityGroupId | sed 's/\\"//g')
1.2 Create a security group for your Pod. You can replace
my-pod-security-group when using it. Note the security group ID returned in the command output, as you will use it in subsequent steps.my_pod_security_group_name=my-pod-security-grouptccli vpc CreateSecurityGroup --GroupName "my-pod-security-group" --GroupDescription "My pod security group"my_pod_security_group_id=$(tccli vpc DescribeSecurityGroups --cli-unfold-argument --Filters.0.Name security-group-name --Filters.0.Values my-pod-security-group --filter SecurityGroupSet[0].SecurityGroupId | sed 's/\\"//g')echo $my_pod_security_group_id
1.3 Allow TCP and UDP traffic on port 53 from the Pod security group you created in the previous step to the cluster security group, enabling Pods in the deployment sample to access the application via domain name.
tccli vpc CreateSecurityGroupPolicies --cli-unfold-argument --SecurityGroupId $my_cluster_security_group_id --SecurityGroupPolicySet.Ingress.0.Protocol UDP --SecurityGroupPolicySet.Ingress.0.Port 53 --SecurityGroupPolicySet.Ingress.0.SecurityGroupId $my_pod_security_group_id --SecurityGroupPolicySet.Ingress.0.Action ACCEPTtccli vpc CreateSecurityGroupPolicies --cli-unfold-argument --SecurityGroupId $my_cluster_security_group_id --SecurityGroupPolicySet.Ingress.0.Protocol TCP --SecurityGroupPolicySet.Ingress.0.Port 53 --SecurityGroupPolicySet.Ingress.0.SecurityGroupId $my_pod_security_group_id --SecurityGroupPolicySet.Ingress.0.Action ACCEPT
1.4 You must allow inbound traffic of any protocol and port from Pods associated with a security group to Pods associated with any security group. Also, allow outbound traffic of any protocol and port from Pods associated with a security group.
tccli vpc CreateSecurityGroupPolicies --cli-unfold-argument --SecurityGroupId $my_pod_security_group_id --SecurityGroupPolicySet.Ingress.0.Protocol ALL --SecurityGroupPolicySet.Ingress.0.Port ALL --SecurityGroupPolicySet.Ingress.0.SecurityGroupId $my_pod_security_group_id --SecurityGroupPolicySet.Ingress.0.Action ACCEPTtccli vpc CreateSecurityGroupPolicies --cli-unfold-argument --SecurityGroupId $my_pod_security_group_id --SecurityGroupPolicySet.Egress.0.Protocol ALL --SecurityGroupPolicySet.Egress.0.Port ALL --SecurityGroupPolicySet.Egress.0.Action ACCEPT
2. Create a Kubernetes namespace to deploy resources.
kubectl create namespace my-namespace
3. Deploy SecurityGroupPolicy to your cluster.
3.1 Save the following example security policy as
my-security-group-policy.yaml. If you prefer to select Pods based on service account Tags, you can replace podSelector with serviceAccountSelector. You must specify one selector or the other. If you specify multiple security groups, all rules in all security groups take effect on the selected Pods. Replace $my_pod_security_group_id with the security group ID you noted when you created the security group for your Pod in the previous step.apiVersion: vpcresources.tke.cloud.tencent.com/v1beta1kind: SecurityGroupPolicymetadata:name: my-security-group-policynamespace: my-namespacespec:podSelector:matchLabels:app: my-appsecurityGroups:groupIds:- $my_pod_security_group_id
Note:
The one or more security groups you specify for a Pod must meet the following conditions:
They must exist.
They must allow inbound requests from the cluster security group (for kubelet) and allow health checks configured for Pods to function.
The security group for your CoreDNS pod must allow inbound TCP and UDP traffic on port 53 from the Pod security group.
They must have the necessary inbound and outbound rules to communicate with other Pods.
The security group policy applies only to newly scheduled Pods. It does not affect running Pods. For existing Pods to take effect, you must manually recreate them after confirming that they meet the conditions described above.
3.2 Deploy the policy.
kubectl apply -f my-security-group-policy.yaml
4. Deploy the example application using the my-app matching Tag you specified in the podSelector in the previous step.
4.1 Save the following content to a file named sample-application.yaml.
apiVersion: apps/v1kind: Deploymentmetadata:name: my-deploymentnamespace: my-namespacelabels:app: my-appspec:replicas: 2selector:matchLabels:app: my-apptemplate:metadata:labels:app: my-appspec:terminationGracePeriodSeconds: 120containers:- name: nginximage: nginx:latestports:- containerPort: 80nodeSelector:node.kubernetes.io/instance-type: eklettolerations:- effect: NoSchedulekey: eks.tke.cloud.tencent.com/ekletoperator: Exists---apiVersion: v1kind: Servicemetadata:name: my-appnamespace: my-namespacelabels:app: my-appspec:selector:app: my-appports:- protocol: TCPport: 80targetPort: 80
4.2 Deploy the application using the following command. When you deploy the application, Pods are preferentially scheduled to super nodes, and the security group you specified in the previous step is applied to the Pods.
kubectl apply -f sample-application.yaml
Note:
If you do not use nodeSelector to preferentially schedule Pods to super nodes, when a Pod is scheduled to other nodes, the security group does not take effect and
kubectl describe pod outputs security groups is only support super node, node 10.0.0.1 is not super node.5. View the Pod deployed using the sample application. This terminal is referred to as
TerminalA.kubectl get pods -n my-namespace -o wide
The example output is as follows:
NAME READY STATUS RESTARTS AGE IP NODE NOMINATED NODE READINESS GATESmy-deployment-866ffd8886-9zfrp 1/1 Running 0 85s 10.0.64.10 eklet-subnet-q21rasu6-8bpgyx9r <none> <none>my-deployment-866ffd8886-b7gzb 1/1 Running 0 85s 10.0.64.3 eklet-subnet-q21rasu6-8bpgyx9r <none> <none>
6. In another terminal, enter any Pod. This terminal is referred to as
TerminalB. Replace it with the Pod ID returned in the previous step's output.kubectl exec -it -n my-namespace my-deployment-866ffd8886-9zfrp -- /bin/bash
7. In
TerminalB, confirm that the sample application is working properly.curl my-app
The example output is as follows:
<!DOCTYPE html><html><head><title>Welcome to nginx!</title>...
You received the response because all Pods running the application are associated with the security group you created. The security group contains the following rules:
Allow all traffic between all Pods associated with the security group.
DNS traffic is allowed to egress from this security group to the cluster security group associated with your nodes. These nodes are running CoreDNS Pods, and your Pods perform DNS lookups for
my-app.8. From
TerminalA, delete the security group rule that allows DNS communication from the cluster security group.tccli vpc DeleteSecurityGroupPolicies --cli-unfold-argument --SecurityGroupId $my_cluster_security_group_id --SecurityGroupPolicySet.Ingress.0.Protocol UDP --SecurityGroupPolicySet.Ingress.0.Port 53 --SecurityGroupPolicySet.Ingress.0.SecurityGroupId $my_pod_security_group_id --SecurityGroupPolicySet.Ingress.0.Action ACCEPTtccli vpc DeleteSecurityGroupPolicies --cli-unfold-argument --SecurityGroupId $my_cluster_security_group_id --SecurityGroupPolicySet.Ingress.0.Protocol TCP --SecurityGroupPolicySet.Ingress.0.Port 53 --SecurityGroupPolicySet.Ingress.0.SecurityGroupId $my_pod_security_group_id --SecurityGroupPolicySet.Ingress.0.Action ACCEPT
9. From
TerminalB, attempt to access the application again.curl my-app
The attempt failed because the Pod cannot access the CoreDNS Pod. The cluster security group no longer allows DNS communication from Pods associated with your security group.
If you attempt to access the application using an IP address, you still receive a response. This is because all ports are allowed between Pods that have the security group associated with them, and no DNS lookup is required.
10. After the experiment is completed, you can use the following commands to delete the created example security group policy, application, and security group.
kubectl delete namespace my-namespacetccli vpc DeleteSecurityGroup --cli-unfold-argument --SecurityGroupId $my_pod_security_group_id
Ajuda e Suporte
Esta página foi útil?
Você também pode entrar em contato com a Equipe de vendas ou Enviar um tíquete em caso de ajuda.
comentários