Using SecurityGroupPolicy for Pods on TKE
Download
Modo Foco
Tamanho da Fonte
Description
This article describes how users can use the SecurityGroupPolicy (abbreviation SGP) on TKE general nodes and native nodes.
TKE Serverless clusters already support SecurityGroupPolicy (SGP). For details, see TKE Pod Security Group. The TKE network component has been comprehensively upgraded. By leveraging the Trunking ENI capability provided by the VPC side, it assigns a dedicated sub-interface card from the trunk to each Pod and binds a security group to that sub-interface card individually. This enables Pods to bind to independent security groups, achieving SGP capability.
Solution Strengths
Support security group binding at the Pod level.
Pods occupy IPs individually, static IPs can be scheduled freely across AZ nodes which further enhancing scheduling flexibility.
Trunking ENI do not consume the quota of secondary IP resources and exclusive ENI resources.
Use Cases
Reduce exposed surface, thereby decreasing the likelihood of network attacks.
By using security groups, Pods can configure their minimum exposed surface, thereby reducing possible attack surface and enhancing security.
Network security policy control with the smallest granularity.
Pod binding to security groups implements network security policy control with the smallest granularity, enabling more precise control of network security policies for each application, thereby enhancing overall cluster security.
Migrate from virtual machine architecture to container architecture and reuse existing security groups of applications.
In traditional virtual machine architecture, applications are deployed on virtual machines, and security groups are bound to the VMs. After migrating to container architecture, with the SGP feature, these security groups can be directly reused.
Features
Support coexistence with the shared ENI mode.
When the eniipamd component enables the security group feature, the security group setting of the Pod has a higher priority, followed by the security group logic of eniipamd, inheriting the security group settings of the node (from the primary ENI or according to the node settings).
By default, Pods on the same node do not go through security groups to communicate with each other.
To also enforce security group checks for Pod-to-Pod communication within the same node, refer to the Data Plane Solution section for configuration when the component's Trunking ENI capability is enabled.
Limitations
The number of Pods using Trunking ENIs on a node cannot exceed the node's Trunking ENI quota, which is currently 100 by default, and a maximum of 256 is supported for 64C models.
Currently, only VPC-CNI shared ENI + static IP mode clusters are supported.
Currently only the following models are supported by default: "ITA5", "M8", "MA4", "MA5", "S8", "S9", "SA4", "SA5". For other models added to the cluster, the Trunking ENI quota will be assigned to 0, prohibiting the use of standalone security groups for Pods. If you need to use other models, please submit a ticket to request support from the VPC.
Usage
Enable the Client-Token Allowlist Feature on the VPC Side
The creation of a Trunking ENI strongly depends on the client-token feature of the VPC. Currently, this feature is in the allowlist management stage. Please submit a ticket to the VPC side to apply for adding the user account to this allowlist.
Note:
If the account is not added to the VPC client-token allowlist, there may be a risk of resource leakage during the use of Trunking ENIs.
Trunking ENI Related API Authorization
1. On the CAM Console > Policies page, click Create a custom policy.
2. Select Create according to the policy syntax method:
2.1 Select Blank Template, click Next.
2.2 Policy Name can be "SubENIForIPAMD". Copy and create the following policies:
{"statement": [{"action": ["vpc:CreateSubNetworkInterface","vpc:DeleteSubNetworkInterface","cvm:CheckNetworkInterfaceSecurityGroupReady"],"effect": "allow","resource": ["*"]}],"version": "2.0"}
3. Click Done.
4. After creation, in the CAM Console > Roles, search for "IPAMDofTKE_QCSRole". Click the role name, select Associate Policies in Permissions, check the created policy "SubENIForIPAMD", and click OK.
5. In the CAM Console > Roles, search for "TKE_QCSRole". Click the role name, select Associate Policies in Permissions, check the created policy "SubENIForIPAMD", and click OK.
Through this authorization, assign TKE and related tke-eni-ipamd components the permission to create and delete Trunking ENIs.
Enable Trunking ENI Feature By Default For Incremental Clusters
1. Submit a ticket to TKE to enable this feature by default for incremental clusters.
2. To enable this feature for existing clusters, refer to the section "Enabling the Trunking ENI Feature for Existing Clusters" for instructions.
3. When creating a cluster, select vpc-cni shared ENI mode and enable static Pod IP to auto turn on the Trunking ENI feature.
Enabling Trunking ENI Feature For Existing Clusters
Conditions:
Cluster restrictions: VPC-CNI network mode, shared ENI, and static Pod IP enabled.
Version limits: 3.5.6 and above versions.
Directions are as follows:
1. Log in to the TKE console and select Cluster in the left sidebar.
2. On the Cluster page, select the target cluster name to enter the cluster details page.
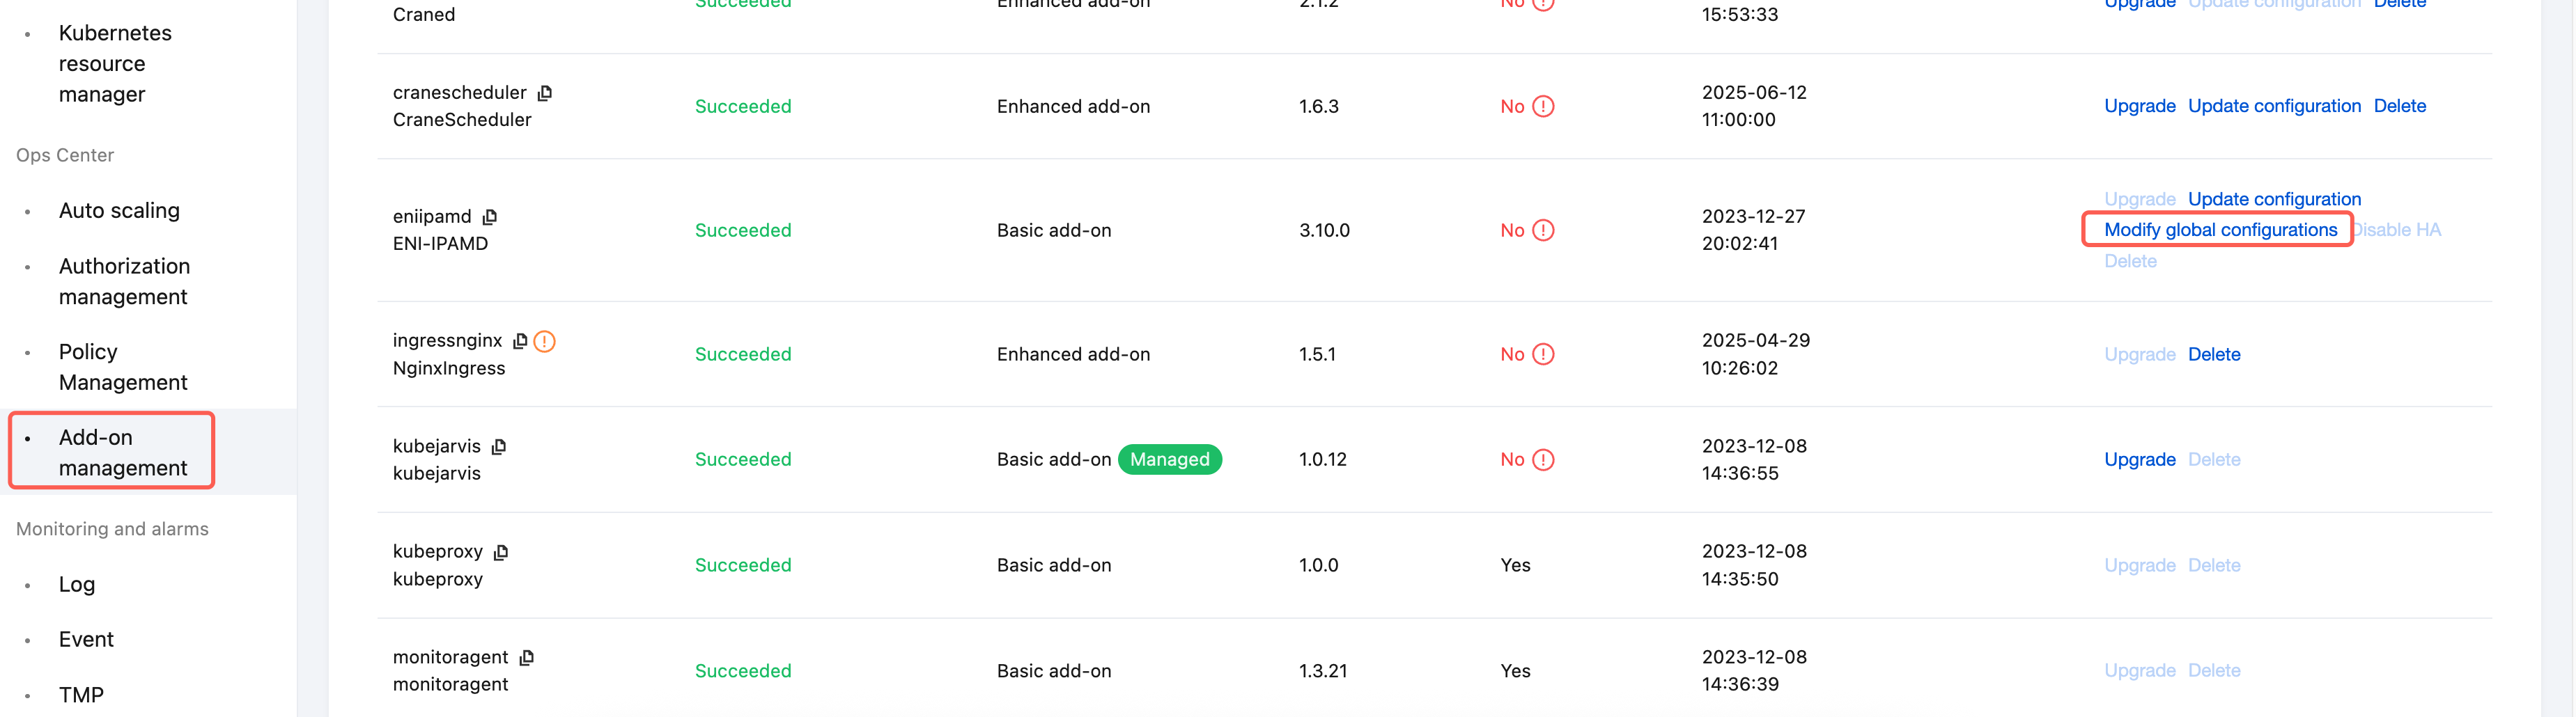
3. Select Add-on management in the left sidebar. On the component page, locate the eniipamd component and click Modify Global Configurations on its right. Change the configuration item "vpcCni.trunkingEni.enableSubEni" to
true, then save and exit.
Enable SGP Feature In The Cluster
After enabling the Trunking ENI for the cluster, you can use SGP on both general and native nodes. Directions:
1. Log in to the TKE console and select Cluster in the left sidebar.
2. On the Cluster page, select the target cluster name to enter the cluster details page.
3. Select Add-on management in the left sidebar, then click Create on the component page.
4. On the Create Add-on management page, select SecurityGroupPolicy. As shown below:
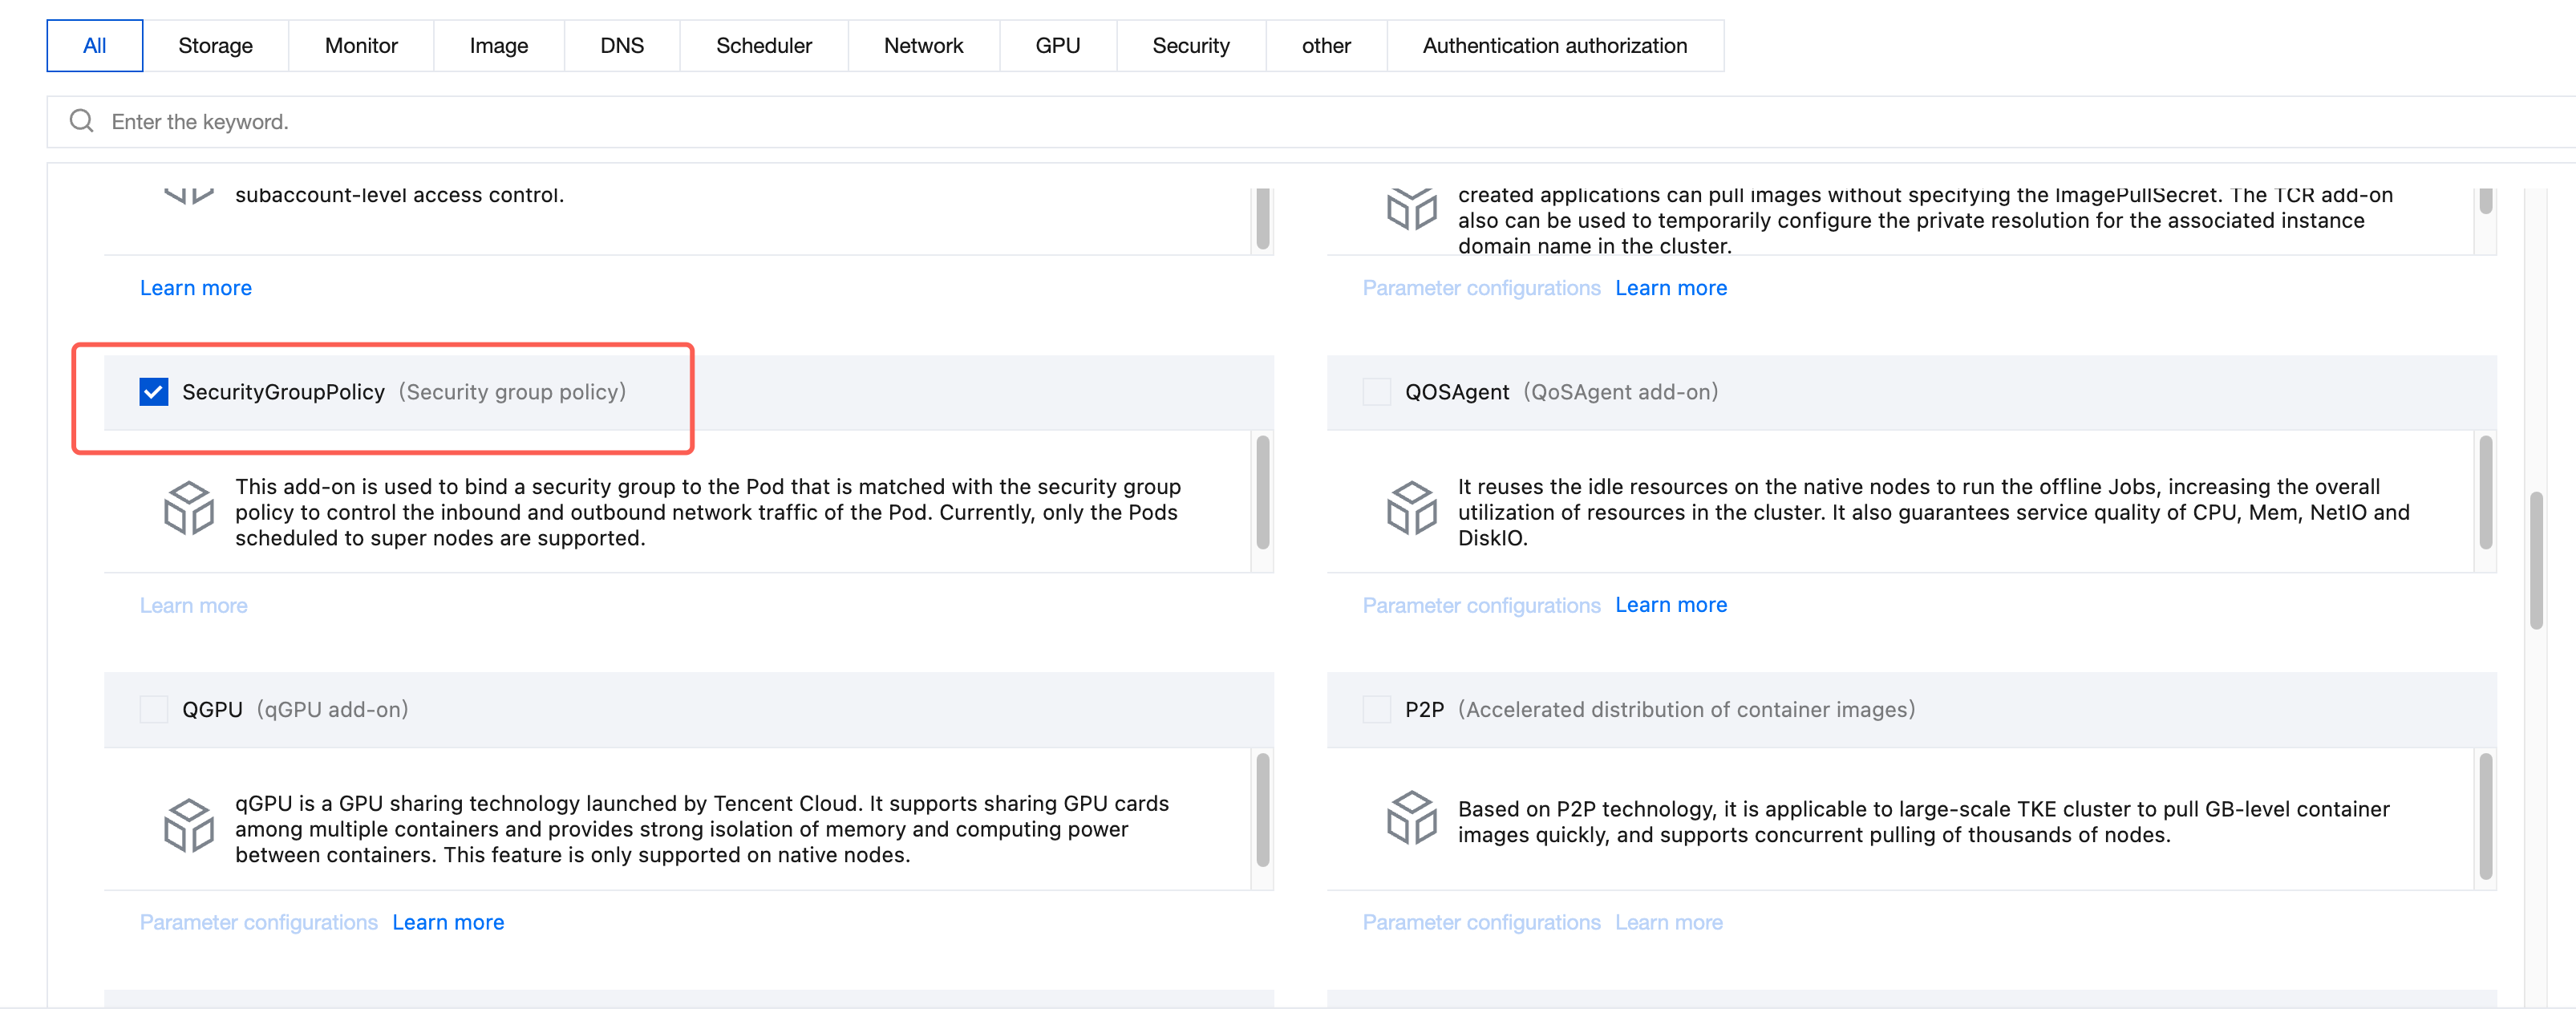
5. Click Done.
6. Please create the required security group for the Pod on the security group page, such as sg-xxxxyyyy.
7. Deploy the SecurityGroupPolicy CR as follows in the yaml file. If you prefer to select Pods based on service account labels, replace
apiVersion: vpcresources.tke.cloud.tencent.com/v1beta1kind: SecurityGroupPolicymetadata:name: my-security-group-policynamespace: my-namespacespec:podSelector:matchLabels:app: my-appsecurityGroups:groupIds:- sg-xxxxyyyy
All subsequently created Pods with the label
app: my-app will use Trunking ENI network capability and bind to the security group sg-xxxxyyyy.Note:
The SGP policy applies only to newly created Pods. The security group configurations for existing Pods are not updated automatically. To update the security group for an existing Pod, you must manually rebuild the Pod after confirming that it complies with the SGP rules.
8. Enter the TKE console, deploy an application that needs to bind to a security group in the cluster workload. See the following yaml to deploy an nginx deployment:
apiVersion: apps/v1kind: Deploymentmetadata:name: nginxlabels:app: my-appspec:replicas: 1selector:matchLabels:app: my-apptemplate:metadata:annotations:labels:app: my-appspec:terminationGracePeriodSeconds: 0containers:- name: nginximage: nginx:1.7.9ports:- containerPort: 80
After successful deployment, you can check Pod information through
kubectl get pod -oyaml to confirm the Trunking ENI feature is already enabled and the corresponding security group is bound: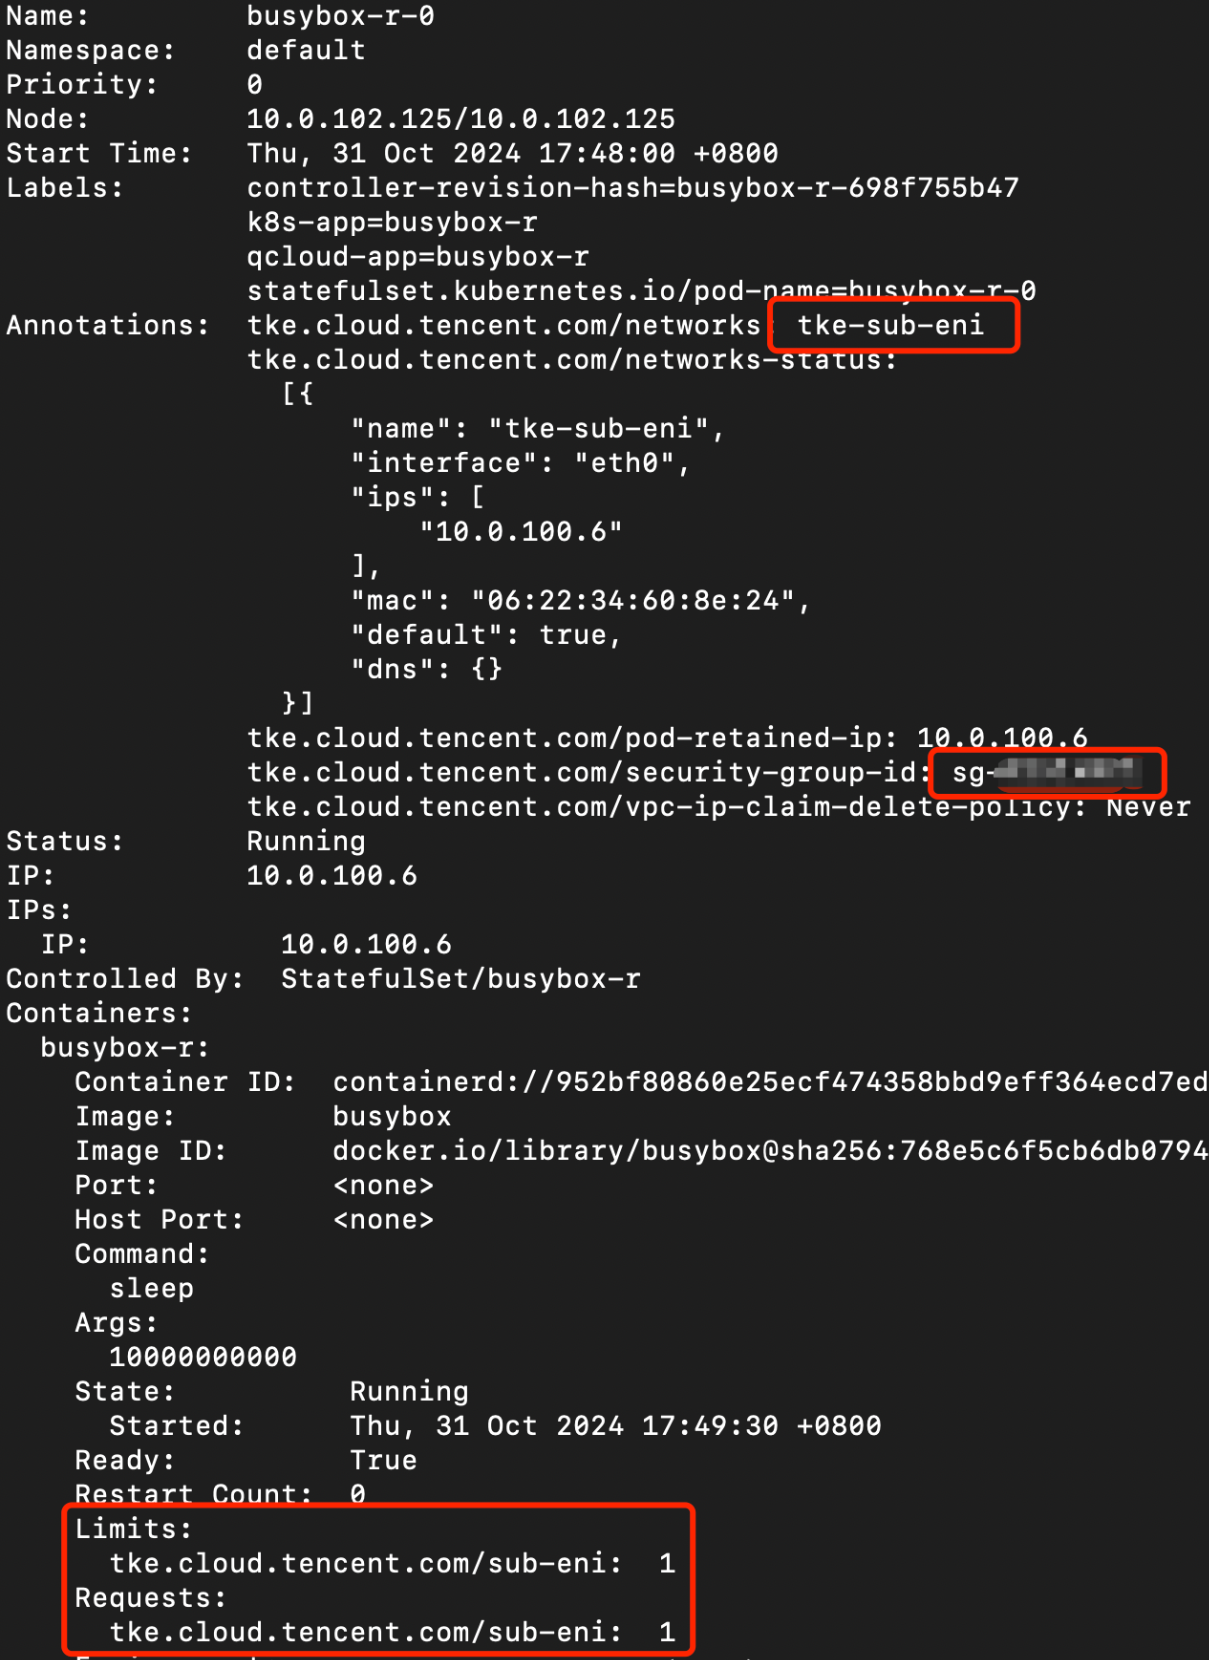
The key information in the red box is as follows:
# tke-sub-eni means the pod already used the Trunking ENItke.cloud.tencent.com/networks: "tke-sub-eni"# means the pod has been bound to a Pod-level security grouptke.cloud.tencent.com/security-group-id: "sg-xx1,sg-xx2"# extension resource, means the pod currently uses Trunking ENI resourcetke.cloud.tencent.com/sub-eni: "1"
Also verify that the security group associated with the ENI used by the Pod meets your expectations. First, obtain the VpcEni CR corresponding to the Pod using the following command:
kubectl get vpceni -l tke.cloud.tencent.com/pod-name=<pod-name>,tke.cloud.tencent.com/pod-namespace=<pod-namespace>
After the VpcEni resource corresponding to the Pod is obtained, obtain the ID of the trunk ENI used by the Pod using the following command:
kubectl get vpceni <resource-name> -ojsonpath='{.status.eni.eniID}'
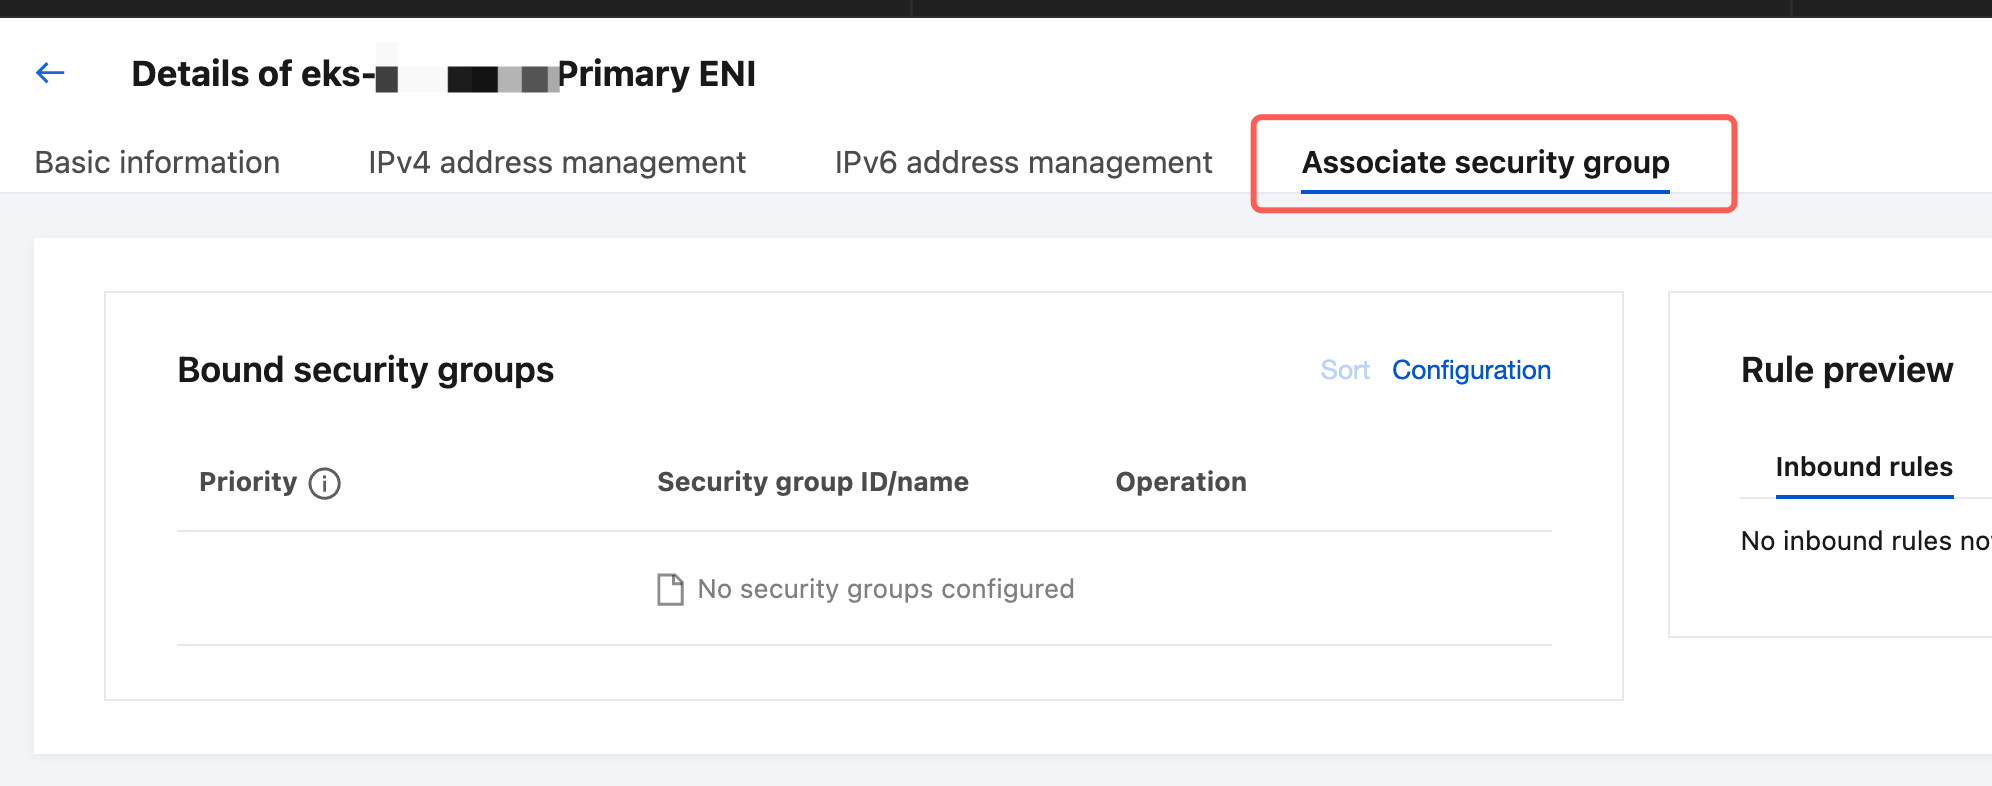
Enter the ENI console, search for the ENI id, enter its details page, and view its associated security groups:
Data Plane Solution
The current TKE Trunking ENI feature supports the following two data routing schemes:
1. Standard Routing Scheme (Default Scheme).
2. Strict Routing Scheme.
The functional differences and usage restrictions of the two schemes are shown in the table:
Data Plane Scheme | Strict Routing | Standard Routing |
Functional differences | Traffic between Pods on the same node, and between Pods and their host node, passes through the Pod security group. Cross-node Pod communication passes through the Pod security group. | Traffic between Pods on the same node, and between Pods and their host node, does not pass through the Pod security group. Cross-node Pod communication passes through the Pod security group. |
Limit | 1. Pods do not support Node LocalDNS. 2. Pods are incompatible with NetworkPolicy rules. 3. Pods are incompatible with clusters in IPVS mode. 4. Network connectivity issues occur when a client accesses a Pod in strict routing mode through a Service of type NodePort or LoadBalancer with its externalTrafficPolicy set to Local. 5. When a node accesses a Pod via TCP or UDP, network connectivity issues may occur, often manifesting as failures of the Pod's health and liveness probes. This issue can be resolved by disabling the kernel's tcp_early_demux and udp_early_demux. For specific operations, see the following section. 6. Traffic from Pods to outside the node must not be subjected to Source Network Address Translation (SNAT). Otherwise, network connectivity issues will occur. For verification and operational steps, see the following section. | None. |
How to Enable Strict Routing
Note: Routing scheme changes only take effect for incremental Pods. To adjust the routing scheme for existing Pods, you need to recreate the corresponding Pods.
Directions are as follows:
1. Log in to the TKE console and select Cluster in the left sidebar.
2. On the Cluster page, select the target cluster name to enter the cluster details page.
3. Select Add-on Management in the left sidebar. On the Add-on page, locate the eniipamd add-on and click Modify Global Configurations on its right. After entering the configuration page, make the following adjustments:
3.1 Change the configuration item "vpcCni.trunkingEni.podSecurityGroupEnforcingMode" to
strict.3.2 Set the configuration item "agent.config.disableTcpEarlyDemux" to
true. This setting disables the kernel's tcp_early_demux feature.3.3 Set the configuration item "agent.config.disableUdpEarlyDemux" to
true. This setting disables the kernel's udp_early_demux feature.4. After confirming the changes are correct, click Done to exit.
Checking the SNAT Configuration of the Current Cluster
A Pod using strict routing mode must not perform Source Network Address Translation (SNAT) when accessing other services. Otherwise, network connectivity issues will occur.
If the ip-masq-agent component is not installed in the current cluster, Pods do not perform Source Network Address Translation (SNAT) by default when accessing external services.
If the ip-masq-agent component is installed in the current cluster, see the ip-masq-agent documentation to configure its SNAT behavior. This ensures that Pods in strict routing mode are not subjected to SNAT when accessing external services.
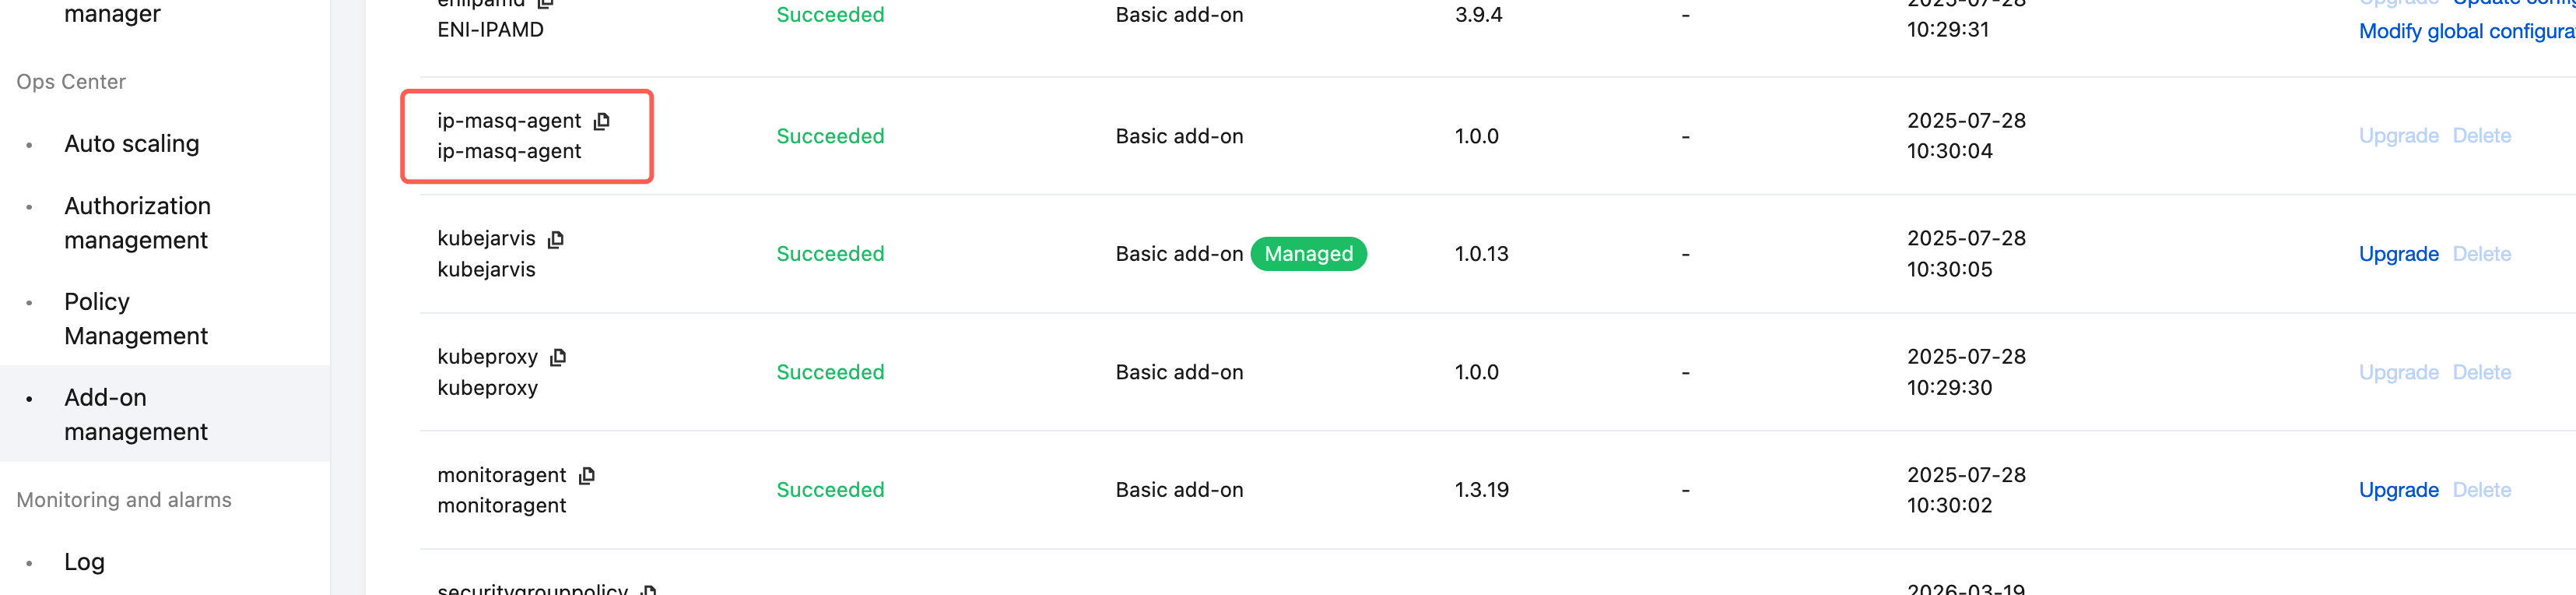
You can follow the steps below to verify whether the ip-masq-agent component is installed in the current cluster:
1. Log in to the TKE console and select Cluster in the left sidebar.
2. On the Cluster page, select the target cluster name to enter the cluster details page.
3. Select Add-on Management in the left sidebar and check whether the ip-masq-agent component is present.
Ajuda e Suporte
Esta página foi útil?
Você também pode entrar em contato com a Equipe de vendas ou Enviar um tíquete em caso de ajuda.
comentários