Web (Vue3)
Download
Modo Foco
Tamanho da Fonte
This guide explains how to integrate the TUIRoomKit Webinar scenario into your web application. The Webinar scenario enables real-time interaction between hosts, guests, and tens of thousands of audience members, delivering ultra-low latency streaming and high-performance message concurrency.
Difference Between Standard Conference and Webinar:
Standard Conference: Ideal for small to medium collaborative meetings where all participants have equal audio/video permissions. Supports multiple layouts, including grid and speaker view, and offers features such as screen sharing and member management.
Webinar: Designed for large-scale live presentations, allows unlimited audience members to enter the room and watch. Audience can use the Raise Hand feature to apply to become a guest and join the discussion. The system is optimized for high-concurrency messaging in large interactive scenarios, meeting the needs of professional presentation and interaction.
Feature Overview
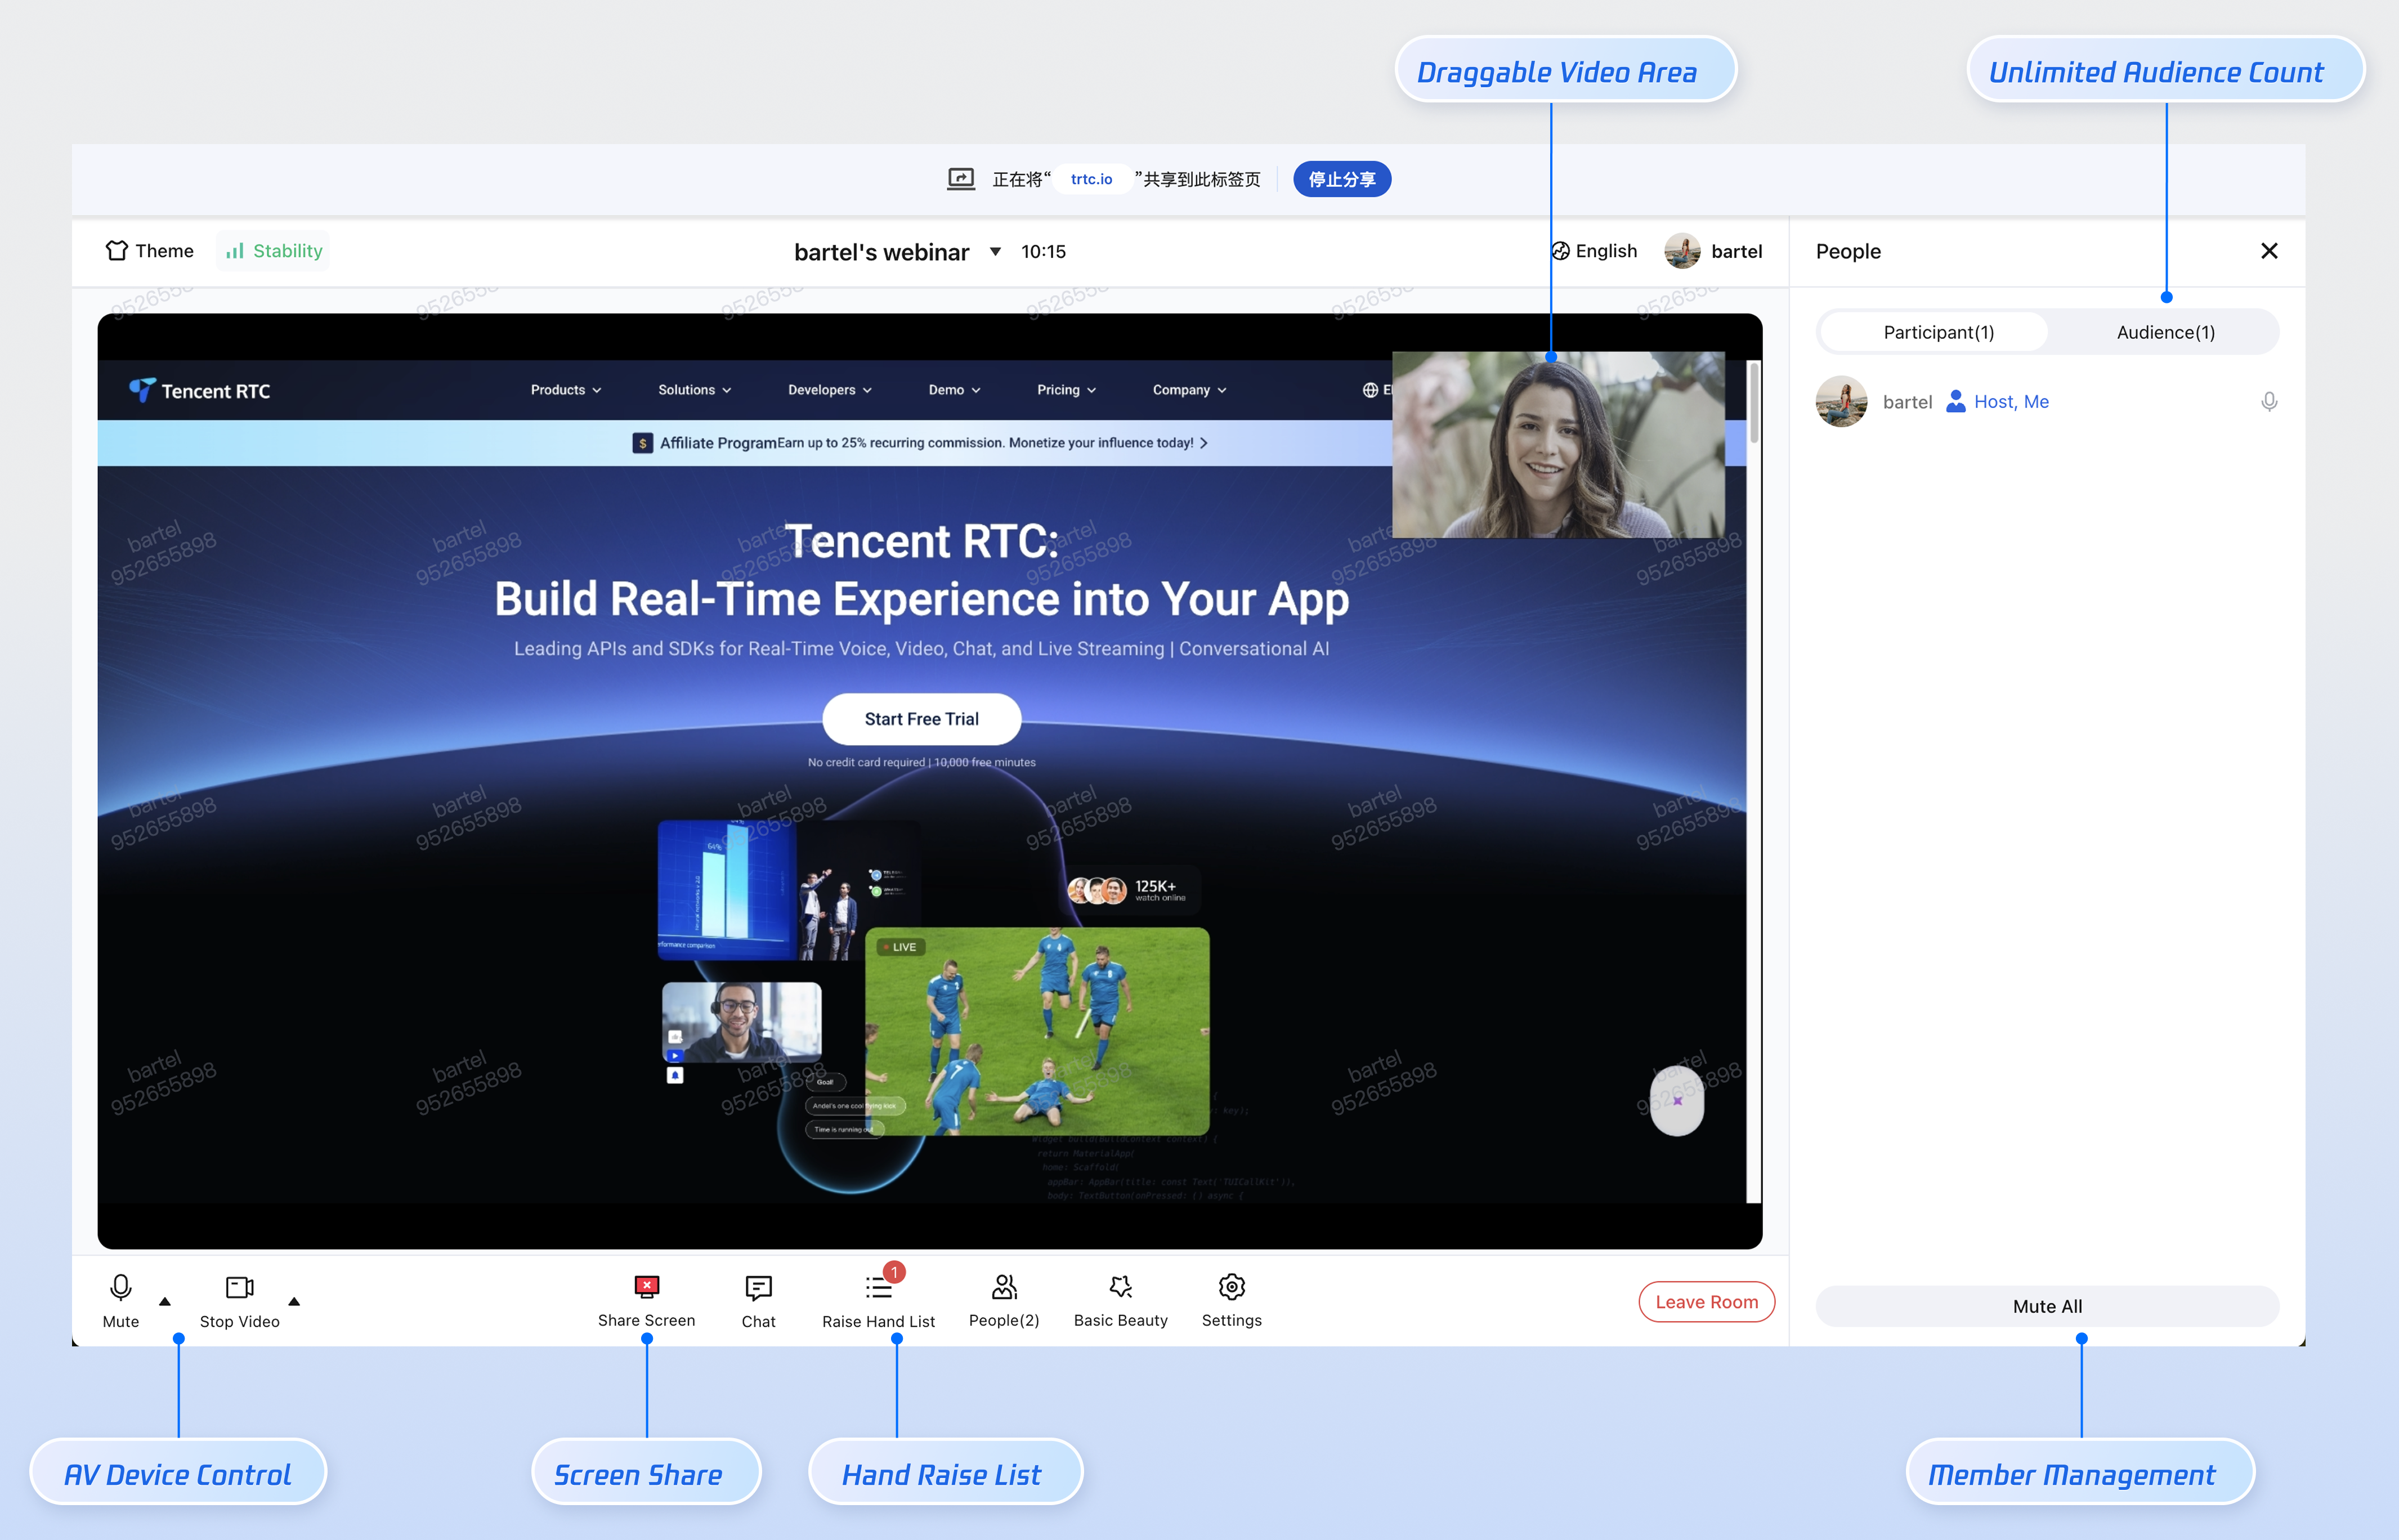
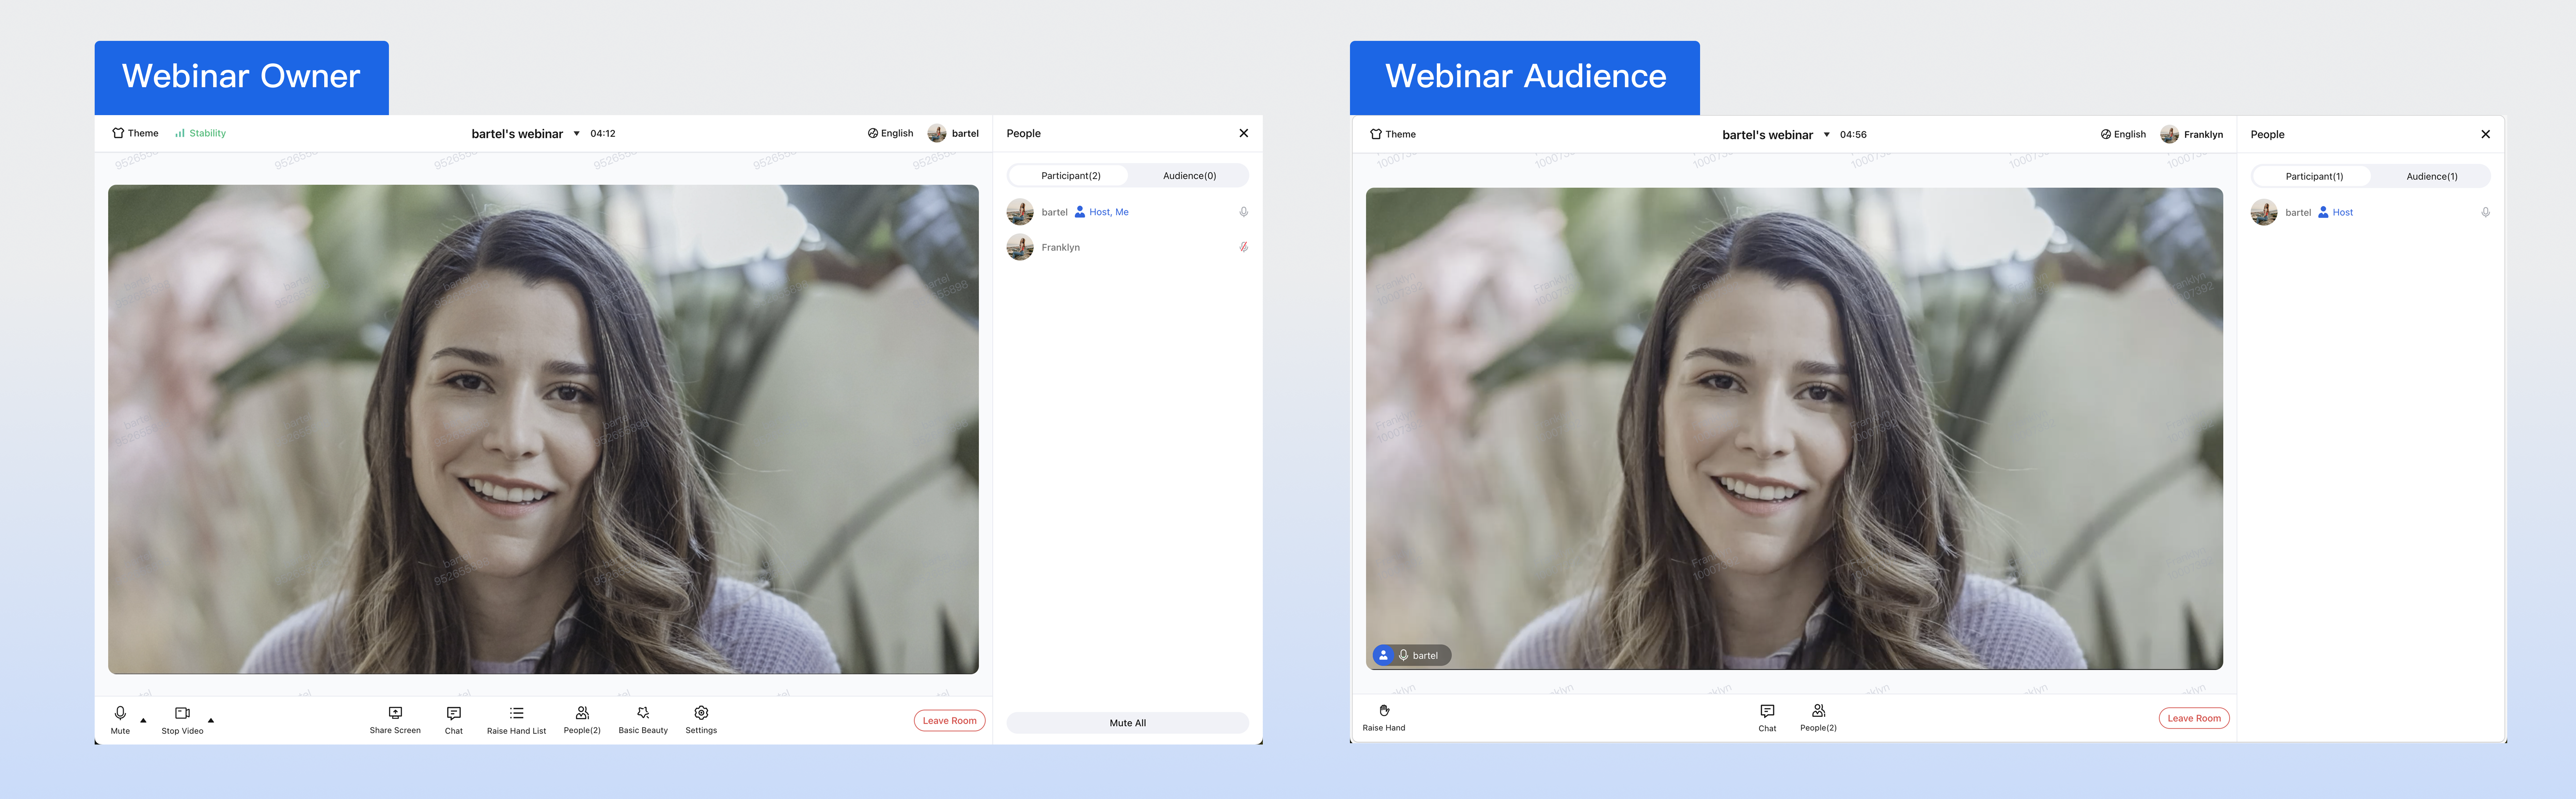
Host Features
Hosts can broadcast high-definition audio/video streams and share their screen. When both video and screen sharing are active, the video window can be repositioned for flexible layout switching.
Guest Features
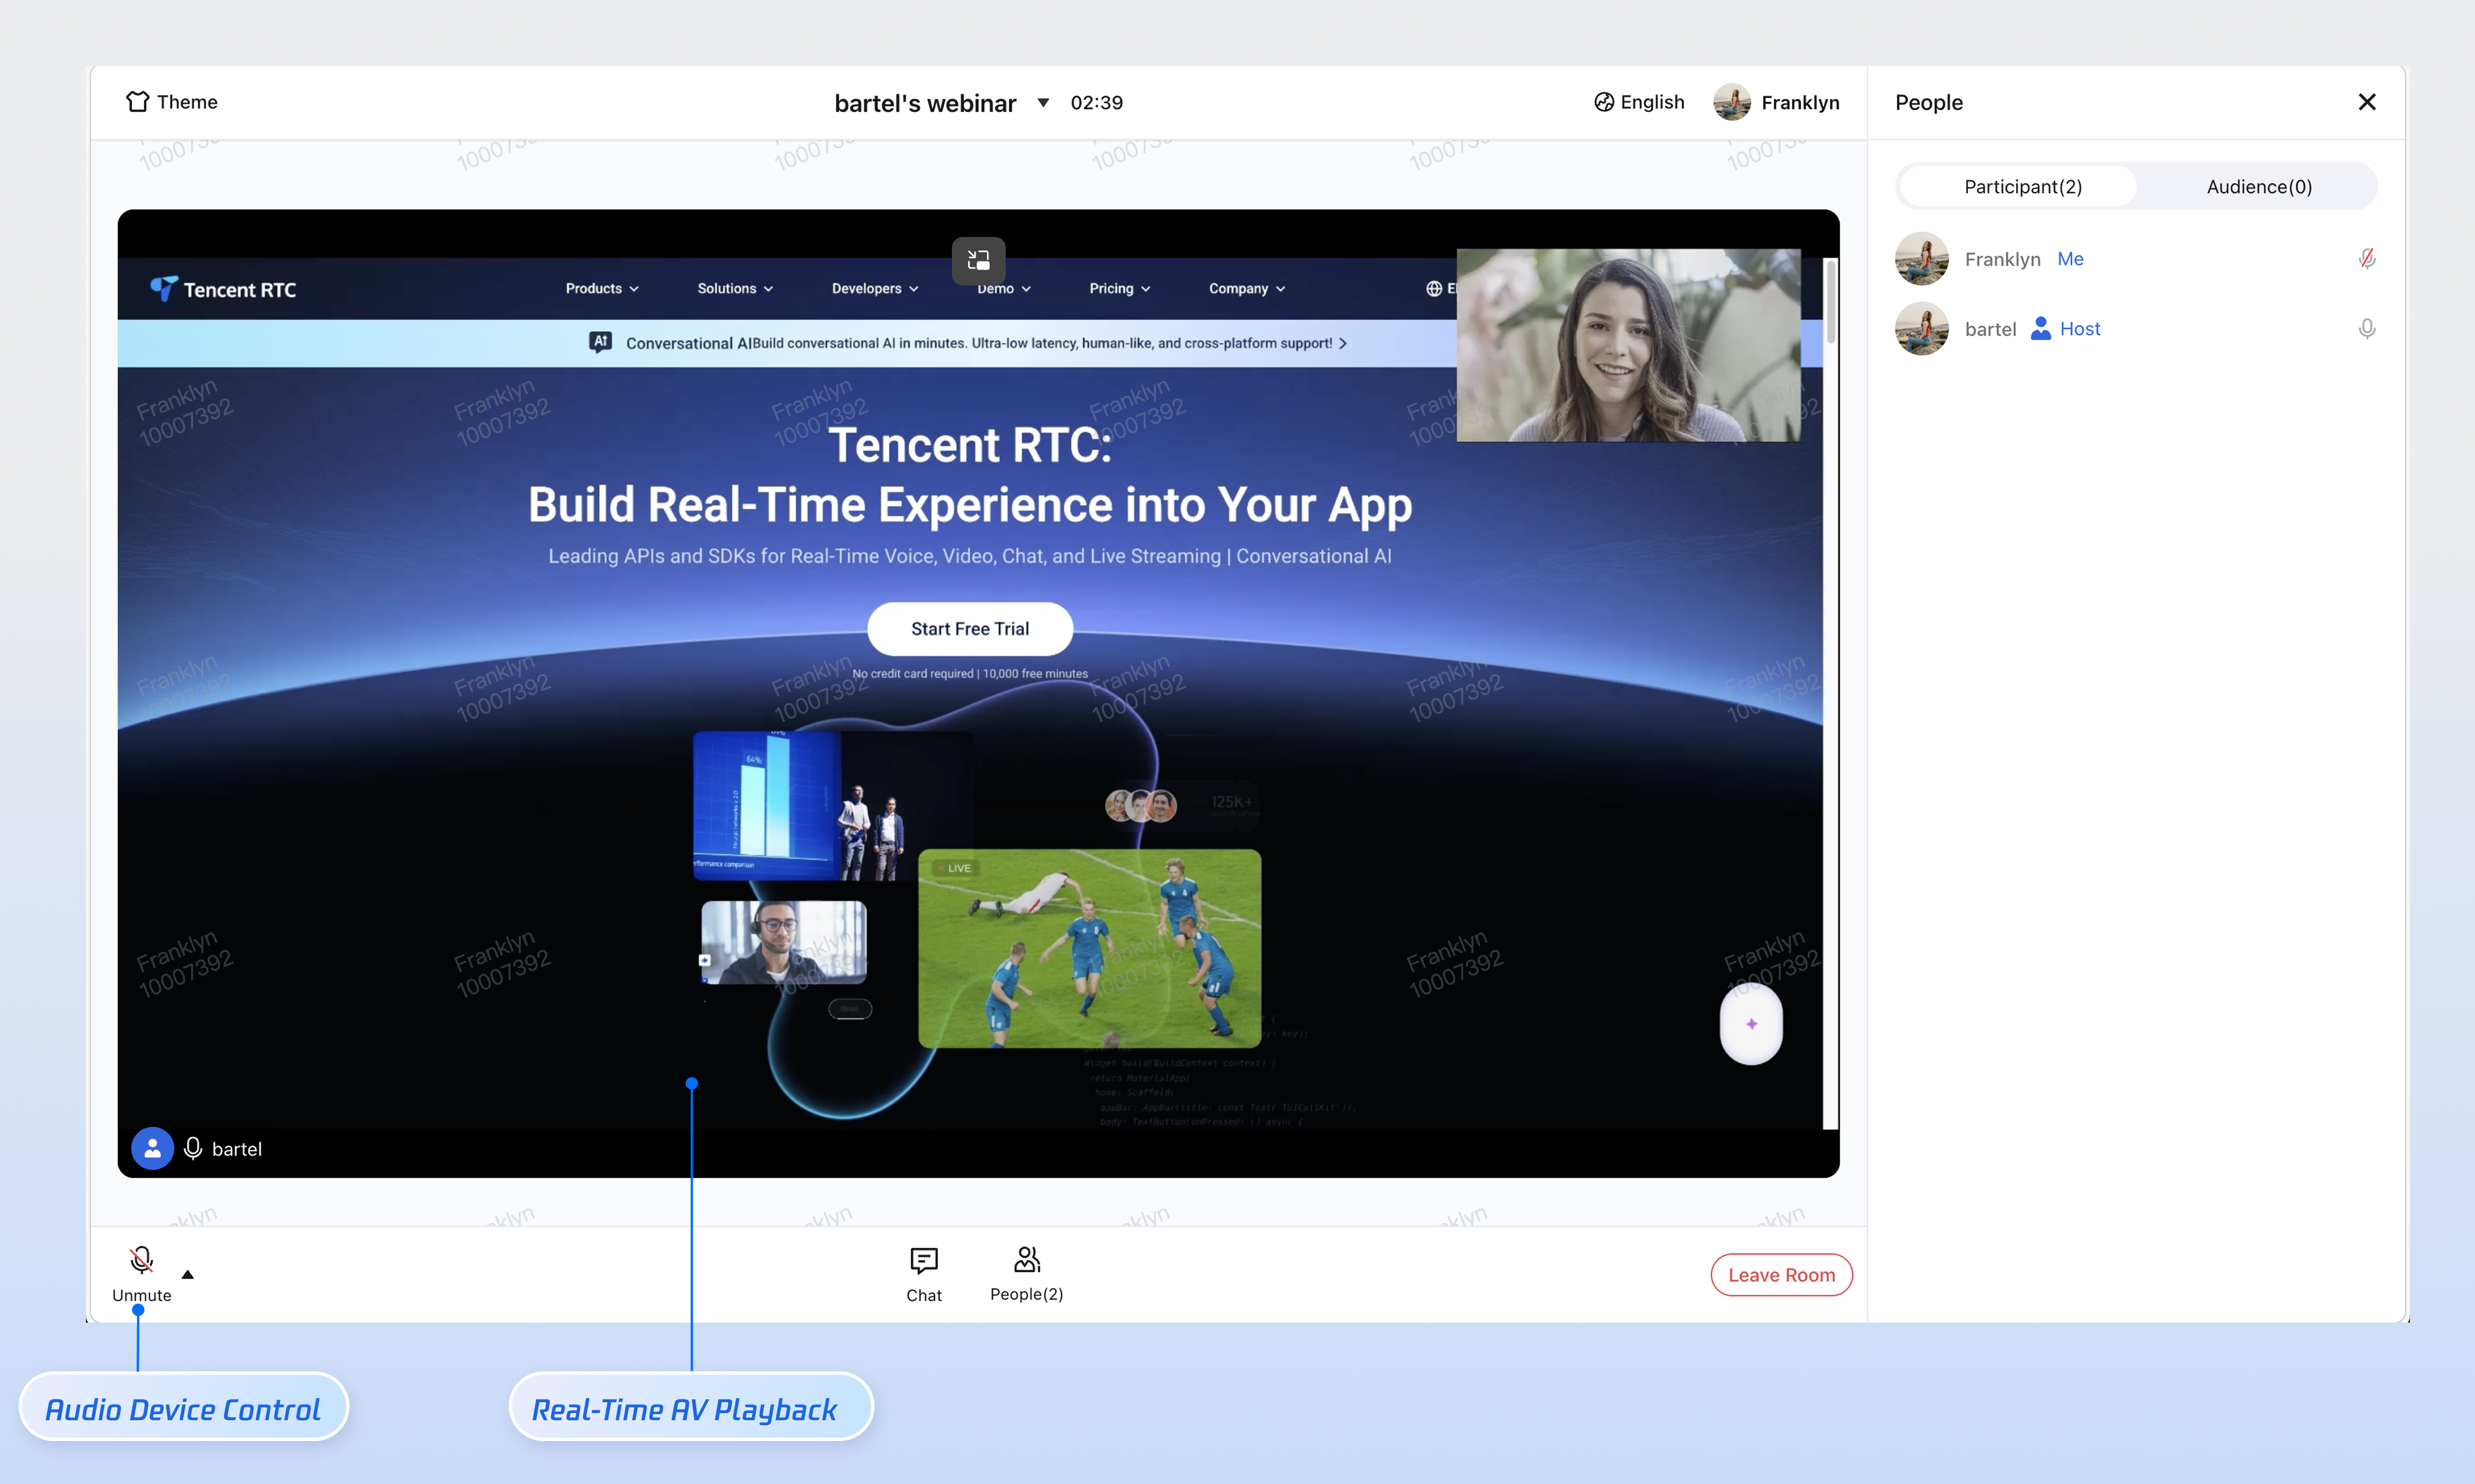
Guests can enable their microphone for real-time voice discussions and sharing.
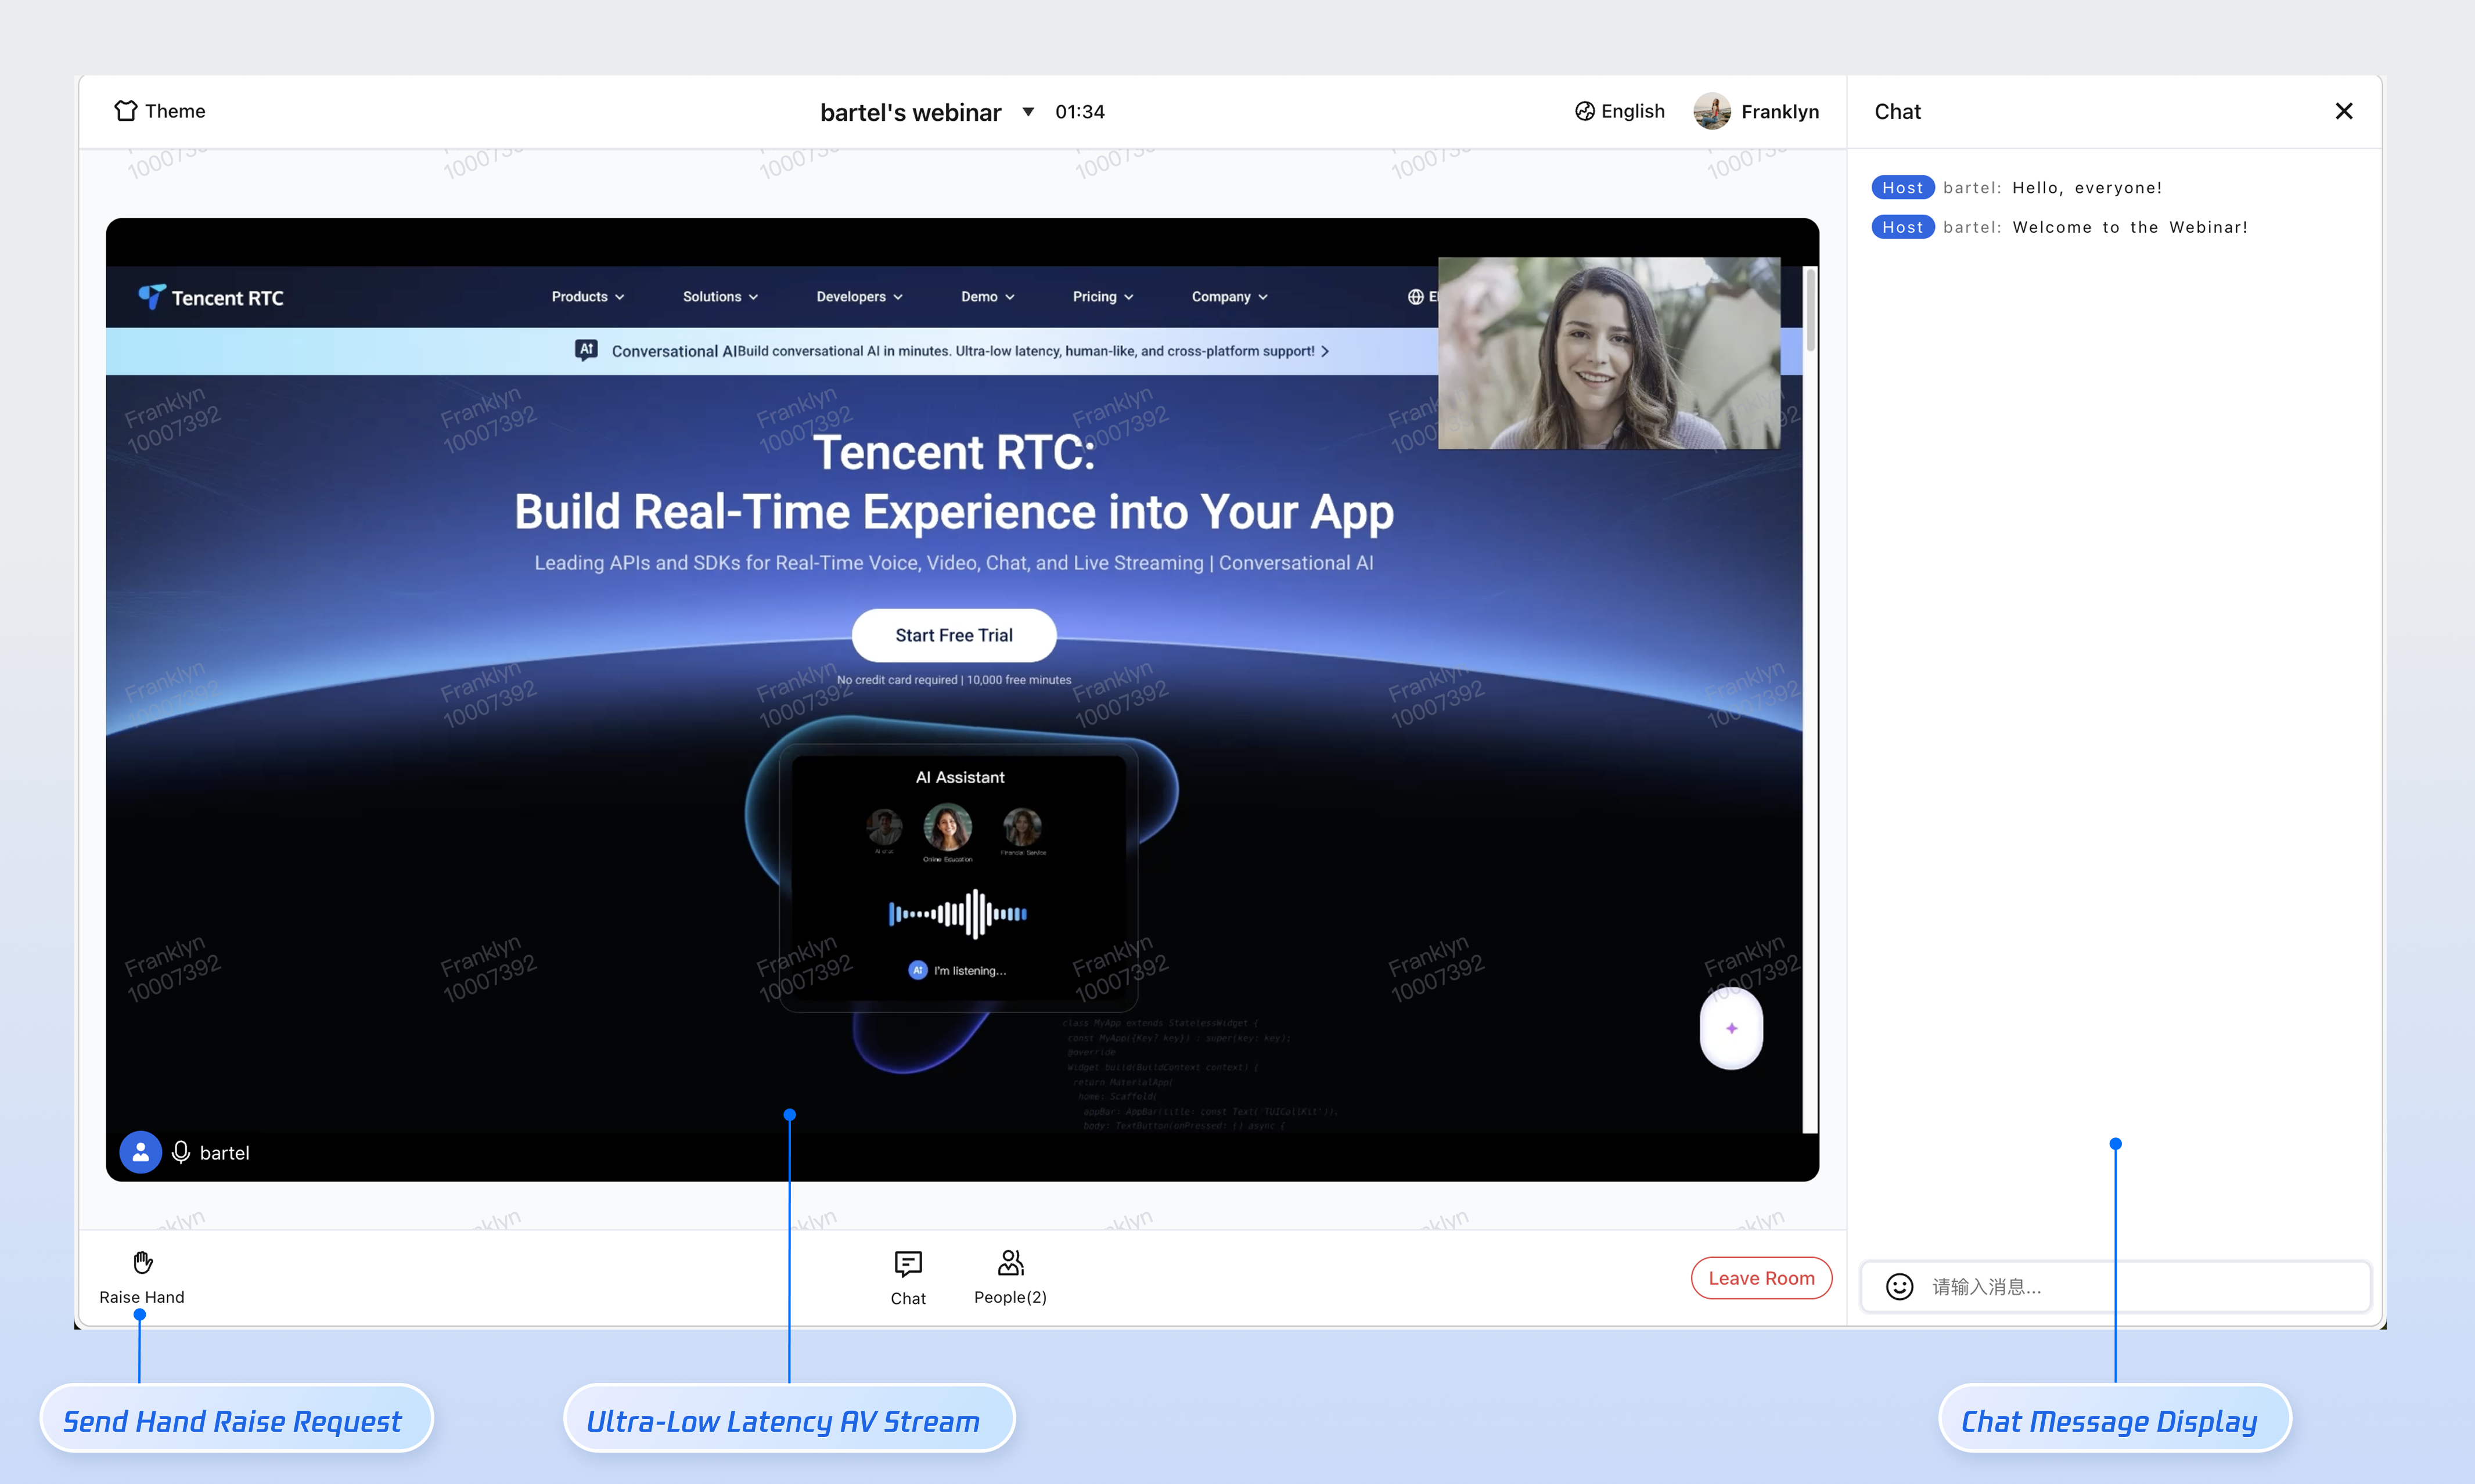
Audience Features
Supports unlimited concurrent audience members joining the room, with ultra-low latency streaming and high-frequency message interaction. Audience can use the "raise hand" feature to request guest access.
Prerequisites
Activate the Service
Refer to Activate the Service to claim the TUILiveKit trial or activate the official TUILiveKit version. Obtain the following information from the Application Management page:
SDKAppID: Application identifier used by TRTC for billing and statistics.
SDKSecretKey: Application secret key used to initialize the configuration file.
Note:
The Webinar scenario is built on the live streaming capability. Ensure you have claimed the TUILiveKit trial or activated the official TUILiveKit version so all features function as expected.
Environment Setup
Node.js: ≥ 18.19.1 (official LTS version recommended)
Vue: ≥ 3.4.21
Modern Browser: Supports WebRTC APIs
Devices: Camera, microphone, speakers
Quick Integration
Step 1: Install Project Dependencies
Install the required dependencies in your project.
npm install @tencentcloud/roomkit-web-vue3@5 tuikit-atomicx-vue3 @tencentcloud/uikit-base-component-vue3 @tencentcloud/universal-api
pnpm install @tencentcloud/roomkit-web-vue3@5 tuikit-atomicx-vue3 @tencentcloud/uikit-base-component-vue3 @tencentcloud/universal-api
yarn add @tencentcloud/roomkit-web-vue3@5 tuikit-atomicx-vue3 @tencentcloud/uikit-base-component-vue3 @tencentcloud/universal-api
Step 2: Import TUIRoomKit Components
<template><UIKitProvider theme="light" language="zh-CN"><ConferenceMainView></ConferenceMainView></UIKitProvider></template><script setup lang="ts">import { UIKitProvider } from '@tencentcloud/uikit-base-component-vue3';import { ConferenceMainView } from '@tencentcloud/roomkit-web-vue3';</script>
Step 3: Login
Login is required to access any TUIRoomKit features. Call the
conference.login method immediately after your business system completes authentication (when the user logs into your web page). After authentication, call conference.setSelfInfo to set the user's display name and avatar, which appear in the participant video area and member list.Note:
You need to provide the UserSig in the configuration code. In production, generate UserSig on your server, and have your client request a dynamic UserSig from your business server for authentication. See How to calculate UserSig in production.
import { onMounted } from 'vue';import { conference } from '@tencentcloud/roomkit-web-vue3';// Replace these values with your actual business data and SDKAppID from the consoleconst SDKAppID = 0;const userId = 'your_user_id';const userSig = 'your_dynamic_user_sig';const userName = 'Display Name';onMounted(async () => {try {// 1. Log in to the SDKawait conference.login({sdkAppId: SDKAppID,userId,userSig,});// 2. (Optional) Set user profile informationawait conference.setSelfInfo({userName,avatarUrl: 'https://your-avatar-url.com/image.png',});} catch (error) {console.error('TUIRoomKit login failed:', error);}});
Handling Login Across Different Routes
If your login page and room entry page are on separate routes, the
conference.login logic may not have executed when the room entry page loads. Use watch to observe loginUserInfo.value?.userId; when this field is populated, TUIRoomKit login is successful.import { watch } from 'vue';import { useLoginState } from 'tuikit-atomicx-vue3/room';import { conference, RoomType } from '@tencentcloud/roomkit-web-vue3';const { loginUserInfo } = useLoginState();watch(() => loginUserInfo.value?.userId, async (userId) => {if (userId) {await conference.joinRoom({ roomId: 'webinar_123456', roomType: RoomType.Webinar });}}, { immediate: true });
Step 4: Create Webinar
The room ID (roomId) is the unique identifier for the webinar and must be generated and managed by your business system (must be globally unique). Choose the creation method that fits your business scenario:
Scenario 1: Client-Side Webinar Creation
Use case: Host starts a new webinar directly from the client.
Implementation: The client generates or requests a unique room ID from the backend, then the host calls
conference.createAndJoinRoom to create and enter the webinar. Other participants should follow Step 5 and call conference.joinRoom to join.import { conference, RoomType } from '@tencentcloud/roomkit-web-vue3';const startWebinar = async () => {await conference.createAndJoinRoom({roomId: 'webinar_123456', // Replace with your actual roomId. Prefix webinar roomIds with 'webinar_' for clarity.roomType: RoomType.Webinar,options: {roomName: 'My Webinar',},});};
Scenario 2: Server-Side Webinar Creation
Use case: For regulated environments (government, healthcare, large enterprise OA) where webinar creation is managed centrally by the backend.
Implementation: The backend initiates webinar creation by calling TRTC’s Server REST API to create a room. Set
RoomType to "Live" and specify the guest seat template in SeatTemplate.POST /v4/live_engine_http_srv/create_room{"RoomInfo": {"RoomId": "webinar_123456","RoomType": "Live","RoomName": "My Webinar","Owner_Account": "host-user-id","SeatTemplate": "VideoLandscapeAudioMix10Seats","IsPublicVisible": false}}
Template Value | Platform | Description |
VideoLandscapeAudioMix10Seats | Web Desktop | Landscape video layout, up to 10 guest seats |
VideoPortraitAudioMix10Seats | Mobile | Portrait video layout, up to 10 guest seats |
After the webinar is created on the server, the host (user specified by
Owner_Account) enters the room as the owner using the conference.joinRoom API. See Step 5 for details.Step 5: Join Webinar
Guests and audience members join the webinar started by the host in Step 4 by calling
conference.joinRoom and providing the corresponding roomId.Note:
By default,
joinRoom enters as an audience. Audience can use the "raise hand" feature to request guest access, or be promoted to guest by the host or administrator in the member list. Currently, joining as a guest via parameters is not supported.import { conference, RoomType } from '@tencentcloud/roomkit-web-vue3';const joinWebinar = async (sharedRoomId: string) => {await conference.joinRoom({roomId: sharedRoomId, // Replace with your actual roomIdroomType: RoomType.Webinar,});};
Step 6: Leave or End Room
TUIRoomKit provides built-in UI buttons for leaving or ending a room. Users can click "Leave Room" or "End Room" in the interface.
To trigger leave or end actions programmatically from the client, use the following APIs.
Scenario 1: Leave Room
Participants and hosts can call
leaveRoom() to exit the webinar. This does not affect other members; the room remains active.import { conference } from '@tencentcloud/roomkit-web-vue3';await conference.leaveRoom();
Note:
Webinar rooms have an independent auto-dismiss mechanism, different from standard conferences. If the host leaves the room via API and does not re-enter within 10 minutes (default), the room will be automatically dismissed. See FAQs > Webinar Auto-Dismiss Mechanism.
Scenario 2: End Room
When the host calls
endRoom(), all members receive a notification that the room has ended.import { conference } from '@tencentcloud/roomkit-web-vue3';await conference.endRoom();
Note:
Only the host can call
endRoom() after successfully entering the room. Calling it as a non-host or before entering the room will result in an error.Step 7: Listen to Room Status
Room status may change due to factors such as the host ending the meeting, account login on another device, or network issues causing entry failure.
TUIRoomKit automatically handles audio/video resource cleanup and UI notifications, but route navigation must be managed by your business logic. Register event listeners when the conference component is mounted (
onMounted) and remove them when unmounted (onUnmounted).<template><ConferenceMainView></ConferenceMainView></template><script setup lang="ts">import { ref, onMounted, onUnmounted } from 'vue';import { ConferenceMainView, conference, RoomEvent } from '@tencentcloud/roomkit-web-vue3';const backToHome = () => {};const backToLogin = () => {};onMounted(() => {conference.on(RoomEvent.ROOM_DISMISS, backToHome);conference.on(RoomEvent.ROOM_LEAVE, backToHome);conference.on(RoomEvent.ROOM_ERROR, backToHome);conference.on(RoomEvent.KICKED_OUT, backToHome);conference.on(RoomEvent.KICKED_OFFLINE, backToLogin);conference.on(RoomEvent.USER_SIG_EXPIRED, backToLogin);});onUnmounted(() => {conference.off(RoomEvent.ROOM_DISMISS, backToHome);conference.off(RoomEvent.ROOM_LEAVE, backToHome);conference.off(RoomEvent.ROOM_ERROR, backToHome);conference.off(RoomEvent.KICKED_OUT, backToHome);conference.off(RoomEvent.KICKED_OFFLINE, backToLogin);conference.off(RoomEvent.USER_SIG_EXPIRED, backToLogin);});</script>
Event | Trigger Timing | Recommended Handling |
RoomEvent.ROOM_DISMISS | Room ended, triggered for all members | Return to home or meeting list |
RoomEvent.ROOM_LEAVE | User clicks "Leave" in TUIRoomKit UI | Return to home or meeting list |
RoomEvent.ROOM_ERROR | Room entry failed or unhandled error | Return to home or meeting list |
RoomEvent.KICKED_OUT | Kicked out by host | Return to home or meeting list |
RoomEvent.KICKED_OFFLINE | Same account logged in on another device, current device forced offline | Redirect to login page |
RoomEvent.USER_SIG_EXPIRED | UserSig expired | Redirect to login page |
Run the Project
npm run dev
pnpm run dev
yarn run dev
After startup, open the debug address in your browser (typically http://localhost:5173) to access the application. You will see the webinar interface:
Next Steps
After completing the basic integration, you can further customize the UI to fit your business requirements.
Configure Theme and Language
Modify the default theme and language by configuring
UIKitProvider parameters in App.vue. UIKitProvider Parameter | Available Values | Default Value |
theme | "light" | "dark" | "light" |
language | "zh-CN" | "en-US" | "en-US" |
<UIKitProvider theme="light" language="zh-CN"><router-view /></UIKitProvider><script setup lang="ts">import { UIKitProvider } from '@tencentcloud/uikit-base-component-vue3';
Configure Share Link
By default, TUIRoomKit uses the current page URL as the room share link. To customize the share link, call
conference.setFeatureConfig after successfully joining or creating a room.import { conference } from '@tencentcloud/roomkit-web-vue3';// Call after conference.createAndJoinRoom or conference.joinRoom succeeds, when roomId is availableconst roomId = 'webinar_123456';conference.setFeatureConfig({shareLink: `https://your-domain.com/room?roomId=${roomId}`,});
FAQs
Webinar Auto-Dismiss Mechanism
Webinar rooms are automatically dismissed under the following conditions. The trigger and waiting time can be configured per sdkAppId in the Console.
If a user enters the webinar room and the room remains empty for a set period (default 30 minutes) with no new entries, the room is auto-dismissed.
If the host leaves via API and does not re-enter within a set period (default 10 minutes), the room is auto-dismissed. This period is configurable from 2 minutes to 12 hours.
If the host is disconnected due to heartbeat timeout and does not recover and re-enter within a set period (default 10 minutes), the room is auto-dismissed. This period is configurable from 2 minutes to 12 hours.
To avoid accidental auto-dismissal, actively end the room at the conclusion of the webinar using any of the following methods:
UI: Host clicks "End Room" in TUIRoomKit UI
Client API: Call
conference.endRoom()Server API: Remotely destroy via REST API
Multiple Devices with Same userId in Webinar
Not supported. TUIRoomKit does not allow the same userId to join the same room on multiple devices simultaneously.
Kick-out mechanism: If a second device attempts to join with the same userId, the device already in the room will be forced offline.
Solution: To support multi-device access (e.g., mobile and PC), assign a unique userId to each device.
Camera or Microphone Access Issues After Deployment
Cause: Browsers restrict access to audio/video devices (microphone, camera) for security and privacy. Access is allowed only in secure environments (https://, localhost, file://, etc.). HTTP is insecure, and browsers block media device access by default.
Solution: If local development works but deployment fails, check if your site uses HTTP. Production deployments must use HTTPS with a valid certificate, or browsers will block camera and microphone access.
Related Resources: See URL Domain and Protocol Restriction Description.
iframe Integration Support
Supported. When integrating TUIRoomKit via iframe, set the allow attribute to grant necessary browser permissions (microphone, camera, screen sharing, fullscreen, etc.):
// Enable microphone, camera, screen sharing, and fullscreen permissions<iframe src="https://your-domain.com/index.html" allow="microphone; camera; display-capture; display; fullscreen;">
Intranet Proxy Support
Supported. Set intranet proxy parameters as shown below. For more details, see Firewall Restriction Handling.
// Set intranet proxy parameters before entering the roomimport TUIRoomEngine from '@tencentcloud/tuiroom-engine-js';import { useRoomEngine } from 'tuikit-atomicx-vue3/room';const { roomEngine } = useRoomEngine();TUIRoomEngine.once('ready', () => {const trtcCloud = roomEngine.instance?.getTRTCCloud();trtcCloud.callExperimentalAPI(JSON.stringify({api: 'setNetworkProxy',params: {websocketProxy: "wss://proxy.example.com/ws/",turnServer: [{url: '14.3.3.3:3478',username: 'turn',credential: 'turn',}],iceTransportPolicy: 'relay',},}));});
Contact Us
If you have questions or suggestions during integration or usage, contact info_rtc@tencent.com for support.
Ajuda e Suporte
Esta página foi útil?
Você também pode entrar em contato com a Equipe de vendas ou Enviar um tíquete em caso de ajuda.
comentários