tcr-assistant-oidc 同账号动态免密拉取配置
Download
聚焦模式
字号
操作场景
在同一个腾讯云账号内,TKE 集群应用需要拉取本账号 TCR 企业版实例中的私有镜像时,传统做法是在 TCR 控制台生成长期访问凭证(用户名/密码),并在集群中手工创建 ImagePullSecret 关联到工作负载。这种做法存在以下痛点:
凭证长期有效:密码需要人工定期更换,一旦泄露即长期可用,存在安全风险。
tcr-assistant-oidc 插件基于 OIDC 身份认证机制,通过 CAM 角色与 STS 动态临时凭证实现同账号免密拉取镜像,适用于以下典型业务场景:
免密拉取自动化:TKE 集群工作负载无需在 YAML 中显式配置 ImagePullSecret,插件自动分发和轮转。
临时凭证自动轮转:需要满足合规要求,禁止在集群中长期保存镜像仓库长期凭证的场景。
自定义域名拉取:TCR 实例已绑定企业自定义域名(如
docker.mycompany.com),需要通过自定义域名拉取镜像。与原有 tcr-assistant 插件相比,tcr-assistant-oidc 在同账号场景下具备以下增强能力:
能力 | tcr-assistant | tcr-assistant-oidc |
凭证类型 | 静态长期凭证(用户名+密码) | 动态临时密钥,自动轮转 |
说明:
前提条件
已创建 TKE 集群,且集群版本 ≥ 1.20(Kubernetes 1.20 版本将 ServiceAccountIssuerDiscovery 特性升级为正式可用)。
已创建 TCR 企业版实例,且实例状态为"运行中"。
TKE 集群所在 VPC 与 TCR 实例内网访问链路已互通(同 VPC 或已配置 TCR 内网访问)。
实现原理
同账号场景下,TKE 集群与 TCR 实例属于同一个腾讯云账号 A,信任边界完全在账号内部。端到端调用可抽象为五段协作:① OIDC 身份注入 → ② CAM 授权换取临时凭证 → ③ 换取 docker 登录密码 → ④ Secret 分发 → ⑤ 工作负载免密拉取。
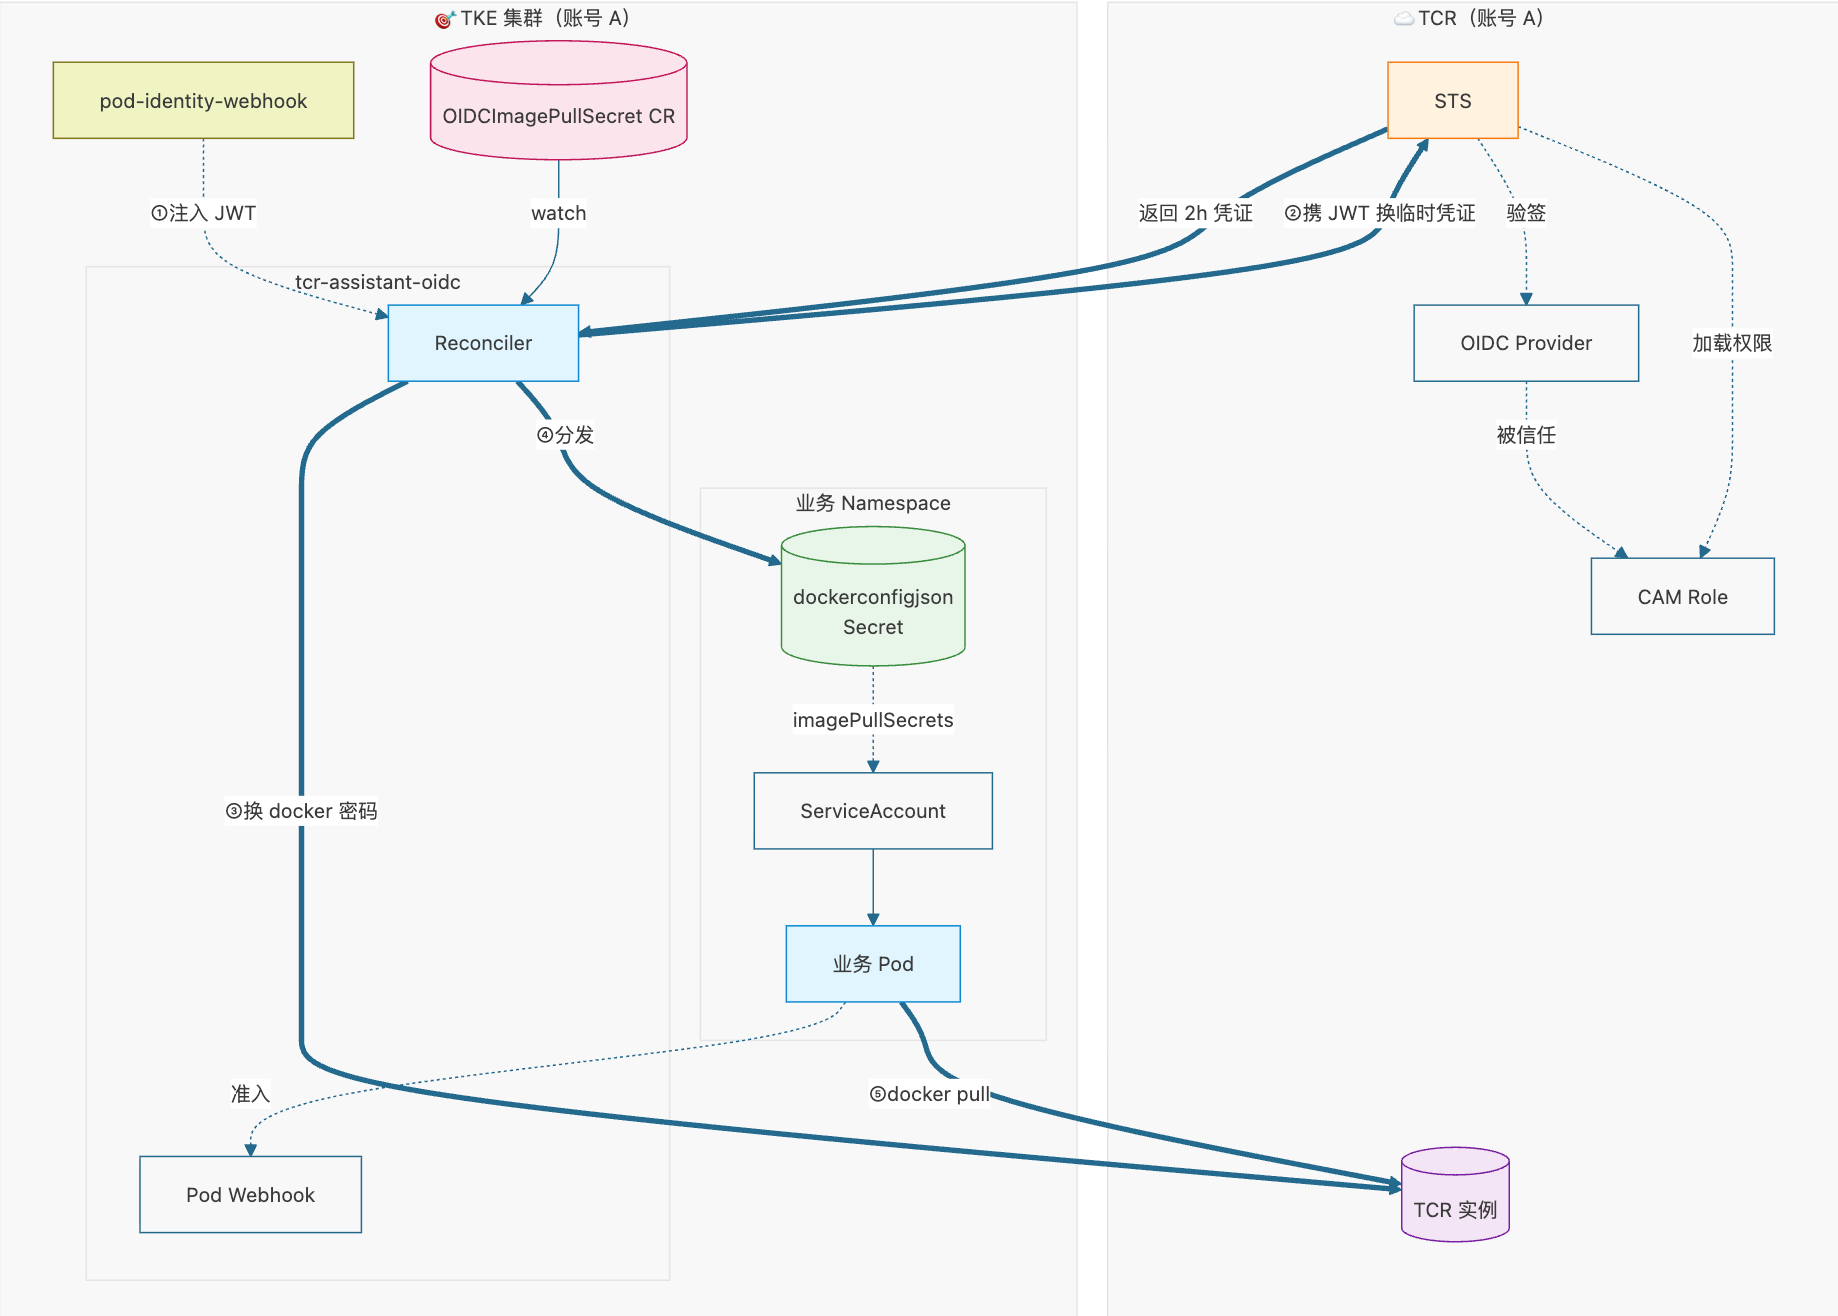
链路解读:
编号 | 环节 | 关键动作 |
① | OIDC 身份注入 | pod-identity-webhook 依据 Controller SA 的注解,将 TKE 集群签发的 OIDC JWT 挂载到 Controller Pod。 |
② | CAM 授权 | Controller 携 JWT 调用 STS,STS 用同账号 OIDC Provider 验签并匹配 Role 信任策略,返回 2h 临时凭证。 |
③ | 换取 docker 密码 | Controller 用临时凭证调用 TCR 获取 docker 登录用户名/密码。 |
④ | Secret 分发 | Controller 渲染 dockerconfigjson Secret(tcr.ips.*),按 CR 中的 namespaces / serviceAccounts 规则分发到目标 ns,并自动挂到目标 SA 的 imagePullSecrets。 |
⑤ | 免密拉取 | 业务 Pod 通过 SA 上的 imagePullSecrets 完成 docker pull;新建 Pod 时 Pod Webhook 兜底校验 Secret & SA 就绪。 |
说明:
同账号关键特征:OIDC Provider 由 TKE 开启 OIDC 时自动生成,无需手动登记;JWT 的
iss 是 TKE 集群自身,Role 的信任策略仅信任自身账号的 OIDC Provider。操作步骤
步骤1:TKE 集群开启 OIDC 功能
1. 登录 容器服务控制台,在左侧导航栏选择集群管理。
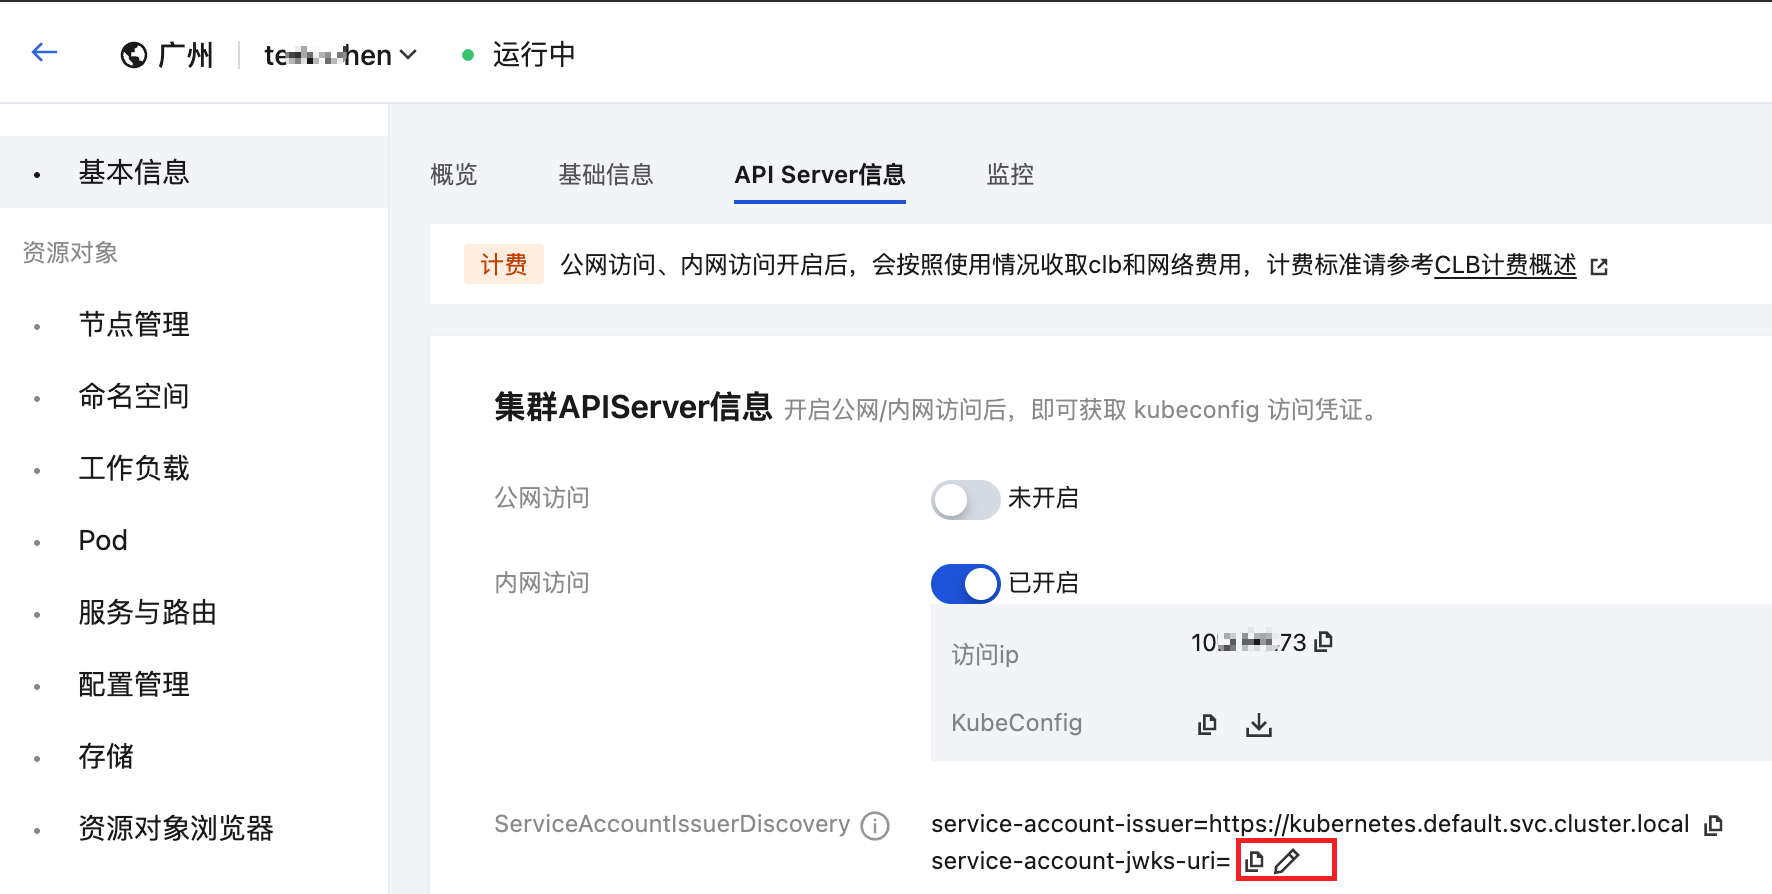
2. 选择目标集群,进入集群详情页,单击基本信息 > API Server 信息。
3. 单击 ServiceAccountIssuerDiscovery 右侧的编辑按钮。如下图所示:
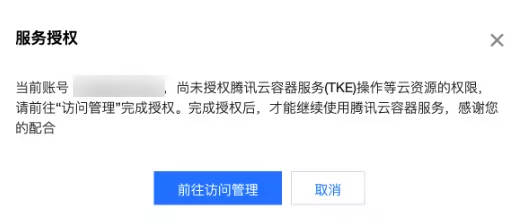
4. 进入修改 ServiceAccountIssuerDiscovery 相关参数页面。若系统提示您无法修改相关参数,请先进行服务授权。如下图所示:
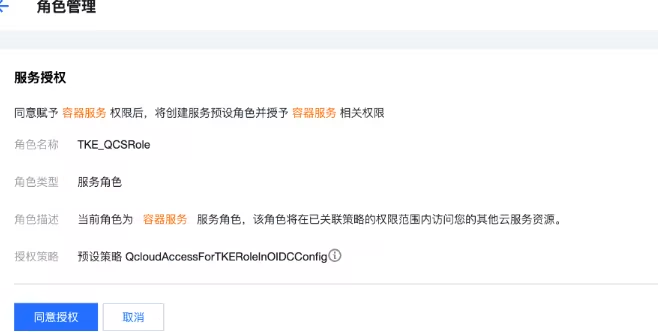
5. 在角色管理页面,查看授权策略 QcloudAccessForTKERoleInOIDCConfig,单击同意授权。如下图所示:
6. 授权完成后,勾选创建 CAM OIDC 提供商和创建 webhook 组件,并填写客户端 ID,客户端 ID 的值固定为
sts.cloud.tencent.com,单击确定。如下图所示: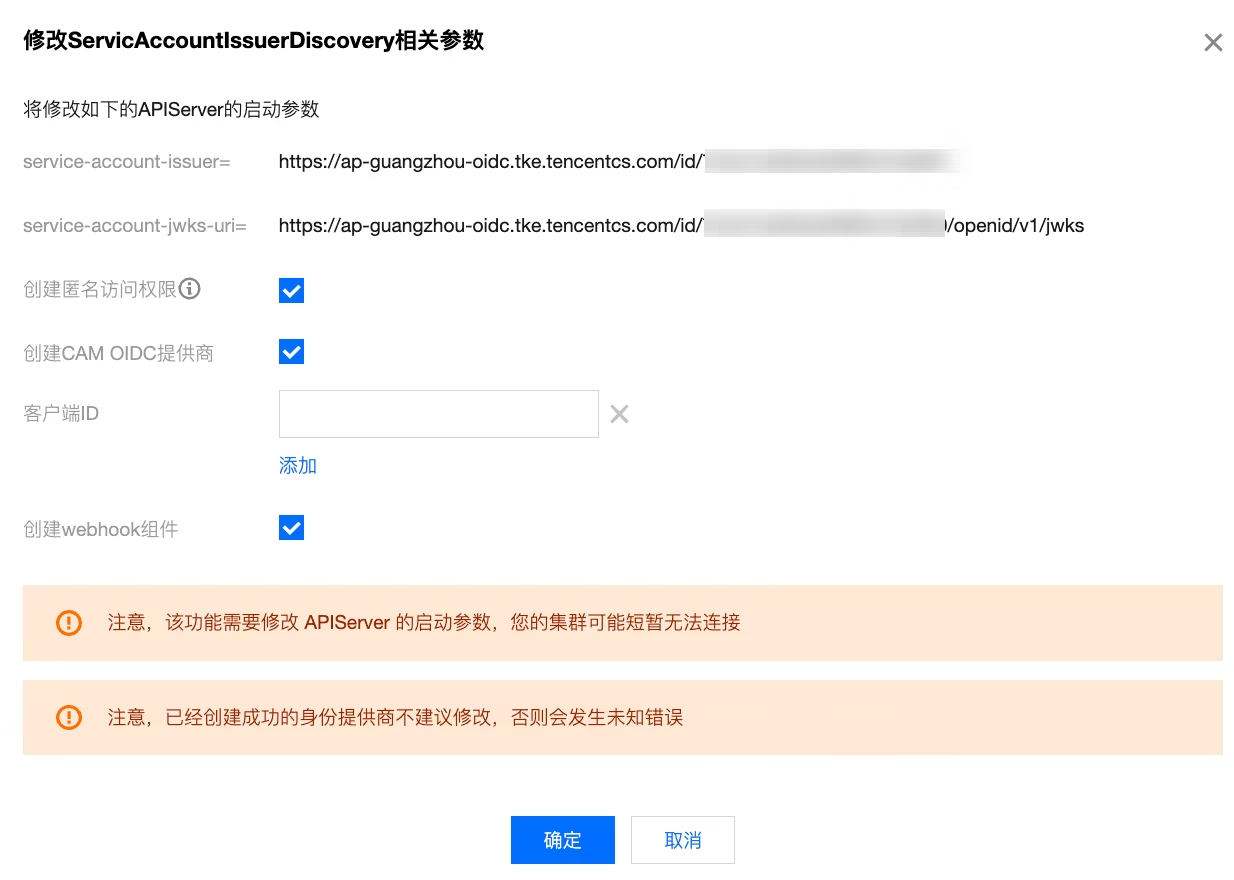
7. 返回基本信息 > API Server 信息页,当 ServiceAccountIssuerDiscovery 可再次编辑时,表明本次开启 OIDC 资源访问控制结束。
说明:
service-account-issuer 和 service-account-jwks-uri 参数值不允许编辑,采用默认规则。步骤2:确认 OIDC 身份提供商及 Webhook 组件创建成功
开启 OIDC 功能后,需要确认 CAM OIDC 身份提供商已创建且
pod-identity-webhook 组件已成功部署:1. 在集群详情页,切换到 API Server 信息选项,单击 ServiceAccountIssuerDiscovery 右侧的编辑按钮。
2. 进入修改 ServiceAccountIssuerDiscovery 相关参数页面,系统将提示"您创建的身份提供商已存在,前往查看"。单击前往查看,确认 CAM OIDC 身份提供商已创建成功。
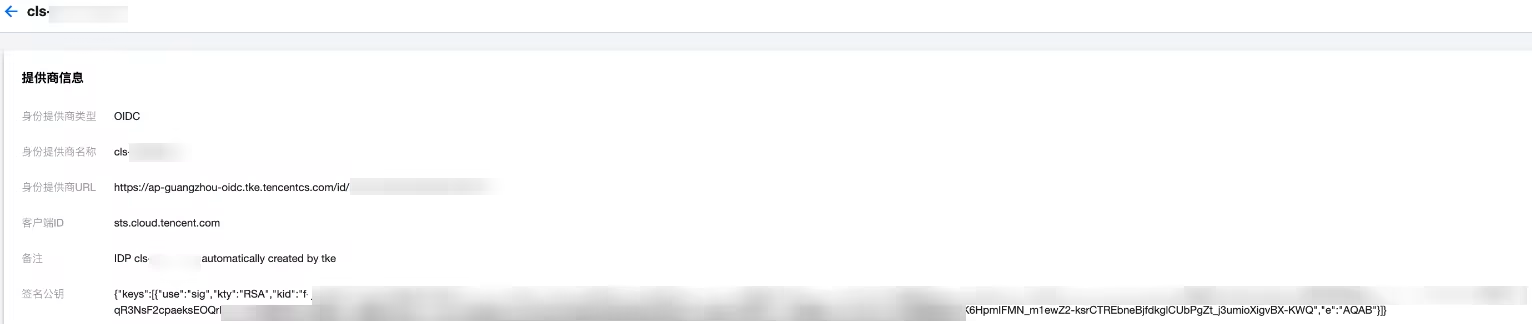
3. 查看刚创建的 CAM OIDC 身份提供商详细信息,确认客户端 ID 配置正确。如下图所示:
4. 在集群信息 > 组件管理中,确认列表中
pod-identity-webhook 组件状态为“成功”,即表示组件安装成功。5. 在集群详情 > 工作负载 > Deployment 页面,确认 kube-system 命名空间下
pod-identity-webhook 的状态为 Running 即表示安装成功。步骤3:创建 TCR 实例的 CAM 自定义策略
根据业务需求创建自定义策略,控制 TCR 实例的访问权限。策略支持精确到命名空间级别的粒度。
注意:
资源六段式中不能增加 region 和 uin 信息。例如
qcs::tcr:::instance/tcr-5jm4cabc,仅需替换最后的 TCR 实例 ID 部分。策略示例:
{"version": "2.0","statement": [{"action": ["tcr:DescribeInstances"],"effect": "allow","resource": ["qcs::tcr:::instance/tcr-5jm4cabc"]},{"action": ["tcr:PullRepository","tcr:PushRepository","tcr:CreateRepository"],"effect": "allow","resource": ["qcs::tcr:::repository/tcr-5jm4cabc/production-backend/*"]}]}
策略说明:
tcr:DescribeInstances:login 时需要的权限。tcr:PullRepository:拉取镜像时需要的策略权限。tcr:PushRepository:按需授予,不影响镜像拉取。tcr:CreateRepository:按需授予,推送时如果 repo 不存在,则需要此权限。resource 中
production-backend/* 表示仅控制命名空间粒度。步骤4:创建角色并绑定自定义策略
1. 登录 CAM 控制台-角色。
2. 单击新建角色 > 身份提供商。
3. 在新建自定义角色页参考以下信息进行设置:
身份提供商类型:选择 OIDC。
身份提供商:选择步骤2中确认的、与当前 TKE 集群对应的 OIDC 提供商(名称形如
cls-xxxxxxxx)。条件:设置
oidc:aud 值等于该 OIDC 提供商的客户端 ID(即 sts.cloud.tencent.com)。4. 绑定步骤3中创建的自定义策略,完成角色创建,并记录角色 ARN(格式:
qcs::cam::uin/{UIN}:roleName/{ROLE_NAME})。说明:
同账号场景下,角色信任策略中的身份提供商载体为当前账号自身的 OIDC 身份提供商,无需配置其他账号载体。
当
oidc:aud 存在多个值时,任选其中之一即可。步骤5:在 TKE 集群中安装 tcr-assistant-oidc 插件
插件会基于 OIDC 身份动态生成临时 docker login 凭证,用于访问同账号下的 TCR 资源。根据实际场景选择以下安装方式之一:
方式一:通过云 API 安装(最新版本 1.0.2)
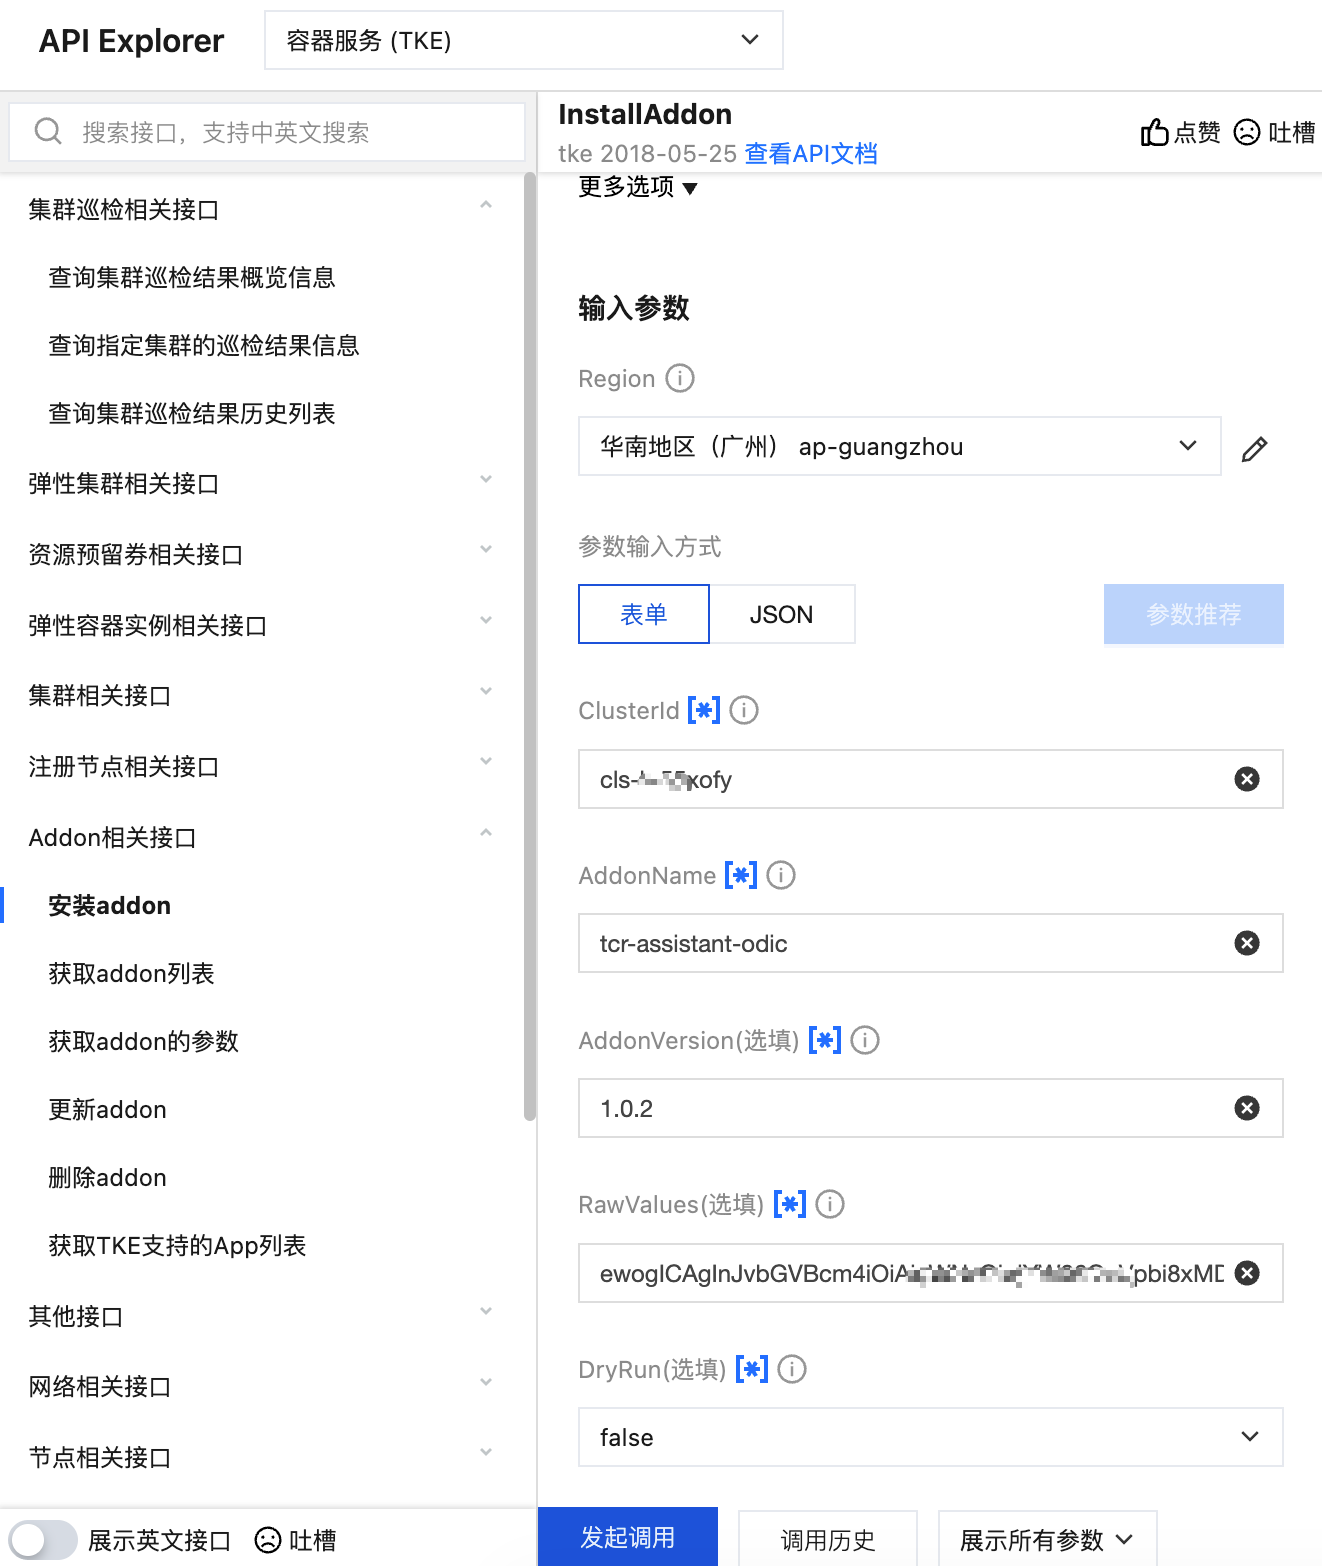
字段说明:
角色 RoleArn 可在 CAM 控制台角色详情页 获取。
TCR 实例名称 registries 可在 TCR 控制台实例列表 获取。
如果要通过自定义域名拉取镜像,需要额外配置
customDomains。请注意:Values 参数已弃用。如需使用,请通过 RawValues 传入,参数值为 JSON 进行 base64 编码后的内容。示例如下:
echo -n '{"roleArn": "qcs::cam::uin/100000000000:roleName/your-role-name","registries": ["your-tcr-registry"]}' | base64
RawValues JSON 完整示例:
{"roleArn": "qcs::cam::uin/100000000000:roleName/tcr-assistant-oidc-read-role","registries": ["your-tcr-registry"],"customDomains": ["docker.mycompany.com"],"tokenExpiration": 3600,"namespaces": "*","serviceAccounts": "*"}
方式二:通过 Terraform 安装
resource "tencentcloud_kubernetes_addon" "tcr_assistant_oidc" {cluster_id = "cls-xxxxxxxx" # 替换为您的 TKE 集群 IDaddon_name = "tcr-assistant-oidc"raw_values = jsonencode({# CAM 角色 ARN(必填)# 格式: qcs::cam::uin/{UIN}:roleName/{ROLE_NAME}roleArn = "qcs::cam::uin/100000000000:roleName/your-role-name"# TCR 镜像仓库名称列表(必填)registries = ["your-tcr-registry"]# 目标 namespace("*" 表示所有,或 "ns1,ns2,ns3")namespaces = "*"# 目标 ServiceAccount("*" 表示所有,或 "sa1,sa2")serviceAccounts = "*"# 自定义域名(选填)customDomains = ["docker.mycompany.com"]})}
验证插件安装状态
安装完成后,在 TKE 集群中执行以下命令确认插件正常运行:
# 确认 Controller Pod 正常运行kubectl get pods -n tcr-assistant-system# 预期:Pod 为 Running 状态# 检查 CR 状态,确认已成功获取临时密钥kubectl get oips tcr-oidc-public -o yaml# 关注 status.credentialStatus 应为 Ready# 确认 imagePullSecret 已分发到目标命名空间kubectl get secret tcr.ips.tcr-oidc-public -n default \\-o jsonpath='{.data.\\.dockerconfigjson}' | base64 -d | jq '.auths | keys'
预期输出包含 TCR 实例的所有域名:
["your-tcr-registry.tencentcloudcr.com","docker.mycompany.com"]
典型使用场景
场景一:通过自定义域名拉取镜像
TCR 实例绑定了自定义域名
docker.mycompany.com,安装组件时指定 customDomains=["docker.mycompany.com"],集群即可通过自定义域名拉取镜像:kubectl run nginx --image=docker.mycompany.com/my-namespace/nginx:latest
场景二:限定生效范围(指定命名空间和 ServiceAccount)
只在特定命名空间和 ServiceAccount 中生效,避免全局注入 ImagePullSecret,设置
namespaces="production,staging", serviceAccounts="default,app-sa"。升级与变更
升级组件版本
使用 UpdateAddon 升级 tcr-assistant-oidc 组件版本。升级时的参数无需重复指定,只需要更新组件版本和预期要更新的参数配置。tcr-assistant-oidc 组件目标版本列表参考 组件版本维护说明。
说明:
升级过程中已有 Secret 不会中断,Controller 重启后自动恢复 reconcile。
验证升级结果
升级完成后,确认 Controller Pod 已更新并正常运行:
# 检查 Pod 状态和镜像版本kubectl get pods -n tcr-assistant-system -o wide# 检查 CR 状态kubectl get oips tcr-oidc-public -o jsonpath='{.status.credentialStatus}'# 预期输出:Ready
故障排查
Pod 拉取镜像失败(ImagePullBackOff)
排查步骤:
1. 检查 Secret 是否存在:
kubectl get secret tcr.ips.tcr-oidc-public -n <pod-namespace>
2. 检查 ServiceAccount 是否注入了 imagePullSecrets:
kubectl get sa default -n <pod-namespace> -o jsonpath='{.imagePullSecrets}'
3. 检查 Controller 日志:
kubectl logs -n tcr-assistant-system deployment/tcr-assistant-oidc-controller
临时密钥过期
动态生成的临时密钥有效期固定为 2 小时(7200 秒),
tokenExpiration 控制轮转间隔。如果设置过大(>5400),可能导致密钥过期。解决方案:确保
tokenExpiration 在 3600~5400 范围内。OIDC 环境变量未注入
如果 Controller Pod 缺少 OIDC 相关环境变量(
TKE_WEB_IDENTITY_TOKEN_FILE 等),说明集群的 pod-identity-webhook 未正常工作。解决方案:
1. 确认 TKE 集群已开启 OIDC。
2. 确认
pod-identity-webhook Pod 正常运行。3. 重建 Controller Pod。
AssumeRole 失败(权限不足)
如果 Controller 日志中出现
AssumeRoleWithWebIdentity 失败,说明角色信任策略或绑定的自定义策略配置有误。排查步骤:
1. 确认角色的信任策略中身份提供商为当前 TKE 集群对应的 OIDC Provider。
2. 确认角色已关联具备 TCR 访问权限的自定义策略。
3. 确认策略
resource 六段式中的 TCR 实例 ID 正确。手动验证临时密钥
从 Secret 中提取凭证手动登录验证:
# 获取凭证SECRET_JSON=$(kubectl get secret tcr.ips.tcr-oidc-public -n default \\-o jsonpath='{.data.\\.dockerconfigjson}' | base64 -d)# 提取用户名和密码,your-tcr-registry.tencentcloudcr.com 要替换成实际的访问域名USERNAME=$(echo $SECRET_JSON | jq -r '.auths["your-tcr-registry.tencentcloudcr.com"].username')PASSWORD=$(echo $SECRET_JSON | jq -r '.auths["your-tcr-registry.tencentcloudcr.com"].password')# 手动登录 TCR 实例,注意访问的客户端机器需要能够正常访问 TCR 域名docker login your-tcr-registry.tencentcloudcr.com --username "$USERNAME" --password "$PASSWORD"
文档反馈