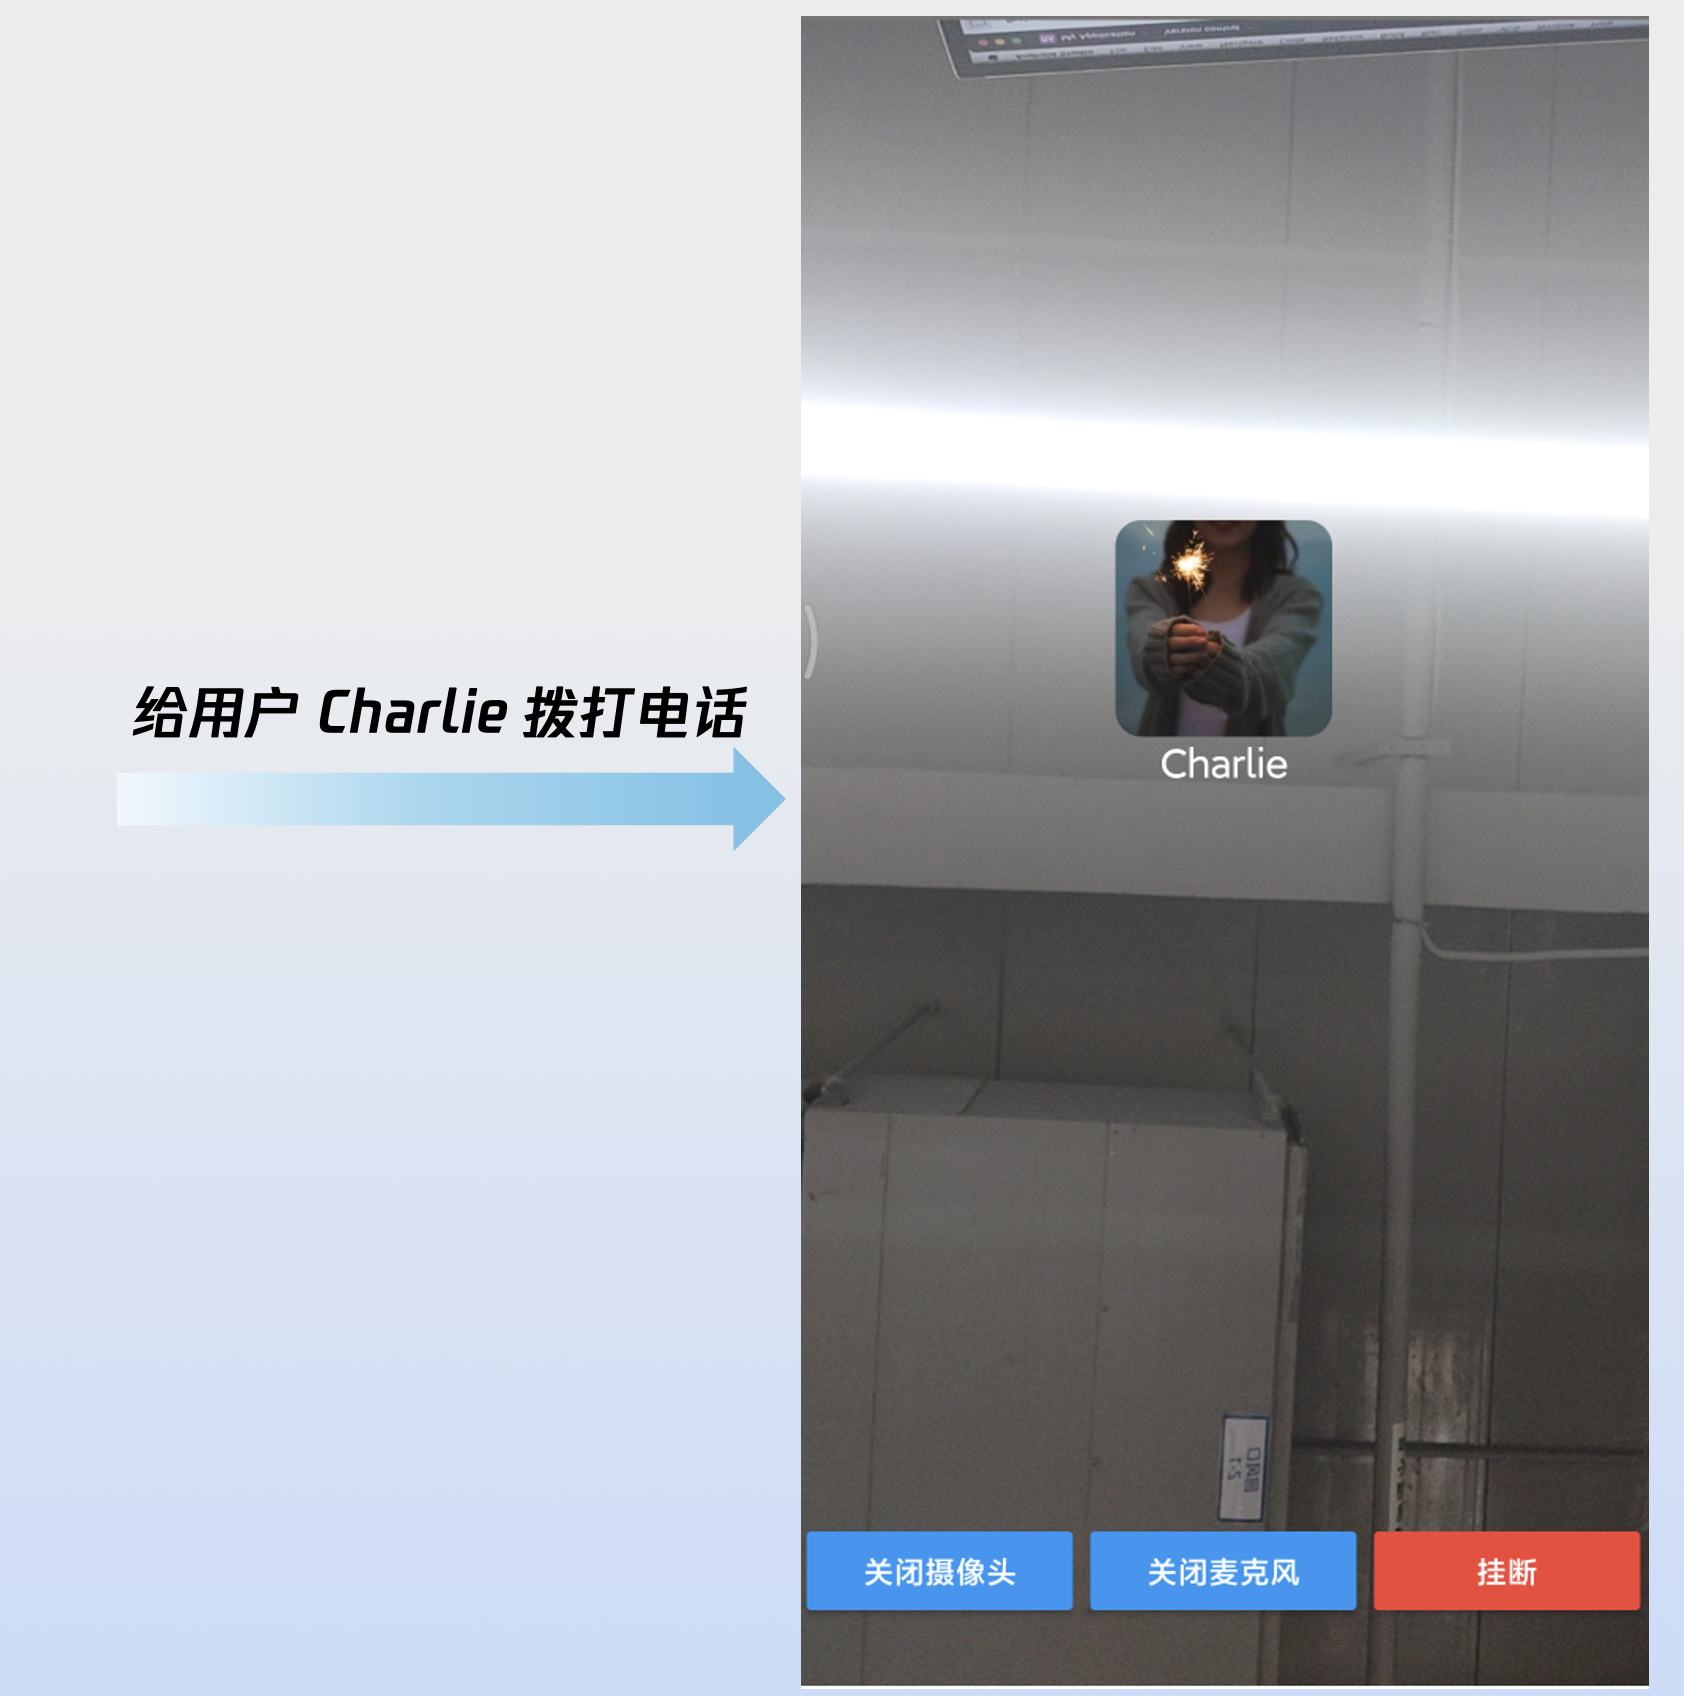
拨打第一通电话
Download
聚焦模式
字号
本文档将帮助您使用 AtomicXCore SDK 的 DeviceStore、CallStore 以及核心组件 CallCoreView,快速完成拨打电话功能。
核心功能
AtomicXCore 中用于搭建多人音视频通话场景所需要使用到的核心模块包含以下三个:
模块 | 功能描述 |
通话视图核心组件。自动监听 CallStore 数据并完成画面渲染,同时提供布局切换、头像与图标配置等 UI 定制化能力。 | |
通话生命周期管理:拨打电话、接通电话、拒接电话、挂断电话。实时获取参与通话人员音视频状态,通话计时、通话记录等数据。 | |
音视频设备控制:麦克风(开关 / 音量)、摄像头(开关 / 切换 / 画质)、屏幕共享,设备状态实时监听。 |
准备工作
步骤1:开通服务
步骤2:集成 SDK
1. 添加 Pod 依赖:在您项目的
Podfile 文件中添加 pod 'AtomicXCore' 依赖。target 'YourProjectTarget' dopod 'AtomicXCore'end
提示:
若项目没有 Podfile 文件:在终端中进入到您的
.xcodeproj 目录下,然后执行 pod init 命令创建 Podfile 文件。2. 安装组件:在终端进入到
Podfile 文件所在的目录,然后执行以下命令安装组件。pod install --repo-update
提示:
安装完成后,使用
YourProjectName.xcworkspace 文件打开项目。步骤3:初始化与登录流程
启动通话服务需依次完成 CallStore 初始化与用户登录。CallStore 通过监听登录成功事件自动同步用户信息,从而进入就绪状态。流程图与示例代码如下:
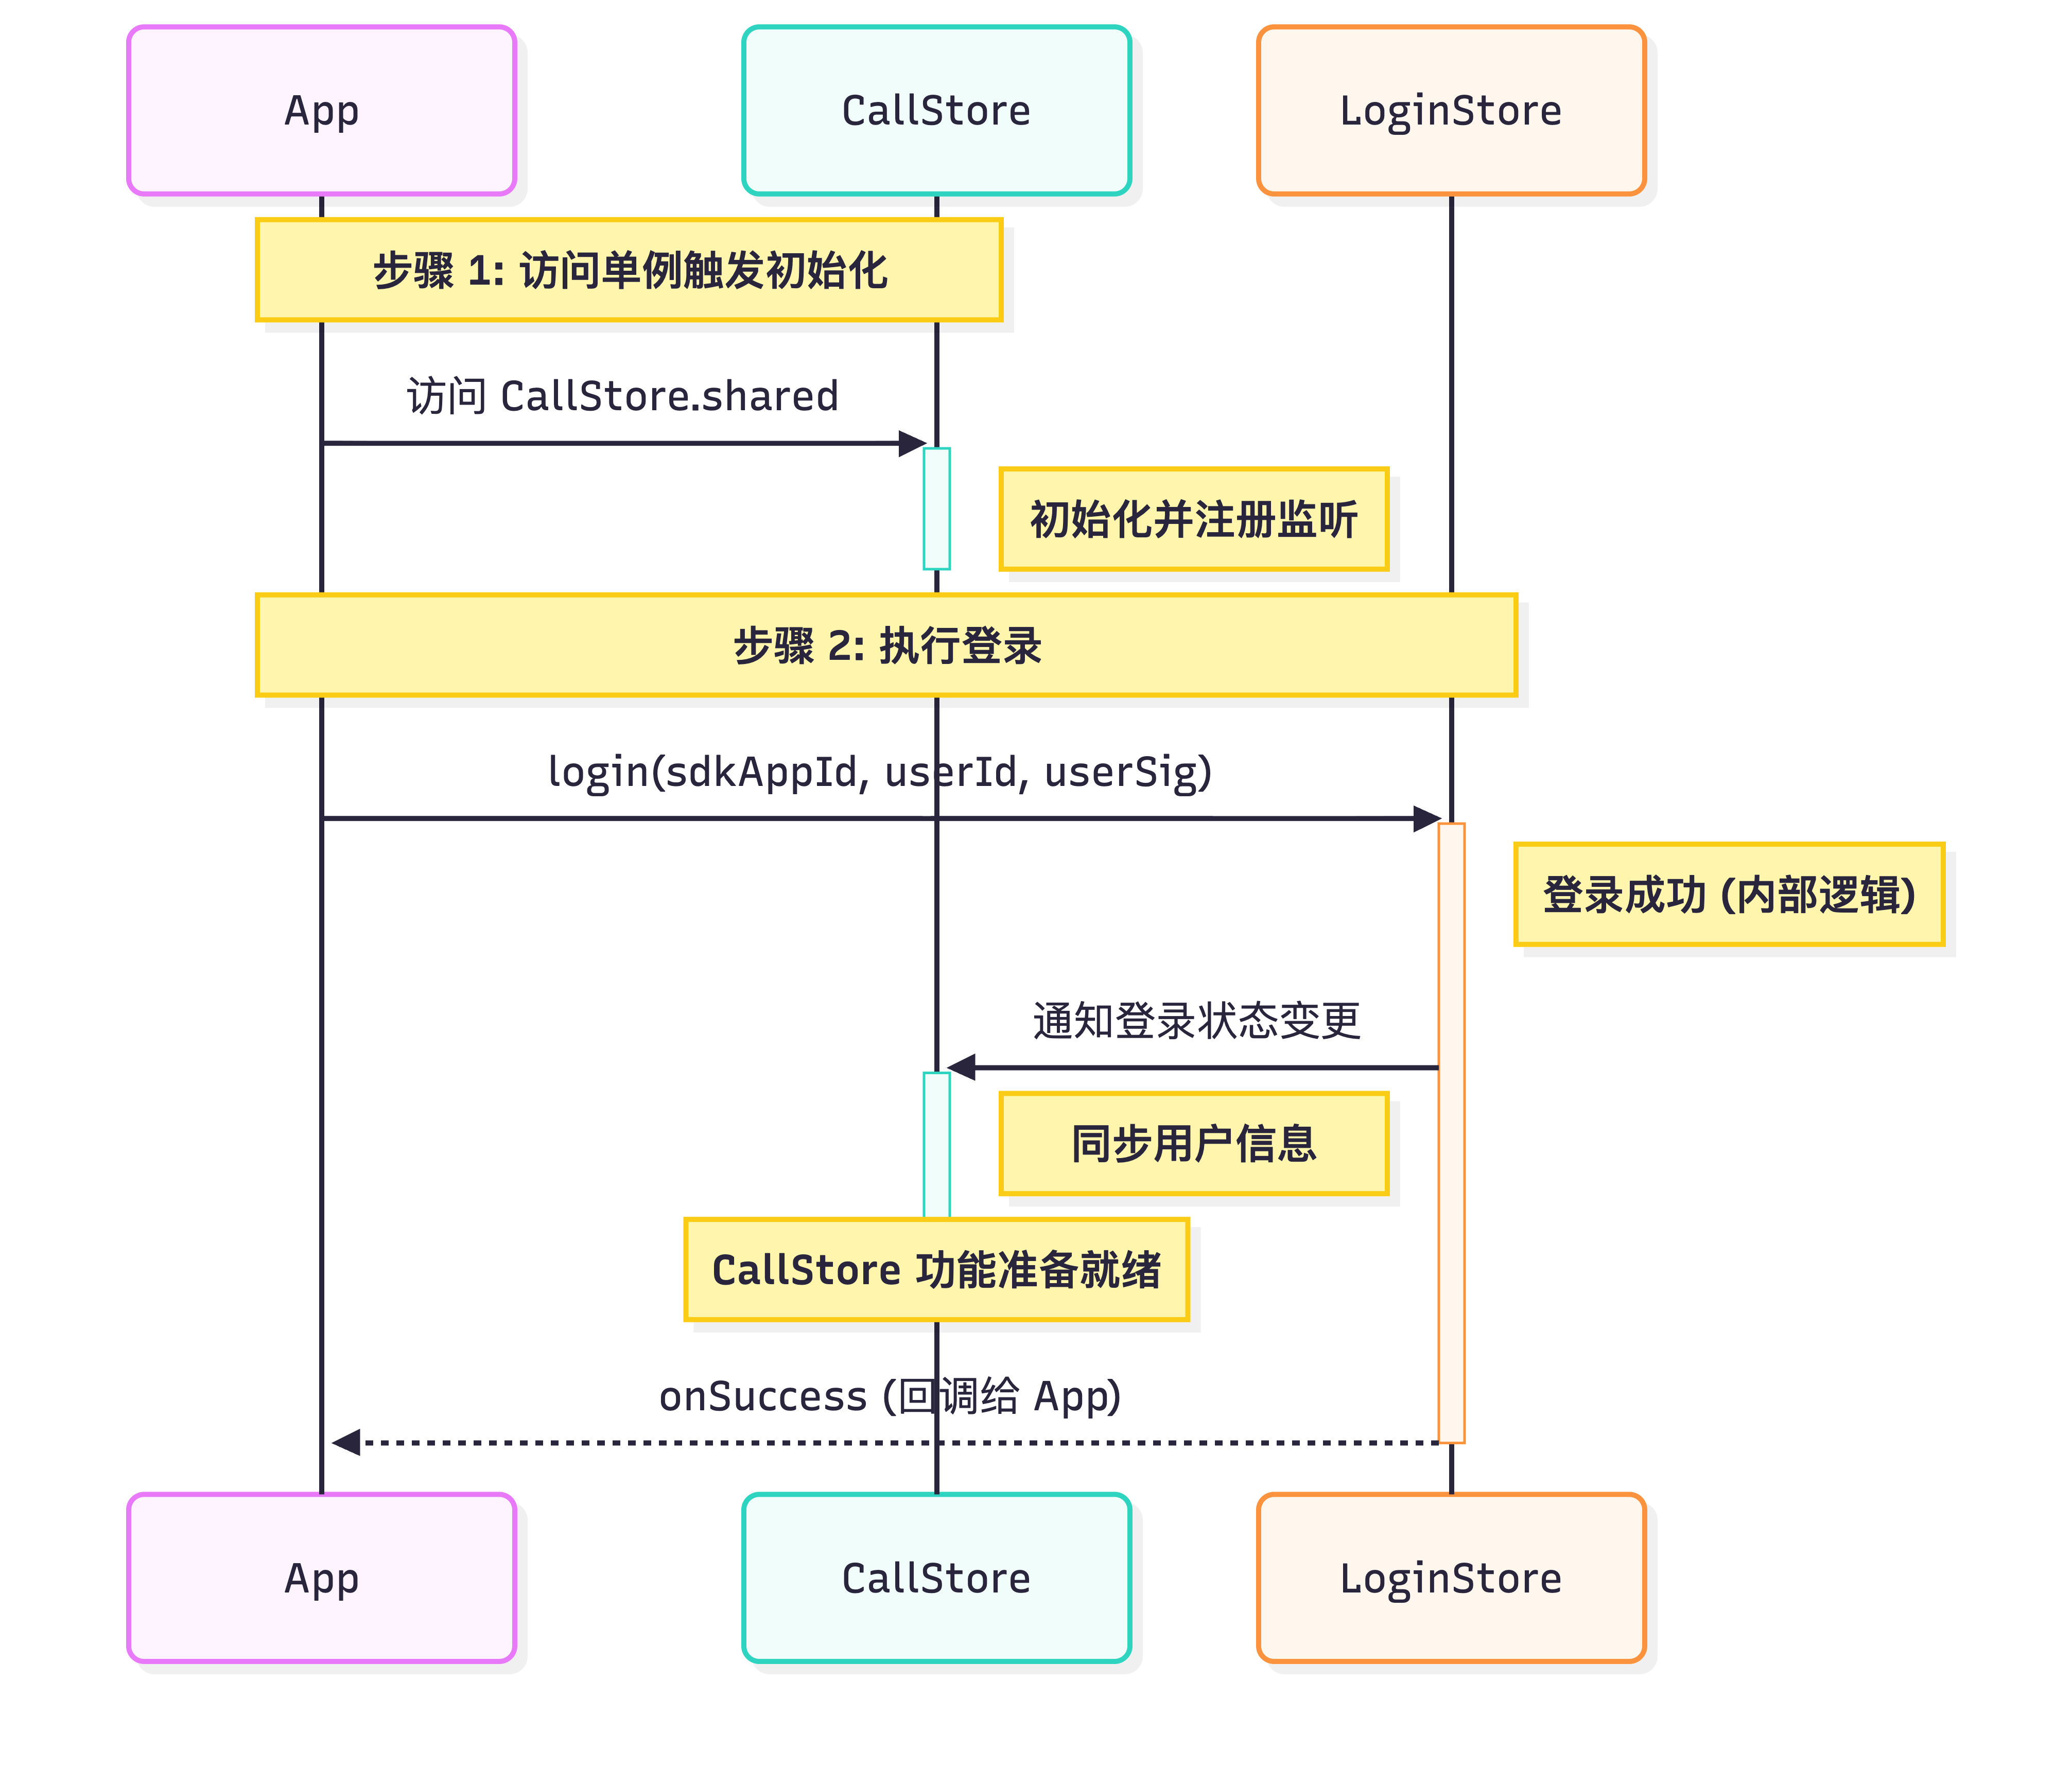
import UIKitimport AtomicXCoreimport Combineclass ViewController: UIViewController {var cancellables = Set<AnyCancellable>()override func viewDidLoad() {super.viewDidLoad()// CallStore 初始化let _ = CallStore.shared// 配置您的信息let userID = "test_001" // 请替换为您的 UserIDlet sdkAppID: Int = 1400000001 // 请替换为在控制台得到的 SDKAppIDlet secretKey = "**************" // 请替换为在控制台得到的 SecretKey// 生成 UserSig(仅用于本地快速测试,正式环境请在服务端生成)let userSig = GenerateTestUserSig.genTestUserSig(userID: userID,sdkAppID: sdkAppID,secretKey: secretKey)// 登录LoginStore.shared.login(sdkAppID: sdkAppID,userID: userID,userSig: userSig) { result inswitch result {case .success:Log.info("login success")// 完成 TUICallEngine 的初始化TUICallEngine.createInstance().`init`(Int32(sdkAppID), userId: userID, userSig: userSig) {Log.info("TUICallEngine init success")} fail: { code, message inLog.error("TUICallEngine init failed, code: \\(code), message: \\(message ?? "")")}case .failure(let error):Log.error("login failed, code: \\(error.code), error: \\(error.message)")}}}}
参数 | 类型 | 说明 |
userID | String | 当前用户的唯一 ID,仅包含英文字母、数字、连字符和下划线。为避免多端登录冲突,请勿使用 1、123 等简单 ID。 |
sdkAppID | int | |
secretKey | String | |
userSig | String | 用于腾讯云鉴权的票据。请注意: 开发环境:您可以采用本地 GenerateTestUserSig.genTestUserSig 函数生成 userSig 或者通过 UserSig 辅助工具 生成临时的 UserSig。 生产环境:为了防止密钥泄露,请务必采用服务端生成 UserSig 的方式。详细信息请参考 服务端生成 UserSig。 |
实现步骤
发起通话前,请确保完成登录,这是服务可用的必要前提。以下将分 5 步为您讲解如何"拨打一通电话"。
步骤1:创建通话界面
您需要创建一个通话页面,当发起通话时唤起通话页面,实现方式如下:
1. 创建通话页面:您可以新建一个 UIViewController 作为通话宿主页面,用于响应来电时的跳转逻辑。
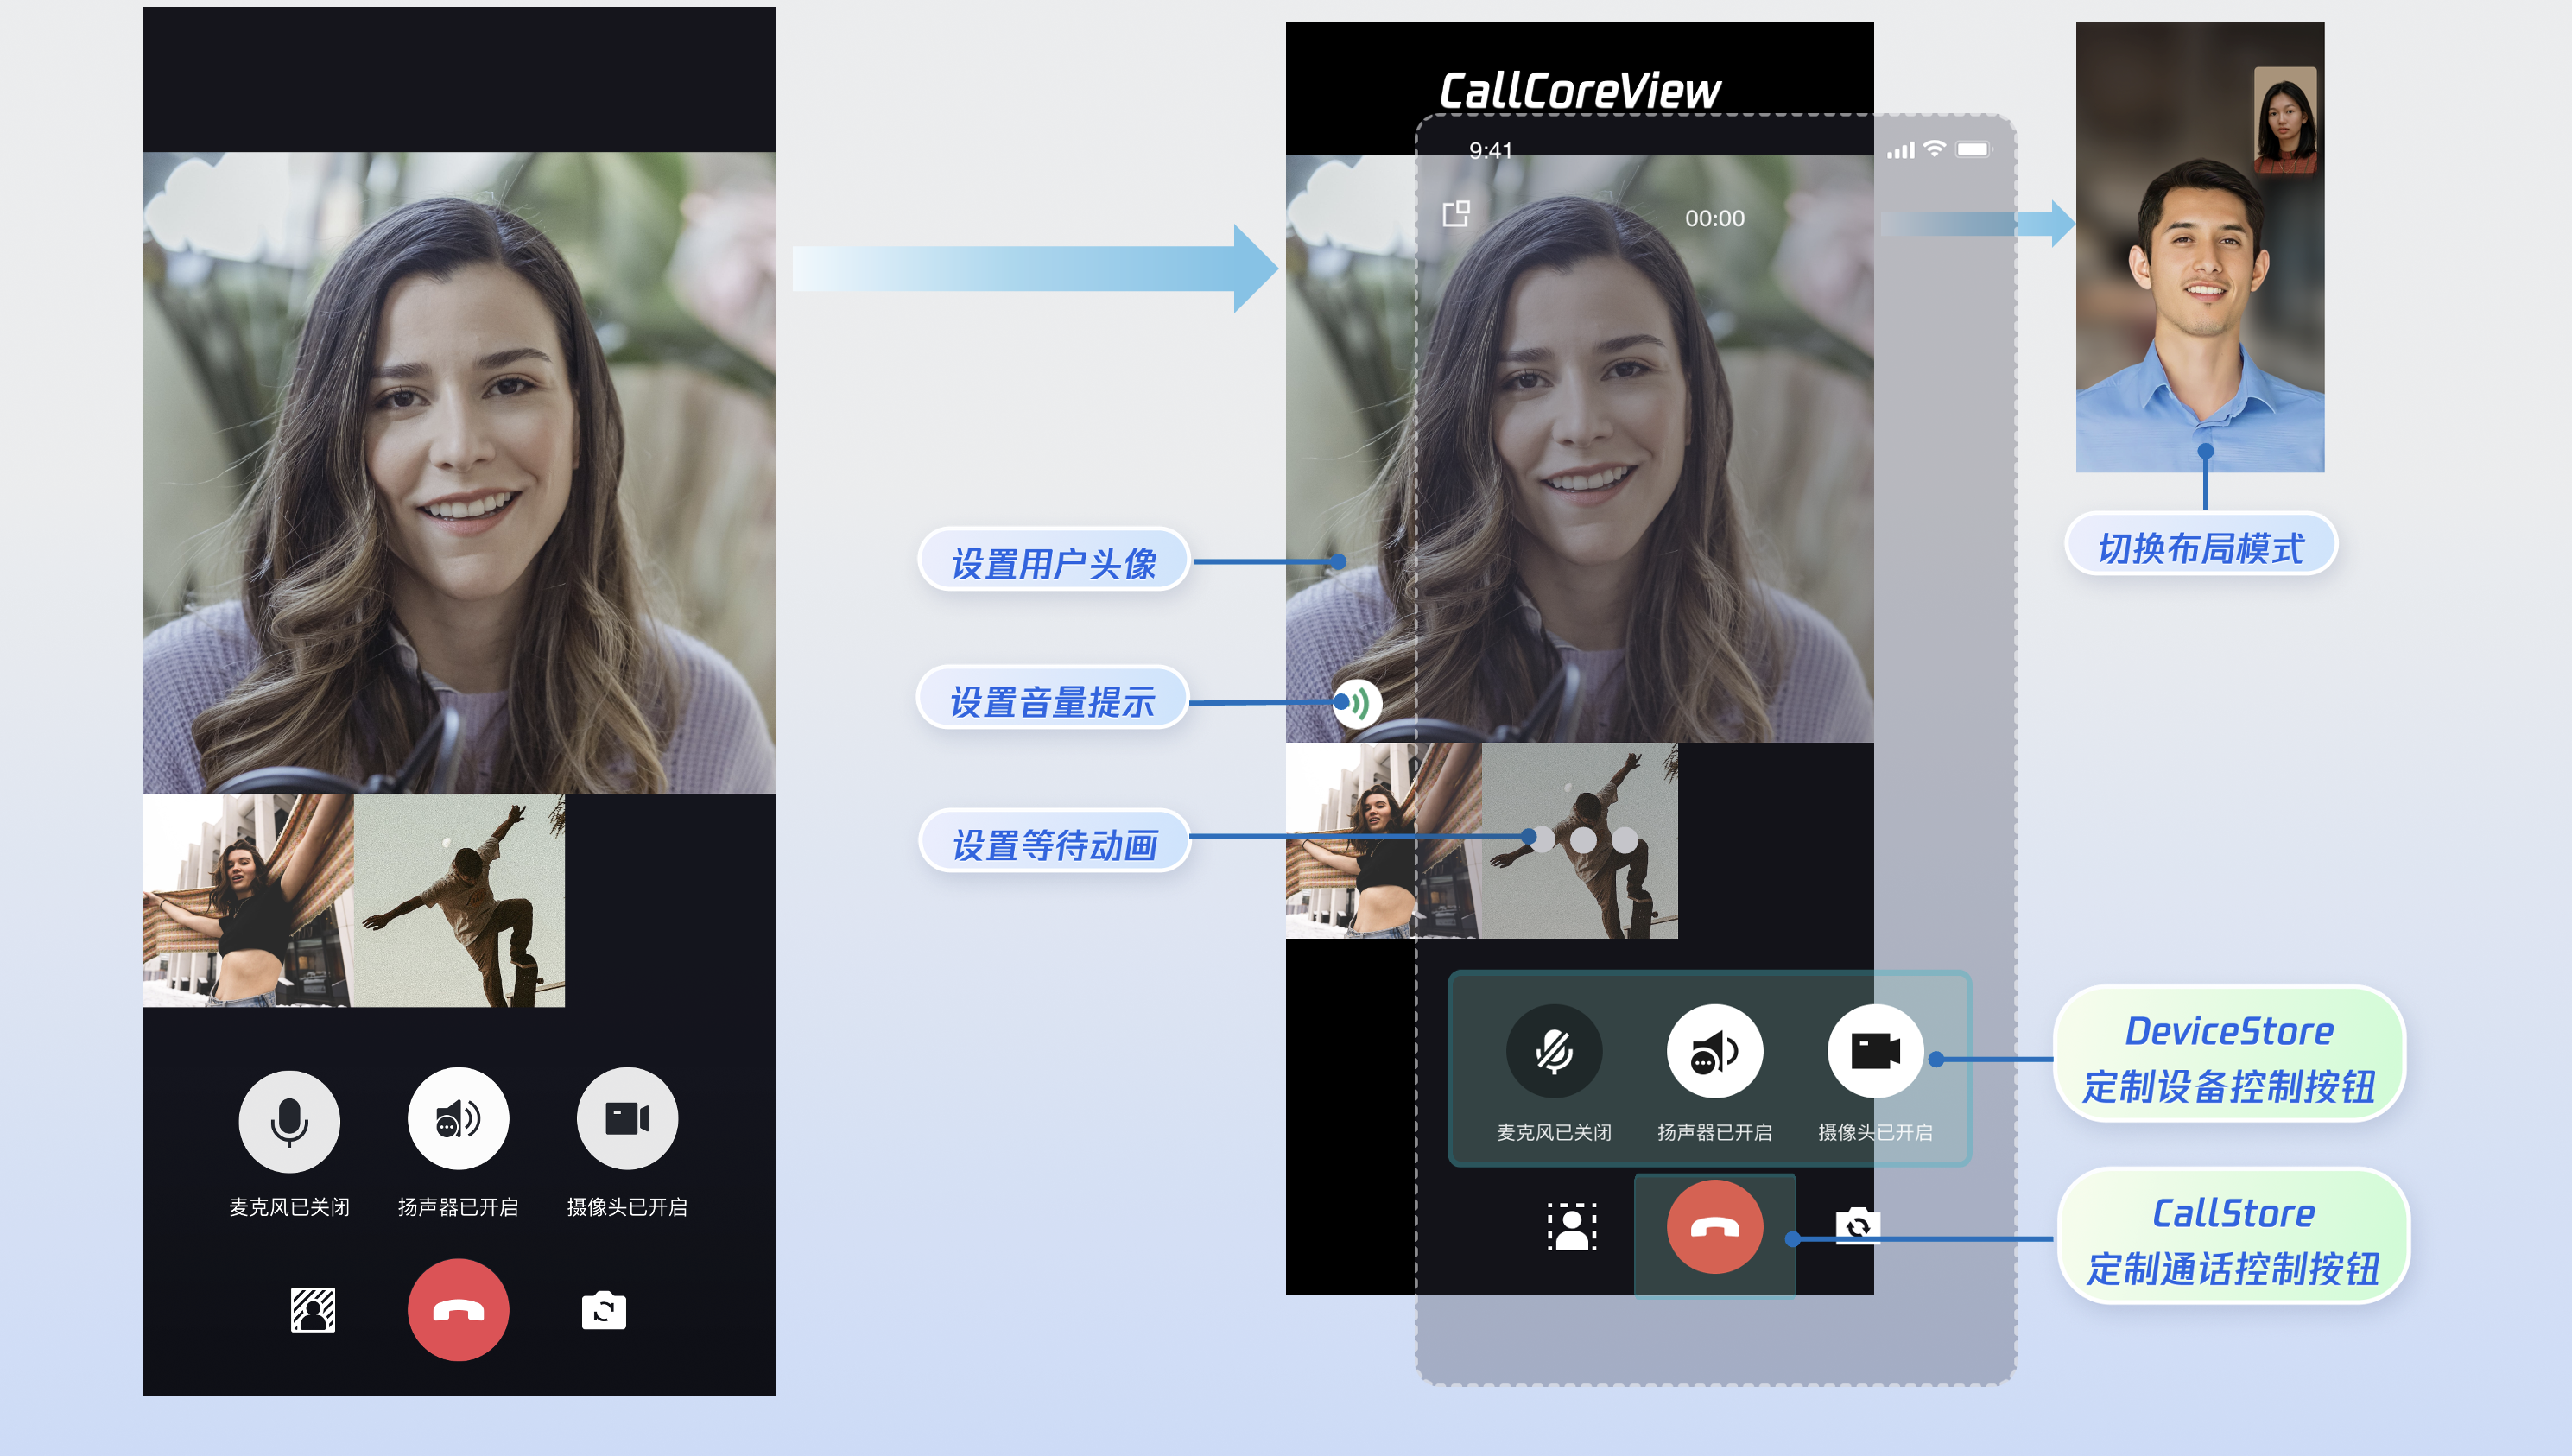
2. 通话页面绑定 CallCoreView : 通话视图核心组件,自动监听 CallStore 数据并完成画面渲染,同时提供布局切换、头像与图标配置等 UI 定制化能力。
import UIKitimport AtomicXCoreclass CallViewController: UIViewController {// 1.创建通话页面override func viewDidLoad() {super.viewDidLoad()view.backgroundColor = .black//2.通话页面绑定 CallCoreViewcallCoreView = CallCoreView(frame: view.bounds)callCoreView?.autoresizingMask = [.flexibleWidth, .flexibleHeight]if let callCoreView = callCoreView {view.addSubview(callCoreView)}}}
CallCoreView 视图组件功能说明:
功能 | 说明 | 参考文档 |
设置布局模式 | 支持自由切换布局模式。若未设置,将根据通话人数自动适配布局。 | |
设置头像 | 支持通过传入头像资源路径,为特定用户自定义头像。 | |
设置音量提示图标 | 支持根据不同音量等级,配置个性化的音量指示图标。 | |
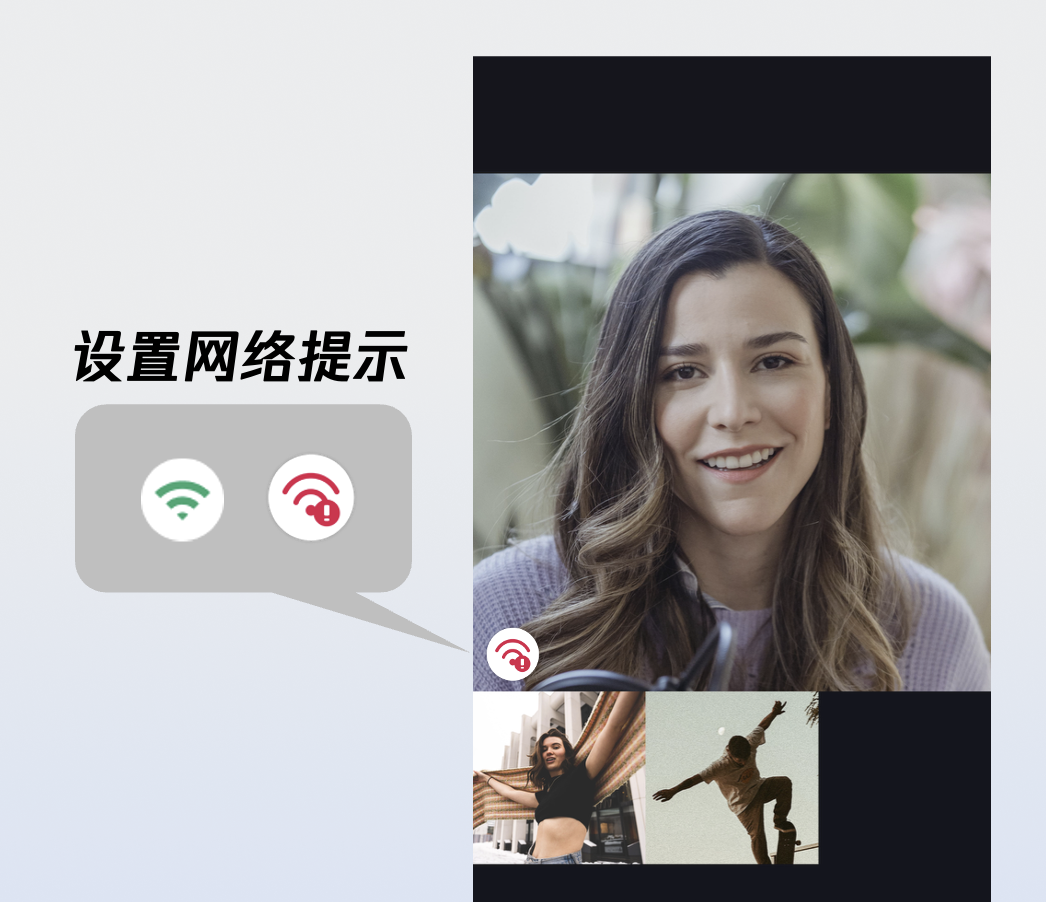
设置网络提示图标 | 支持根据实时网络质量,配置对应的网络状态提示图标。 | |
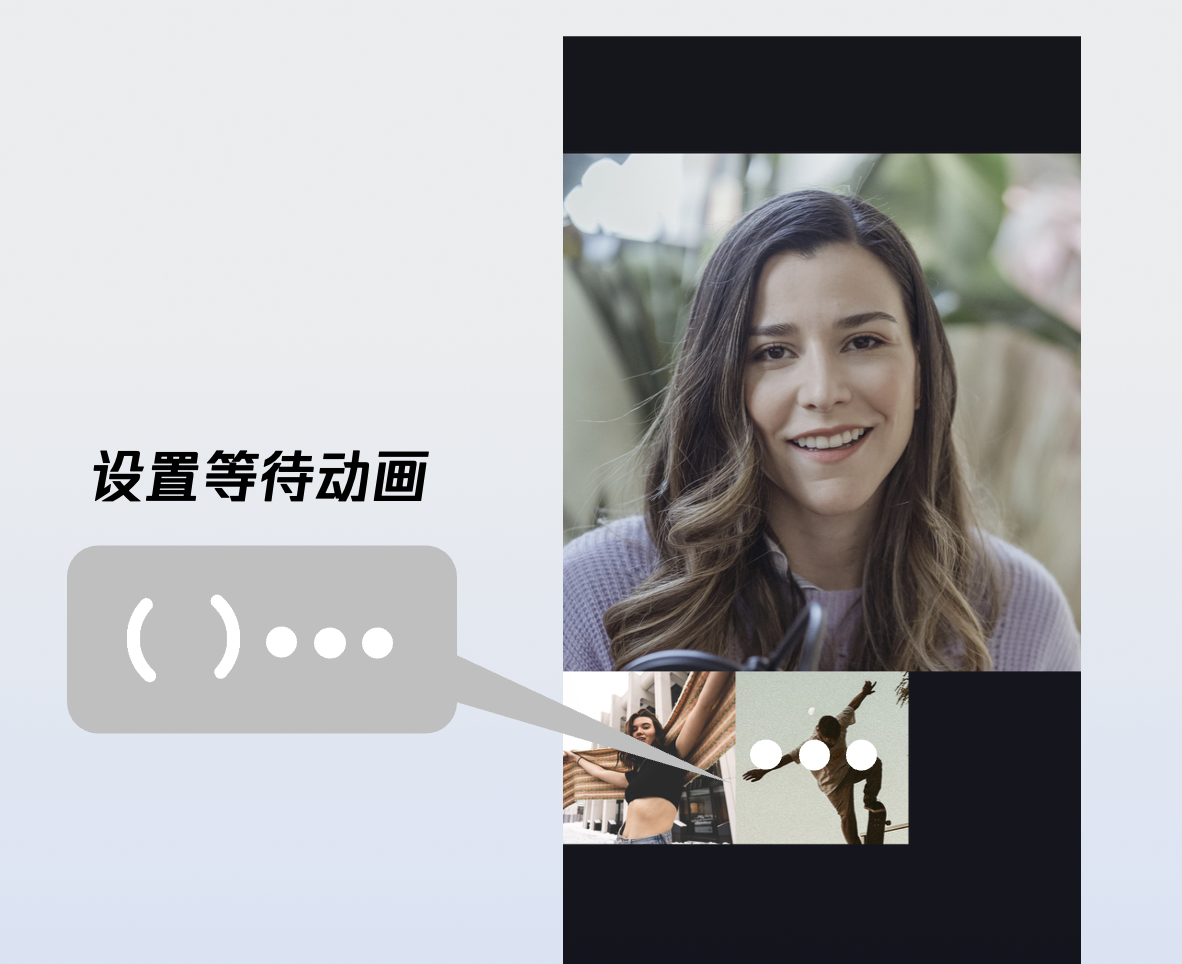
设置等待接听用户的动画 | 在多人通话场景下,支持传入 GIF 图像路径,为待接听状态的用户展示动画。 |
步骤2:添加通话控制按钮
DeviceStore 功能说明:麦克风(开关 / 音量)、摄像头(开关 / 切换 / 画质)、屏幕共享,设备状态实时监听。建议将对应方法绑定至按钮点击事件,并通过监听设备状态变更来实时刷新按钮的 UI 状态。
CallStore 功能说明:接听、挂断、拒接等核心通话控制能力。建议将对应方法绑定至按钮点击事件,并监听通话状态的变化,以确保按钮显示与当前通话阶段保持同步。
图标资源下载:按钮图标可以直接从 GitHub 下载。这些图标由我们的设计师专为 TUICallKit 打造,无版权风险,可放心使用。
图标: |  |  |  |  |  |  |  |  |
以添加挂断、麦克风、摄像头按钮为例,实现方式如下:
1.1 添加挂断按钮:创建并添加挂断按钮,在点击事件中调用 hangup 并销毁界面。
import UIKitimport AtomicXCoreimport Combineclass CallViewController: UIViewController {private lazy var buttonHangup: UIButton = {let buttonWidth: CGFloat = 80let buttonHeight: CGFloat = 80let spacing: CGFloat = 30let bottomMargin: CGFloat = 80let totalWidth = buttonWidth * 3 + spacing * 2let startX = (view.bounds.width - totalWidth) / 2let buttonY = view.bounds.height - bottomMargin - buttonHeightlet button = createButton(frame: CGRect(x: startX + (buttonWidth + spacing) * 2, y: buttonY, width: buttonWidth, height: buttonHeight),title: "挂断")button.backgroundColor = .systemRedbutton.addTarget(self, action: #selector(touchHangupButton), for: .touchUpInside)return button}()override func viewDidLoad() {super.viewDidLoad()// 其他初始化代码// 1.添加挂断按钮view.addSubview(buttonHangup)}@objc private func touchHangupButton() {// 2.在点击事件中调用 hangup 接口并销毁页面CallStore.shared.hangup(completion: nil)}private func createButton(frame: CGRect, title: String) -> UIButton {let button = UIButton(type: .system)button.frame = framebutton.setTitle(title, for: .normal)button.setTitleColor(.white, for: .normal)button.backgroundColor = UIColor(white: 0.3, alpha: 0.8)button.layer.cornerRadius = frame.width / 2button.titleLabel?.font = UIFont.systemFont(ofSize: 14)return button}}
1.2 添加麦克风开关按钮:创建并添加麦克风开关按钮,并在点击事件中调用 openLocalMicrophone 或 closeLocalMicrophone 接口。
import UIKitimport AtomicXCoreimport Combineclass CallViewController: UIViewController {private lazy var buttonMicrophone: UIButton = {let buttonWidth: CGFloat = 80let buttonHeight: CGFloat = 80let spacing: CGFloat = 30let bottomMargin: CGFloat = 80let totalWidth = buttonWidth * 3 + spacing * 2let startX = (view.bounds.width - totalWidth) / 2let buttonY = view.bounds.height - bottomMargin - buttonHeightlet button = createButton(frame: CGRect(x: startX + buttonWidth + spacing, y: buttonY, width: buttonWidth, height: buttonHeight),title: "麦克风")button.addTarget(self, action: #selector(touchMicrophoneButton), for: .touchUpInside)return button}()override func viewDidLoad() {super.viewDidLoad()// 其他初始化代码// 1.添加麦克风开关按钮view.addSubview(buttonMicrophone)}// 2.点击事件调用开启或关闭麦克风@objc private func touchMicrophoneButton() {let microphoneStatus = DeviceStore.shared.state.value.microphoneStatusif microphoneStatus == .on {DeviceStore.shared.closeLocalMicrophone()} else {DeviceStore.shared.openLocalMicrophone(completion: nil)}}// 创建圆形按钮辅助方法private func createButton(frame: CGRect, title: String) -> UIButton {let button = UIButton(type: .system)button.frame = framebutton.setTitle(title, for: .normal)button.setTitleColor(.white, for: .normal)button.backgroundColor = UIColor(white: 0.3, alpha: 0.8)button.layer.cornerRadius = frame.width / 2button.titleLabel?.font = UIFont.systemFont(ofSize: 14)return button}}
1.3 添加摄像头开关按钮:在底部工具栏容器中添加摄像头开关按钮,并在点击事件中调用 openLocalCamera 或 closeLocalCamera 接口。
import UIKitimport AtomicXCoreimport Combineclass CallViewController: UIViewController {private lazy var buttonCamera: UIButton = {let buttonWidth: CGFloat = 80let buttonHeight: CGFloat = 80let spacing: CGFloat = 30let bottomMargin: CGFloat = 80let totalWidth = buttonWidth * 3 + spacing * 2let startX = (view.bounds.width - totalWidth) / 2let buttonY = view.bounds.height - bottomMargin - buttonHeightlet button = createButton(frame: CGRect(x: startX, y: buttonY, width: buttonWidth, height: buttonHeight),title: "摄像头")button.addTarget(self, action: #selector(touchCameraButton), for: .touchUpInside)return button}()override func viewDidLoad() {super.viewDidLoad()// 其他初始化代码// 1.添加摄像头开关按钮view.addSubview(buttonCamera)}// 2.摄像头按钮点击事件@objc private func touchCameraButton() {let cameraStatus = DeviceStore.shared.state.value.cameraStatusif cameraStatus == .on {DeviceStore.shared.closeLocalCamera()} else {let isFront = DeviceStore.shared.state.value.isFrontCameraDeviceStore.shared.openLocalCamera(isFront: isFront, completion: nil)}}// 创建圆形按钮辅助方法private func createButton(frame: CGRect, title: String) -> UIButton {let button = UIButton(type: .system)button.frame = framebutton.setTitle(title, for: .normal)button.setTitleColor(.white, for: .normal)button.backgroundColor = UIColor(white: 0.3, alpha: 0.8)button.layer.cornerRadius = frame.width / 2button.titleLabel?.font = UIFont.systemFont(ofSize: 14)return button}}
1.4 实时更新媒体设备按钮文本:监听麦克风和摄像头的状态,实时更新按钮文本。
import UIKitimport AtomicXCoreimport Combineclass CallViewController: UIViewController {private var cancellables = Set<AnyCancellable>()override func viewDidLoad() {super.viewDidLoad()// 其他初始化代码// 1.监听麦克风和摄像头的状态observeDeviceState()}private func observeDeviceState() {DeviceStore.shared.state.subscribe().map { $0.cameraStatus }.removeDuplicates().receive(on: DispatchQueue.main).sink {// 2.更新摄像头按钮文本[weak self] cameraStatus inlet title = cameraStatus == .on ? "关闭摄像头" : "开启摄像头"self?.buttonCamera?.setTitle(title, for: .normal)}.store(in: &cancellables)DeviceStore.shared.state.subscribe().map { $0.microphoneStatus }.removeDuplicates().receive(on: DispatchQueue.main).sink {// 2.更新麦克风按钮文本[weak self] microphoneStatus inlet title = microphoneStatus == .on ? "关闭麦克风" : "开启麦克风"self?.buttonMicrophone?.setTitle(title, for: .normal)}.store(in: &cancellables)}}
步骤3:申请麦克风/摄像头权限
建议在发起通话前,先行检测音视频权限。若权限缺失,请引导用户动态申请。实现方法如下:
1. 声明权限:请在应用的
Info.plist 文件中添加以下两项,并填写对应的使用说明,这些说明将在系统请求权限时向用户显示:<key>NSCameraUsageDescription</key><string>需要访问您的摄像头,并可用于视频通话、群组视频通话等功能</string><key>NSMicrophoneUsageDescription</key><string>需要访问您的麦克风,并可用于音频通话、群组音频通话、视频通话、群组视频通话等功能</string>
2. 动态申请权限:我们推荐您在发起通话时,根据通话媒体类型动态申请音视频权限。以下是权限处理的示例代码:
import AVFoundationimport UIKitextension UIViewController {// 检查麦克风权限func checkMicrophonePermission(completion: @escaping (Bool) -> Void) {let status = AVCaptureDevice.authorizationStatus(for: .audio)switch status {case .authorized:completion(true)case .notDetermined:AVCaptureDevice.requestAccess(for: .audio) { granted inDispatchQueue.main.async {completion(granted)}}case .denied, .restricted:completion(false)@unknown default:completion(false)}}// 检查摄像头权限func checkCameraPermission(completion: @escaping (Bool) -> Void) {let status = AVCaptureDevice.authorizationStatus(for: .video)switch status {case .authorized:completion(true)case .notDetermined:AVCaptureDevice.requestAccess(for: .video) { granted inDispatchQueue.main.async {completion(granted)}}case .denied, .restricted:completion(false)@unknown default:completion(false)}}// 显示权限提示func showPermissionAlert(message: String) {let alert = UIAlertController(title: "权限请求",message: message,preferredStyle: .alert)alert.addAction(UIAlertAction(title: "去设置", style: .default) { _ inif let url = URL(string: UIApplication.openSettingsURLString) {UIApplication.shared.open(url)}})alert.addAction(UIAlertAction(title: "取消", style: .cancel))present(alert, animated: true)}}
步骤4:发起通话
1. 发起通话:调用
calls 发起通话。2. 开启媒体设备:发起通话成功后开启麦克风,如果是视频通话同时开启摄像头。
3. 唤起通话页面:发起通话成功,唤起通话页面。
import UIKitimport AtomicXCoreimport Combineclass MainViewController: UIViewController {// 1.发起通话private func startCall(userIdList: [String], mediaType: CallMediaType) {var params = CallParams()params.timeout = 30 // 设置通话超时时间为30秒CallStore.shared.calls(participantIds: userIdList,callMediaType: mediaType, // 通话类型:.audio(音频) 或 .video(视频)params: params) { [weak self] result inswitch result {case .success:// 2.开启媒体设备self?.openDevices(for: mediaType)// 3.唤起通话页面DispatchQueue.main.async {let callVC = CallViewController()callVC.modalPresentationStyle = .fullScreenself?.present(callVC, animated: true)}case .failure(let error):Log.error("发起通话失败: \\(error)")}}}private func openDevices(for mediaType: CallMediaType) {DeviceStore.shared.openLocalMicrophone(completion: nil)if mediaType == .video {let isFront = DeviceStore.shared.state.value.isFrontCameraDeviceStore.shared.openLocalCamera(isFront: isFront, completion: nil)}}}
calls 接口参数详细说明:
参数 | 类型 | 是否必填 | 说明 |
participantIds | List<String> | 是 | 目标用户的 userId 列表。 |
callMediaType | 是 | 通话媒体类型,用于指定发起音频通话还是视频通话。 CallMediaType.video : 视频通话。CallMediaType.audio : 语音通话。 | |
params | 否 | 通话扩展参数,如:房间号、通话邀请超时时间等。 roomId (String) : 房间 ID,可选参数,未指定时由服务端自动分配。timeout (Int) : 呼叫超时时间(秒)。userData (String) : 用户自定义数据。chatGroupId (String) : Chat 群组 ID,用于群组通话场景。isEphemeralCall (Boolean) : 是否为加密通话(不产生通话记录)。 |
步骤5:结束通话
1. 监听通话结束事件:监听
onCallEnded 事件。2. 销毁通话页面:
onCallEnded 触发后,销毁通话页面。import UIKitimport AtomicXCoreimport Combineclass CallViewController: UIViewController {override func viewDidLoad() {super.viewDidLoad()// 其他初始化代码// 1.添加通话事件监听addListener()}private func addListener() {CallStore.shared.callEventPublisher.receive(on: DispatchQueue.main).sink { [weak self] event inif case .onCallEnded = event {// 2.销毁通话页面self?.dismiss(animated: true)}}.store(in: &cancellables)}}
onCallEnded 事件参数详细说明:
参数 | 类型 | 说明 |
callId | String | 此次通话的唯一标识。 |
mediaType | 通话媒体类型,用于指定发起音频通话还是视频通话。 CallMediaType.video : 视频通话。CallMediaType.audio : 语音通话。 | |
reason | 通话结束的原因。 unknown : 未知原因,无法确定结束原因。hangup : 正常挂断,用户主动挂断通话。reject : 拒绝接听,被叫方拒绝来电。noResponse : 无响应,被叫方未在超时时间内接听。offline : 对方离线,被叫方不在线。lineBusy : 对方忙线,被叫方正在通话中。canceled : 通话取消,主叫方在对方接听前取消。otherDeviceAccepted : 其他设备已接听,通话已在另一登录设备上接听。otherDeviceReject : 其他设备已拒绝,通话已在另一登录设备上拒绝。endByServer : 服务器结束,通话被服务器终止。 | |
userId | String | 触发结束的用户 ID。 |
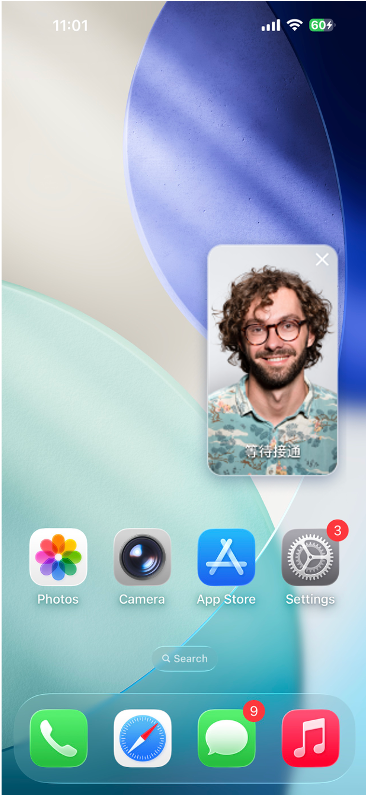
运行效果
当您完成以上 5 步后,"拨打一通电话"运行效果如下:
定制页面
CallCoreView 提供了完善的 UI 定制能力,支持头像及音量提示等图标的自由替换。为助力快速集成,您可以直接从 GitHub 下载。这些图标由我们的设计师专为 TUICallKit 打造,无版权风险,可放心使用。
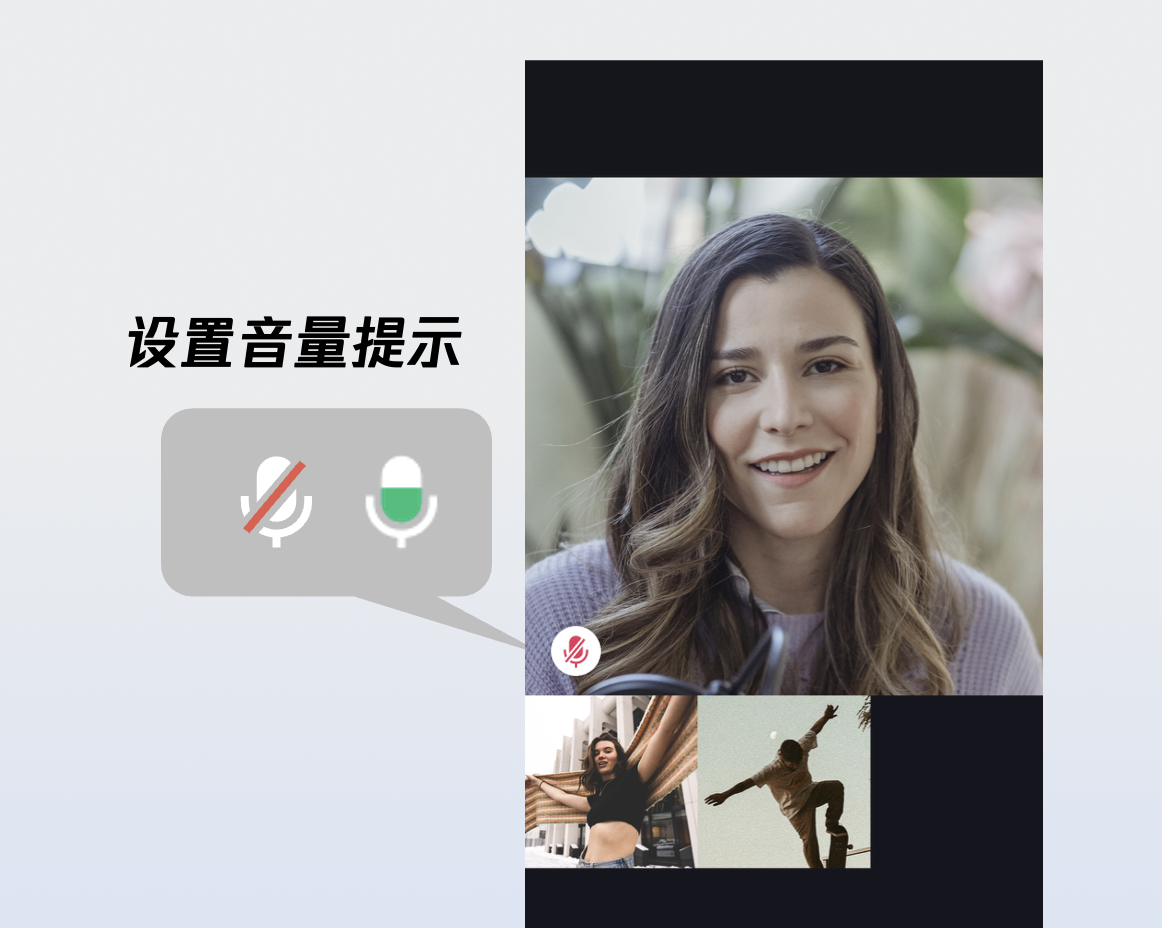
自定义音量提示的图标
setVolumeLevelIcons 示例代码:
// 设置音量提示图标let volumeLevelIcons: [VolumeLevel: String] = [.mute: "对应图标资源的路径"]callCoreView.setVolumeLevelIcons(icons: volumeLevelIcons)
setVolumeLevelIcons 接口参数详细说明:
参数 | 类型 | 是否必填 | 说明 |
icons | [VolumeLevel: String] | 是 | 音量等级与图标资源的映射表。字典结构说明如下: key ( VolumeLevel ) 表示音量等级: VolumeLevel.mute :表示麦克风关闭,静音状态。VolumeLevel.low :表示音量范围 (0-25]。VolumeLevel.medium : 表示音量范围 (25-50]。VolumeLevel.high : 表示音量范围 (50-75]。VolumeLevel.peak : 表示音量范围 (75-100]。Value ( String ) 表示对应音量等级的图标资源路径。 |
音量提示图标:
图标 | 说明 |
 | 音量提示图标。 您可以将该图标等级设置为 VolumeLevel.low 或 VolumeLevel.medium ,当用户音量大于对应等级时显示。 |
 | 静音图标。 您可以将该图标等级设置为 VolumeLevel.mute ,当该用户静音时显示。 |
自定义网络提示的图标
setNetworkQualityIcons 示例代码:
// 设置网络质量图标let networkQualityIcons: [NetworkQuality: String] = [.bad: "对应图标的路径"]callCoreView.setNetworkQualityIcons(icons: networkQualityIcons)
setNetworkQualityIcons 接口参数详细说明:
参数 | 类型 | 是否必填 | 说明 |
icons | [NetworkQuality: String] | 是 | 网络质量与图标资源的映射表。字典结构说明如下: Key ( NetworkQuality ) : 表示网络质量等级。 NetworkQuality.unknown :未知网络状态。NetworkQuality.excellent:网络状态极佳。NetworkQuality.good : 网络状态较好。NetworkQuality.poor : 网络状态较差。NetworkQuality.bad : 网络状态差。NetworkQuality.veryBad :网络状态极差。NetworkQuality.down :网络断开。Value ( String ) : 对应网络状态的图标资源路径。 |
网络较差的提示图标:
图标 | 说明 |
 | 网络较差的提示图标。 您可以将该图标等级设置为 NetworkQuality.bad、NetworkQuality.veryBad 或 NetworkQuality.down ,当网络较差时显示该图标。 |
自定义默认头像
您可以调用 CallCoreView 的 setParticipantAvatars 接口设置用户头像。建议您监听响应式数据 allParticipants(所有参与通话的成员):当获取到用户头像时设置并展示;若用户未设置头像或加载失败,则显示默认头像(占位图)。
setParticipantAvatars 示例代码:
// 设置用户头像var avatars: [String: String] = [:]let userId = "" // 用户 IDlet avatarPath = "" // 用户默认头像资源的路径avatars[userId] = avatarPathcallCoreView.setParticipantAvatars(avatars: avatars)
setParticipantAvatars 接口参数详细说明:
参数 | 类型 | 是否必填 | 说明 |
avatars | [String: String] | 是 | 用户头像映射表。字典结构说明如下: Key : 用户的 userID。 Value : 该用户的头像资源绝对路径。 |
默认头像资源:
图标 | 说明 |
 | 默认头像。 当用户头像加载失败或无头像时,您可以给该用户设置此默认头像。 |
自定义 loading 动画
setWaitingAnimation 示例代码:
// 设置等待动画let waitingAnimationPath = "" // 等待动画 GIF 图像资源的路径callCoreView.setWaitingAnimation(path: waitingAnimationPath)
setWaitingAnimation 接口参数详细说明:
参数 | 类型 | 是否必填 | 说明 |
path | String | 是 | GIF 格式图像资源的绝对路径。 |
等待接听的动画:
图标 | 说明 |
 | 用户等待接听动画。 群组通话时设置的动画。设置后,当用户的状态为等待接听时,显示该动画。 |
添加通话计时提示
1. 数据层订阅:订阅
CallStore.observerState.activeCall , 建立当前活跃通话的响应式监听。2. 绑定通话计时数据:将
activeCall.duration 字段绑定至 UI 控件。该字段为响应式数据,会自动驱动 UI 实时刷新,无需手动维护定时器。import UIKitimport AtomicXCoreimport Combineclass TimerView: UILabel {private var cancellables = Set<AnyCancellable>()override init(frame: CGRect) {super.init(frame: frame)setupView()}required init?(coder: NSCoder) {super.init(coder: coder)setupView()}private func setupView() {textColor = .whitetextAlignment = .centerfont = .systemFont(ofSize: 16)}override func didMoveToWindow() {super.didMoveToWindow()if window != nil {// 1.数据层订阅registerActiveCallObserver()} else {cancellables.removeAll()}}private func registerActiveCallObserver() {CallStore.shared.state.subscribe().map { $0.activeCall }.removeDuplicates { $0.duration == $1.duration }.receive(on: DispatchQueue.main).sink { [weak self] activeCall in// 更新通话计时self?.updateDurationView(activeCall: activeCall)}.store(in: &cancellables)}private func updateDurationView(activeCall: CallInfo) {let currentDuration = activeCall.durationlet minutes = currentDuration / 60let seconds = currentDuration % 60text = String(format: "%02d:%02d", minutes, seconds)}}
说明:
更多功能
自定义用户头像/昵称
setSelfInfo 示例代码:
var userProfile = UserProfile()userProfile.userID = "" // 您的 userIduserProfile.avatarURL = "" // 头像的 urluserProfile.nickname = "" // 需要设置的昵称LoginStore.shared.setSelfInfo(userProfile: userProfile) { result inswitch result {case .success:// 设置成功回调case .failure(let error):// 设置失败回调}}
setSelfInfo 接口参数详细说明:
参数 | 类型 | 是否必填 | 说明 |
userProfile | 是 | 用户信息结构体: userID :用户的 IDavatarURL : 用户头像的 URLnickname :用户的昵称 |
切换布局模式
CallCoreView 内置三种布局模式,您可以调用 setLayoutTemplate 设置布局模式。若未主动配置,CallCoreView 将根据通话人数自动适配:1 V 1 场景下默认采用
Float 模式,多人通话场景下则自动切换为 Grid 模式。不同布局模式的说明如下:Float 模式 | Grid 模式 | PIP 模式 |
 |  |  |
布局逻辑:呼叫等待时全屏显示己方画面;接通后全屏显示对方画面,己方画面以悬浮小窗展示。 交互特性:支持小窗拖拽移动,点击小窗可实现大小画面互换。 | 布局逻辑:所有成员画面呈网格状平铺排列成宫格模式布局,适用 2 人以上通话,支持点击放大画面功能。 交互特性:支持点击特定成员画面放大查看。 | 布局逻辑:1 v 1 场景固定显示对方画面,多人场景:采用当前发言者(Active Speaker) 策略,自动识别并全屏展示正在说话的用户。 交互特性:等待时显示自己的画面,接通后还会显示通话计时。 |
setLayoutTemplate 示例代码:
func setLayoutTemplate(_ template: CallLayoutTemplate)
setLayoutTemplate 接口参数详细说明:
参数 | 类型 | 说明 |
template | CallCoreView 的布局模式 CallLayoutTemplate.float :布局逻辑:呼叫等待时全屏显示己方画面;接通后全屏显示对方画面,己方画面以悬浮小窗展示。 交互特性:支持小窗拖拽移动,点击小窗可实现大小画面互换。 CallLayoutTemplate.grid :布局逻辑:所有成员画面呈网格状平铺排列成宫格模式布局,适用 2 人以上通话,支持点击放大画面功能。 交互特性:支持点击特定成员画面放大查看。 CallLayoutTemplate.pip : 布局逻辑:1v1 场景固定显示对方画面,多人场景:采用当前发言者(Active Speaker) 策略,自动识别并全屏展示正在说话的用户。 交互特性:等待时显示自己的画面,接通后还会显示通话计时。 |
设置通话的默认超时时间
var callParams = CallParams()callParams.timeout = 30 // 设置通话超时为30秒CallStore.shared.calls(participantIds: userIdList,callMediaType: .video,params: callParams,completion: nil)
参数 | 类型 | 是否必填 | 说明 |
userIdList | List<String> | 是 | 目标用户的 userId 列表。 |
mediaType | 是 | 通话媒体类型,用于指定发起音频通话还是视频通话。 CallMediaType.video : 视频通话。CallMediaType.audio : 语音通话。 | |
params | 否 | 通话扩展参数,如:房间号、通话邀请超时时间等。 roomId (String) : 房间 ID,可选参数,未指定时由服务端自动分配。timeout (Int) : 呼叫超时时间(秒)。userData (String) : 用户自定义数据。chatGroupId (String) : Chat 群组 ID,用于群组通话场景。isEphemeralCall (Boolean) : 是否为加密通话(不产生通话记录)。 |
实现应用内悬浮窗
AtomicXCore SDK 提供了
CallPipView 组件,可以在应用内实现悬浮窗效果。当您的通话界面被其他页面覆盖时(例如用户点击了返回键但通话未结束),可以显示一个悬浮的小窗口,让用户随时查看通话状态并快速返回通话界面。第一步:创建悬浮窗控制器。
import UIKitimport AtomicXCoreimport Combine/*** 悬浮窗控制器** 用于显示通话悬浮窗,内部包含 CallCoreView*/class FloatWindowViewController: UIViewController {var tapGestureAction: (() -> Void)?private var cancellables = Set<AnyCancellable>()private lazy var callCoreView: CallCoreView = {let view = CallCoreView(frame: self.view.bounds)view.autoresizingMask = [.flexibleWidth, .flexibleHeight]view.setLayoutTemplate(.pip) // 设置为 Pip 布局模式view.isUserInteractionEnabled = false // 禁用交互,让点击事件穿透到父视图return view}()override func viewDidLoad() {super.viewDidLoad()view.backgroundColor = UIColor(white: 0.1, alpha: 1.0)view.layer.cornerRadius = 10view.layer.masksToBounds = trueview.addSubview(callCoreView)// 添加点击手势let tapGesture = UITapGestureRecognizer(target: self, action: #selector(handleTap))view.addGestureRecognizer(tapGesture)// 延迟监听状态变化,避免在创建时立即被关闭DispatchQueue.main.asyncAfter(deadline: .now() + 1.0) { [weak self] inself?.observeCallStatus()}}@objc private func handleTap() {tapGestureAction?()}/*** 监听通话状态变化* 当通话结束时自动关闭悬浮窗*/private func observeCallStatus() {CallStore.shared.state.subscribe(StatePublisherSelector<CallState, CallParticipantStatus>(keyPath: \\.selfInfo.status)).removeDuplicates().receive(on: DispatchQueue.main).sink { [weak self] status inif status == .none {// 通话结束,发送通知隐藏悬浮窗NotificationCenter.default.post(name: NSNotification.Name("HideFloatingWindow"), object: nil)}}.store(in: &cancellables)}deinit {cancellables.removeAll()}}
第二步:在主界面实现悬浮窗管理逻辑。
import UIKitimport AtomicXCoreclass MainViewController: UIViewController {private var floatWindow: UIWindow?override func viewDidLoad() {super.viewDidLoad()// 监听显示悬浮窗的通知NotificationCenter.default.addObserver(self,selector: #selector(showFloatingWindow),name: NSNotification.Name("ShowFloatingWindow"),object: nil)// 监听隐藏悬浮窗的通知NotificationCenter.default.addObserver(self,selector: #selector(hideFloatingWindow),name: NSNotification.Name("HideFloatingWindow"),object: nil)}/*** 显示应用内悬浮窗*/@objc private func showFloatingWindow() {// 检查通话是否进行中let selfStatus = CallStore.shared.state.value.selfInfo.statusguard selfStatus == .accept else {return}// 如果悬浮窗已存在,不重复创建guard floatWindow == nil else { return }// ⚠️ 关键:必须使用当前的 windowScene 来创建 windowguard let windowScene = UIApplication.shared.connectedScenes.first as? UIWindowScene else {return}// 创建悬浮窗(宽高比 9:16)let pipWidth: CGFloat = 100let pipHeight: CGFloat = pipWidth * 16 / 9let pipX = UIScreen.main.bounds.width - pipWidth - 20let pipY: CGFloat = 100// 创建悬浮窗 Window(关联到 windowScene)let window = UIWindow(windowScene: windowScene)window.windowLevel = .alert + 1window.backgroundColor = .clearwindow.frame = CGRect(x: pipX, y: pipY, width: pipWidth, height: pipHeight)// 创建悬浮窗控制器let floatVC = FloatWindowViewController()floatVC.tapGestureAction = { [weak self] inself?.openCallViewController()}window.rootViewController = floatVCself.floatWindow = window// 设置可见window.isHidden = falsewindow.makeKeyAndVisible()// 立即将主窗口恢复为 key windowif let mainWindow = windowScene.windows.first(where: { $0 != window }) {mainWindow.makeKey()}}/*** 隐藏应用内悬浮窗*/@objc private func hideFloatingWindow() {floatWindow?.isHidden = truefloatWindow = nil}/*** 打开通话界面(从悬浮窗点击进入)*/private func openCallViewController() {// 先隐藏悬浮窗hideFloatingWindow()// 获取当前最顶层的 ViewControllerguard let topVC = getTopViewController() else {return}let callVC = CallViewController()callVC.modalPresentationStyle = .fullScreentopVC.present(callVC, animated: true)}/*** 获取当前最顶层的 ViewController*/private func getTopViewController() -> UIViewController? {guard let windowScene = UIApplication.shared.connectedScenes.first as? UIWindowScene,let keyWindow = windowScene.windows.first(where: { $0.isKeyWindow }),let rootVC = keyWindow.rootViewController else {return nil}var topVC = rootVCwhile let presentedVC = topVC.presentedViewController {topVC = presentedVC}return topVC}deinit {NotificationCenter.default.removeObserver(self)}}
第三步:在通话界面添加悬浮窗触发逻辑。
import UIKitimport AtomicXCoreclass CallViewController: UIViewController {override func viewWillAppear(_ animated: Bool) {super.viewWillAppear(animated)// 进入通话界面时,发送通知隐藏悬浮窗NotificationCenter.default.post(name: NSNotification.Name("HideFloatingWindow"), object: nil)}override func viewWillDisappear(_ animated: Bool) {super.viewWillDisappear(animated)// 离开通话界面时,检查通话是否进行中let selfStatus = CallStore.shared.state.value.selfInfo.statusif selfStatus == .accept {// 如果通话还在进行中,发送通知显示悬浮窗NotificationCenter.default.post(name: NSNotification.Name("ShowFloatingWindow"), object: nil)}}}
实现应用外画中画
AtomicXCore SDK 支持通过底层 TRTC 引擎实现应用外画中画功能。当应用进入后台时,通话画面可以以系统画中画形式悬浮在其他应用之上,用户可以边使用其他应用边进行视频通话。实现方式如下:
说明:
1. 需要在 Xcode 的
Signing & Capabilities 中添加 Background Modes 能力,并勾选 Audio, AirPlay, and Picture in Picture。2. 需要 iOS 15.0 及以上版本支持。
1. 配置画中画参数:您需要设置画中画窗口的填充模式、用户视频区域、画布参数等参数。
import Foundationimport AtomicXCore// 填充模式枚举enum PictureInPictureFillMode: Int, Codable {case fill = 0 // 填充模式case fit = 1 // 适应模式}// 用户视频区域struct PictureInPictureRegion: Codable {let userId: String // 用户 IDlet width: Double // 宽度(0.0-1.0,相对于画布)let height: Double // 高度(0.0-1.0,相对于画布)let x: Double // X 坐标(0.0-1.0,相对于画布左上角)let y: Double // Y 坐标(0.0-1.0,相对于画布左上角)let fillMode: PictureInPictureFillMode // 填充模式let streamType: String // 流类型("high" 或 "low")let backgroundColor: String // 背景颜色}// 画布配置struct PictureInPictureCanvas: Codable {let width: Int // 画布宽度let height: Int // 画布高度let backgroundColor: String // 背景颜色}// 画中画参数struct PictureInPictureParams: Codable {let enable: Bool // 是否启用画中画let cameraBackgroundCapture: Bool? // 是否在后台采集摄像头let canvas: PictureInPictureCanvas? // 画布配置(可选)let regions: [PictureInPictureRegion]? // 用户视频区域列表(可选)}// 画中画请求struct PictureInPictureRequest: Codable {let api: String // API 名称let params: PictureInPictureParams // 参数}
2. 启用画中画:您可以通过
configPictureInPicture 方法启用/关闭画中画功能。let params = PictureInPictureParams(enable: true,cameraBackgroundCapture: true,canvas: nil,regions: nil)let request = PictureInPictureRequest(api: "configPictureInPicture",params: params)// 编码为 JSON 字符串let encoder = JSONEncoder()if let data = try? encoder.encode(request),let jsonString = String(data: data, encoding: .utf8) {TUICallEngine.createInstance().callExperimentalAPI(jsonObject: jsonString)}
设置通话过程中屏幕常亮
通话过程中保持屏幕常亮是通话应用的基本需求。iOS 提供了
UIApplication.shared.isIdleTimerDisabled 属性来实现此功能。class CallViewController: UIViewController {override func viewDidLoad() {super.viewDidLoad()// 禁用自动锁屏,保持屏幕常亮UIApplication.shared.isIdleTimerDisabled = true}override func viewWillDisappear(_ animated: Bool) {super.viewWillDisappear(animated)// 恢复自动锁屏UIApplication.shared.isIdleTimerDisabled = false}}
播放等待接听的提示音
您可以监听自己的通话状态,在等待接听时播放铃声,在接听通话或通话结束时停止播放铃声。
import Combineprivate var cancellables = Set<AnyCancellable>()private func observeSelfCallStatus() {CallStore.shared.state.subscribe().map { $0.selfInfo.status }.removeDuplicates().receive(on: DispatchQueue.main).sink { [weak self] status inif status == .accept || status == .none {// 停止播放铃声return}if status == .waiting {// 播放铃声}}.store(in: &cancellables)}
开启后台采集音频/视频
为了确保应用在进入后台时仍能正常采集音频和视频(例如用户锁屏或切换到其他应用),您需要配置 iOS 的后台模式权限并设置音频会话。
配置步骤:在 Xcode 中打开您的项目,按照以下步骤操作:
1. 选择项目的
Target → Signing & Capabilities。2. 点击
+ Capability 。3. 搜索并添加
Background Modes。4. 勾选以下三个选项:
Audio, AirPlay, and Picture in Picture(保持音频采集和画中画功能)。Voice over IP(支持 VoIP 通话)。Remote notifications(可选,用于接收离线推送)。配置完成后,您的
Info.plist 文件会自动添加以下内容:<key>UIBackgroundModes</key><array><string>audio</string><string>voip</string><string>remote-notification</string></array>
配置音频会话(AVAudioSession)
为了确保通话音频在后台正常工作,您需要在通话开始前配置音频会话。建议在通话界面的
viewDidLoad 或发起通话前设置:import AVFoundation/*** 设置音频会话,支持后台音频采集** 建议在以下场景调用:* 1. 通话界面的 viewDidLoad 中* 2. 发起通话 (calls) 之前* 3. 接听通话 (accept) 之前*/private func setupAudioSession() {let audioSession = AVAudioSession.sharedInstance()do {// 设置音频会话类别为播放和录音// .allowBluetooth: 支持蓝牙耳机// .allowBluetoothA2DP: 支持高质量蓝牙音频(A2DP 协议)try audioSession.setCategory(.playAndRecord, options: [.allowBluetooth, .allowBluetoothA2DP])// 激活音频会话try audioSession.setActive(true)} catch {// 音频会话配置失败}}
播放铃声时的特殊处理(可选)
如果您需要在等待接听时播放铃声,并且希望铃声通过扬声器播放,可以临时切换音频会话为
.playback 模式:/*** 播放铃声时切换音频会话** 使用场景:当您使用 AVAudioPlayer 播放铃声时*/private func setAudioSessionForRingtone() {let audioSession = AVAudioSession.sharedInstance()do {// 切换为播放模式try audioSession.setCategory(.playback, options: [.allowBluetooth, .allowBluetoothA2DP])// 强制使用扬声器播放铃声try audioSession.overrideOutputAudioPort(.speaker)try audioSession.setActive(true)} catch {// 铃声音频会话配置失败}}/*** 停止播放铃声后恢复为通话模式*/private func restoreAudioSessionForCall() {let audioSession = AVAudioSession.sharedInstance()do {// 恢复为播放和录音模式try audioSession.setCategory(.playAndRecord, options: [.allowBluetooth, .allowBluetoothA2DP])try audioSession.setActive(true)} catch {// 恢复音频会话失败}}
下一步
常见问题
在通话邀请超时时间内,被邀请者如果离线再上线,能否收到来电事件?
单人通话时,如果在超时时间内上线,会触发来电邀请;群组通话,如果在超时时间内上线,会拉起未处理的20条群消息,如果存在通话邀请,则触发来电邀请事件。
联系我们
文档反馈