After a CLB instance is created, you can configure a CLB security group to isolate public network traffic. This document describes how to configure CLB security groups in different modes.
Use Limits
Each CLB can be bound with up to five security groups. To increase the quota, go to Quota Management to submit a request.
Up to 512 rules are allowed for a security group.
Security groups cannot be bound to classic network-based private CLB instances and classic private CLB instances. If a private CLB instance is bound to an Anycast EIP, security groups bound to the instance will not take effect.
Allow by Default is not available for classic private CLBs and classic network-based CLBs.
Background
A security group is a virtual firewall that can filter stateful data packets and control outbound and inbound traffic at the instance level. For more information, please see Security Group.
A CLB security group is bound to a CLB instance, while a CVM security group is bound to a CVM instance. They target at different objects. For a CLB security group, you can choose to:
For IPv4 CLB security groups, Allow by Default is disabled by default, you can enable it in the console.
For IPv6 CLB security groups, Allow by Default is enabled by default and you cannot disable it.
Enabling Allow by Default
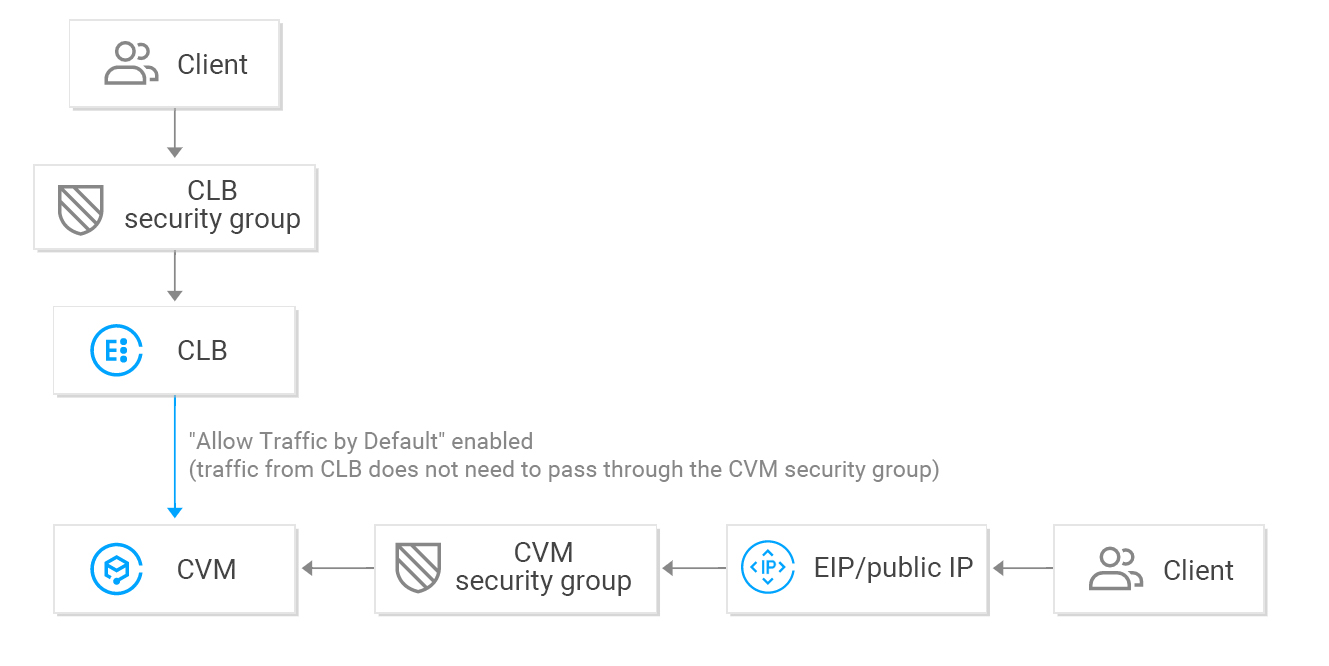
When Allow by Default is enabled:
If you want to allow access only from a specified client IP, you need to allow it and the listening port in the CLB security group, however you don't need to allow the client IP and service port in the backend CVM security group. Access traffic from the CLB only pass through the CLB security group, as the real server allows traffic from CLB by default.
Traffic from public IPs (including general public IPs and EIPs) still needs to pass through the CVM security group.
If a CLB instance has no security group configured, all traffic will be allowed, and only ports configured with listeners on the VIP of the CLB instance can be accessed; therefore, the listening port will allow traffic from all IPs.
To reject traffic from a specified client IP, you need to configure in the CLB security group. Rejecting a client IP in the CVM security group takes effect only for traffic from public IPs (including general public IPs and EIPs) but not for traffic from CLB.
Disabling Allow by Default
When Allow by Default is disabled:
If you want to only allow access from the specified client IP, you need to allow the client IP and listening port in the CLB security group and also allow the client IP and service port in the CVM security group; therefore, business traffic passing through CLB will be double checked by both the CLB security group and CVM security group.
Traffic from public IPs (including general public IPs and EIPs) still needs to pass through the CVM security group.
If a CLB instance has no security group configured, only traffic passing through the CVM security group will be allowed.
You can reject access either the CLB security group or the CVM security group to reject traffic from a specified client IP.
When Allow by Default is disabled, the CVM security group should be configured as follows to ensure effective health check:
1. Configure public network CLB
You need to allow the CLB VIP on the backend CVM security group, so that CLB can use the VIP to detect the backend CVM health status.
2. Configure private network CLB
For private network CLB (formerly "private network application CLB"), if your CLB instance is in a VPC, the CLB VIP needs to be allowed in the backend CVM security group for health check; if your CLB instance is in the classic network, no additional configuration is needed as the health check IP is allowed by default.
For private network classic CLB, if your CLB instance was created before December 5, 2016 and is in a VPC, the CLB VIP needs to be allowed (for health check) in the backend CVM security group; otherwise, no additional configuration is needed as the health check IP is allowed by default.
Directions
In the following example, the security group is configured to only allow inbound traffic to the CLB from port 80, and the service is provided via CVM port 8080. There is no limit upon the client IPs.
Note:
For the public network CLB instance used in this example, the CLB VIP needs to be allowed in the backend CVM security group for health check. The current IP is set to 0.0.0.0/0, which means all IPs are allowed.
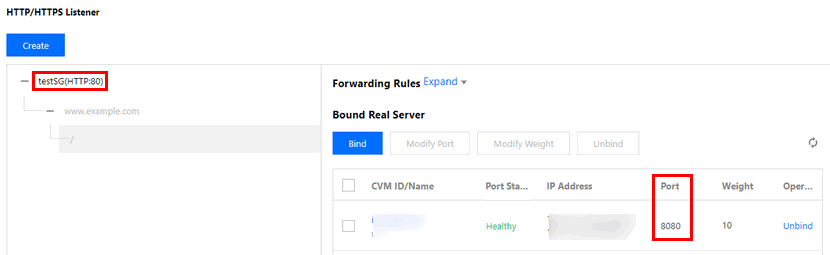
Step 1. Create a CLB instance and listener, and bind them to a CVM
For more information, please see Getting Started with CLB. An HTTP:80 listener is created and bound to a backend CVM instance whose service port is 8080 in this example.
Step 2. Configure a CLB security group
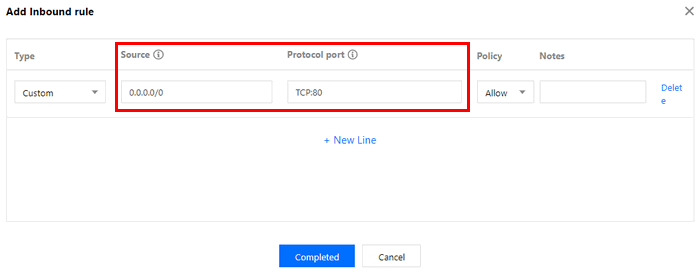
1. Configure a CLB security group rule
Log in to the Security Group Console to configure a security group rule. In the inbound rule, allow requests from port 80 of all IPs (i.e., 0.0.0.0/0) and reject traffic from other ports.
Note:
Security group rules are screened to take effect from top to bottom. If the new rule is put into effect, other rules will be denied by default; therefore, pay attention to their order. For more information, seeSecurity Group Overview.
A security group has inbound and outbound rules. The above configuration is intended to restrict inbound traffic and is therefore an inbound rule, while the outbound rule does not need to be specially configured.
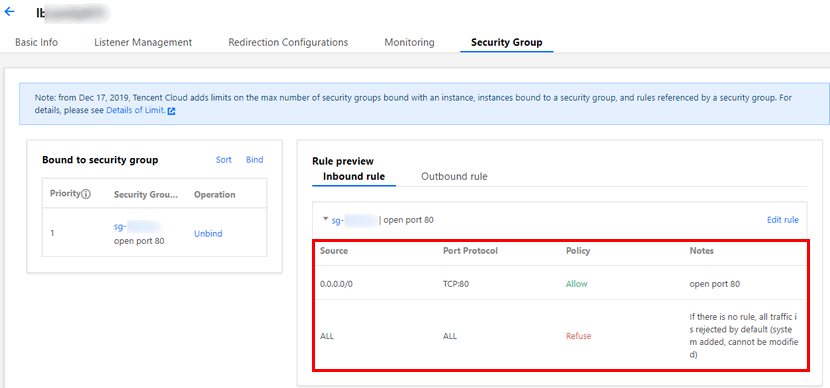
2. On the Instance Management page, click the ID of the target CLB instance.
3. On the instance details page, click the Security Group tab.
4. On the Security Group tab, click
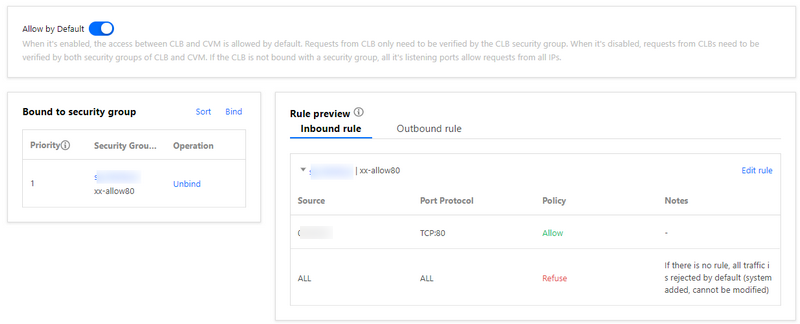
to enable Allow by Default.
5. When Allow by Default is enabled, only security group rules in the rule preview as shown below need to be verified.
Method 2. Disable Allow by Default
If Allow by Default is disabled, you need to allow the client IP in the CVM security group. Business traffic is allowed to access CVM only from CLB port 80 and use services provided by CVM port 8080.
Note:
To allow traffic from a specified client IP, you need o allow the IP in both the CLB security group and CVM security group. If the CLB does not have a security group, please allow the IP in the CVM security group.
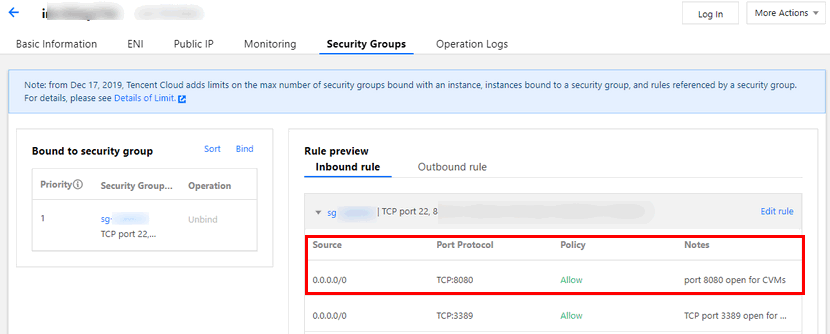
1. Configure a CVM security group rule
A CVM security group can be configured to only allow access from service ports for traffic accessing the backend CVM instance.<br>Go to the Security Group Console to configure a security group policy. In the inbound rule, all port 8080 of all IPs. To ensure smooth remote CVM login and ping services, open 22, 3389, and ICMP services in the security group.
2. Bind the security group to the CVM instance
2.1 In the CVM Console, click the ID of CVM instance bound to the CLB instance to enter the details page.
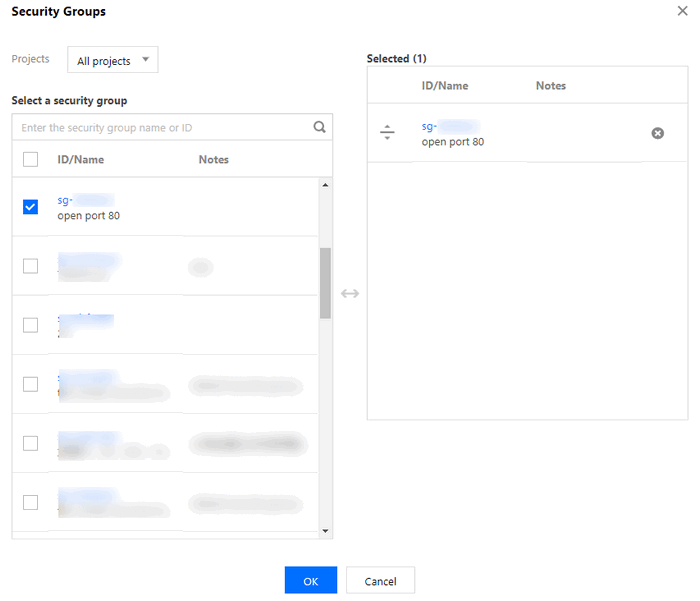
2.2 Select the Security Group tab and click Bind in the Bound Security Groups module.
2.3 In the Configure Security Group window that pops up, select the security group bound to the CVM instance and click OK.


 Yes
Yes
 No
No
Was this page helpful?