Tencent Cloud Mesh currently supports enabling sidecar auto-injection for a specified namespace on the console. After sidecar auto-injection is enabled, mesh sidecars will be automatically installed on newly created workloads under the namespace. Because injection is completed during the workload creation process, sidecars cannot be automatically installed on existing workloads even if sidecar auto-injection is enabled. You can complete sidecar auto-injection by rebuilding workloads.
Steps for configuring namespace-level sidecar auto-injection are as follows:
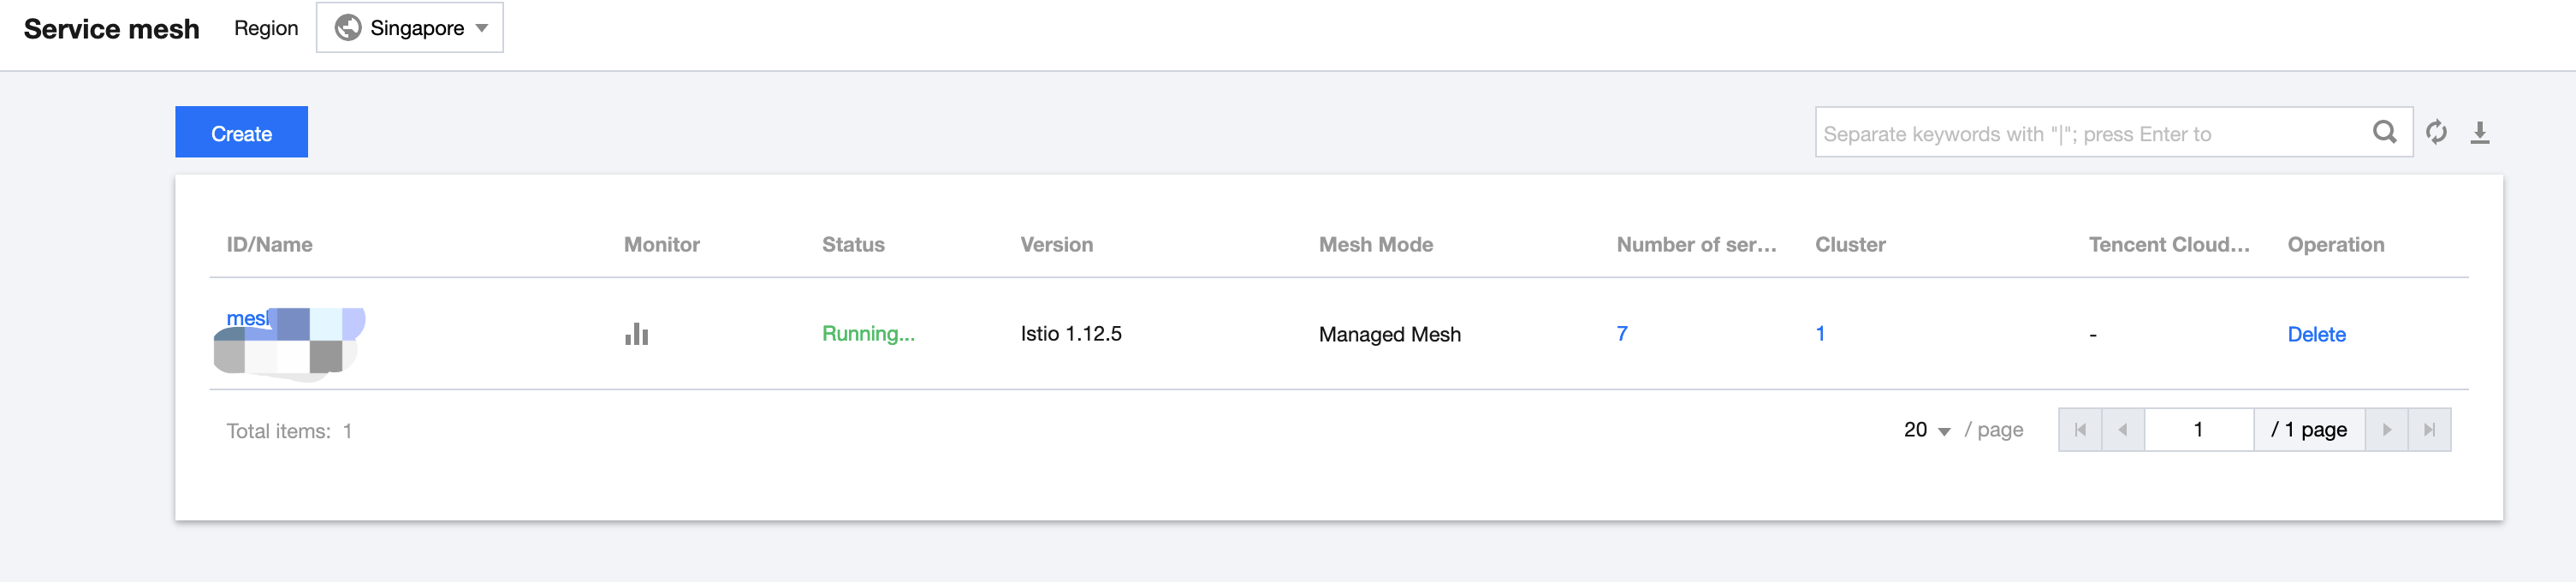
1. Log in to the Tencent Cloud Mesh console, and click a specified mesh ID in the list to enter the mesh management page.
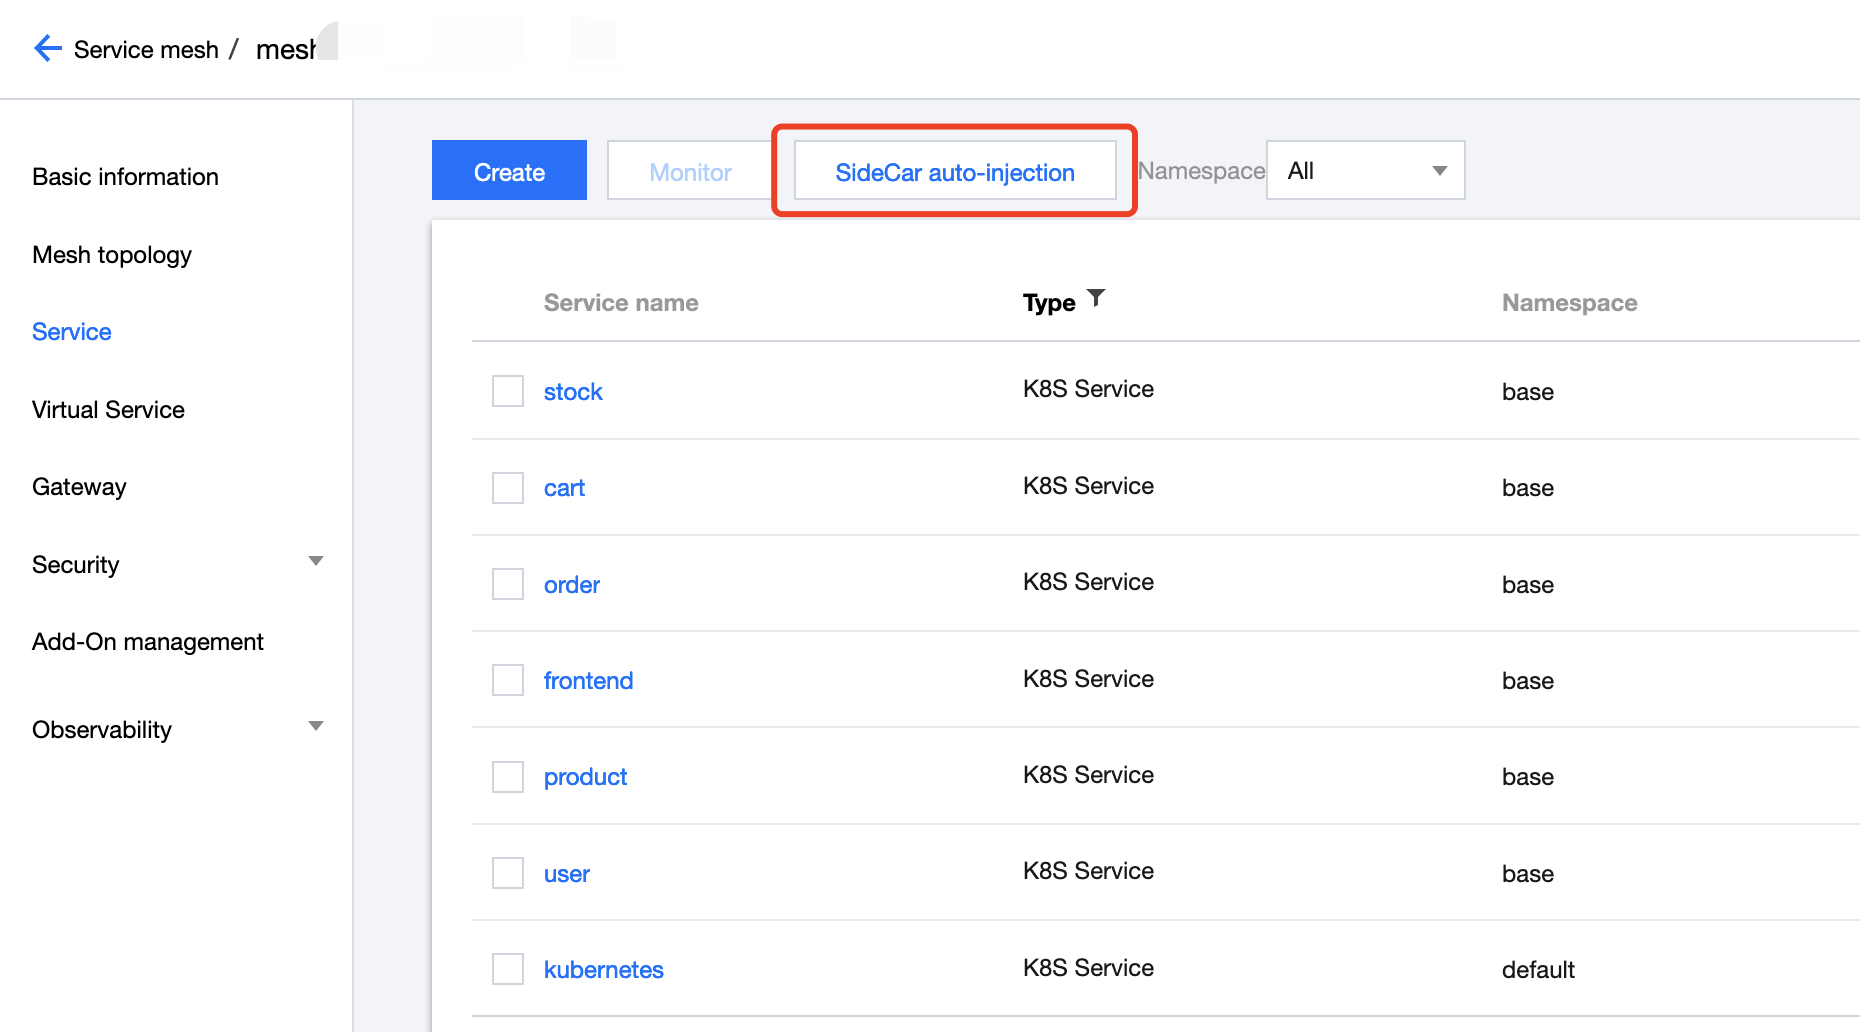
2. On the service list page, click Sidecar auto-injection to pop up the Sidecar auto-injection configuration window.
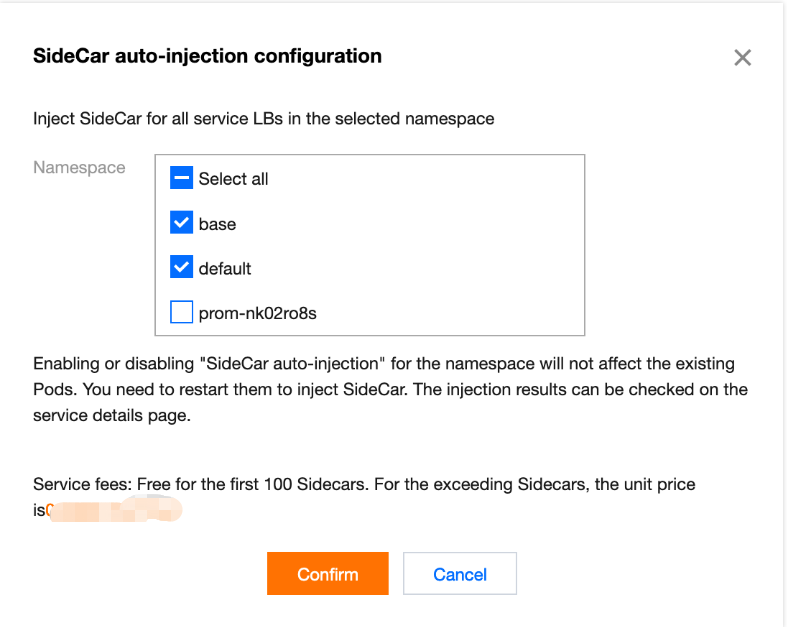
3. Select one or more namespaces for which sidecar auto-injection needs to be enabled, and click Confirm to complete sidecar auto-injection configuration.
Customizing Sidecar Injection
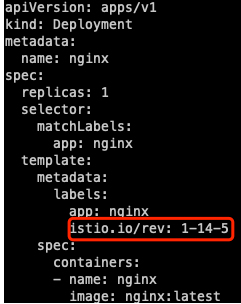
Tencent Cloud Mesh also allows you to enable sidecar auto-injection for a specific workload by editing a .yaml file. If necessary, you can add a label istio.io/rev: {Istio version number} to a pod. (Note that label settings related to sidecar injection in Tencent Cloud Mesh are slightly different from Istio's default syntax.) An example is as follows:
If you need to add a special case for a specific pod under a namespace that has auto-injection enabled to disable sidecar auto-injection, you can add a label sidecar.istio.io/inject="false" for the pod. Pod-level injection has a higher priority than namespace-level injection. For more details on sidecar auto-injection, see the Istio documentation Installing the Sidecar.
Allowing Traffic from Specified IP Ranges
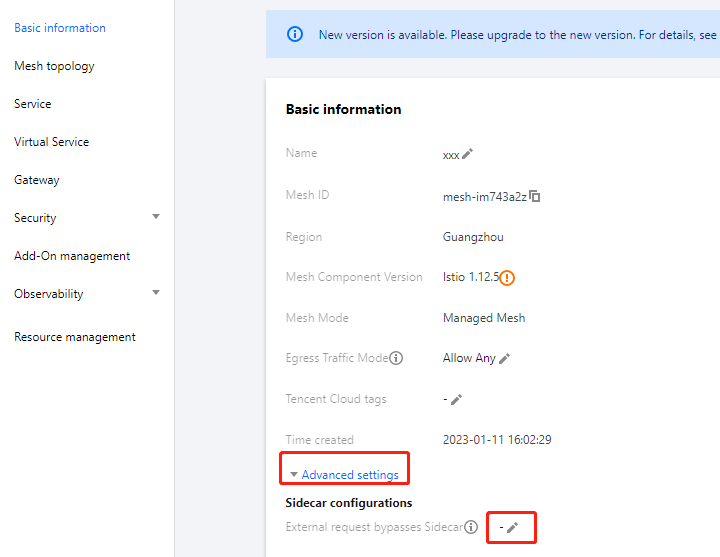
You can configure not to block certain traffic. For example, you may not want to block the traffic of uploading files to Cloud Object Storage (private destination IPs beginning with 169.254). If such traffic is blocked and the downloaded files are large, it may lead to a high memory resource usage of the sidecar. The reason is that the sidecar caches the requested content and the requested content will be reused upon an automatic retry when an error occurs. To allow such traffic, you can go to the External request bypasses Sidecar window in the advanced settings area on the mesh basic information page to add the IP ranges that you do not want to block. The steps are as follows:
1. Log in to the Tencent Cloud Mesh console, and click a specified mesh ID in the list to enter the mesh management page.
2. On the basic information page, click
on the right of External request bypasses Sidecar. See the figure below:
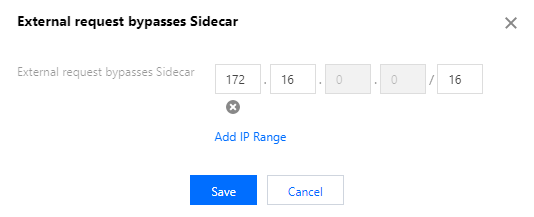
3. In the External request bypasses Sidecar window that pops up, add the IP ranges that you do not want to block. See the figure below:
4. Click Save.
Above is the global configuration method. To make configuration for certain workloads only, add the traffic.sidecar.istio.io/excludeOutboundIPRanges annotation to the pod. For more information, see Resource Annotations.
Controlling the Sidecar Startup Sequence
When Kubernetes starts a pod, all containers in the pod will be started simultaneously. In scenarios where Istio is used, because traffic will be blocked by the sidecar, if the sidecar is slower than the service containers in startup, the network requests initiated just after the service containers are started will fail, because the traffic is blocked by the sidecar but the sidecar startup is not completed. A common scenario is that, for a large-scale cluster, the sidecar starts slowly due to the slow pull of XDS when the sidecar is started, and the service process needs to pull configuration from the registry when it starts. The configuration pull fails because the traffic is blocked by the sidecar but the sidecar is not ready to handle the traffic at the time, and then the service process reports an error and exits, and the containers exit as a result.
Two solutions are available: The first is to make the service code more robust by retrying requests that fail during startup until they succeed. The second is to let the sidecar start first, and then start the service containers when the sidecar is ready. You can follow the steps below to enable sidecar readiness guarantee:
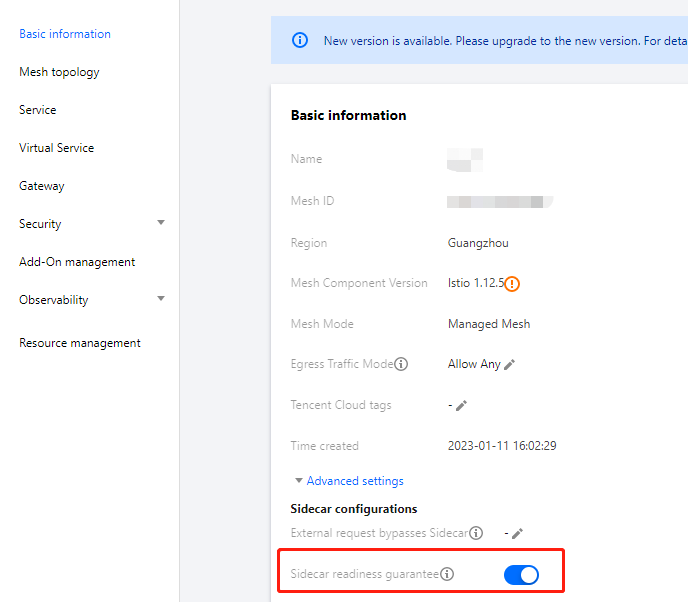
1. Log in to the Tencent Cloud Mesh console, and click a specified mesh ID in the list to enter the mesh management page.
2. On the basic information page, click
on the right of Sidecar Readiness Guarantee. See the figure below:
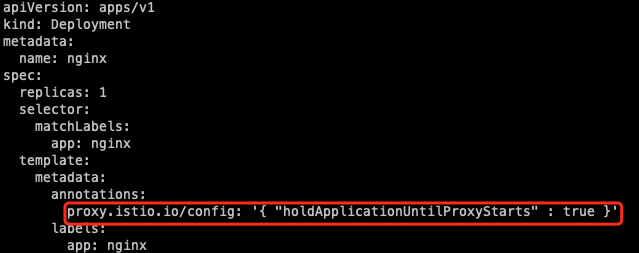
Above is the global configuration method. To make configuration for certain workloads only, add the following annotation to the pod:
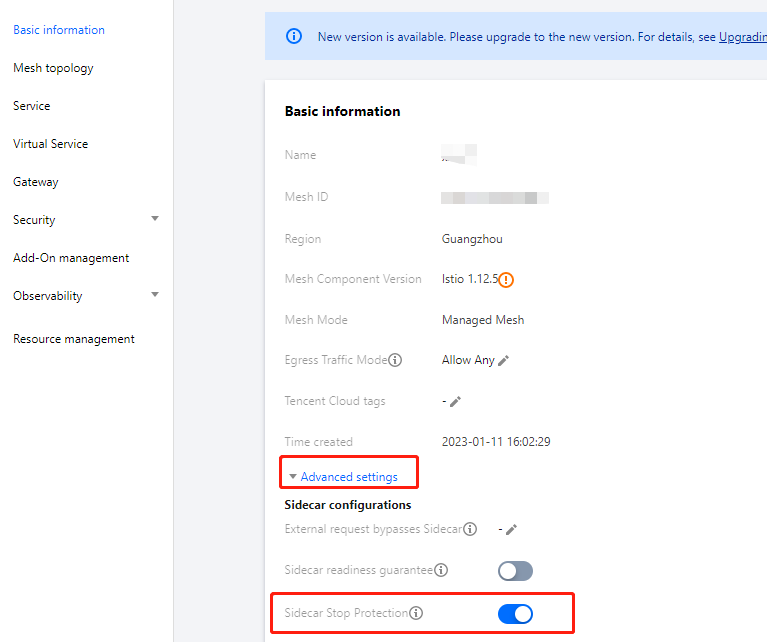
When a service is released, the associated workload will be updated on a rolling basis. During the termination of the pod, the sidecar waits only a few seconds by default before being forced to stop. If the service requests themselves take a long time, or if persistent connections are used, some normal service requests and connections may be interrupted. We want the sidecar to wait for the existing service requests and connections to end before exiting for graceful termination. To achieve this, the environment variable EXIT_ON_ZERO_ACTIVE_CONNECTIONS is added to sidecars starting from Istio 1.12, and, in responses, the server instructs the client to end persistent connections (adding the Connection: close header to HTTP 1 responses and adding the GOAWAY frame to HTTP 2 responses). You may follow the steps below to enable sidecar stop protection:
1. Log in to the Tencent Cloud Mesh console, and click a specified mesh ID in the list to enter the mesh management page.
2. On the basic information page, click
on the right of Sidecar Stop Protection. See the figure below:
Above is the global configuration method, which is recommended. To make configuration for certain workloads only, add the following annotation to the pod:
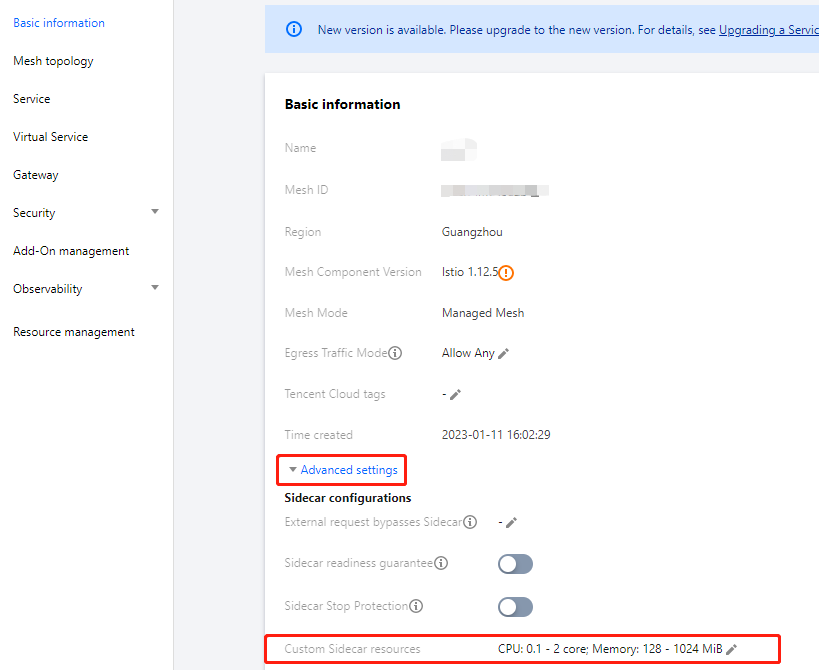
A sidecar is a container under a pod, and request and limit also need to be set for a sidecar. When necessary, you can make global custom configuration in the advanced settings area on the mesh basic information page. The steps are as follows:
1. Log in to the Tencent Cloud Mesh console, and click a specified mesh ID in the list to enter the mesh management page.
2. On the basic information page, click
on the right of Custom Sidecar resources. See the figure below:
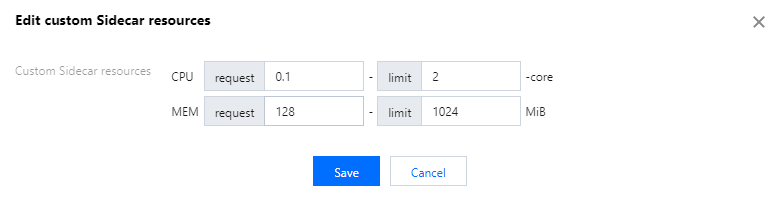
3. In the Custom Sidecar resources window that pops up, edit custom resources. See the figure below:
4. Click Save.
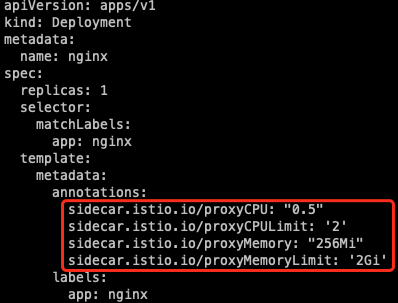
To apply different custom sidecar resources for different workloads, add annotations similar to the following to the pod:
sidecar.istio.io/proxyCPU:"0.5"
sidecar.istio.io/proxyCPULimit:'2'
sidecar.istio.io/proxyMemory:"256Mi"
sidecar.istio.io/proxyMemoryLimit:'2Gi'
If TKE Serverless is used and you do not want to increase the pod specifications significantly due to sidecar request and limit settings, you can use annotations to set request but not limit. You can set request as needed. The value 0 indicates that the pod specifications will not be upgraded due to sidecars.


 Yes
Yes
 No
No
Was this page helpful?