- Updates and Announcements
- Product Introduction
- New/Legacy Anti-DDoS Advanced Version Differences
- Comparison of Anti-DDoS Protection Schemes
- Purchase Guide
- Getting Started
- Operation Guide
- Best Practice
- API Documentation
- FAQs
- Troubleshooting
- Anti-DDoS Advanced (Global Enterprise Edition)
- Legacy Anti-DDoS Advanced (Legacy)
- Service Level Agreement
- Contact Us
- Glossary
This document describes how to connect a non-website business to an Anti-DDoS Advanced instance and verify the forwarding configuration.
Prerequisites
- To add a forwarding rule, you need to purchase an Anti-DDoS Advanced instance in Mainland China or outside Mainland China.
- To modify the DNS information of your business domain name, you need to purchase the domain name resolution product.
Process

Directions
Configuring forwarding rule
- Log in to the new Anti-DDoS Advanced Console and click Business Connection on the left sidebar.
- On the "Business Connection" page, select the Port Connection tab and click Add Rule.
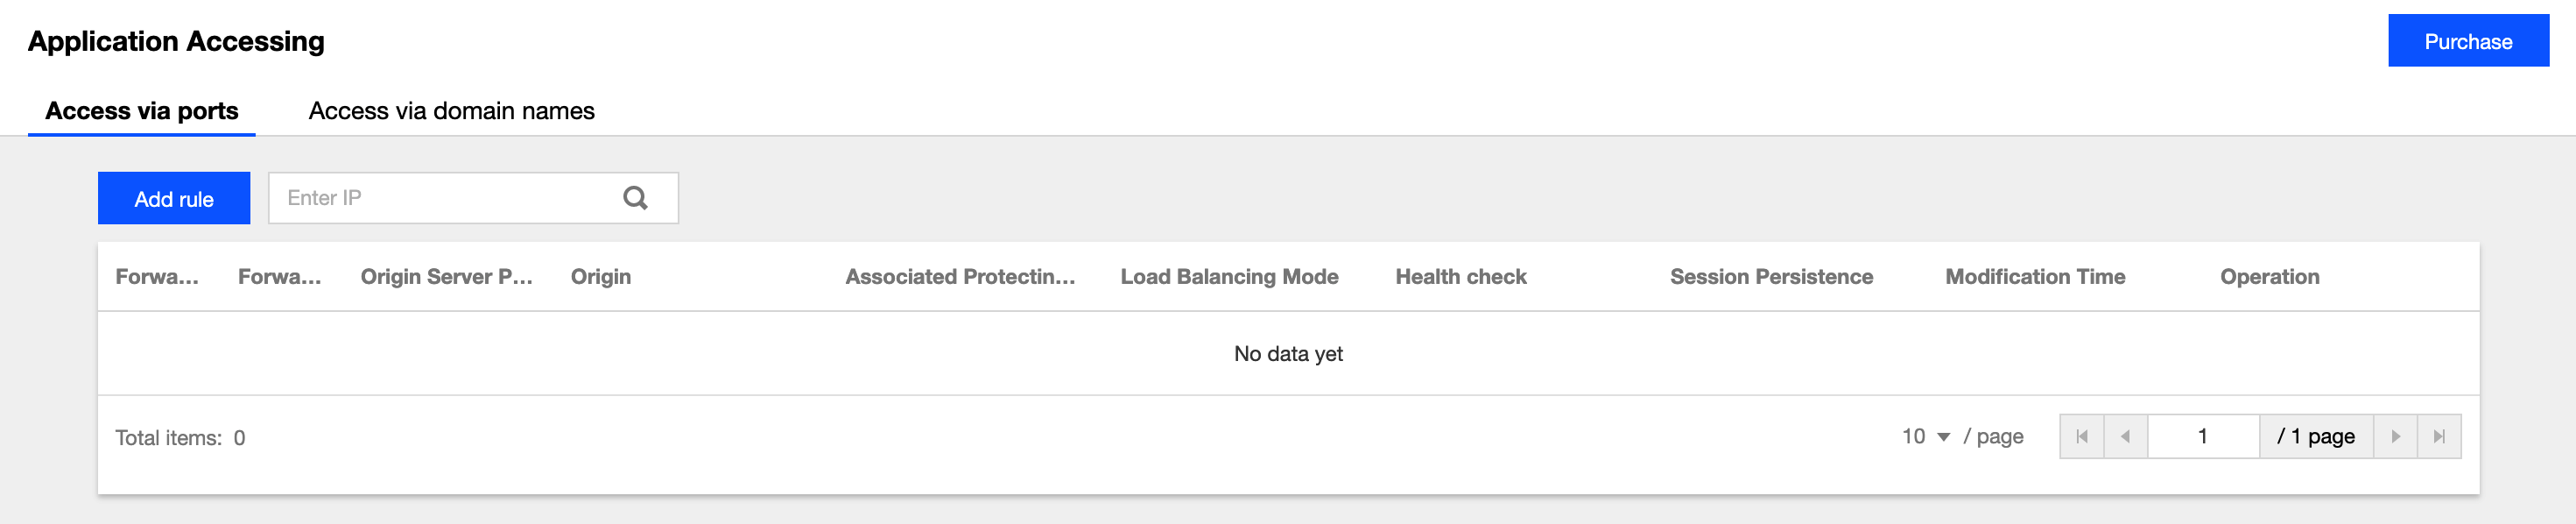
- On the forwarding rule adding page, configure the following parameters as needed:
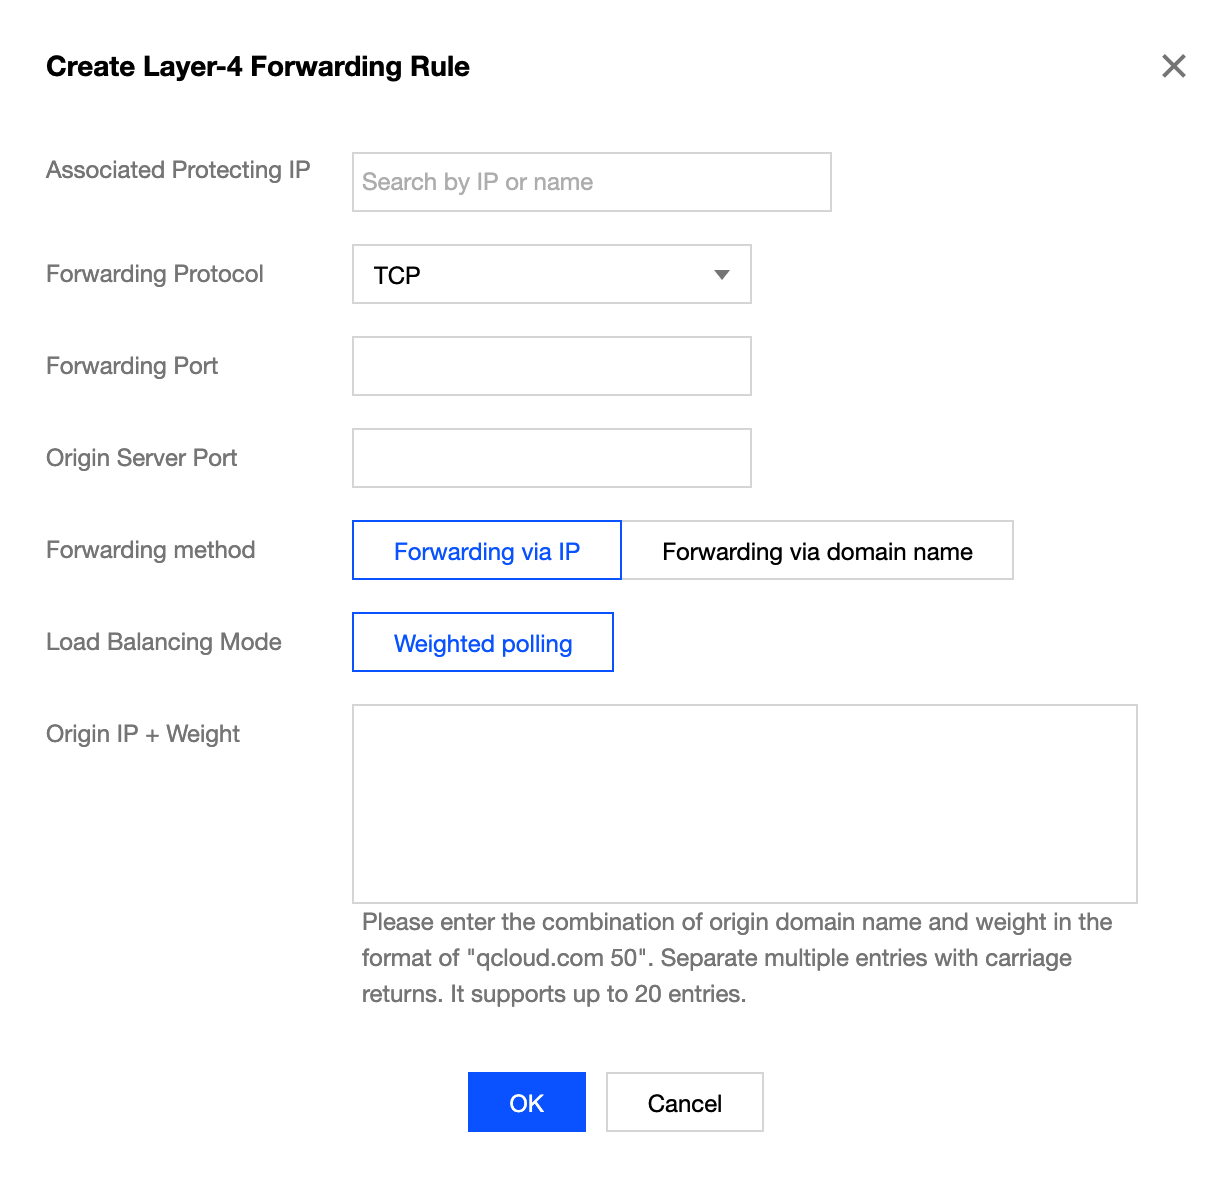
Parameter description:- Associated Anti-DDoS Advanced IP: select the target IP.
- Forwarding Protocol: TCP and UDP are supported.
- Forwarding Port: it is the Anti-DDoS Advanced IP port to be accessed. You are recommended to select the same port as that of the real server. Port 843 cannot be used as the forwarding port of an Anti-DDoS Advanced IP in all regions except Beijing and Guangzhou.
- Real Server Port: it is the real port of your business website.
- Forwarding Method: forwarding via IP and forwarding via domain name are supported.
- Load Balancing Method: only weighted round-robin is supported currently.
- Real Server IP + Weight or Real Server Domain Name: enter the real server IP + weight or real server domain name based on the forwarding method. Up to 20 pairs of IP + weight or domain names are supported.
- If you select Forwarding via IP, enter the real server IP address + weight such as
1.1.1.1 50. If a domain name corresponds to multiple pairs of real server IP + weight, you can enter all of them and separate them with carriage returns. Up to 20 entries are supported. - If you select Forwarding via domain name, enter the real server domain name. If one domain name corresponds to multiple real server domain names, you can enter all of them and separate them with carriage returns. Up to 20 entries are supported.
- If you select Forwarding via IP, enter the real server IP address + weight such as
Opening forwarding IP range
To prevent business interruption that occurs if the real server blocks the Anti-DDoS Advanced forwarding IP, you are recommended to configure allowlist policies for the real server infrastructure (such as firewall, web application firewall, intrusion protection system (IPS), and traffic management system) and disable the protection features of the server firewall and other security software tools (such as Safedog) or set allowlist policies for them, so that the forwarding IP will not be affected by the security policies of the real server.
You can log in to the new Anti-DDoS Advanced Console and click Instance List on the left sidebar to find the target instance ID.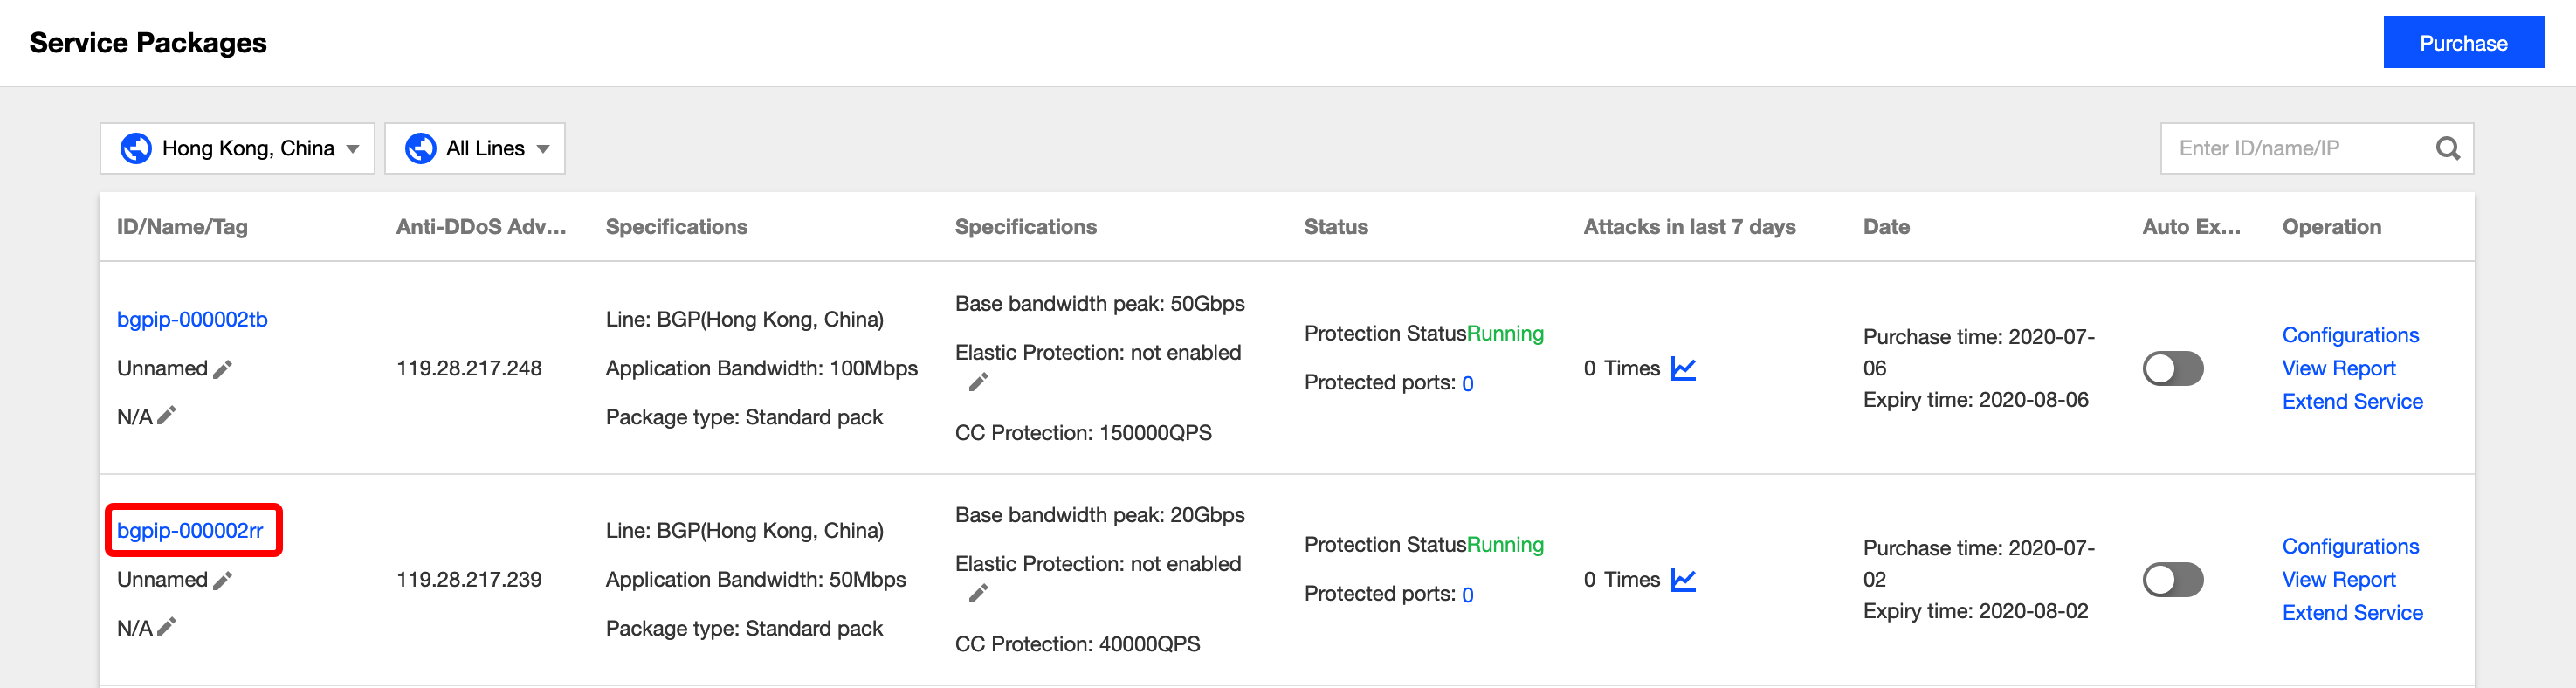
Click the instance ID to enter the basic information page and view the Anti-DDoS Advanced forwarding IP range.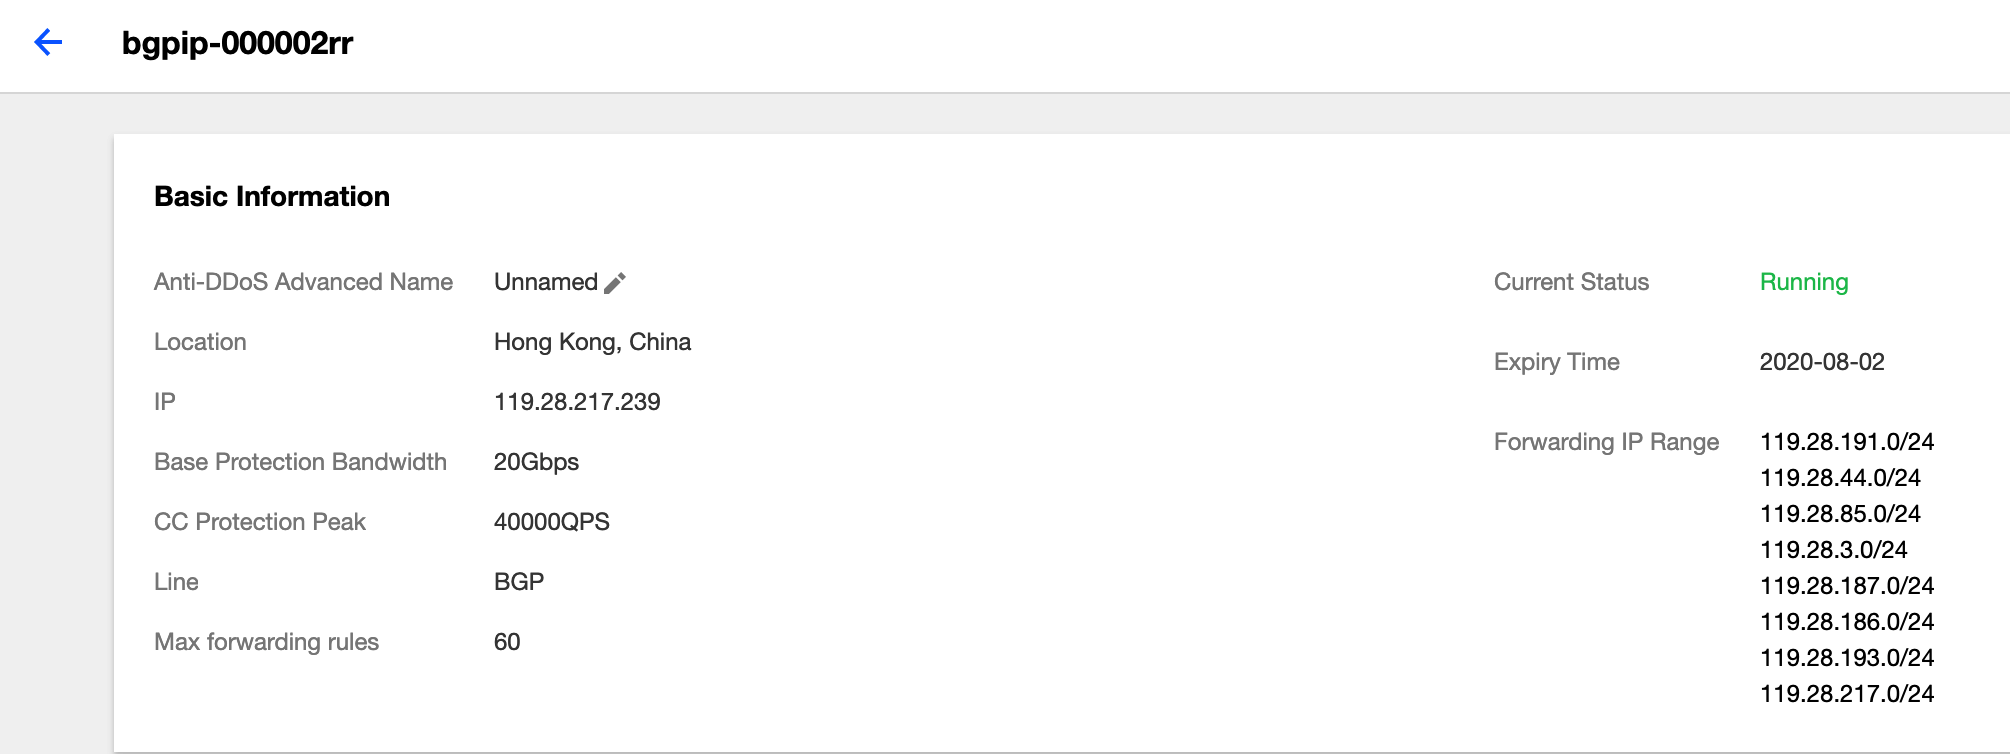
Verifying configuration locally
After the forwarding configuration is completed, the Anti-DDoS Advanced IP will forward the packets from the relevant port to the corresponding real server port according to the forwarding rule.
To ensure the stability of your business, a local test is recommended. The verification method is as follows:
For businesses accessed through IPs
For businesses accessed through IPs (such as games), runtelnetto check whether the Anti-DDoS Advanced port is accessible. You can also enter the Anti-DDoS Advanced IP as the server IP in your local client (if available) to check whether the local client can connect to it.For example, if your Anti-DDoS Advanced IP is
10.1.1.1with forwarding port1234, and your real server IP is10.2.2.2with port1234, when you runtelnetlocally to access10.1.1.1:1234, if the address can be accessed, the forwarding is successful.For businesses accessed through domain names
For businesses accessed through domain names, you can modify the localhostsfile to verify whether the configuration has taken effect.
a. Modify the localhostsfile to direct local requests to the protected site to your Anti-DDoS Advanced instance. The following uses Windows as an example to describe how to configure the localhostsfile:
Open thehostsfile inC:\Windows\System32\drivers\etcand add the following content at the end of the file:<Anti-DDoS Advanced IP address> <Domain name of the protected website>For example, if the Anti-DDoS Advanced IP is
10.1.1.1and the domain name iswww.qq.com, then add:10.1.1.1 www.qqq.comSave the
hostsfile and run thepingcommand on the local computer to ping the protected domain name. If the resolved IP address is the Anti-DDoS Advanced IP address bound in thehostsfile, the localhostsconfiguration has taken effect.If the resolved IP address is still the real server IP address, try running the
ipconfig /flushdnscommand in Windows Command Prompt to clear the local DNS cache.b. After successfully configuring the
hosts, check whether the domain name can be accessed. If it can be accessed properly, the configuration has taken effect.
If the verification still fails with the correct method, please log in to the Anti-DDoS Advanced Console and check whether the configuration is correct. If the problem persists after you fix any incorrect configuration items, please contact Tencent Cloud technical support.

 Yes
Yes
 No
No
Was this page helpful?