You can create a CVM instance on a purchased CDH instance through the console or an API.
Prerequisites
To assign a CVM to a CDH instance, complete the following preparations as needed:
To create a CVM instance whose network type is virtual private cloud (VPC), you need to create a VPC in the target region and create a subnet in the target availability zone under the VPC.
If you do not use the default project, you need to create a project.
If you do not use the default security group, you need to create a security group in the target region and add a security group rule that meets your business requirements.
To bind a SSH key pair when creating a Linux instance, you need to create a SSH key for the target project.
The number of CVMs that can be created on a CDH instance depends on the CVM specifications and the available resources including CPU, memory, and local disk.
For example, a completely idle HS20 (56 cores and 224 GB memory) can be assigned with seven 8-core, 32 GB CVMs.
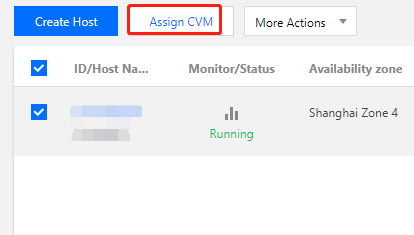
2. On the Dedicated Host page, select a desired region. Under the region, select a CDH instance, and click Assign CVM, as shown below:
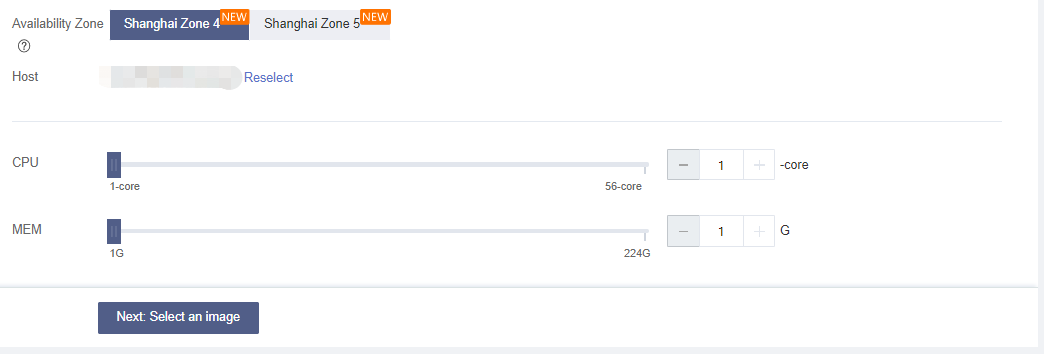
Selecting CPU and memory configurations for CVMs
1. On the 1. Select the region and model page, select the region, model, and other information.
Main parameters are described as follows:
CPU: you can customize the CVM CPU according to the remaining resources of the selected CDH or host resource pool.
MEM: you can customize the CVM memory according to the remaining resources of the selected CDH or host resource pool.
Note:
The CVM configurations determine the number of CVMs that can be created.
2. Click Next: Select an image.
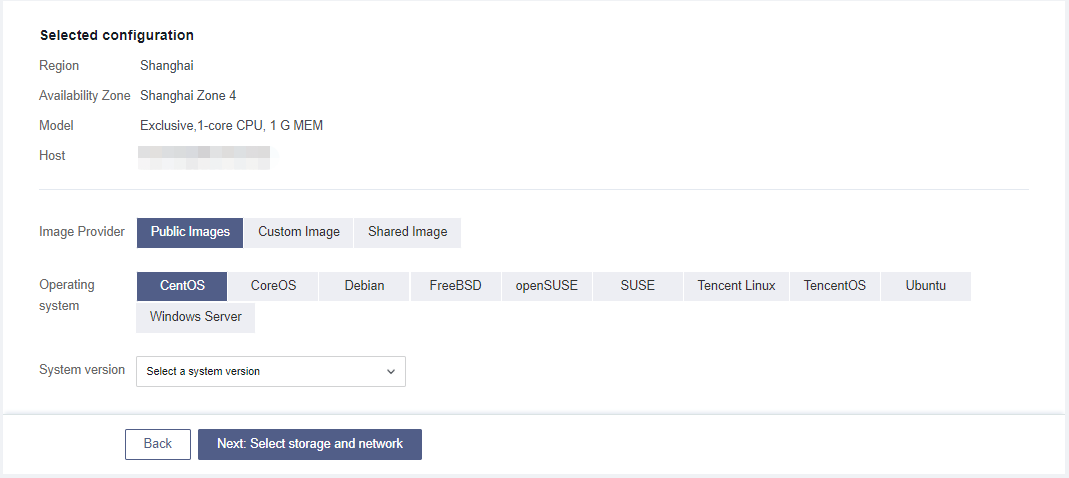
Selecting an image
1. On the 2. Select an image page, select an image.
Main parameters are described as follows:
Image Provider: Tencent Cloud provides three types of images, namely public images, custom images, and shared images. For more information, see Image Types.
Operating system: select the operating system used in your environment.
System version: select the operating system version used in your environment.
2. Click Next: Select storage and network.
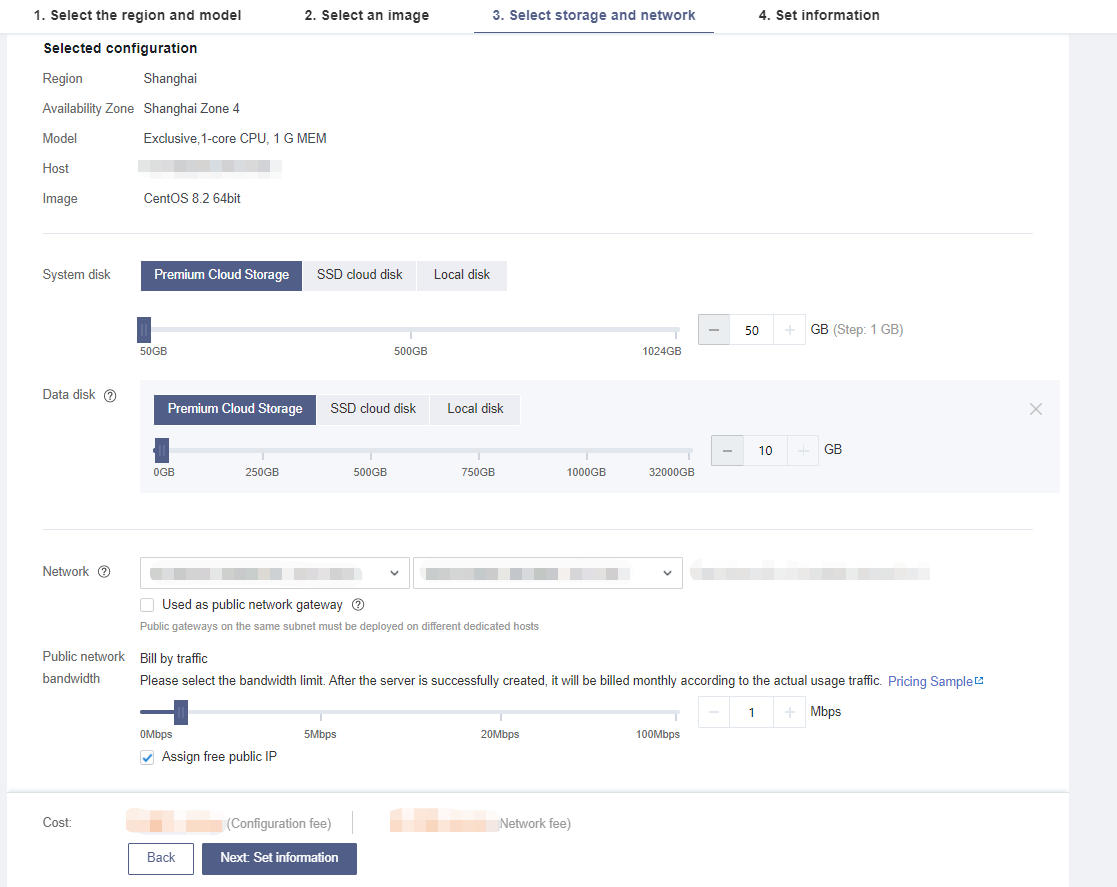
Selecting storage and network configurations
1. On the Select storage and network page, select the system disk and data disk, and configure network information.
Main parameters are described as follows:
System disk: this parameter is required. The system disk is used to install the operating system. Its default capacity is 50 GB. You can select a disk type and capacity as needed. The available disk types vary depending on the region selected.
Data disk: this parameter is optional. You can choose to add a data disk when or after creating an instance, and select the cloud disk type and capacity. You can also create an empty data disk or create a data disk using a data disk snapshot.
CVM supports local disks (HDD or SDD) and cloud disks (HDD, Premium Cloud Storage, and SSD) for storage. For more information about cloud disks, see Cloud Disk Types.
Network type:
Classic Network: the classic network is unavailable for all accounts in regions that were activated after August 3, 2017 and some accounts that were registered after June 13, 2017.
Virtual Private Cloud: select a VPC and a subnet. If no existing VPC and subnet are available, select the default VPC and subnet. For more information about the classic network and VPC, see Overview.
Public IP: the network of CVMs on a CDH instance supports only bill-by-traffic. To assign a public IP to a CVM, select Buy Now. The public IP assigned in this way cannot be directly unbound from the instance. However, you can convert the public IP into an EIP and then unbind it from the instance.
Public network bandwidth: set this parameter based on your actual requirements.
CVM Quantity: set this parameter based on your actual requirements.
2. Click Next: Set information.
Setting information
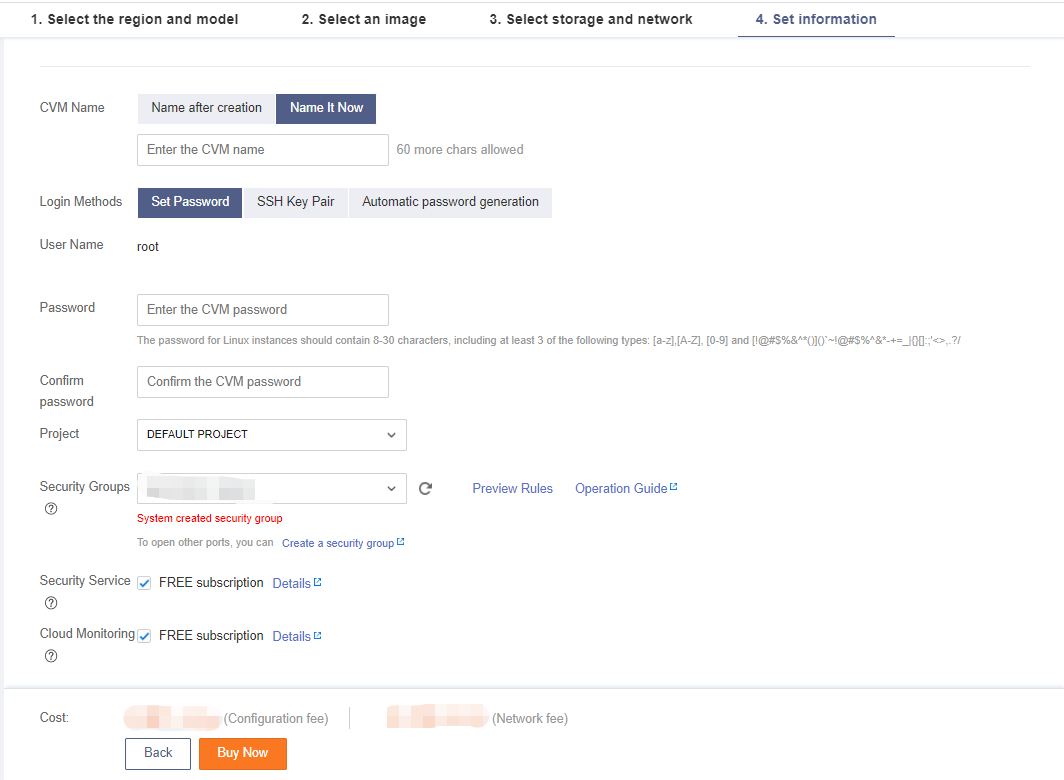
1. On the 4. Set information page, set the project, CVM name, and login method, and select a security group.
Main parameters are described as follows:
CVM Name:
If you select Name after creation, the name of the CVM after creation will be Unnamed, which is displayed only on the console and is not the host name of the CVM.
If you select Name It Now, enter a meaningful name within 60 characters.
Login Methods:
For CVMs with Linux images, the options include Set Password, SSH Key Pair, and Automatic password generation.
For CVMs with Windows images, the options include Set Password and Automatic password generation.
Security Groups:
If no security group is available, click Create a security group.
If there are available security groups, select an existing one. You can also preview the security group rules. For more information about security group rules, see Security Group.
Security Service: by default, DDoS Protection, Web Application Firewall (WAF), and Cloud Workload Protection are activated for free. For more information, see Product Introduction.
Cloud Monitoring: by default, cloud monitoring is enabled for free. You can install Cloud Monitor to obtain CVM monitoring metrics and display them in visual charts. You can also specify custom alarm thresholds. For more information, see Product Overview.
2. Click Buy Now.
Note:
After the CVM is created, go to the Message Center and receive information such as instance name, public IP, private IP, login name, and initial login password (if you choose the login method Automatic password generation). You can use these information to log in to and manage instances.
Creating a CVM via an API
Use the RunInstances API to create CVM instances on a specified CDH instance.

 Yes
Yes
 No
No
Was this page helpful?