Authentication Policy
Download
Focus Mode
Font Size
Scenarios
Authentication policies control client access to AI Gateway APIs. By configuring authentication policies, you can:
Configure different access permissions for different consumers.
A single consumer supports configuring multiple types of credentials.
Achieve fine-grained access control and security protection.
Authentication policies are configured when a model API is created, ensuring that only authorized clients can access the gateway service.
This document guides you on how to configure and manage authentication policies in AI Gateway. Supported authentication methods include API Key, JWT, OAuth 2.0, and OIDC.
Prerequisites
The AI Gateway instance has been created. For details, see Create AI Gateway.
The consumer has been created. For details, see Create Consumer.
The model API has been created. For details, see Create Model API.
Authentication key credentials have been created for the consumer. For details, see Create Consumer Key.
Operation Steps
Configuring an Authentication Policy for the Model API
After creating a consumer and adding credentials, you must configure an authentication policy in the model API.
Note:
1. The API can only be accessed by consumers using the configured authentication method.
2. If a consumer is configured with a different authentication method, the authentication will fail because the method does not match the API configuration, resulting in access failure. Ensure that the consumer is configured with an authentication method consistent with the API.
Step 1: Go to the Model API Authentication Policy Configuration Page
1. Log in to the AI Gateway console and select the target instance.
2. In the left sidebar, choose Model Management > Model API. Then, click the target API ID to go to its details page.
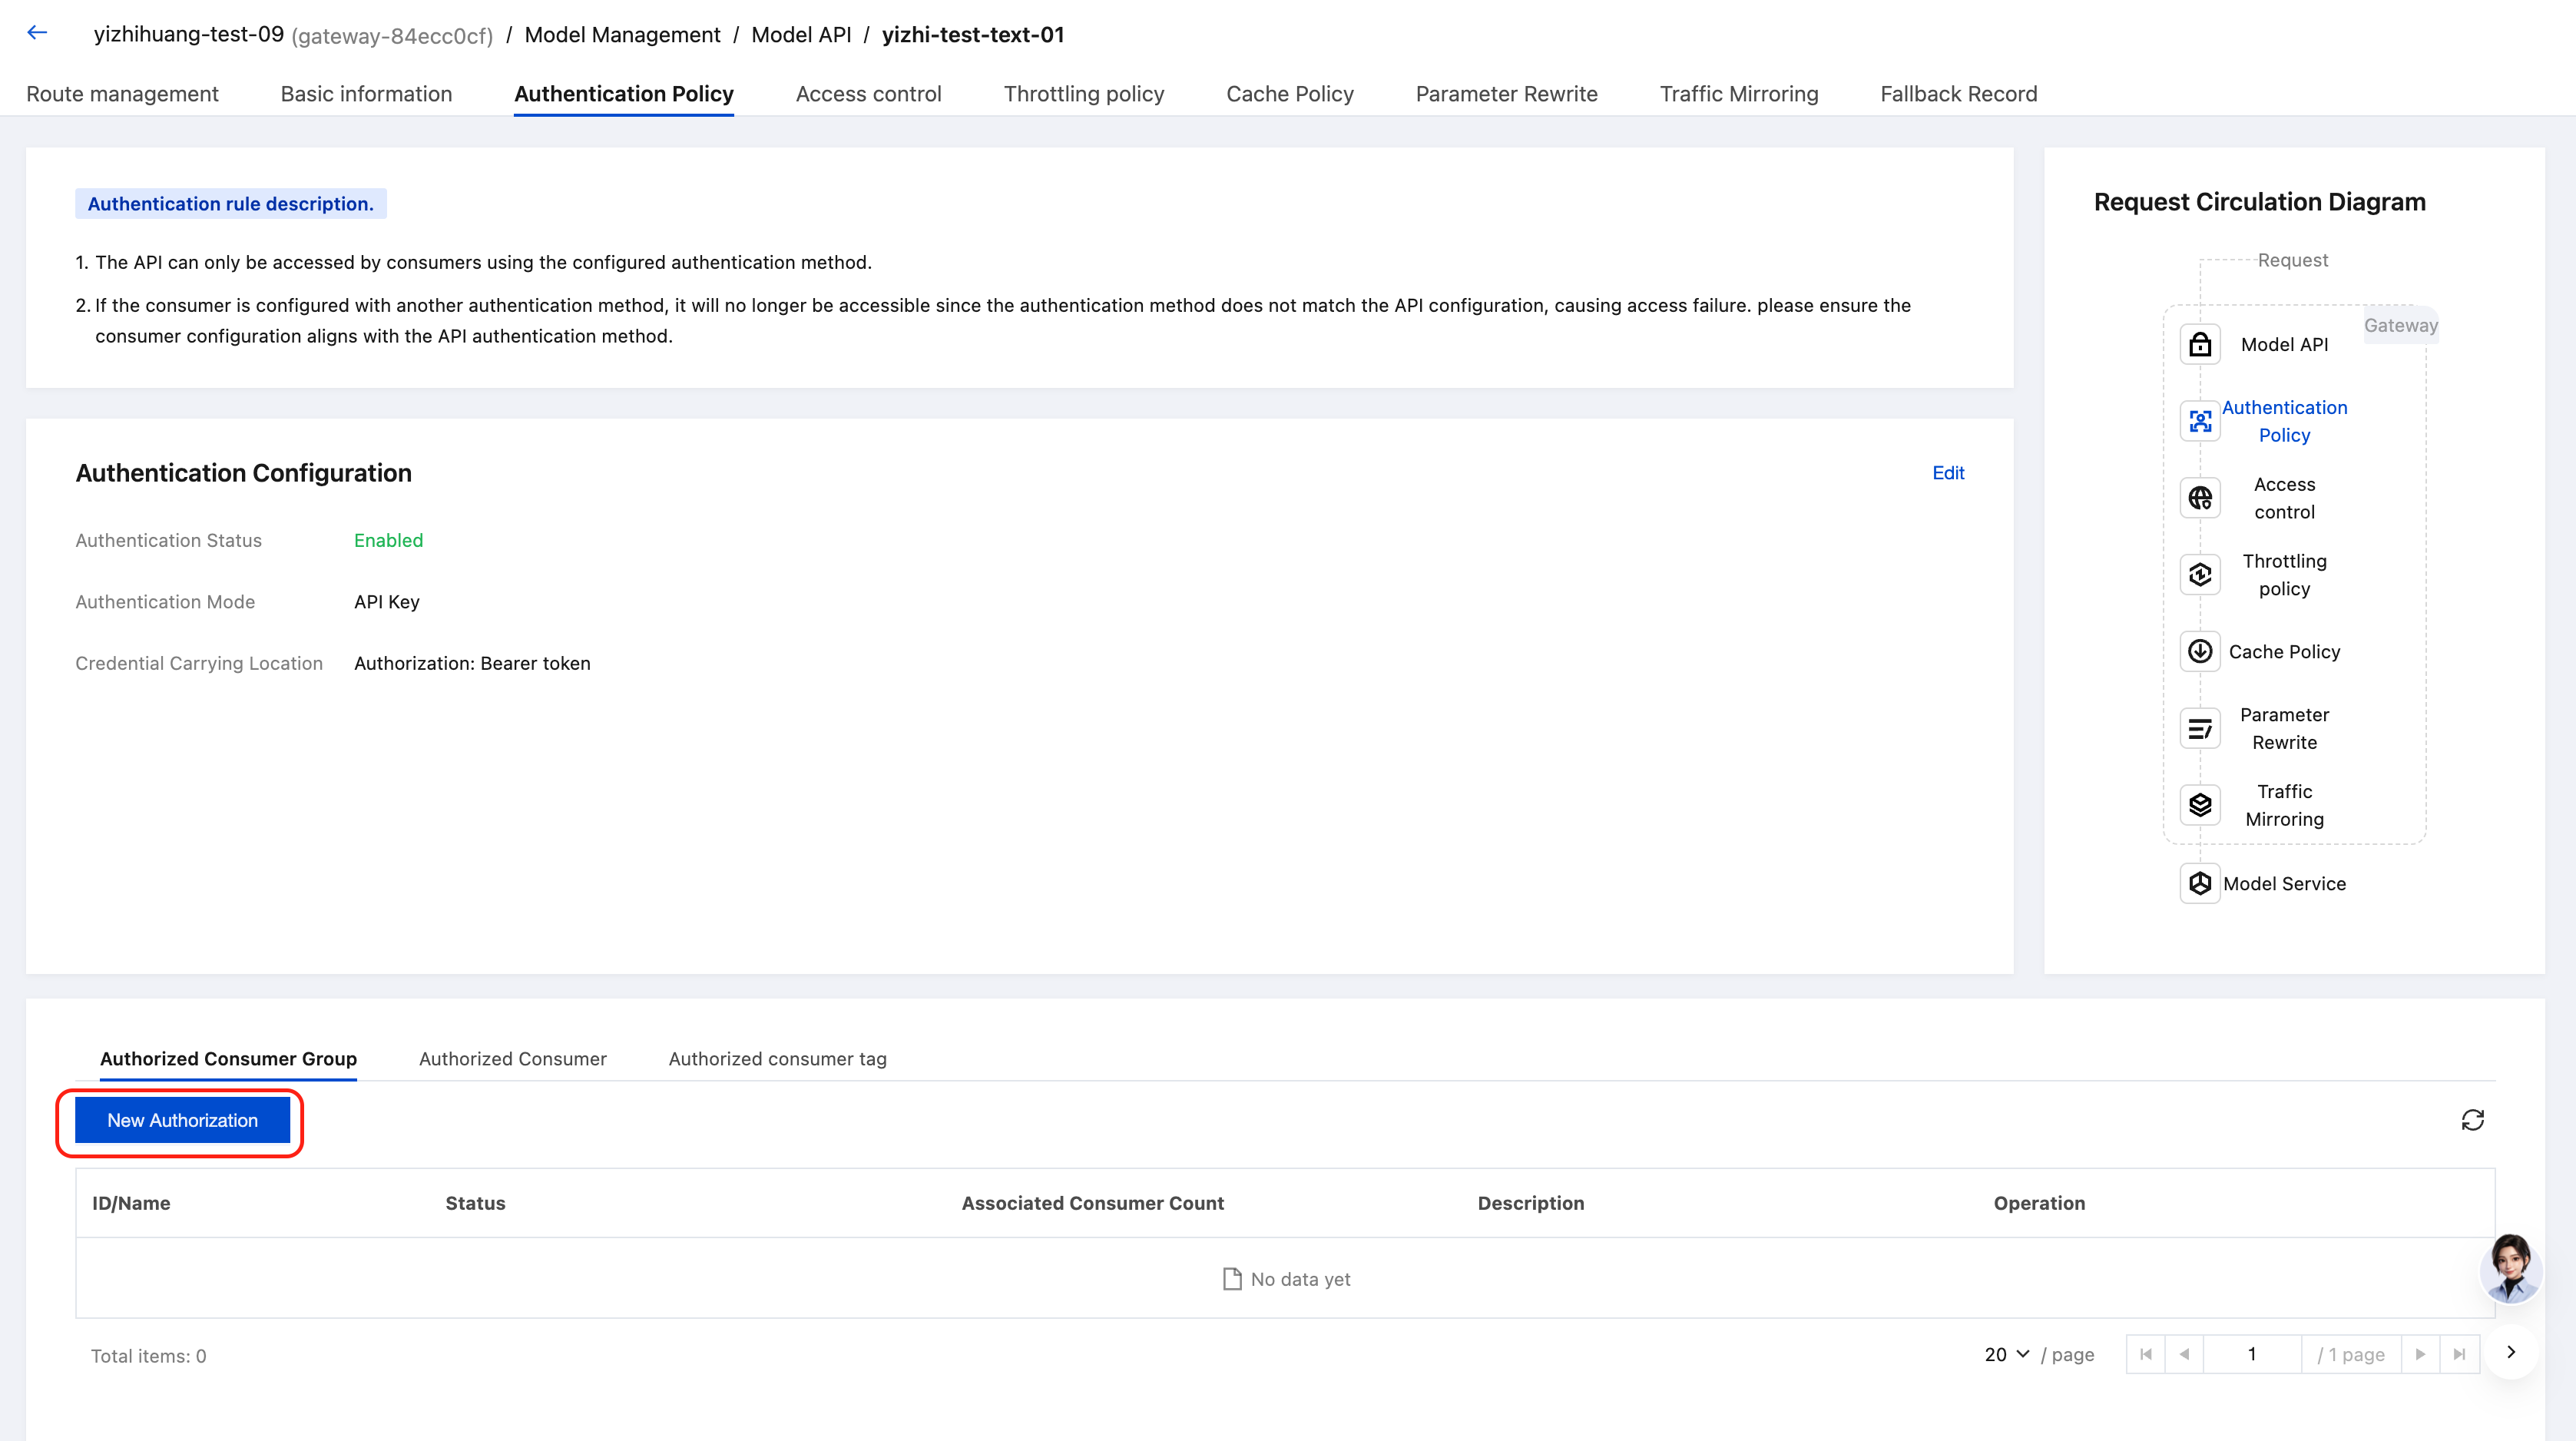
3. At the top of the details page, click the Authentication Policy tab.
Step 2: Enable Authentication and Select an Authentication Method
Click Edit and complete the following configurations:
Parameter | Required | Description |
Enable Authentication | Yes | Authentication switch. When disabled, it becomes an authentication-free mode, allowing any client to access the API without any authentication. For private network environments or testing scenarios, the authentication-free mode can be selected. Using the authentication-free mode is strongly discouraged in production environments. |
Authentication Method | Yes | API Key The system will automatically generate an API Key. |
| | JWT Header Name: Extract the JWT from the specified request header. Separate multiple JWTs with English commas. Cookie Name: Extract the JWT from the specified Cookie. Separate multiple JWTs with English commas. URI Parameter: Extract the JWT from the specified URI parameter. Separate multiple parameters with English commas. Consumer ID: Used to match the consumer's identifier. Standard Claims Validation: exp (expiration time), nbf (not before time). Maximum Validity Period: The maximum validity period allowed for a JWT, measured in seconds. A value of 0 indicates no limit. Base64 Encoding: Disabled (default) the plug-in directly uses the secret field stored in the cngw_jwt_secrets table as the signature key and performs HMAC verification on the JWT with it. Enabled the plug-in treats the secret stored in the database as a Base64-encoded string. It first decodes the secret to obtain the original key and then uses that key for verification. CORS Preflight Validation: Whether to validate CORS preflight requests. |
| | OAuth 2.0 Header Name: Extract the Access Token from the specified request header. Separate multiple tokens with English commas. Token Expiration Time: The Token expiration time, measured in seconds. A value of 0 indicates no limit. Scope Allowlist: The allowed Scope allowlist. Separate multiple scopes with English commas. Mandatory Scope Validation: Whether to mandatorily validate the Scope of the Token carried by the request. |
| | OIDC Client ID (required): The OIDC client ID. Client Secret (required): The OIDC client secret. Issuer URL (required): The issuer URL of the identity provider, used to discover OIDC configuration, for example, https://example.com/oidc. Audience: The expected Audience. If left empty, it is not validated. Scopes: The requested Scopes. Separate multiple scopes with English commas. Consumer ID: Used to match the consumer's identifier. Realm: The realm identifier returned in the WWW-Authenticate response header upon authentication failure. Timeout: The timeout duration for requests to the identity provider, measured in seconds. Token Endpoint Authentication Method: The authentication method used when a client makes a request to the Token Endpoint. Introspection Endpoint: The address of the token introspection endpoint. Introspection Endpoint Authentication Method: The authentication method used when a request is made to the Introspection Endpoint. |
Note:
A single API supports only one authentication method.
A single API can be bound to multiple consumers.
A single consumer can be configured with multiple types of credentials (such as both an API Key and a JWT), and the client can choose which credential to use based on the actual situation.
Step 3: Save the Configuration
Click OK to save the authentication policy configuration.
Adding Permissions
On the Authentication Policy page, authorize the specified consumer group/consumer.
Usage Methods
After configuration is complete, the client includes the corresponding credentials in the request to access the gateway. In the following example, the credential extraction location (such as the Authorization header) must match the Header Name / Cookie Name / URI Parameter configured in the authentication policy.
API Key
When making a client request, include the API Key in the request header:
curl -X POST https://{Gateway Domain}/{base_path}/v1/chat/completions \\-H "Authorization: Bearer {API_Key}" \\-H "Content-Type: application/json" \\-d '{"model": "qwen-plus","messages": [{"role": "user", "content": "Hello"}]}'
Note:
The Authorization Header format is
Bearer {API_Key}.Once an API Key is generated, keep it secure and do not disclose it to unauthorized personnel.
JWT
When a client request is made, include the JWT Token in the request header:
curl -X POST https://{Gateway Domain}/{base_path}/v1/chat/completions \\-H "Authorization: Bearer {JWT_Token}" \\-H "Content-Type: application/json" \\-d '{"model": "qwen-plus","messages": [{"role": "user", "content": "Hello"}]}'
JWT Token Example (HS256):
Header:{"alg": "HS256","typ": "JWT"}Payload:{"sub": "user123","iss": "your-app","exp": 1735660800}Signature:HMACSHA256(base64UrlEncode(header) + "." + base64UrlEncode(payload),your-secret-key)
OAuth 2.0
Method 1: The client obtains the Access Token independently.
The client first calls the OAuth service to obtain an Access Token, and then accesses the gateway with the Token:
# Step 1: Obtain the Access Tokencurl -X POST https://oauth.example.com/token \\-d "grant_type=client_credentials" \\-d "client_id=client-12345" \\-d "client_secret=secret-xxxxxx"# Response Example:{"access_token": "eyJhbGciOiJIUzI1NiIsInR5cCI6IkpXVCJ9...","token_type": "Bearer","expires_in": 3600}# Step 2: Access the Gateway with the Access Tokencurl -X POST https://{Gateway Domain}/{base_path}/v1/chat/completions \\-H "Authorization: Bearer eyJhbGciOiJIUzI1NiIsInR5cCI6IkpXVCJ9..." \\-H "Content-Type: application/json" \\-d '{"model": "qwen-plus","messages": [{"role": "user", "content": "Hello"}]}'
Method 2: The gateway obtains the Access Token on behalf of the client.
Based on the configured OAuth information, the gateway can obtain and cache the Access Token on behalf of the client. The client only needs to provide the Client ID and Client Secret:
curl -X POST https://{Gateway Domain}/{base_path}/v1/chat/completions \\-H "X-Client-ID: client-12345" \\-H "X-Client-Secret: secret-xxxxxx" \\-H "Content-Type: application/json" \\-d '{"model": "qwen-plus","messages": [{"role": "user", "content": "Hello"}]}'
OIDC
Usage
When a client request is made, include the ID Token in the request header:
curl -X POST https://{Gateway Domain}/{base_path}/v1/chat/completions \\-H "Authorization: Bearer {ID_Token}" \\-H "Content-Type: application/json" \\-d '{"model": "qwen-plus","messages": [{"role": "user", "content": "Hello"}]}'
Note:
OIDC uses the ID Token for identity authentication, and the ID Token is a JWT.
The gateway automatically obtains the public key from the OIDC service's Discovery Endpoint and verifies the ID Token signature.
The gateway validates standard Claims in the ID Token, such as iss, aud, and exp.
Verifying the Result
Verifying API Key Authentication
Use the correct API Key to access the API:
curl -X POST https://{Gateway Domain}/{base_path}/v1/chat/completions \\-H "Authorization: Bearer {Correct_API_Key}" \\-H "Content-Type: application/json" \\-d '{"model": "qwen-plus","messages": [{"role": "user", "content": "Hello"}]}'
Expected Result: A 200 response is returned, and the model is successfully invoked.
Access the API using an incorrect API Key:
curl -X POST https://{Gateway Domain}/{base_path}/v1/chat/completions \\-H "Authorization: Bearer wrong-api-key" \\-H "Content-Type: application/json" \\-d '{"model": "qwen-plus","messages": [{"role": "user", "content": "Hello"}]}'
Expected Result: A 401 Unauthorized error is returned.
{"error": {"code": "unauthorized","message": "Invalid API Key"}}
Verifying JWT Authentication
Generate a JWT Token using the shared secret and algorithm configured in the consumer key, with the iss claim set to the consumer identifier:
import jwtimport time# JWT Configurationsecret = os.getenv('SECRET_KEY') # The shared secret configured in the consumer keyalgorithm = "HS256" # The algorithm configured in the consumer key# Generate Tokenpayload = {"sub": "user123", # What is this?"iss": "your-app", # What is this?"exp": int(time.time()) + 3600 # Expires in 1 hour}token = jwt.encode(payload, secret, algorithm=algorithm)print(f"JWT Token: {token}")
Access the API using the generated JWT Token:
curl -X POST https://{Gateway Domain}/{base_path}/v1/chat/completions \\-H "Authorization: Bearer {JWT_Token}" \\-H "Content-Type: application/json" \\-d '{"model": "qwen-plus","messages": [{"role": "user", "content": "Hello"}]}'
Expected Result: A 200 response is returned, and the model is successfully invoked.
Verifying OAuth 2.0 Authentication
First, obtain an Access Token from the OAuth service. Then, access the API with the Token. For details, refer to the Usage section above.
Verifying OIDC Authentication
Access the API using the ID Token issued by the OIDC service. For details, refer to the Usage section above.
Must-Knows
Credential Security: Securely store credentials such as API Keys, secrets, and Client Secrets. Do not commit them to code repositories or public channels.
Credential Rotation: It is recommended to rotate credentials periodically to reduce the risk of credential leakage.
Validity Period Setting: It is recommended to set a validity period for credentials to prevent long-term valid credentials from being continuously abused after leakage.
Principle of Least Privilege: Configure different API access permissions for different consumers to avoid over-privileging.
Authentication-Free Risk: The authentication-free method is prohibited in production environments and is only applicable to private network testing scenarios.
OAuth Token Caching: The gateway caches OAuth Access Tokens. If a token becomes invalid on the Provider side, you must wait for the cache to expire or manually refresh it.
Credential Extraction Location Consistency: The location where the client carries the credential (Header / Cookie / URI parameter) must match the location configured in the authentication policy. Otherwise, authentication fails.
FAQs
Configuration and Usage
Q1: How to Choose the Appropriate Authentication Method?
Select an option based on your actual scenario:
API Key: It is suitable for simple scenarios, such as internal services or trusted clients. It is easy to configure and offers optimal performance.
JWT: It is used to transmit user identity information, supports custom Claims, and is suitable for inter-microservice calls.
OAuth 2.0: It requires integration with third-party OAuth services and supports the standard OAuth flow.
OIDC: It requires user identity authentication and supports SSO (Single Sign-On).
Authentication-Free: It is only applicable to private network testing scenarios and is prohibited in production environments.
Q2: Can a Single API Support Multiple Authentication Methods?
No. A single API supports only one authentication method but can be bound to multiple consumers. Each consumer can be configured with multiple types of credentials. To support multiple authentication methods, create multiple APIs and configure different authentication methods for each.
Feature Limitations
Q1: What Is the Maximum Number of Consumers a Single API Can Bind?
A single API can be bound to a maximum of 100 consumers.
Q2: What Authorization Modes Does OAuth 2.0 Support?
The following authorization modes are currently supported:
Client Credentials (Client Credentials mode): It is used for machine-to-machine (M2M) scenarios.
Password (Password mode): It is used for trusted client scenarios.
Authorization Code (Authorization Code mode): It is used for Web application scenarios.
Implicit (Implicit mode) and Refresh Token flows are not currently supported.
Error Handling
Q1: What to Do When a 401 Unauthorized Error Is Returned During API Calls?
A 401 error indicates authentication failure. Check the following:
1. Check whether the credentials (such as API Key, JWT Token) are correct.
2. Check whether the consumer has been bound to the API's authentication policy.
3. Check whether the credential has expired or been disabled.
4. Check whether the Authorization Header format is correct (format:
Bearer {credential}).5. If JWT is used, check whether the signature algorithm and key match the configuration.
6. If OAuth 2.0 is used, check whether the Access Token is valid.
Q2: After JWT authentication is configured, an 'Invalid signature' Error Is Returned During Calls?
This indicates that JWT signature verification has failed. Check the following:
1. Check whether the signature algorithm (HS256, RS256, ES256) matches the configuration.
2. Check whether the key/public key is correct:
HS256: The key must match the one used for signing.
RS256/ES256: The public key must correspond to the private key used for signing.
3. Check whether the JWT Token has been tampered with or corrupted.
Q3: After OAuth 2.0 Authentication is configured, a 'Failed to get access token' Error Is Returned During Calls?
This indicates that the gateway cannot obtain the Access Token from the OAuth service. Check the following:
1. Check whether the token Endpoint address is correct.
2. Check whether the Client ID and Client Secret are correct.
3. Check whether the OAuth service is functioning properly (that is, whether the gateway can access the token endpoint).
4. Check whether the Scope configuration is correct (some OAuth services require the Scope to match).
5. Check whether the authorization mode matches the mode supported by the OAuth service.
It is recommended to first use curl to directly call the token endpoint of the OAuth service to confirm that the Access Token can be successfully obtained.
Tutorials
Q1: How to Manage Authentication Credentials in a Production Environment?
Recommended management practices:
1. Credential Rotation: Rotate credentials periodically (for example, quarterly) to reduce the risk of credential leakage.
2. Validity Period Setting: Set a reasonable validity period for credentials (for example, one year) to prevent permanently valid credentials from being continuously abused after leakage.
3. Permission Separation: Create distinct consumers for different business systems to avoid sharing credentials.
4. Monitoring and Alarming: Monitor the authentication failure rate and promptly alarm on abnormal traffic.
5. Credential Storage: Store credential information in a configuration center or a key management service. Do not hardcode it in the code.
6. Leakage Response: If a credential is leaked, immediately disable or delete it and create a new one.
Q2: How to Implement Authentication Isolation Across Multiple Environments (Development, Testing, Production)?
Adopt the following solution:
1. Solution 1: Multiple Gateway Instances
Create separate gateway instances for the development, test, and production environments respectively.
Configure independent consumers and credentials for each instance.
Environments are completely isolated from each other and do not interfere with one another.
2. Solution 2: Single Gateway Instance + Multiple Consumers
Use a single gateway instance.
Create separate consumers for different environments (such as "dev-consumer" and "prod-consumer").
Create different APIs and bind them to different consumers respectively.
Distinguish environments by their API access addresses (for example,
/dev/api, /prod/api).Solution 1 is recommended, as it provides more thorough and secure environment isolation.
Q3: How to Design an Authentication Scheme for a Multi-Tenant Scenario?
For multi-tenant scenarios such as SaaS, the following solutions are recommended:
1. Tenant Isolation: Create an independent consumer for each tenant.
2. Authentication Method:
B-end tenants: Use API Key or OAuth 2.0 for easier management.
C-end users: Use JWT or OIDC to support user identity information transfer.
3. Tenant Identification:
Solution A: Include the tenant ID (for example,
tenant_id) in the JWT Claims.Solution B: Assign an independent API key to each tenant.
4. Access Control: Tenants are identified at the gateway layer, and backend services perform data isolation based on the tenant ID.
5. Billing and Quota: Traffic statistics and rate limiting are performed based on the consumer dimension to achieve tenant-level billing and quota management.
Help and Support
Was this page helpful?
You can also Contact sales or Submit a Ticket for help.
Help us improve! Rate your documentation experience in 5 mins.
Feedback