Connecting a Local IDC to CVM by Using a VPC NAT Gateway and Direct Connect
Download
Focus Mode
Font Size
Last updated: 2025-11-13 11:03:45
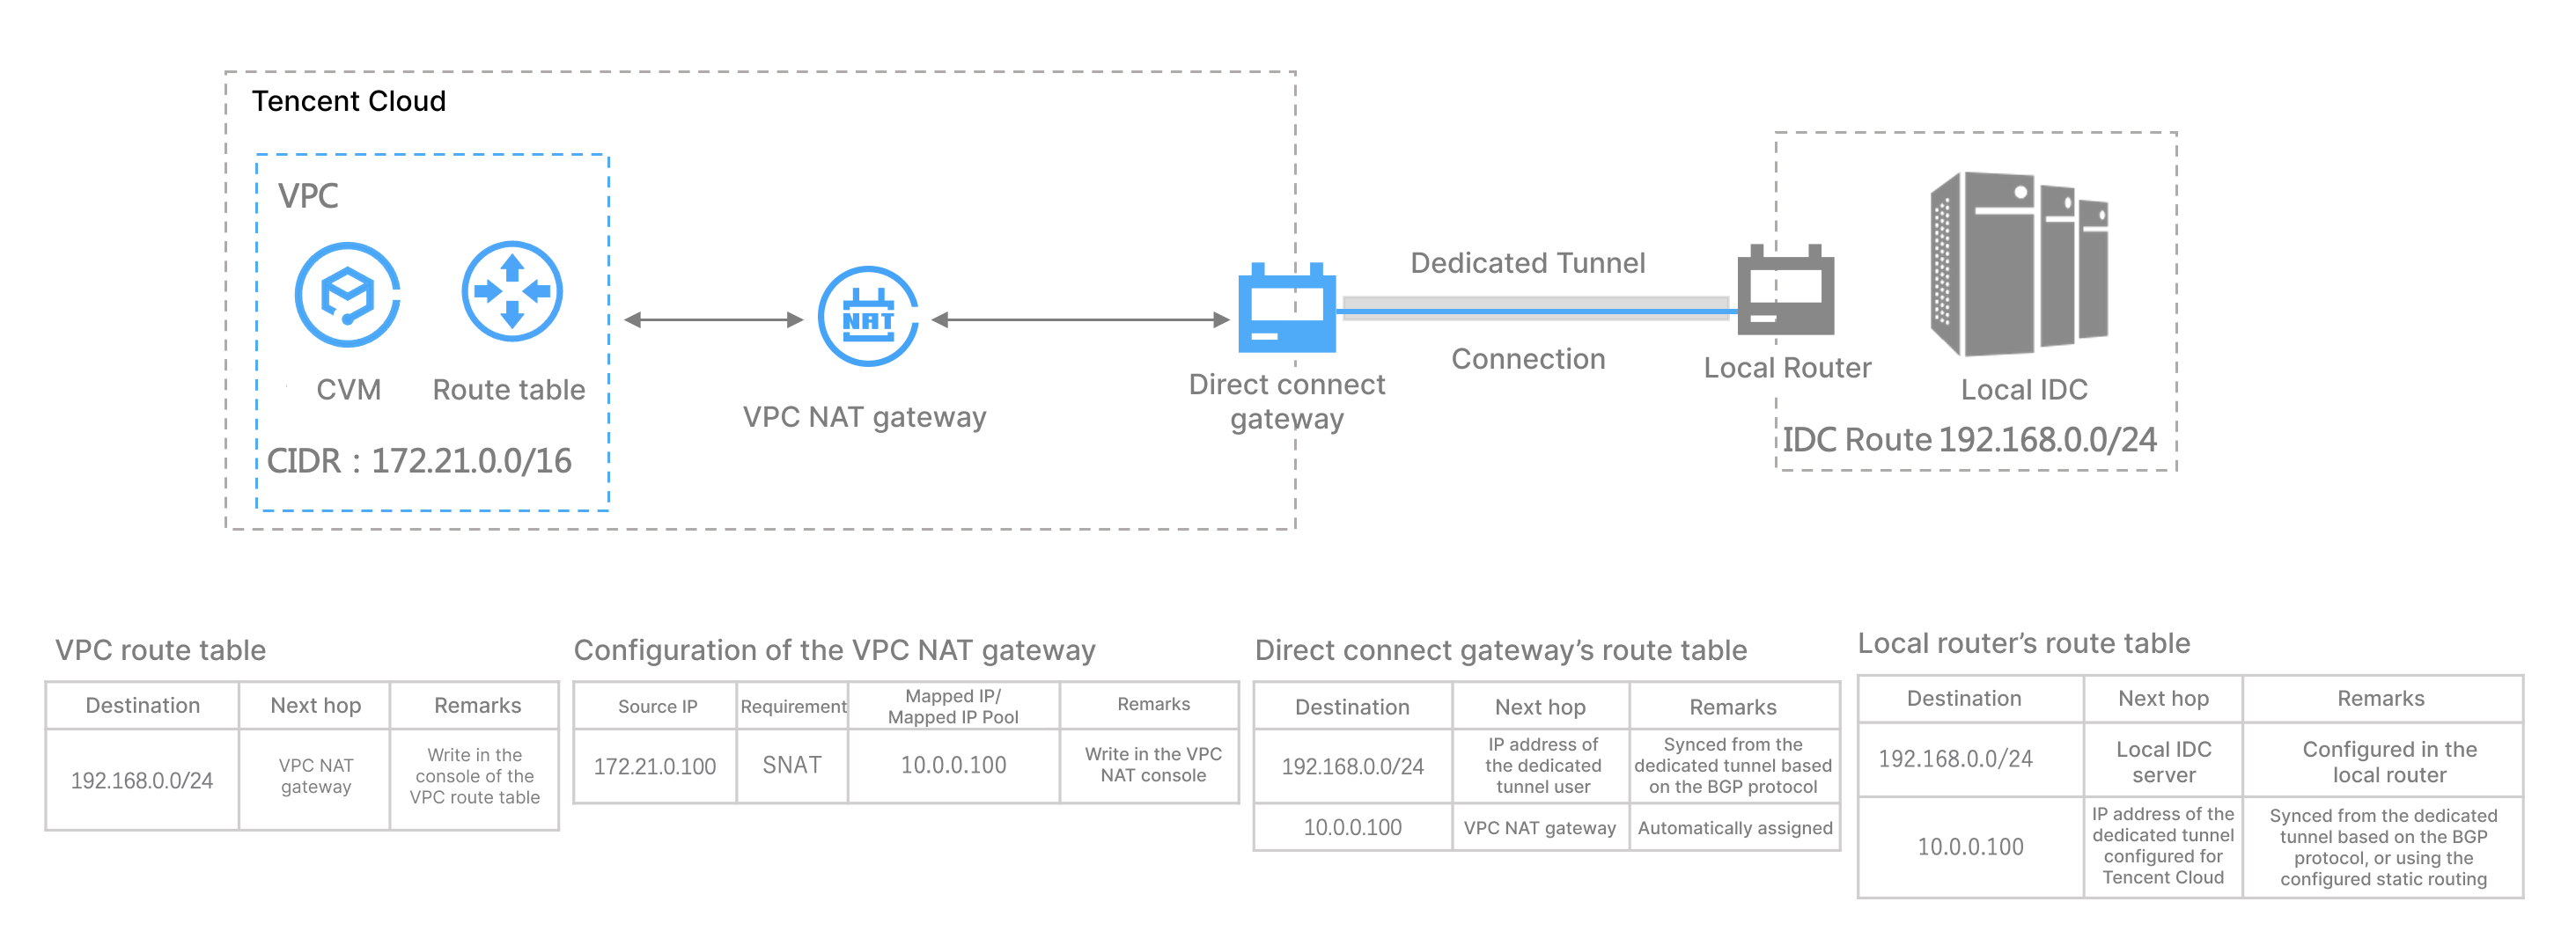
This document describes how to achieve resource access between an Internet Data Center (IDC) and VPC by using Direct Connect and the SNAT and DNAT features of a VPC NAT gateway.
Note:
V3R2 NAT direct connect gateway is in beta testing. To use this feature, please submit a ticket.
VPC NAT gateway is in beta testing. To use this feature, please submit a ticket.
Scenarios
You can use Direct Connect and a VPC NAT gateway to build direct connections for resource access between Tencent Cloud and your IDC without causing conflicts between specified IP addresses.
You must configure network address mappings for the NAT gateway.
When you configure routing rules for a VPC NAT gateway, SNAT-Local-Layer-3, SNAT-Local-Layer-4, and DNAT-Peer-Layer-4 rules are mapped automatically. Peer-Layer-3 rules cannot be mapped. In addition, VPC CIDR is not published by default. Therefore, if you specify only Peer-Layer-3 rules, you must manually configure VPC CIDR routing for your IDC. We recommend that you use a Peer-Layer-3 rule with a Local-Layer-3 or Local-Layer-4 rule.
2. In the Create a direct connect gateway window, enter a gateway name, select the zone, select NAT for Associated Network, and select an NAT instance to which the direct connect gateway associates.
3. Agree to the redundant gateway cleanup agreement and click OK.
The tunnels created on the connections vary depending on the access method. You can create tunnels of one of the following types as needed:
The tunnels created on your own connections are exclusive dedicated tunnels, which are applicable to scenarios with requirements for high-bandwidth access and exclusive access. For details, see Exclusive Dedicated Tunnel.
The tunnels created on our partners' connections pre-established in Tencent are shared dedicated tunnels, which are applicable to scenarios where there is no need for high-bandwidth access and the cloudification time is short. For details, see Shared Dedicated Tunnel.
Step 4: Configure SNAT and DNAT routing rules for the VPC NAT gateway
1. Log in to the NAT Gateway console and click VPC NAT Gateways in the left sidebar. On the page that appears, click the ID of the created VPC NAT gateway.
2. On the details page of the VPC NAT gateway, configure SNAT and DNAT rules on the SNAT and DNAT tabs respectively. This document uses SNAT rules as an example.
3. On the SNAT tab, click Create. On the Create SNAT rule page, select Layer-3 for Mapping type, enter the VPC IP address in the Source IP field, and enter an IP address or IP address pool in the Mapped IP/Mapped IP pool field as needed.
You can click + New line to configure multiple SNAT routing rules.
4. Click OK.
Note:
For more information about parameter configuration, see Operation Overview.
Step 5: Configure routing policies in the VPC route table
1. Log in to the VPC console and go to the Route Tables page.
2. On the Route tables page, find the route table corresponding to your VPC and click the table name.
3. On the details page of the route table, click + New routing policies. In the pop-up window, configure the routing policy.
Specify the IP range of your IDC for Destination, VPC NAT gateway for Next hop type, and the name of the VPC NAT gateway created in Step 1 for Next hop.
Test whether CVM instances and your local IDC are connected.
1. Log in to an CVM instance in your VPC.
2. Run the ping command to test the IP address of the server in your local IDC. If ICMP packets are returned, the CVM instance is connected to the IDC.
Run the packet capture command on the server in your local IDC. You can see that the source IP address of the packets is the specified IP address after SNAT.
Note:
If no packets are returned, perform the following operations for troubleshooting:
Check the VPC route table. Ensure that you have specified the VPC NAT gateway for next hop. For more information, see Step 5.
Check whether you have configured an SNAT or DNAT rule. If no rules are configured, the connection fails. For more information, see Step 4.
Ensure that the status of the dedicated tunnel is Connected. The BGP status of Dedicated Tunnel 2.0 must be established.
If you have tried all above operations and the issue persists, please submit a ticket.
3. Log in to the server in your local IDC and run the ssh root@NAT IP command.
If packets are returned, the connection succeeds.