Policy Management
ダウンロード
フォーカスモード
フォントサイズ
Alarm Policy
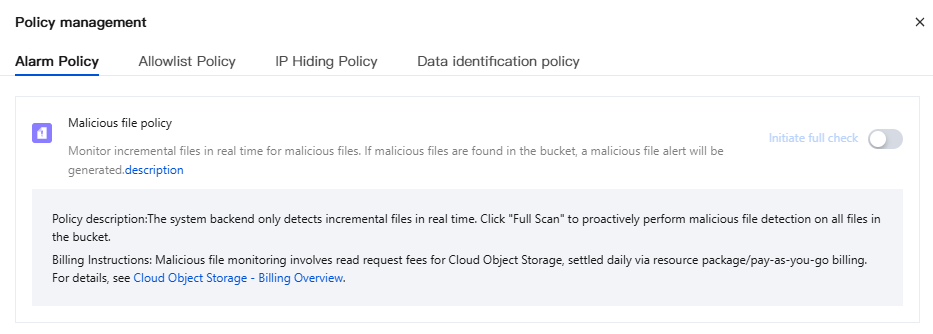
Malware Policy
The system monitors incremental files for malicious content in real time. If a malicious file is detected in a bucket, a malicious file alarm is generated.
1. Log in to the CSC console. In the left navigation pane, click Data Security Situation Management > COS Risk Monitoring.
2. On the COS Exception Monitoring page, click Policy management in the upper-right corner.
3. In the Policy Management window, click the Alarm Policy Tag to enable or disable full malicious file checking.
Note:
Policy Description: The backend system only checks for malicious content in incremental files in real time. You can click **Full Scan** to proactively scan all files in a bucket for malicious content.
Billing Description: Sensitive data identification incurs COS read request fees. These fees are settled daily through resource packs/pay-as-you-go billing. For details, see COS - Billing Overview.
Anomaly Detection Policy
The system monitors abnormal behavior in real time. If a bucket access behavior triggers an enabled alarm policy, an abnormal behavior alarm is generated.
1. Log in to the CSC console. In the left navigation pane, click Data Security Situation Management > COS Risk Monitoring.
2. On the COS Exception Monitoring page, click Policy management in the upper-right corner.
3. In the Policy Management window, click the Alarm Policy Tag. You can manage alarm policies. Currently, you can enable/disable specific alarm policies, add new alarm policies, and quickly locate alarms that match a policy.
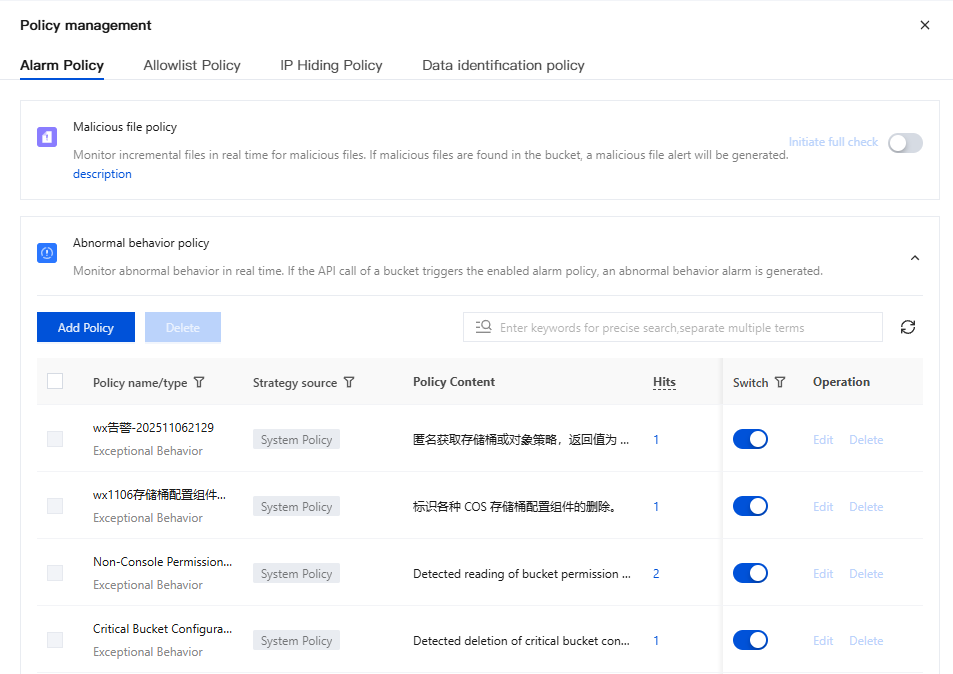
4. On the Alarm Policy Tag page, click Add Policy.
5. In the Add Policy window, configure the relevant parameters as needed. After configuration is complete, click Save.
Content Name | Description | Example |
Take effect call Source IP | You can select all source IP addresses, filter them by type (such as internal/external account or LAN), or manually enter an IP address or CIDR block. Enter multiple IPs or types, each on a new line, up to a maximum of 150 lines. If duplicate IPs are entered, the backend will automatically merge them. If no selection is made, the rule applies to all calling IPs by default. | 1.x.x.1 x.x.x.x/24 |
UA call | You can select all calling User-Agents (UAs) or define custom ones. Enter multiple User-Agents (UAs), each on a new line, up to a maximum of 20 lines. If duplicate User-Agents (UAs) are entered, the backend will automatically merge them. If no selection is made, the rule applies to all calling User-Agents (UAs) by default. | cos-xx-xx-v5.3.0 custom-xx |
Effective AK | You can select all Access Keys (AKs), choose from existing AKs, long-term keys, temporary keys, or anonymous access, or manually enter a custom AK. Enter multiple Access Keys (AKs), each on a new line, up to a maximum of 150 lines. If duplicate Access Keys (AKs) are entered, the backend will automatically merge them. If no selection is made, the rule applies to all Access Keys (AKs) by default. | AK1 AK2 |
effective domain name | You can select all domains or define custom ones. Enter multiple domains, each on a new line, up to a maximum of 150 lines. If duplicate domains are entered, the backend will automatically merge them. If no selection is made, the rule applies to all domains by default. | example0.com example1.com |
Take effect bucket | You can select all buckets or choose from existing ones. If no selection is made, the rule applies to all buckets by default. | - |
File path takes effect | You can select all file paths or define custom ones. Enter multiple file paths, each on a new line, up to a maximum of 150 lines. If duplicate file paths are entered, the backend will automatically merge them. If no selection is made, the rule applies to all file paths by default. | bucket1/logs/ydeyes.yaml |
Take effect API | You can select all interfaces or manually choose specific ones. If no selection is made, the rule applies to all interfaces by default. | - |
Return Code | Select all response codes, or choose only successful or failed ones. If no selection is made, the rule applies to all response codes by default. | - |
Allowlist Policy
1. Log in to the CSC console. In the left navigation pane, click Data Security Situation Mangement > COS Risk Monitoring.
2. On the COS Exception Monitoring page, click Policy management in the upper-right corner.
3. In the Policy Management window, click the Allowlist Policy tag. You can manage allowlist policies, which support adding to the allowlist based on source IP address, UA, domain, bucket, file path, AK, API, and response code, and allow you to specify the scope of effect.
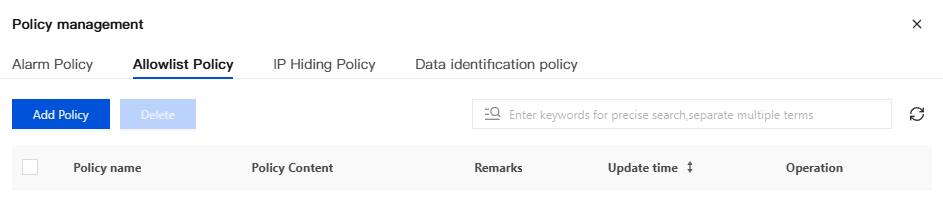
4. On the Allowlist Policy Tag page, click Add Policy.
5. In the Add Policy window, configure the relevant parameters as needed. After configuration is complete, click Save.
Content Name | Description | Example |
Alarm Type | Select the alarm type for the allowlist policy: abnormal access, malicious files. | |
Take effect call Source IP | You can select all source IP addresses, filter them by type (such as internal/external account or LAN), or manually enter an IP address or CIDR block. Enter multiple IPs or types, each on a new line, up to a maximum of 150 lines. If duplicate IPs are entered, the backend will automatically merge them. If no selection is made, the rule applies to all calling IPs by default. | 1.x.x.1 x.x.x.x/24 |
UA call | You can select all calling User-Agents (UAs) or define custom ones. Enter multiple User-Agents (UAs), each on a new line, up to a maximum of 20 lines. If duplicate User-Agents (UAs) are entered, the backend will automatically merge them. If no selection is made, the rule applies to all calling User-Agents (UAs) by default. | cos-xx-xx-v5.3.0 custom-xx |
Effective AK | You can select all Access Keys (AKs), choose from existing AKs, long-term keys, temporary keys, or anonymous access, or manually enter a custom AK. Enter multiple Access Keys (AKs), each on a new line, up to a maximum of 150 lines. If duplicate Access Keys (AKs) are entered, the backend will automatically merge them. If no selection is made, the rule applies to all Access Keys (AKs) by default. | AK1 AK2 |
effective domain name | You can select all domains or define custom ones. Enter multiple domains, each on a new line, up to a maximum of 150 lines. If duplicate domains are entered, the backend will automatically merge them. If no selection is made, the rule applies to all domains by default. | example0.com example1.com |
Take effect bucket | You can select all buckets or choose from existing ones. If no selection is made, the rule applies to all buckets by default. | - |
File path takes effect | You can select all file paths or define custom ones. Enter multiple file paths, each on a new line, up to a maximum of 150 lines. If duplicate file paths are entered, the backend will automatically merge them. If no selection is made, the rule applies to all file paths by default. | bucket1/logs/ydeyes.yaml |
Take effect API | You can select all interfaces or manually choose specific ones. If no selection is made, the rule applies to all interfaces by default. | - |
Return Code | Select all response codes, or choose only successful or failed ones. If no selection is made, the rule applies to all response codes by default. | - |
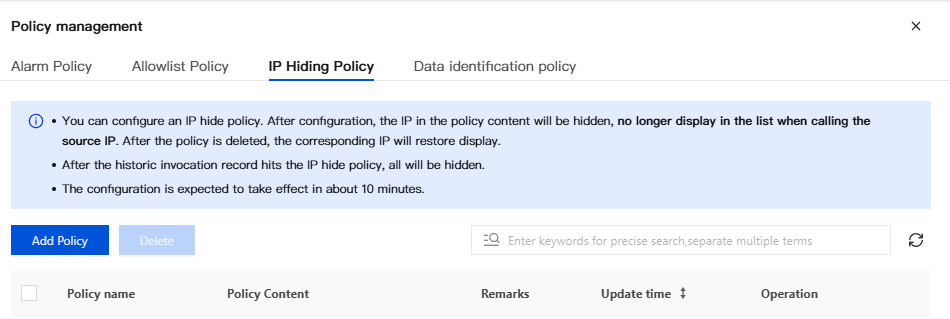
IP address Masking Policy
1. Log in to the CSC console. In the left navigation pane, click Data Security Situation Management > COS Risk Monitoring.
2. On the COS Exception Monitoring page, click Policy management in the upper-right corner.
3. In the Policy Management window, click the IP Hiding Policy Tag. Here, you can configure IP hiding rules. Once the rules take effect, the specified IPs will no longer appear in the source IP list.
4. On the IP Hiding Policy Tag page, click Add Policy.
5. In the Add Policy window, configure the relevant parameters as needed. After configuration is complete, click Save.
Content Name | Description | Example |
Take effect call Source IP | You can select all source IP addresses, filter them by type (such as internal/external account or LAN), or manually enter an IP address or CIDR block. Enter multiple IPs or types, each on a new line, up to a maximum of 150 lines. If duplicate IPs are entered, the backend will automatically merge them. If no selection is made, the rule applies to all calling IPs by default. | 1.x.x.1 x.x.x.x/24 |
Effective AK | You can select all Access Keys (AKs), choose from existing AKs, long-term keys, temporary keys, or anonymous access, or manually enter a custom AK. Enter multiple Access Keys (AKs), each on a new line, up to a maximum of 150 lines. If duplicate Access Keys (AKs) are entered, the backend will automatically merge them. If no selection is made, the rule applies to all Access Keys (AKs) by default. | AK1 AK2 |
Take effect bucket | You can select all buckets or choose from existing ones. If no selection is made, the rule applies to all buckets by default. | - |
Note:
After the IP hiding policy is configured, the IPs specified in the policy will be hidden and no longer appear in the source IP list. When the policy is deleted, the corresponding IPs will be restored and displayed again.
Once historical call records match the IP address hiding policy, they will all be hidden.
The policy is expected to take effect approximately 10 minutes after configuration.
Data Identification Policy
The system monitors incremental files in buckets for sensitive data in real time. If sensitive data is detected, it will be displayed in the asset and alarm sections.
1. Log in to the CSC console. In the left navigation pane, click Data Security Situation Management > COS Risk Monitoring.
2. On the COS Exception Monitoring page, click Policy management in the upper-right corner.
3. In the Policy Management window, click the Data Identification policy Tag. You can then enable or disable the sensitive data identification policy.
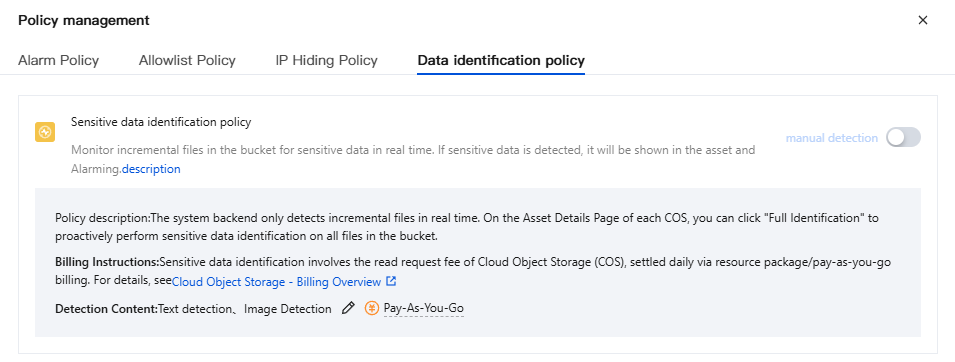
Note:
Policy description: The backend system only checks for sensitive data in incremental files in real time. On the details page of each COS asset, you can click [Full Scan] to proactively scan all files in a bucket for sensitive data.
Billing Instructions: Sensitive data identification incurs COS read request fees. These fees are settled daily through resource packs/pay-as-you-go billing. For details, see COS - Billing Overview.
フィードバック