Flutter
ダウンロード
フォーカスモード
フォントサイズ
TUIKit supports sending and displaying standard message types, including text, image, voice, video, and file messages. If these default types don't meet your needs, you can extend functionality by adding custom message types.
Custom Messages
When the default message types are insufficient for your use case, you can define custom messages tailored to your business requirements.
The following example shows how to send a custom message containing hypertext that opens in a browser, helping you quickly understand the implementation workflow.
The following steps guide you through using custom messages.
Display Custom Messages
Custom messages are rendered in
custom_message_widget.dart. The message content is stored as a String in customMessage.data, and it's recommended to use JSON format.To display custom messages:
1. Define a class representing the structure of your custom message. Implement a
fromJSON method to create an instance from a Map.For example, for a custom message format containing a link and text:
class CustomMessage {String? link;String? text;String? businessID;CustomMessage.fromJSON(Map json) {link = json["link"];text = json["text"];businessID = json["businessID"];}}
2. In the
_buildDefaultCustomMessage method, parse the custom message to create a CustomMessage object, then render the message using _buildTextLinkMessage.Example code:
Widget _buildDefaultCustomMessage(BuildContext context,SemanticColorScheme colorsTheme,AtomicLocalizations atomicLocale,) {final customMessageData = message.messageBody?.customMessage;final customContent = ChatUtil.jsonData2Dictionary(customMessageData?.data);// Handle custom messages of type text_linkif (customContent != null) {final customMessage = CustomMessage.fromJSON(customContent);if (customMessage.businessID == 'text_link') {return _buildTextLinkMessage(context, colorsTheme, customMessage);}}}Widget _buildTextLinkMessage(BuildContext context,SemanticColorScheme colorsTheme,CustomMessage customMessage,) {final text = customMessage.text ?? '';final link = customMessage.link ?? '';return Container(constraints: BoxConstraints(maxWidth: maxWidth * 0.7,),padding: const EdgeInsets.fromLTRB(16, 12, 16, 12),decoration: BoxDecoration(color: isSelf ? colorsTheme.buttonColorPrimaryDefault : colorsTheme.bgColorDefault,borderRadius: BorderRadius.circular(12),),child: Column(crossAxisAlignment: CrossAxisAlignment.start,mainAxisSize: MainAxisSize.min,children: [Text(text,style: TextStyle(color: isSelf ? colorsTheme.textColorAntiPrimary : colorsTheme.textColorPrimary,fontSize: 14,fontWeight: FontWeight.w500,),),const SizedBox(height: 8),GestureDetector(onTap: () => _launchUrl(link),child: Text('View Details',style: TextStyle(color: isSelf ? colorsTheme.textColorAntiPrimary : colorsTheme.buttonColorPrimaryDefault,fontSize: 14,fontWeight: FontWeight.w400,decoration: TextDecoration.underline,decorationColor: isSelf ? colorsTheme.textColorAntiPrimary : colorsTheme.buttonColorPrimaryDefault,),),),],),);}
3. In the
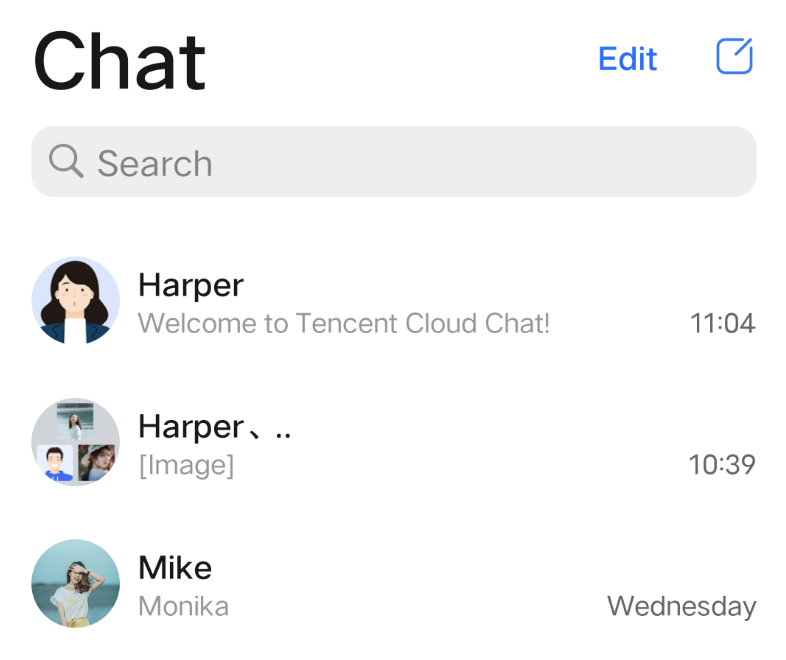
getMessageAbstract method in message_utils.dart, parse the new custom message type to generate a summary for the conversation list.Example code:
static String getMessageAbstract(MessageInfo? messageInfo,BuildContext context,{bool showMergedTitle = false}) {switch (messageInfo.messageType) {// Other message types omitted// Custom message text summarycase MessageType.custom:final customMessage = messageInfo.messageBody?.customMessage;if (customMessage == null) {return localizations.messageTypeCustom;}// Some code omittedfinal customInfo = ChatUtil.jsonData2Dictionary(customMessage.data);if (customInfo != null) {// Other custom message parsing omitted// Parse the added custom messageif (customInfo['businessID'] == 'text_link') {return customInfo['text']?.toString() ?? localizations.messageTypeCustom;}}return localizations.messageTypeCustom;default:return '';}}
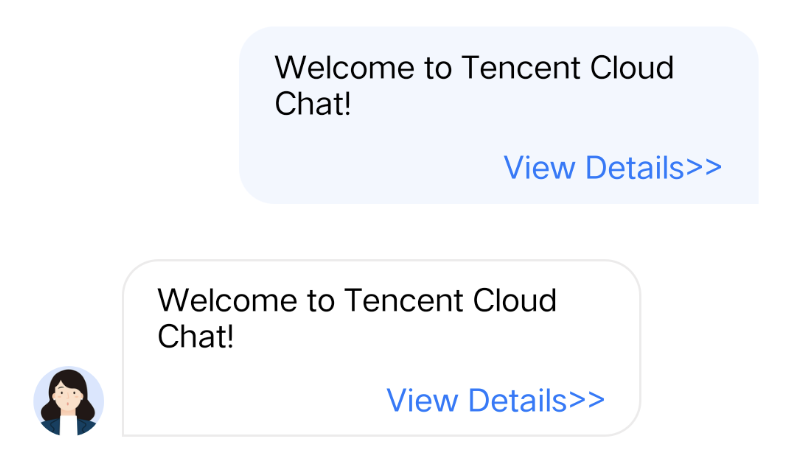
The result is shown below:
Send Custom Messages
To send a custom message, follow these steps: create a custom message, serialize the content as a JSON String and assign it to
data, then use the sendMessage method of MessageInputStore to send it.Example code:
// Create a MessageInputStore objectMessageInputStore _messageInputStore = MessageInputStore.create(conversationID: widget.conversationID);// Construct a custom messagefinal messageInfo = MessageInfo();messageInfo.messageType = MessageType.custom;MessageBody messageBody = MessageBody();messageBody.customMessage = CustomMessageInfo(data: '{"businessID":"text_link","link":"https://www.tencentcloud.com/document/product/269/3794?from_cn_redirect=1","text":"Welcome to Tencent Cloud Chat!"}',);messageInfo.messageBody = messageBody;// Send the messageawait _messageInputStore.sendMessage(message: messageInfo);
フィードバック