Using Git for Code Management and Team Collaboration
Overview
During team development, tools such as GitLab, GitHub, and Bitbucket are commonly used for code and process management. In WeData Studio, you can connect to a remote Git repository by creating a Git folder, enabling efficient team collaboration.
Purpose of a Remote Git Repository
A remote Git repository serves as the centralized management point for code, with its primary responsibilities including:
Maintaining the authoritative version of the code: ensuring team members can access the latest code version.
Handling Pull Request reviews and merges: allows team members to submit code changes and merge them through the review process.
Triggering the CI/CD process: automating testing and deployment to improve development efficiency.
Purpose of the Studio Git Folder
The Studio Git folder serves as a personal "development workspace" and a local "Git client", with its primary responsibilities including:
Synchronizing code from the remote repository to the Git folder: pulling code from the remote repository into the Git folder for development.
Committing and pushing code: submitting local code changes to the remote Git repository to record development history.
Visualizing differences and resolving conflicts: provides tools to view code change differences and resolve conflicts during merges, ensuring code correctness.
The following uses a simple example to illustrate how to use the Git feature in WeData for team collaboration.
Note:
WeData Studio is built on VSCode, and its Git operation page is consistent with VSCode's. If you are familiar with the Git feature in VSCode, you can start using it directly. For more detailed information about the VSCode Git feature, refer to the VSCode Source Control official documentation.
Case Scenario
An e-commerce company, Company A, has a data development team. The team has received a data requirement from the business side and needs to develop a "regional order statistics table". This table will regularly output data to assist the business side in decision-making.
Project Team Roles and Responsibilities
Assume the data development team has three members, whose roles and responsibilities are as follows:
Member | Role | Responsibilities | Required Permissions |
Member A | Project Admin | Responsible for project configuration on the WeData platform | WeData project administrator role |
Member B | Data Development Engineer | Responsible for developing new tasks and fixing existing bugs. | WeData data engineer role |
Member C | CI/CD Engineer | Responsible for code review and branch merging. | WeData data engineer role + Git repository management permission |
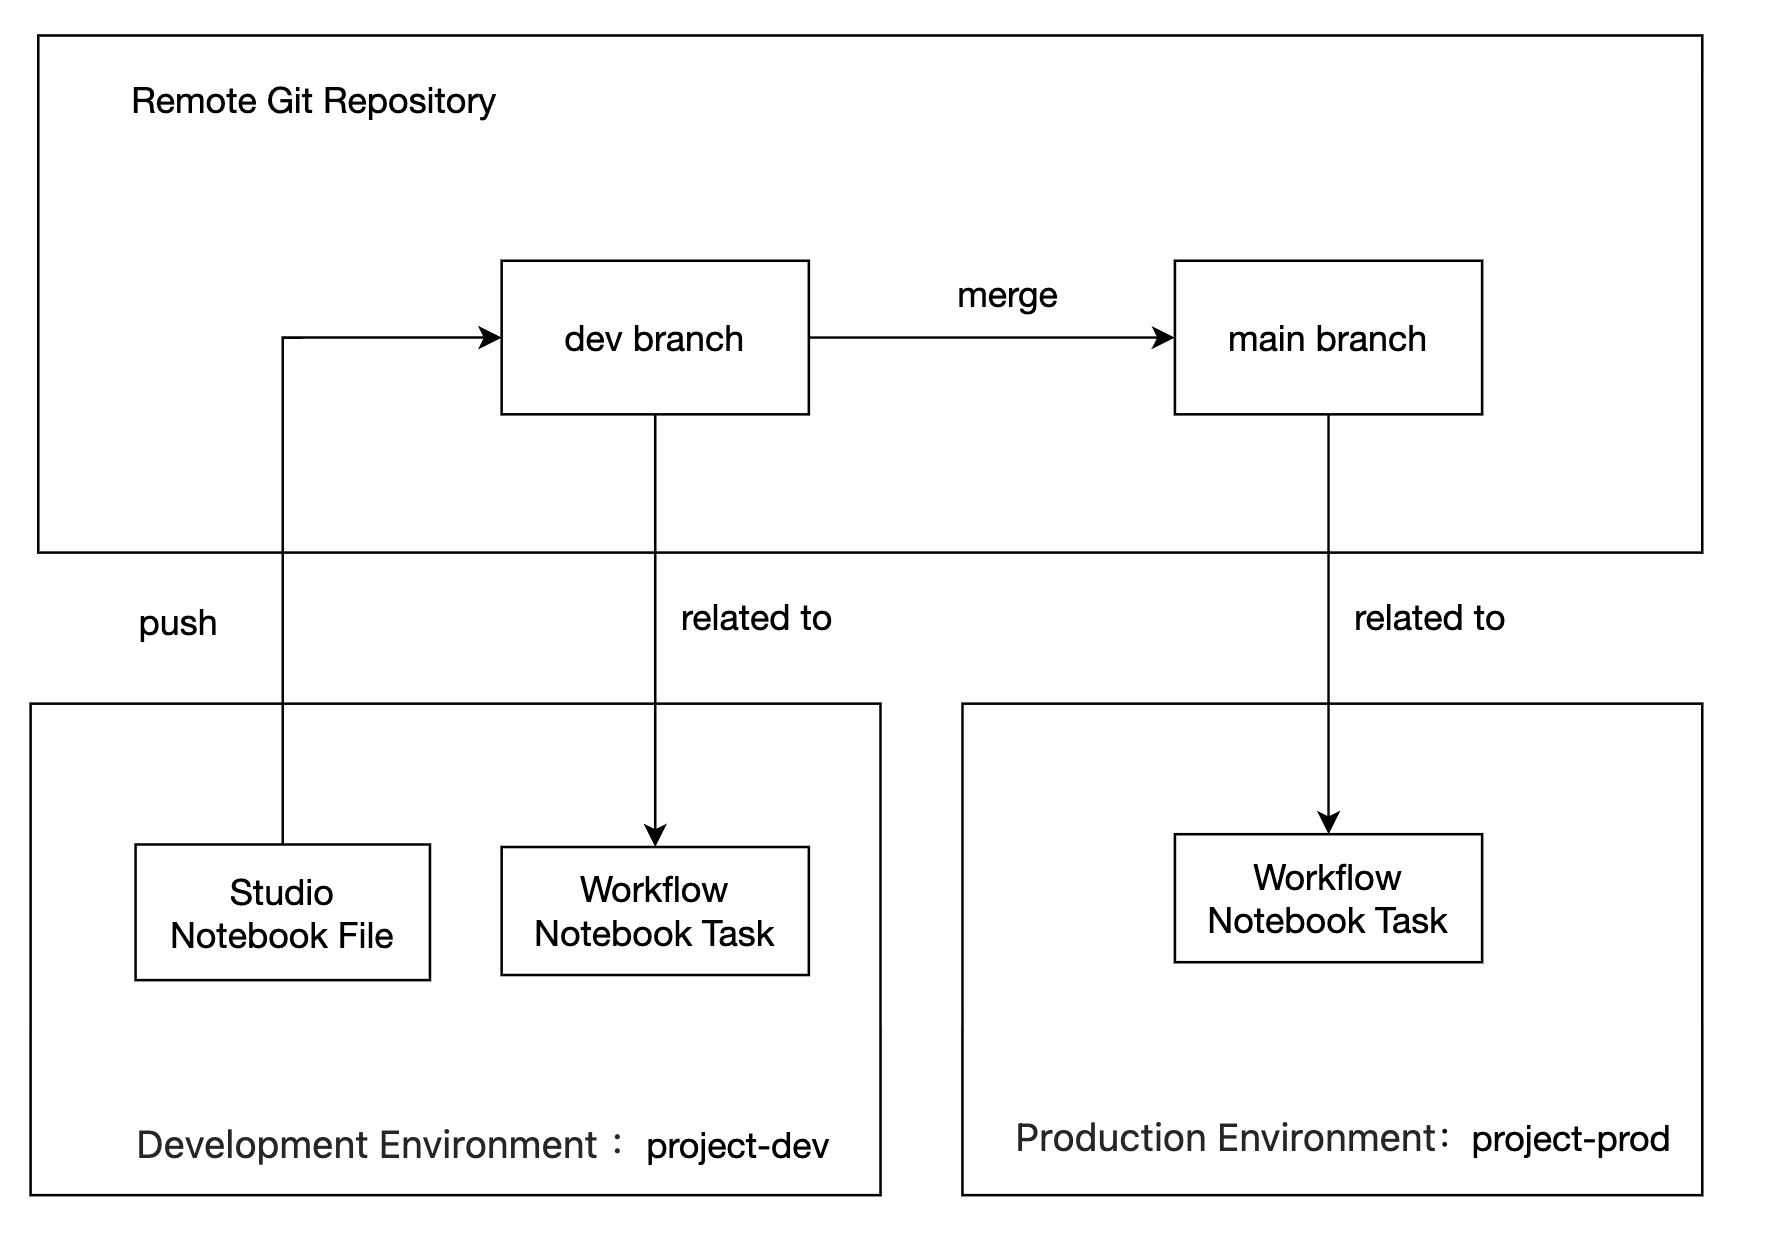
Project and Branch Management
To isolate the development and production environments, the project team has a development environment project: project_dev, and a production environment project: project_prod.
Here, the development environment project is bound to the development branch dev, and the production environment project is bound to the production branch main.
Git Branch Types and Uses
Branch | Purpose | Naming specifications | Lifecycle |
main/master | Production branch, storing stable and releasable code. | - | Permanent |
develop | Development branch, daily development integration branch | - | Permanent |
feature/* | Developing new features | feature/feature name | Temporary |
bugfix/* | Bug Fix | bugfix/issue description | Temporary |
hotfix/* | Fixing urgent online issues | hotfix/issue description | Temporary |
release/* | Preparing for release | release/version name | Temporary |
Note:
Branch Merge Policy Recommendations:
Merge: suitable for merging feature branches into the main branch, preserving the complete development history.
Rebase: suitable for synchronizing the latest code from the main branch to a personal development branch, maintaining a linear history.
Squash Merge: suitable for combining multiple small commits into one, keeping the main branch clean.
Operation Process
Member A: Creating a Project and Configuring Git
1. Create and configure a project.
Go to the WeData console, create two projects: project_dev and project_prod, which correspond to the development and production environments respectively, and bind the big data storage and compute engines and execution resource groups required by the projects.
2. Configure project members and roles.
Go to Project Management > Member and Role Management, add User B to both projects, and grant the data engineer role.
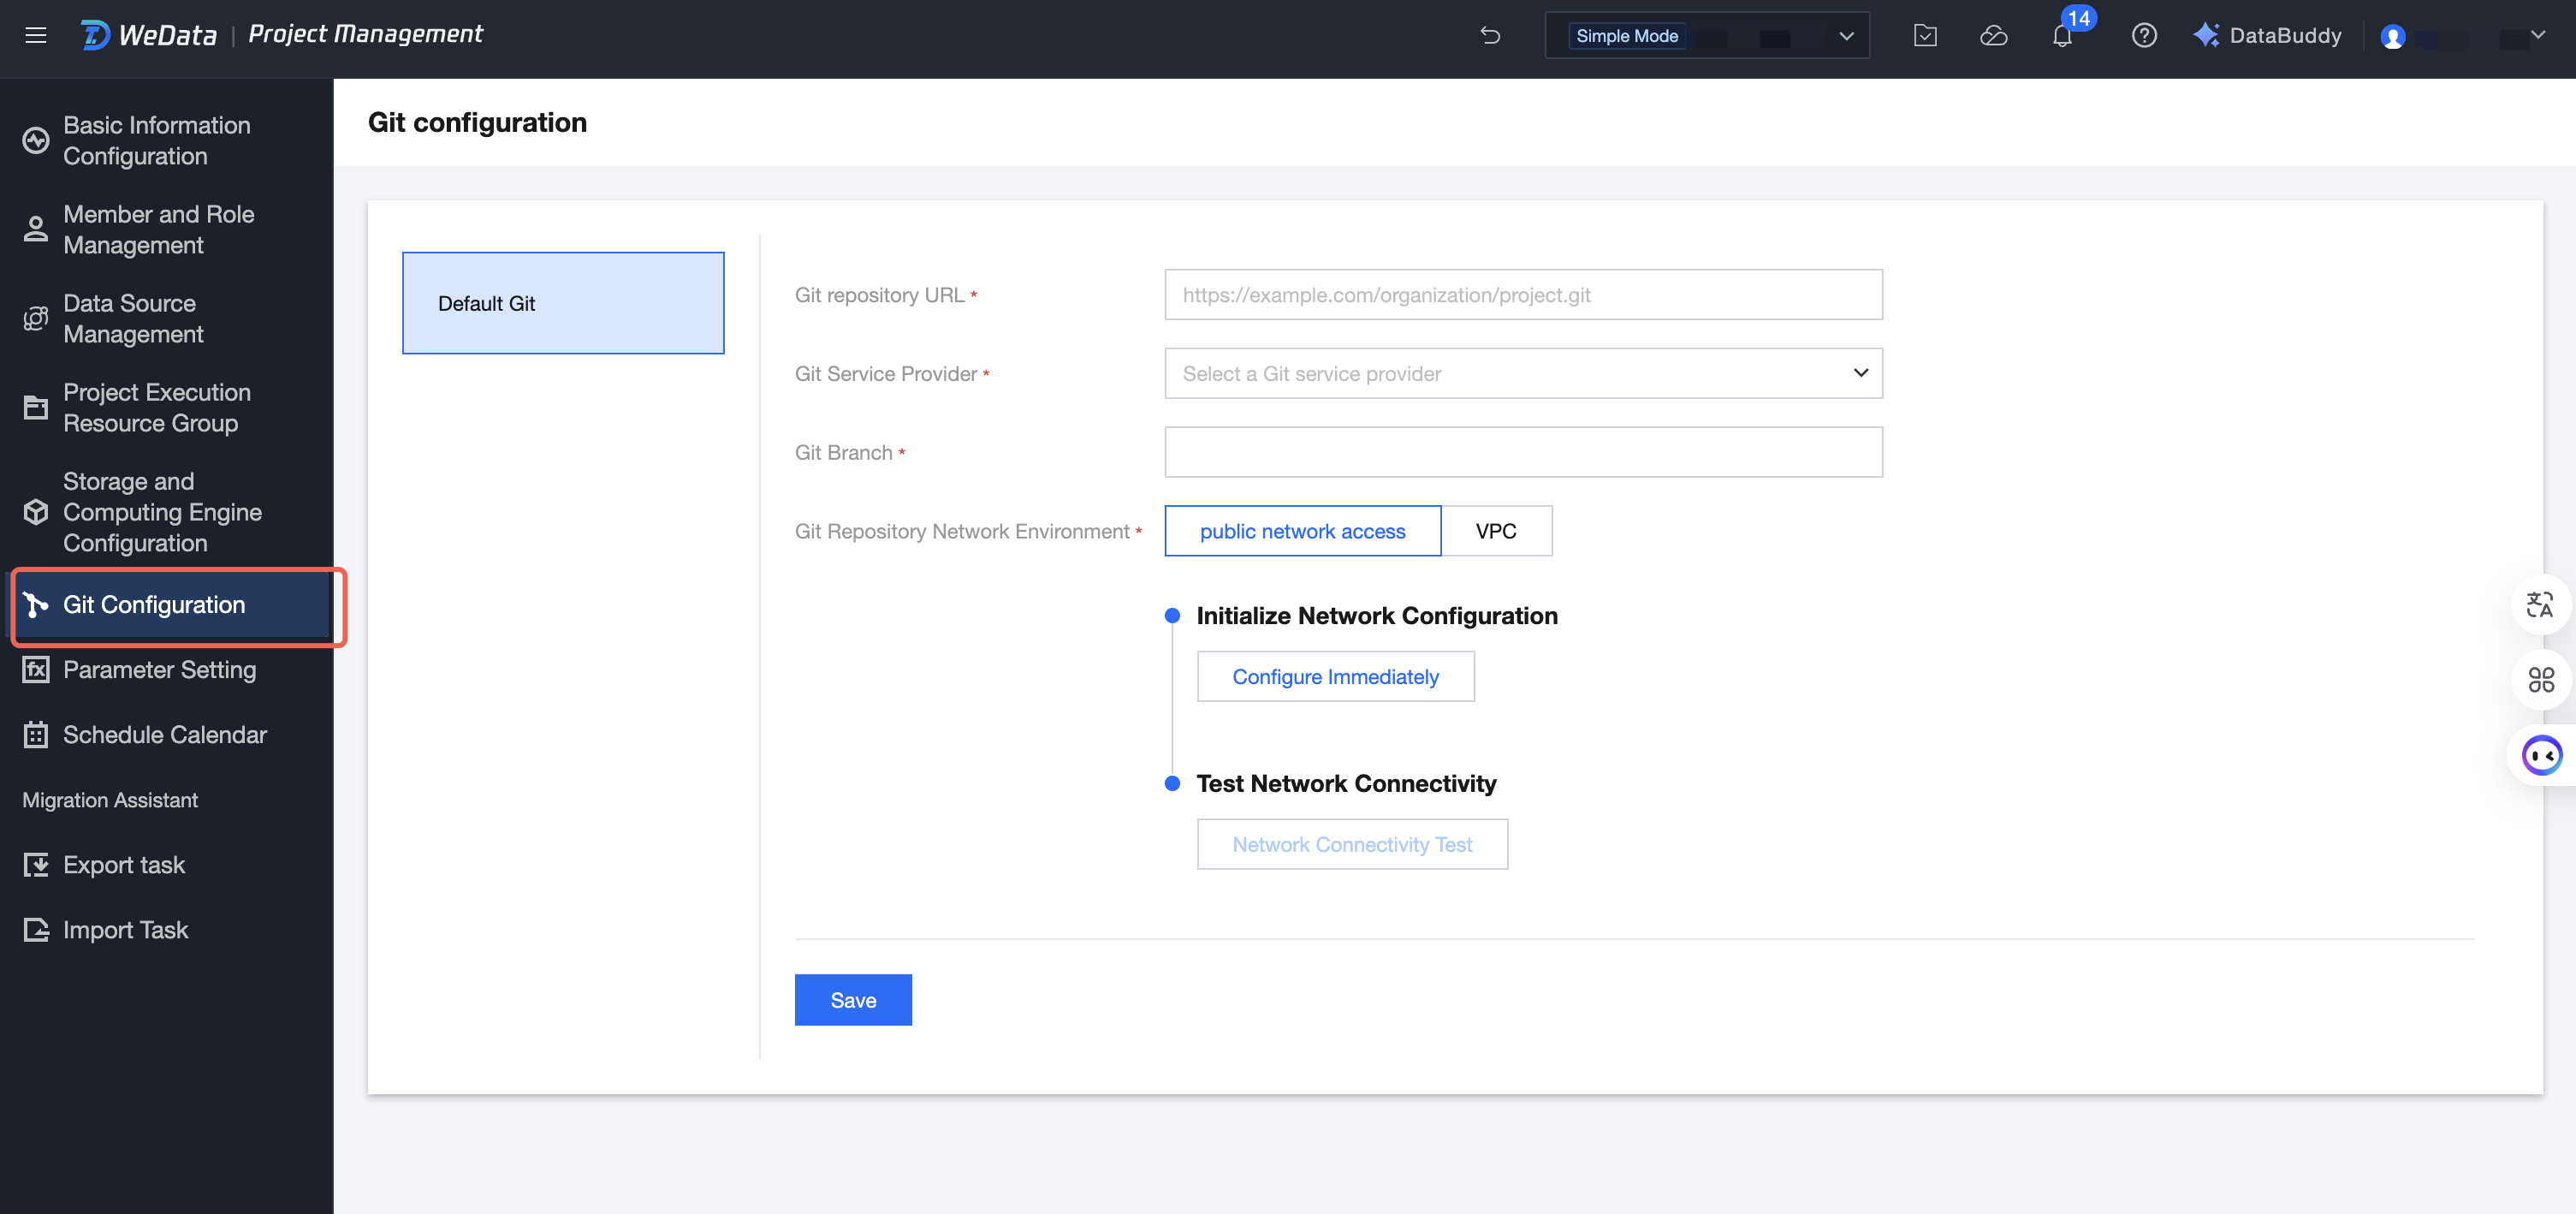
3. Configure the project Git address.
Go to Project Management > Git Configuration and fill in the Git repository address, provider, and branch. Here, the development environment uses the dev branch, and the production environment uses the main branch.
Select the network environment where the Git repository is located, initialize the network configuration and perform connectivity tests, and save the configuration information after the connection is successful.
Note:
Branch Protection Recommendations:
Configure branch protection rules on Git platforms (such as GitLab/GitHub):
Direct pushes to the main branch are prohibited; code must be merged via PR.
Require at least one person to approve the Code Review before merging.
Require the CI check to pass before merging.
Member B: Performing Data Development and Pushing Code
1. Go to the development environment project.
Go to the development environment project: project_dev.
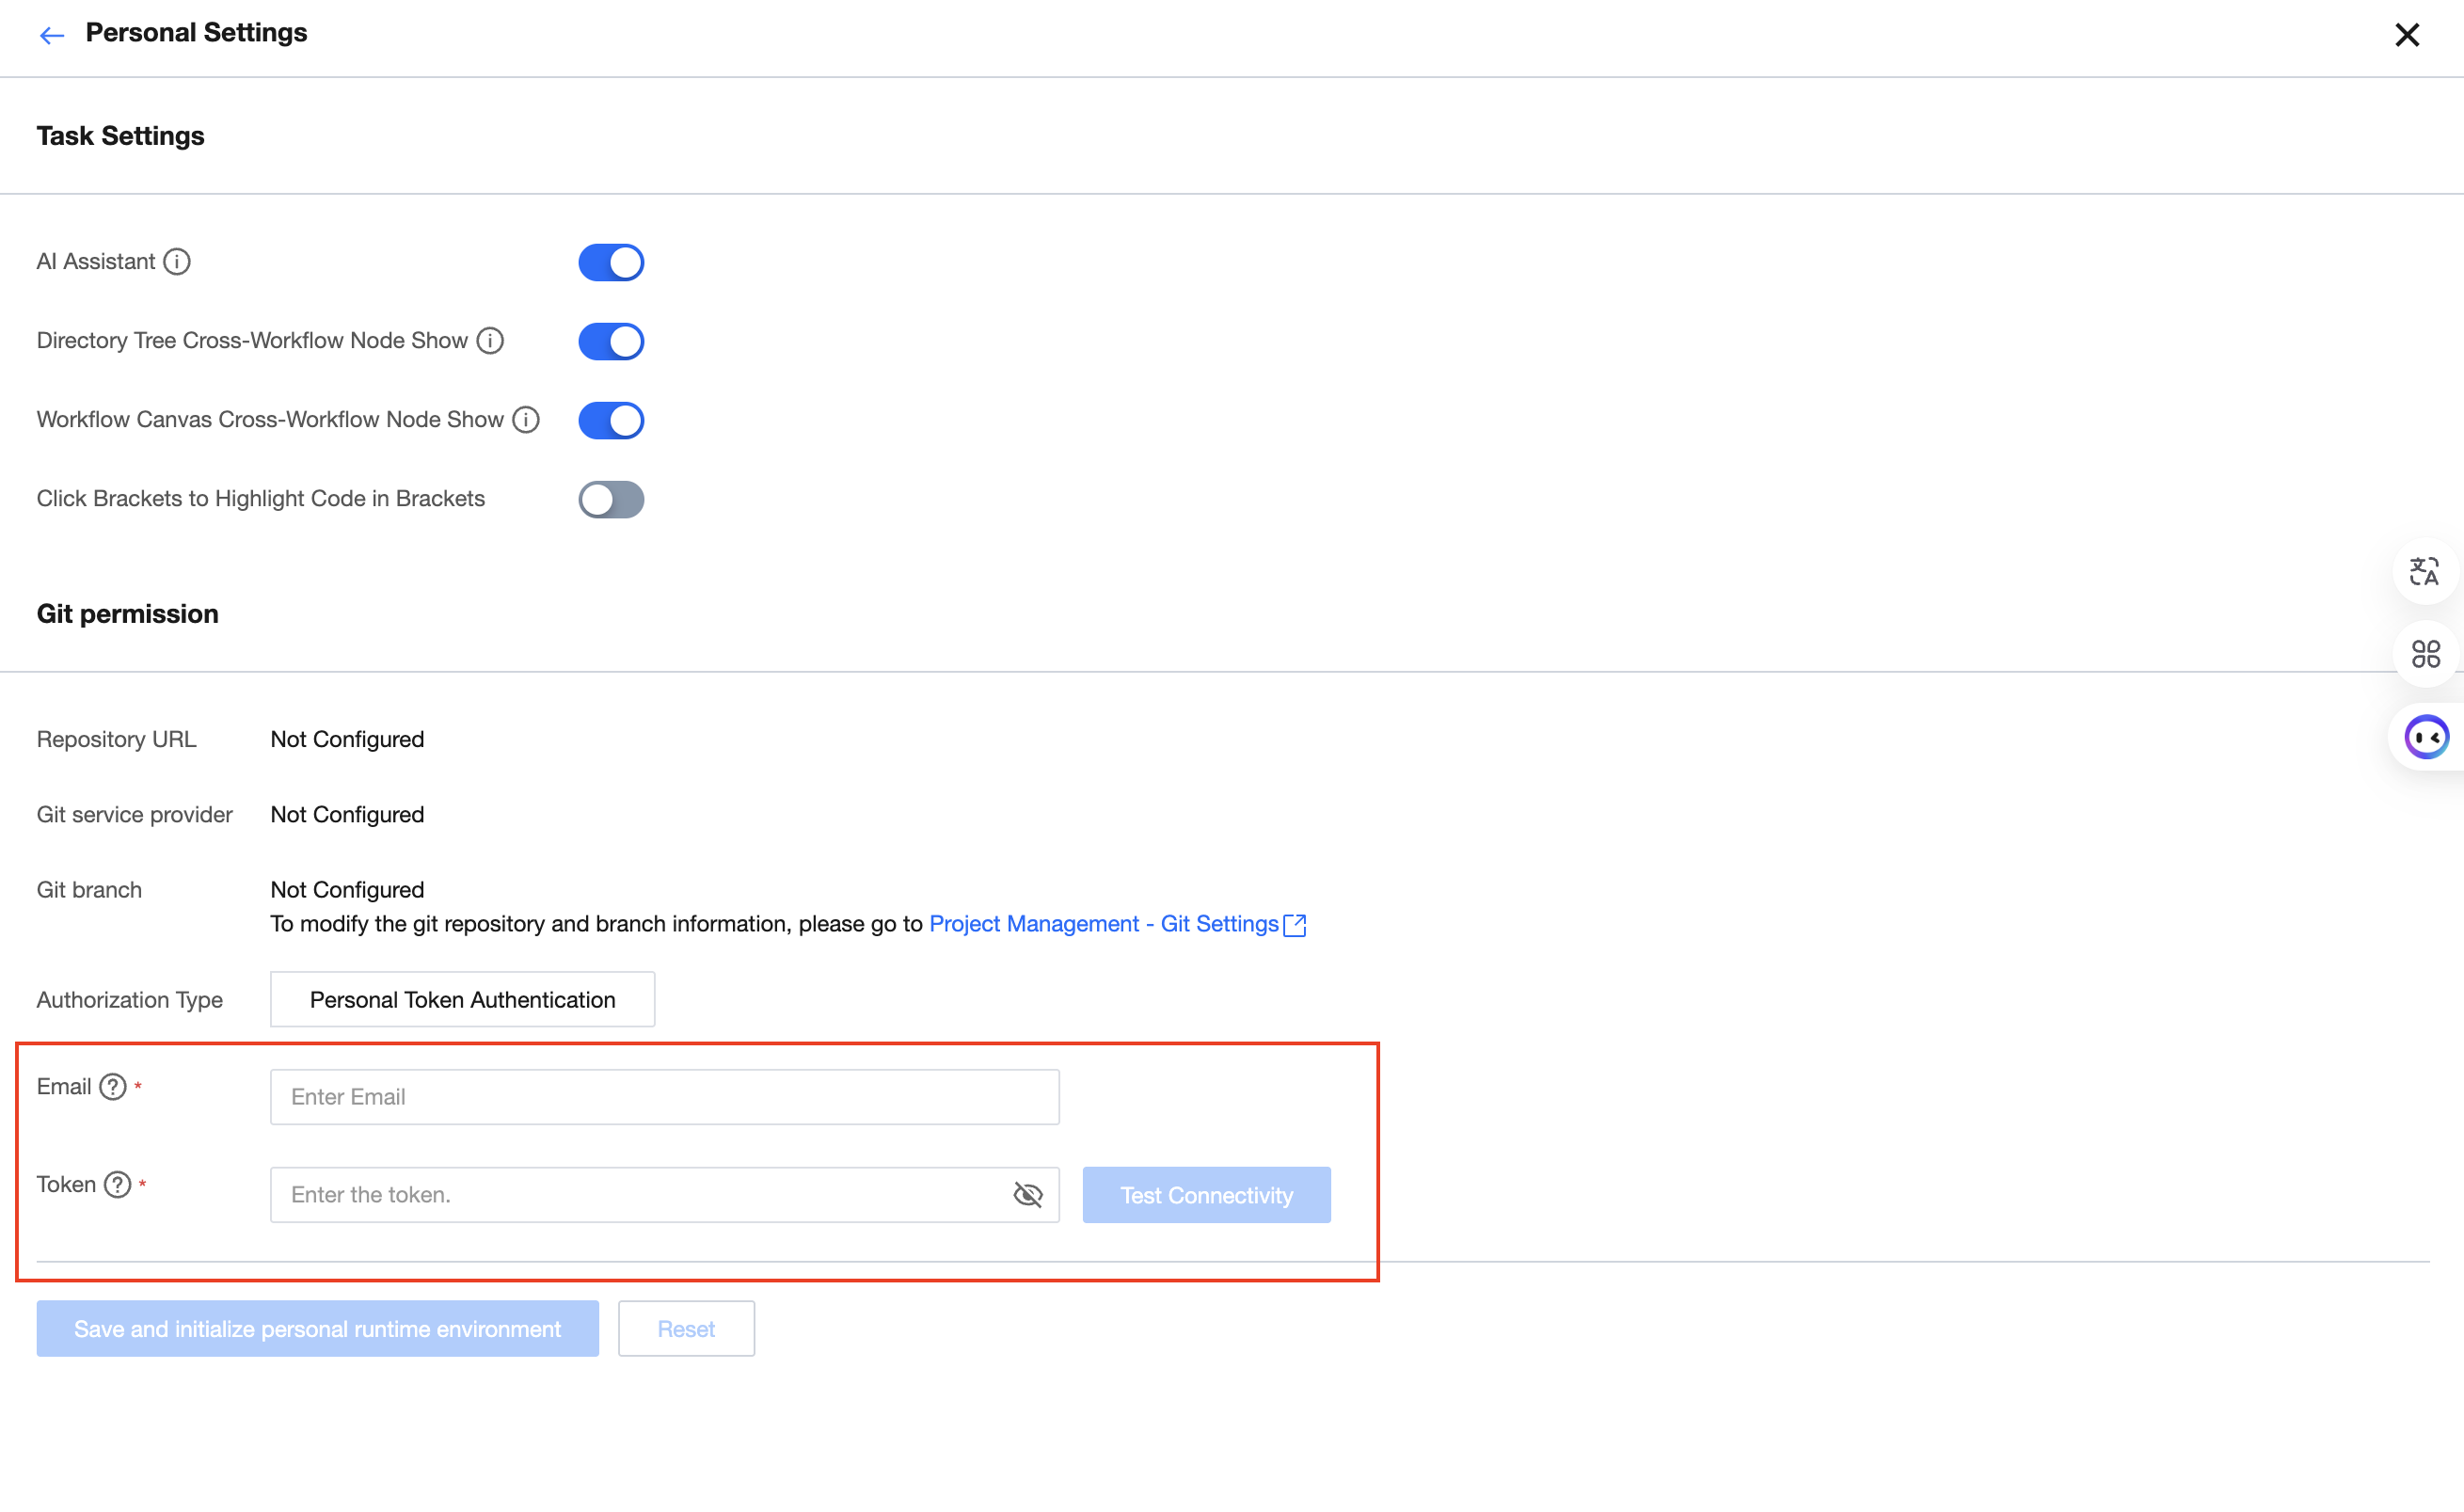
2. Complete the personal Git permission configuration.
Click User Center > Personal Settings in the upper-right corner, configure your personal Git permissions, and fill in your Email and Token information. Then, click Save and Initialize Personal Runtime Environment.
Note:
Token Security Best Practices:
Principle of Least Privilege: Grant Tokens only the necessary permissions (for example, read and write access to code repositories only).
Regular Rotation: It is recommended to rotate Tokens every 3-6 months.
Do not disclose: Never hardcode Tokens in code, and do not share them with others.
Revoke promptly: Immediately revoke the Token on the Git platform when an employee leaves or a Token is leaked.
Verify whether the configuration is successful:
Go to Studio and check whether GitFolder can properly display the repository file list.
If an error message is displayed, check the Token permissions and network connection.
3. Synchronize the dev branch to your local repository.
Go to Studio. All code files under the dev branch will be automatically synchronized in GitFolder.
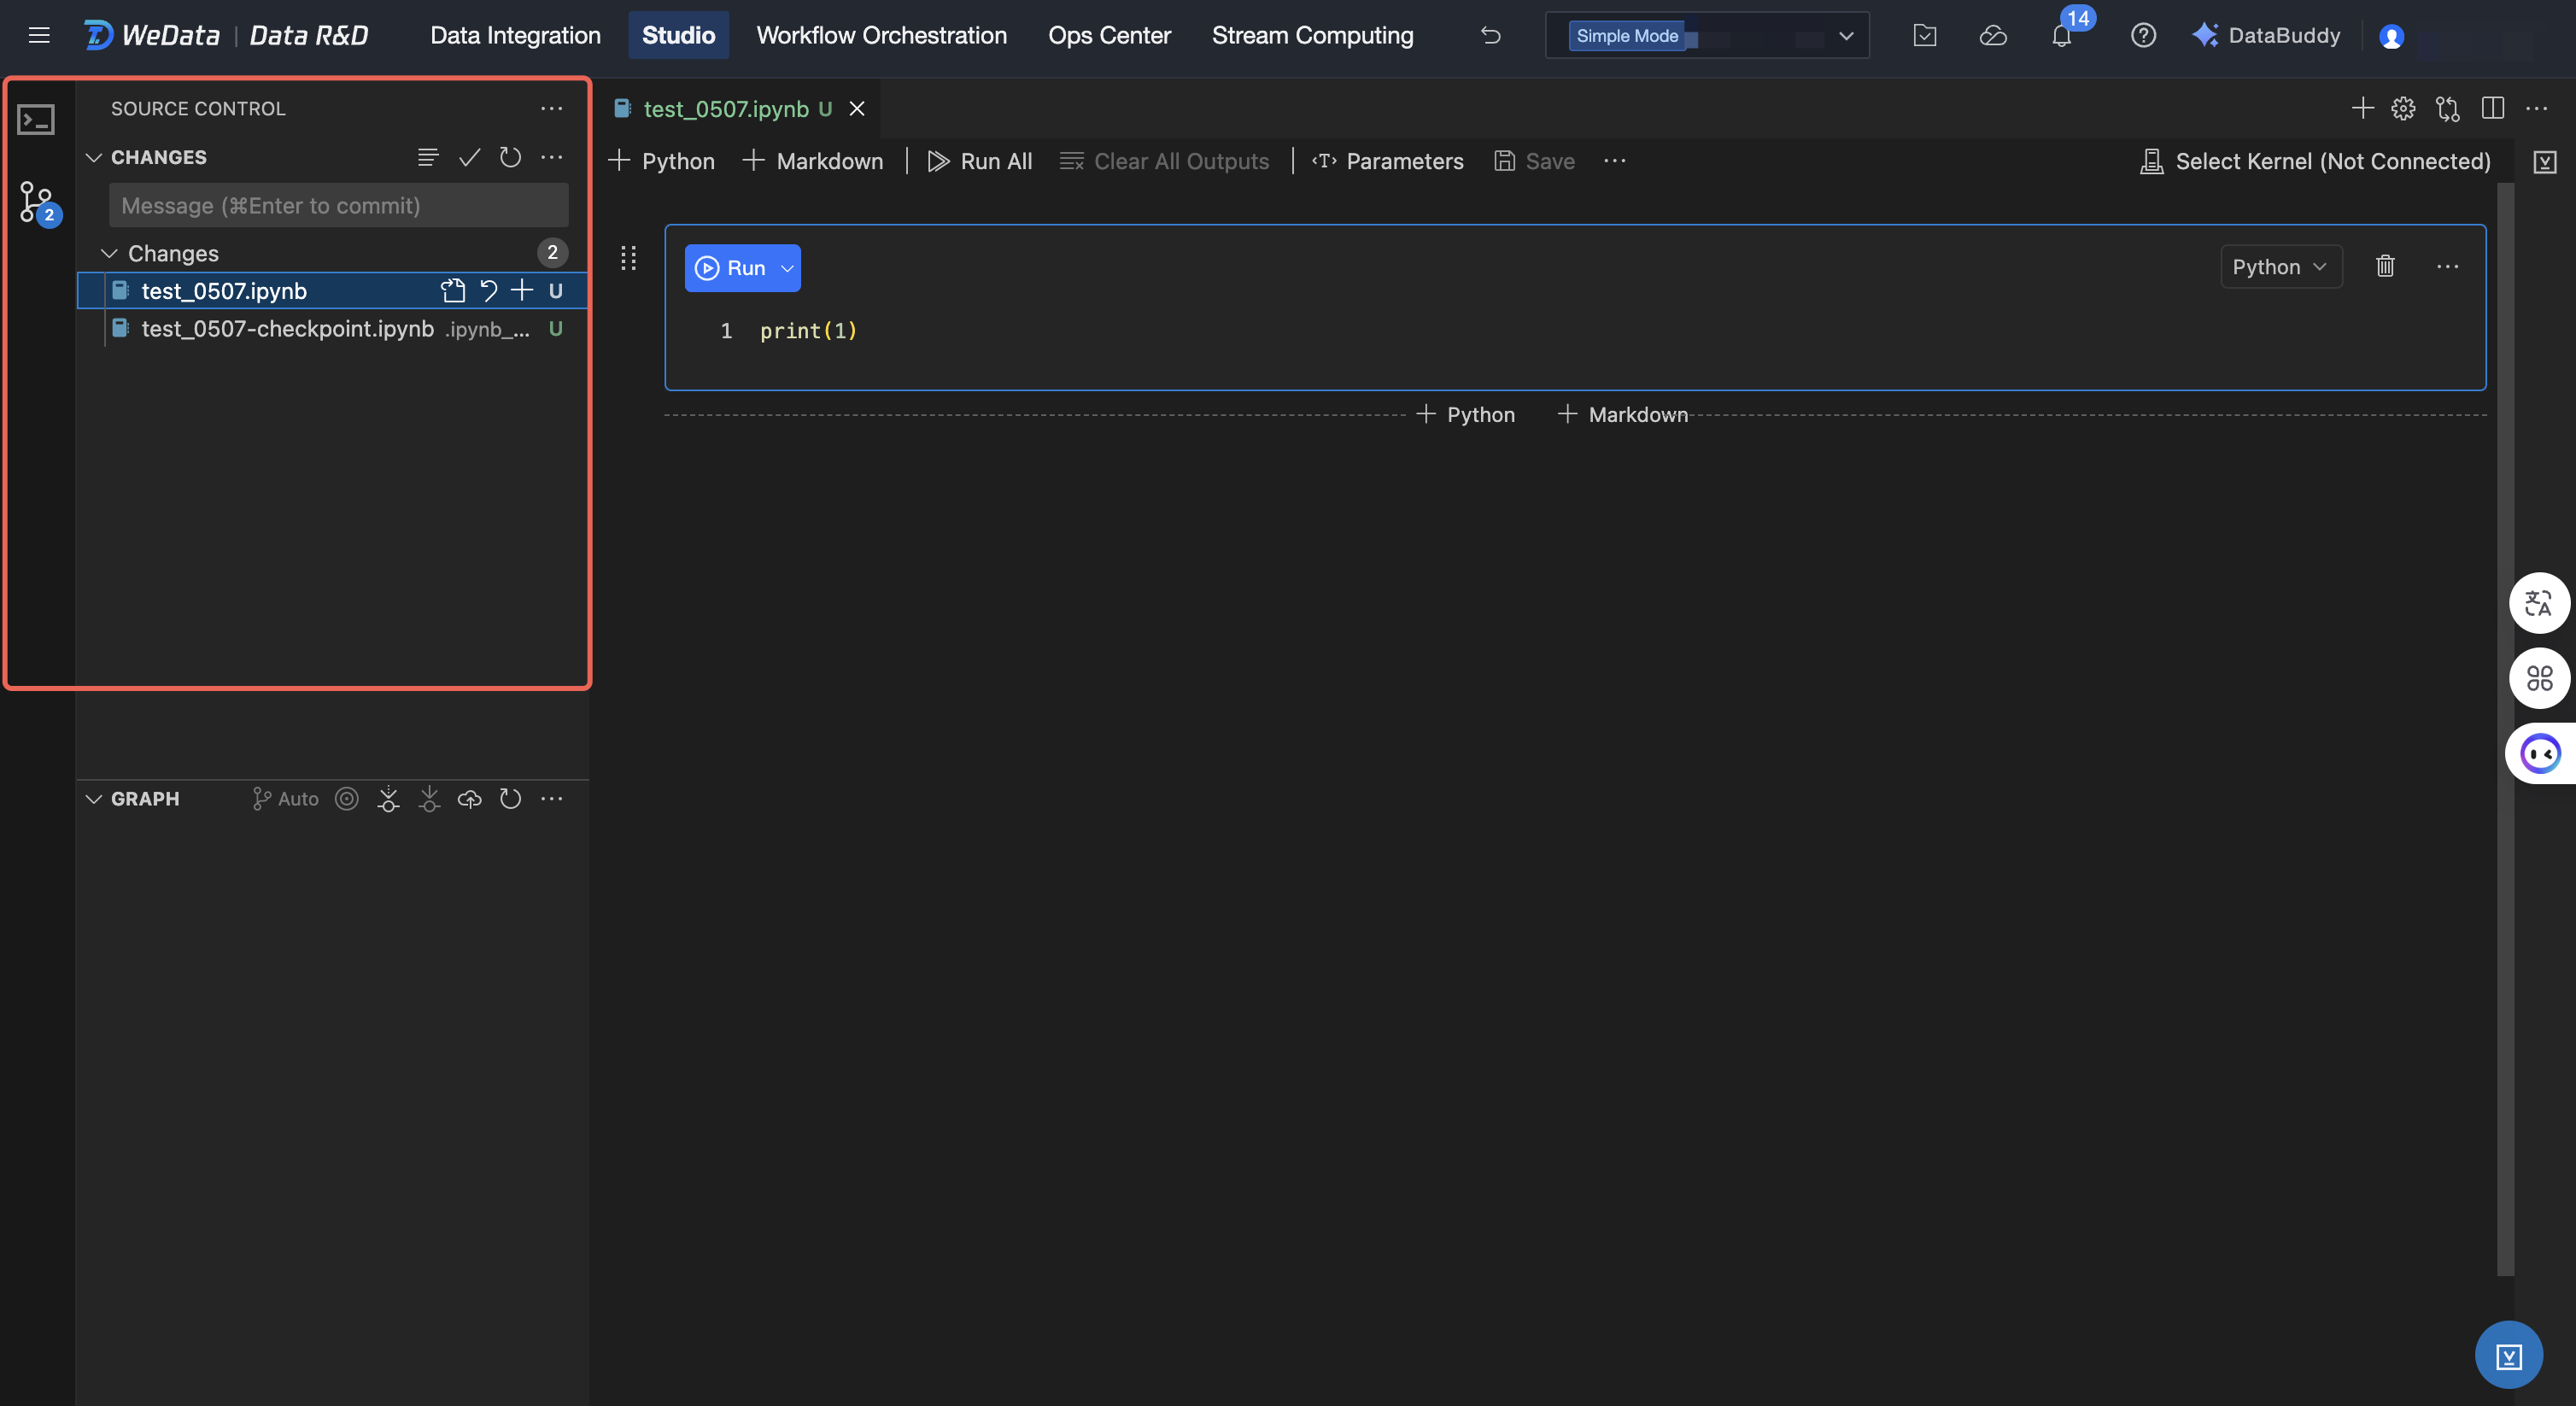
4. Develop and submit the code.
After code development is completed, go to Git source code management:
Stage changes: Select the files to be committed and click "+" to stage them.
Fill in the commit message: Write the commit description according to the commit specification.
Commit code: Click Commit to stage and commit the code changes to the local dev branch.
5. Push the branch to the remote repository.
Click Sync Changes (equivalent to git push) to push the code from the local dev branch to the remote dev branch.
Note:
Push Conflict Resolution:
If a conflict is prompted during push, it indicates that other members have submitted updates. Resolution steps:
1. First, Pull the latest code.
2. Resolve conflicts locally (edit the conflicting files and select the content to keep).
3. Resubmit and push.
6. Create a PR on the Git platform and submit it to Member C for review.
Operate on a remote Git platform (e.g., GitLab/GitHub):
Go to the repository page and click New Pull Request or New Merge Request.
Select the source branch: dev, and the target branch: main.
Fill in the PR title and description to explain the changes in this update.
Specify Member C as the Reviewer.
Submit the PR and wait for review.
Member C: Code Review and Release
1. Review the changes in the PR on the Git platform.
2. Operate on a remote Git platform:
Go to the PR details page and view the Files Changed tab.
Review the code changes line by line, focusing on the following key points:
Check whether the code logic is correct.
Check whether it complies with the coding standards.
Check whether there are potential performance issues.
Check whether there are security risks.
If you identify any issues, add a comment on the corresponding code line to suggest modifications.
If the code needs to be modified, click Request Changes.
3. Approve and merge the dev branch into the main branch.
After the code is confirmed to have no issues:
Click Approve to approve the PR.
Click Merge to merge the dev branch into the main branch.
(Optional) After merging, delete the source branch to keep the repository clean.
Member B: Configuring Production Environment Tasks
1. Go to the production environment project.
Go to the production environment project: project_prod.
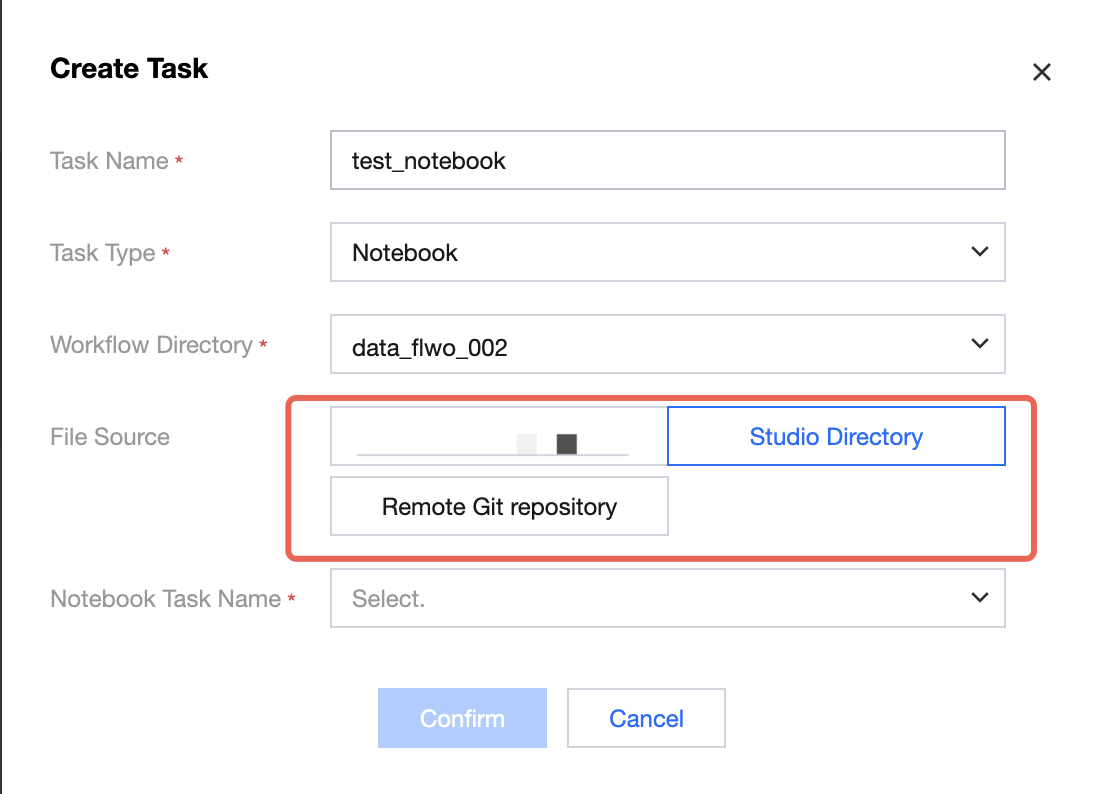
2. Create a Notebook task.
Go to Workflow Orchestration > Orchestration Space, create a workflow and a Notebook task, and reference the Notebook file from the main branch of the remote Git repository.
3. Configure periodic task scheduling.
Click Task Configuration > Scheduling Settings to configure the task's scheduling cycle, for example, to run once daily at 00:00, thereby periodically producing data results.
Studio Git Page Operations Guide
WeData Studio is built on VSCode, and its Git operation page is consistent with VSCode's. For detailed instructions on the Git interface, refer to the VSCode Source Control official documentation.
This document covers the following content:
Using the Source Control Panel
File staging, committing, and pushing operations
View file differences (Diff Editor)
Branch switching and creation
Visual merge conflict resolution
Timeline View (Timeline)
and more advanced features.
Security Best Practices
.gitignore Configuration
Create a .gitignore file in the project root directory to prevent sensitive information from being committed:
# Configuration File*.propertiesconfig/secrets.yaml# Environment Variables.env.env.local# IDE Configuration.idea/.vscode/# Log File*.loglogs/# Temporary Files*.tmp*.bak
Sensitive Information Handling
1. Do not commit passwords, tokens, keys, or other sensitive information to code repositories.
2. Manage sensitive configurations using environment variables or a configuration center.
3. If you accidentally commit sensitive information, take the following actions immediately:
Replace the compromised password/Token.
Contact the Git repository administrator to clean up the history, or refer to the Git platform's sensitive information deletion guide.
FAQs
Why Does the Git Folder Fail to Synchronize Code?
Possible Causes and Solutions:
1. Network Issue: Check the network connection and verify that the Git repository address is accessible.
2. Token Expired: Regenerate the Token and update your personal settings.
3. Insufficient Permissions: Verify that the Token has repository read permissions.
Why Does "Permission Denied" Appear When Code Is Pushed?
Possible Causes and Solutions:
1. Insufficient Token Permissions: Verify that the Token has write permissions.
2. Branch Protection: Check whether protection is enabled on the target branch. Merges must be performed via pull requests.
How to Handle Large Files
Recommendations:
1. Avoid committing large files (such as videos or datasets) directly to Git repositories.
2. Alternatively, store large files in COS and reference the URL in your code.
How to Handle Concurrent File Modifications by Multiple Users?
1. Pull the latest code before starting development.
2. Split large files into multiple smaller ones to reduce the probability of conflicts.
3. Commit and synchronize frequently to avoid a large backlog of code.
4. When a conflict is encountered, resolve it after communicating with the relevant colleagues.
How to View Historical Commit Records?
In the Git source code management panel:
1. Click History or Git Log to view the commit history.
2. You can view the changes, author, and time for each commit.
Related Links
フィードバック