Terminating/Returning Instance
Download
フォーカスモード
フォントサイズ
Scenarios
When you no longer need a TDMQ for CKafka (CKafka) instance, you can delete and release it.
Prerequisites
The instance does not have deletion protection enabled. If the feature has been enabled, disable it before performing the deletion operation. For specific steps, see Configuring Instance Deletion Protection.
The instance status is Running (Healthy/Alarm).
Operation Steps
Manual Return
For yearly/monthly subscription instances that have not expired, you can manually request a return for the instance. The steps are as follows:
1. Log in to the CKafka console.
2. In the left sidebar, select Instance List. Select your region and find the target instance.
Delete a single instance: Choose More > Terminate/Return in the Operation column of the target instance.
Delete multiple instances: Select all instances you want to delete, and then click Terminate/Return in the upper-left corner of the instance list.
3. Complete identity verification through WeChat QR code and mobile captcha in the pop-up window to ensure the operation is authorized by the account owner.
4. In the pop-up window for requesting an instance return, confirm the details of the resources, read the refund rules, and then click View Refund Information.
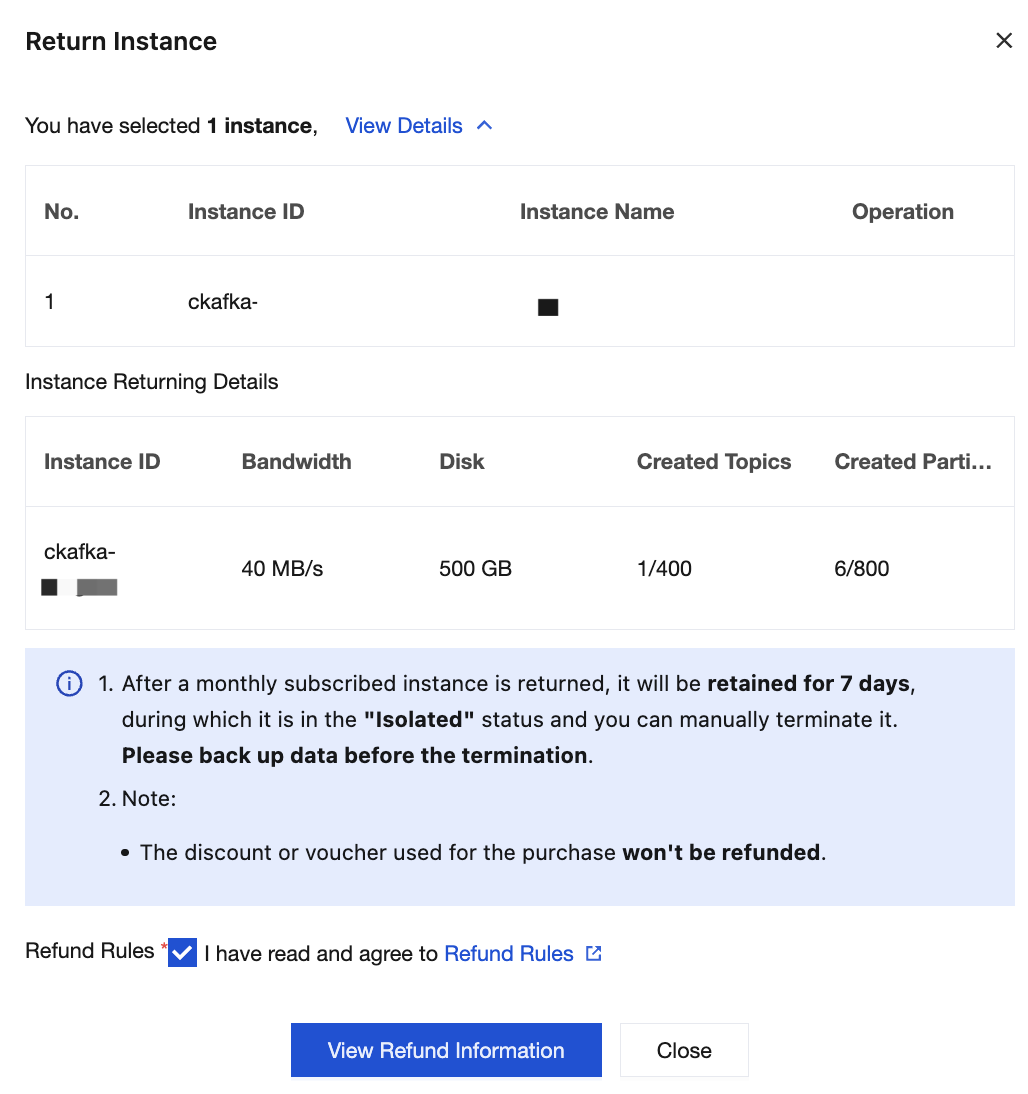
5. On the unsubscription list page, carefully review the refund information, such as the relevant instance details. Click Confirm Unsubscribe. After submission, the refund will be processed, and the instances will be returned.
Note:
After a yearly/monthly subscription instance is returned, it will be retained for 7 days (status: Isolated). During the isolation period, you can manually delete the instance permanently or manually renew it to recover the instance. If not renewed, the instance will be automatically and permanently deleted after 7 days. Once deleted, all resources and metadata of the instance will be cleared and cannot be recovered. Back up your data in advance.
Instances in the Isolated status cannot produce or consume data. Existing data and configurations stored in the CKafka instance will not be deleted, but expired messages will still be automatically deleted based on the Apache Kafka mechanism.
For more information about refunds, see Refund.
Automatic Return upon Expiration or Overdue Payment
A yearly/monthly subscription instance can be retained in the CKafka console for up to 7 calendar days after expiration or overdue payment. If renewal is completed within 7 days, the instance can continue to be used. For more information, see Overdue Payments.
If your CKafka instance is not renewed within 7 days (including the 7th day) after expiration, the system will release the resources within approximately 24 hours after expiration. All data in the expired instance will be deleted and cannot be recovered.
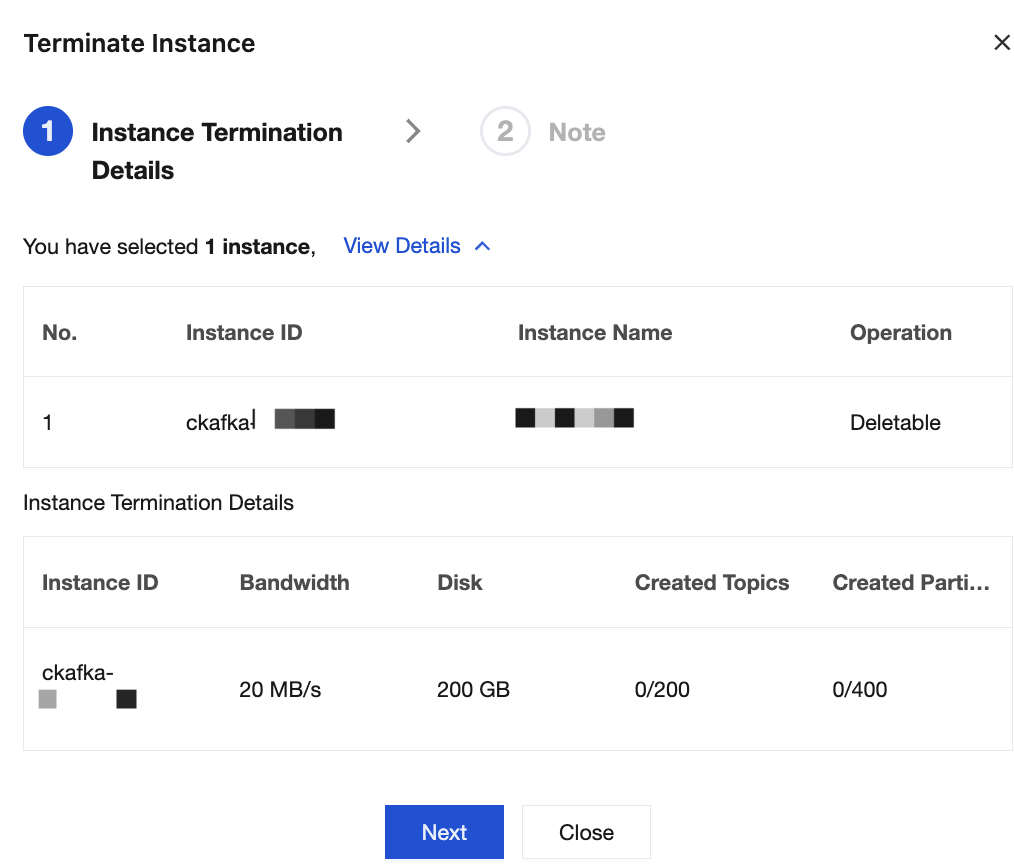
Deleting an Instance
After a yearly/monthly subscription instance is manually returned or automatically returned upon expiration or overdue payment, it remains in the console for 7 days with a status of Isolated. It is permanently released after 7 days (including the 7th day). During this period, you can choose to delete the instance permanently.
Note:
After deletion, all data will be cleared and cannot be recovered. Back up your data in advance.
1. Log in to the CKafka console.
2. In the left sidebar, select Instance List. Select your region and choose More > Terminate/Return in the Operation column of the target instance.
3. In the pop-up window for confirmation of the deletion, click Submit to permanently delete the instance.
You can delete pay-as-you-go instances permanently in the console.
Note:
Permanently deleting an instance will immediately remove it from the instance list for your account. The instance cannot be recovered afterward through renewal or any other means.
After deletion, all data will be cleared and cannot be recovered. Back up your data in advance.
1. Log in to the CKafka console.
2. In the left sidebar, select Instance List. Select your region and find the target instance.
Delete a single instance: Choose More > Delete/Return in the Operation column of the target instance.
Delete multiple instances: Select all instances you want to delete, and then click Delete/Return in the upper-left corner of the instance list.
3. Complete identity verification through WeChat QR code and mobile captcha in the pop-up window to ensure the operation is authorized by the account owner.
4. In the pop-up window for confirmation of the deletion, confirm the deletion details and click Next. In the confirmation pop-up window, click Confirm Deletion to delete the instance.
フィードバック