ロール作成
ダウンロード
フォーカスモード
フォントサイズ
操作シナリオ
本ドキュメントは、Cloud Access Management (CAM)コンソールまたはCAM APIの2つの方法を使用してロールを作成する方法を紹介します。作成が成功した後、ロールは取得した権限の範囲内でマスターアカウント下のリソースを管理できます。
前提条件
操作手順
コンソールでの作成
Tencent Cloudマスターアカウント向けロールの作成
1. ロールリストページで、新規ロール作成をクリックします。
2. ポップアップしたロール担い手選択ウィンドウで、Tencent Cloudアカウントをロール担い手として選択し、ロール情報入力ページに進みます。

3. ロール担い手情報入力ページで、以下の情報を入力します。次へをクリックします。
クラウドアカウントタイプ:「現在のメインアカウント」または「他のメインアカウント」を選択します。
アカウントID:Tencent Cloudリソースにアクセスするためのロールの引き受けを許可するメインアカウントIDを入力します。デフォルトではご自身のメインアカウントIDが入力されています。
コンソールアクセス:チェックを入れると、現在のロールがコンソールにアクセスすることを許可します。
外部ID:作成するロールをサードパーティの外部プラットフォームで使用するために割り当てる場合、またはアカウントおよびロール情報が他のユーザーによって比較的容易に取得される可能性がある場合、外部ID検証を有効化することをお勧めします。有効化後は、外部IDの入力が必要です。
4. ポリシーリスト内で、現在作成中のロールに付与したいポリシーにチェックを入れ、次へをクリックします。
5. ロールのTagキーとTag値をマークし、次へをクリックします。
6. ロール名を入力します。ロール担い手とポリシー情報を確認し、問題がないことを確認した後、完了をクリックすると、カスタムロールの作成が完了します。
説明:
Tencent Cloudプロダクトサービス向けロール作成
1. ロールリストページで、新規ロール作成をクリックします。
2. ポップアップ表示されるロール担い手選択ウィンドウで、Tencent Cloudプロダクトサービスをロール担い手として選択し、ロール情報入力ページに進みます。
Tencent Cloudプロダクトサービスがサービスロールの使用をサポートしているかどうかは、CAMをサポートするプロダクトを参照してください。
3. ロール機能をサポートしているサービスプロダクトリスト内で、必要なサービスをロール担い手として選択し、次へをクリックします。
4. ポリシーリスト内で、現在のロールに追加したいポリシー(ロールにポリシーを設定する)にチェックを入れ、次へをクリックします。
5. ロールのTagキーとTag値をマークし、次へをクリックします。
6. ロール名を入力します。作成するロールの関連情報を確認し、問題がないことを確認した後、完了をクリックすると、カスタムロールの作成が完了します。
身分プロバイダ向けロールの作成
1. ロールリストページで、新規ロール作成をクリックします。
2. ポップアップ表示されるロール担い手選択ウィンドウで、身分プロバイダをロール担い手として選択し、ロール情報入力ページに進みます。
身分プロバイダは作成済みの身分プロバイダを指し、その中から今回ロールを作成する身分プロバイダを選択します。
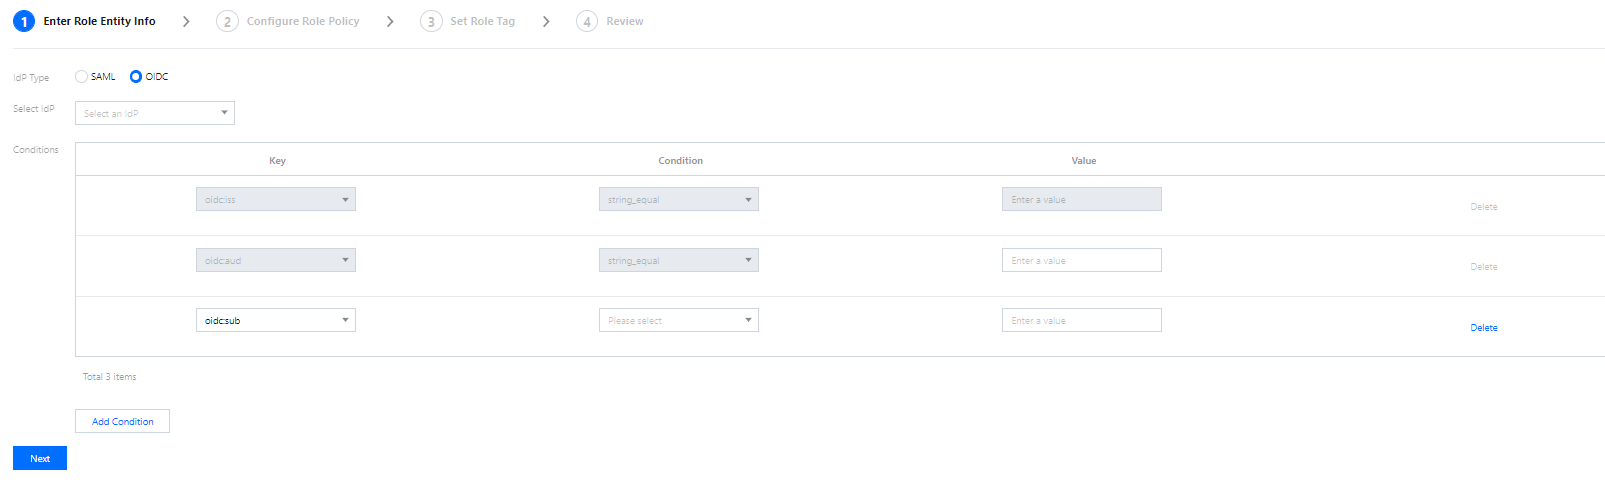
3. 身分プロバイダのタイプと具体的な身分プロバイダを選択し、必要に応じて使用条件を設定して、次へをクリックします。
身分プロバイダタイプ:SAMLとOIDCをサポートしています。
身分プロバイダの選択:今回ロールを作成する身分プロバイダを選択します。
コンソールアクセス(オプション):ロールがTencent Cloud管理コンソールにログインすることを許可するかどうかを管理します。ロールはデフォルトですべてプログラマティックアクセスでTencent Cloudにアクセス可能です。
利用条件(オプション):身分プロバイダがこのロールを使用する条件を管理します。詳細は利用条件を参照してください。
4. ポリシーリスト内で、現在のロールに追加したいポリシーにチェックを入れ、ロールの権限設定を完了し、次へをクリックします。
5. ロールのTagキーとTag値をマークし、次へをクリックします。
6. カスタムロール名を入力します。作成するロールの関連情報を確認し、問題がないことを確認した後、完了をクリックすると、カスタムロールの作成が完了します。
APIによる作成
Tencent Cloudアカウントのロール作成
Tencent Cloudは、CAM APIを使用してロールを新規作成することをサポートしています。典型的なケースを通じて、APIを使用してロールを作成する方法を簡単に理解していただけます。
以下のシナリオを想定します。会社Aには運用保守エンジニアのポジションがあり、そのポジションを会社Bに外部委託したいと考えています。このポジションは、会社Aの広州リージョンにあるすべてのCloud Virtual Machine (CVM)リソースを操作する必要があります。
会社Aの企業アカウントCompanyExampleA(ownerUinは12345)は、ロールを作成し、ロール担い手を会社Bの企業アカウントCompanyExampleB(ownerUinは67890)に設定します。
1. 会社Aの企業アカウントCompanyExampleA(ownerUin:12345)は、CreateRoleインターフェースを呼び出してroleNameをDevOpsRoleとするロールを作成し、policyDocument(ロール信頼ポリシー)パラメータを次のように設定します:
{"version": "2.0","statement": [{"action": "name/sts:AssumeRole","effect": "allow","principal": {"qcs": ["qcs::cam::uin/67890:root"]}}]}
2. 会社Aの企業アカウントCompanyExampleA(ownerUinは12345)は、先ほど作成したロールに権限を付与する必要があります。
3. 会社Aの企業アカウントCompanyExampleA(ownerUinは12345)は、ポリシーDevOpsPolicyを作成し、ポリシー構文は次のとおりです:
{"version": "2.0","statement": [{"effect": "allow","action": "cvm:*","resource": "qcs::cvm:ap-guangzhou::*"}]}
4. 会社Aの企業アカウントCompanyExampleA(ownerUin:12345)は、AttachRolePolicyを呼び出し、ステップ1で作成したポリシーをロールDevOpsRoleに紐付けます。パラメータとしてpolicyName=DevOpsPolicy、roleName=DevOpsRoleを指定します。
上記の手順を経て、会社Aの企業アカウントCompanyExampleA(ownerUinは12345)はロールの作成と権限付与を完了しました。
身分プロバイダ向けロールの作成
1. 作成予定のロールの信頼ポリシーを準備します。
説明:
信頼ポリシーの各フィールドは以下のように規定されています:
actionフィールド:SAMLフェデレーティッド身分による現在のロールの使用を許可するインターフェースを定義します。
sts:AssumeRoleWithSAMLを使用します。principal フィールド:現在のロールを使用できる身分プロバイダを定義します。
{"federated": [ IdPArn ]} 文字列を使用します。例:qcs::cam::uin/10001:saml-provider/idp_name。conditionフィールド:現在のロールの使用を許可する条件を定義します。デフォルトでは
{"StringEquals": {"SAML:aud": "https://cloud.tencent.com/login/saml"}}を使用します。この条件は、SAMLフェデレーションエンドポイントがTencent Cloudの身分プロバイダである場合にのみ、このロールの使用を許可するように制限します。 ロールの信頼ポリシーの例は次のとおりです:
{"version": "2.0","statement": [{"action": "name/sts:AssumeRoleWithSAML","effect": "allow","principal": {"federated": ["qcs::cam::uin/10001:saml-provider/idp_name"]},"condition": {"string_equal": {"saml:aud": "https://cloud.tencent.com/login/saml"}}}]}
2. 作成予定のロールの権限ポリシーを準備します。権限ポリシーについてはポリシーをご参照ください。
3. camの呼び出す:CreateRoleインターフェースを呼び出して身分プロバイダロールを作成します。
利用条件
SAMLが現在サポートしている条件は以下の通りです:
条件キー | 意味 | 必須入力かどうか | 説明 |
saml:aud | 受信者 | 任意入力 | SAMLアサーションの送信先エンドポイントURLであり、このキーの値はアサーション内のSAML Recipientフィールドから取得され、Audienceフィールドからではありません。 |
saml:iss | 送信者 | 任意入力 | このキーの値は、アサーション内のURNで示されるSAML Issuerフィールドから取得されます。 |
saml:sub | 外部アカウントID | 任意入力 | これは、組織内の特定のユーザーを唯一に識別する値を含むステートメントのサブジェクトです。このキーは、アサーション内のSAML NameIDフィールドから取得されます。 |
saml:sub_type | 外部ユーザータイプ | 任意入力 | このキーは、アサーション内の SMAL NameID の Format 属性から取得されます。 |
OIDCが現在サポートしている条件は以下の通りです:
条件キー | 意味 | 必須入力かどうか | 説明 |
oidc:iss | OIDC発行者(Issuer) | 必須 | この条件では必ずstring_equalを使用する必要があり、条件値はOIDC身分プロバイダで入力した身分プロバイダのURLのみ可能です。ロールの引き受けに使用されるOIDCトークン内のissフィールド値がこの条件を満たす必要があり、そうして初めてロールの引き受けが許可されます。 |
oidc:aud | OIDC オーディエンス(Audience) | 必須 | この条件では必ずstring_equalを使用する必要があり、条件値はOIDC身分プロバイダで設定した1つまたは複数のクライアントIDのみ使用可能です。ロールの引き受けに使用されるOIDCトークン内のaudフィールド値がこの条件を満たす必要があり、そうして初めてロールの引き受けが許可されます。 |
oidc:sub | OIDC サブジェクト(Subject) | 任意入力 | この条件では任意のstringクラスの条件操作タイプを使用でき、条件値は最大10個のOIDCサブジェクトを設定できます。ロールの引き受けに使用されるOIDCトークン内のsubフィールド値がこの条件を満たす必要がある場合にのみ、ロールの引き受けが許可されます。 |
フィードバック