Creating an Account
다운로드
포커스 모드
폰트 크기
Scenarios
In TencentDB for MongoDB, an account serves as the identity credential for database instance access. The role bound to the account determines the operations it can perform and the scope of resources it can access. By creating accounts and configuring role permissions through the console, you can assign independent access credentials to different applications, team members, or external collaborators. This helps avoid misoperations and unauthorized access resulting from sharing a common account. This approach is applicable to the following scenarios:
Application Access: Create a dedicated account for the newly launched business system. Grant it permissions to access only the target database or collection, following the principle of least privilege. This reduces the risk of application-layer fault propagation to the entire instance.
Multi-Role Collaboration: Create accounts for different roles such as development, operations (Ops), and data analysis. Grant them corresponding database roles (such as read, readWrite, and dbAdmin) to achieve separation of duties and enable operation auditing (CloudAudit).
Database/Collection-Level Fine-Grained Authorization: When a business requires independent read/write isolation for a single collection, you can achieve fine-grained permission control for the specified collection by referencing a custom role.
Quick Permission Reuse: When creating an account for a new member with the same permissions as an existing account, you can adjust roles based on the existing account. This avoids repetitive configuration and improves Ops efficiency.
Feature Description
Creating an account involves two steps: configuring account information and setting permissions. Two modes are provided for permission setting:
Quick Configuration: This mode grants general roles such as read and readWrite based on a two-tier model of "global permissions + single-database permissions". It is suitable for routine scenarios where read/write permissions for all databases or a single database need to be granted at once.
Custom Configuration: This mode grants roles based on the MongoDB RBAC model. It supports selecting database roles, global roles, or custom roles, and allows precise specification down to the database and collection levels. It is suitable for scenarios requiring fine-grained authorization at the database/collection level.
Usage Notes
Note:
After the successful creation of an account or modification of account permissions, the system requires 2 minutes for background configuration to take effect. Wait a moment before using the account to connect to or access the database.
To ensure database access security, it is recommended to change your account password regularly, with a recommended interval of no more than 3 months.
Prerequisites
The status of the replica set instance or sharded cluster instance of TencentDB for MongoDB is Running.
Operation Steps
Step 1: Go to the Account Creation Page
1. Log in to the TencentDB for MongoDB console.
2. In the left sidebar, expand the MongoDB dropdown list, and select either Replica Set Instance or Shard Instance. The operations for replica set instances and sharded cluster instances are similar.
3. Select a region at the top of the instance list page on the right.
4. Find the target instance in the instance list.
5. Click the target instance ID to go to the Instance Details page.
6. Select the Database Management tab, go to the Account Management page, and click Create Account.
Step 2: Enter Account Information
In the Create Account pop-up window, configure the account information as shown in the table below, and then click OK.
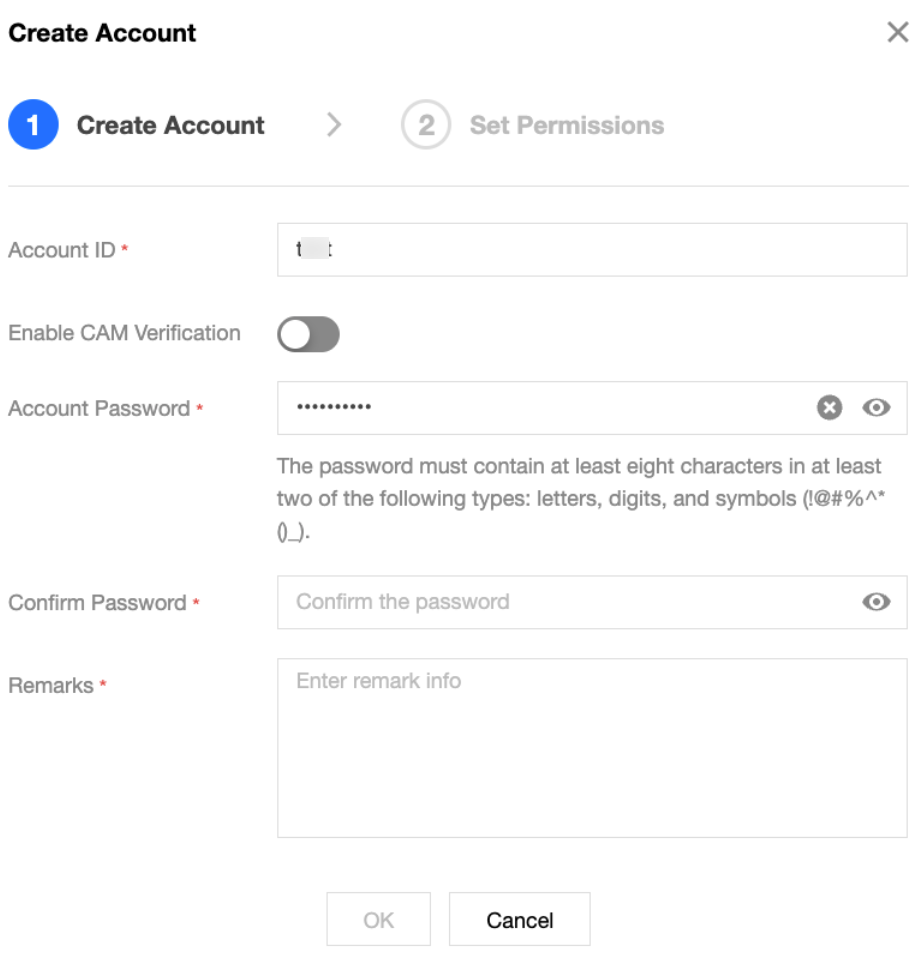
Parameter Name | Required or Not | Description | Rule and Example |
Account ID | Yes | Sets a name for the new account. | Length: 1 to 32 characters. Only letters (A - Z, a - z), digits (0 - 9), underscores (_), and hyphens (-) are supported. For example, app_order. |
Enable CAM Verification | No | Binds the account to Tencent Cloud Access Management (CAM), using dynamically generated security credentials to replace static passwords. For details, see Enable CAM Verification. | Disabled by default. Note: After CAM authentication is enabled, the password for this account can no longer be changed, and access tokens can only be dynamically obtained through the CAM API. It is recommended to enable this feature only for scenarios that require dynamic credentials, such as temporary access or compliance audits. |
Account Password | Yes | Sets the login password for the new account. | Length: 8 to 32 characters. Must contain at least two of the following: letters, digits, and special characters. Allowed special characters are ! @ # % ^ * ( ) _. For example, Test@123. |
Confirm Password | Yes | Re-enter the password for the new account, which must match the one entered above. | Same as above. |
Remarks | Yes | Describes the purpose of the account to facilitate subsequent Ops identification. | Any characters. It is recommended to specify the business or owner to which the account belongs. For example, order service read/write account. |
Step 3: Select a Permissions Configuration Mode
After completing the account information, click Next to go to the Set Permissions page. The system provides two modes: Quick configuration and Custom configuration, with Quick configuration selected by default.
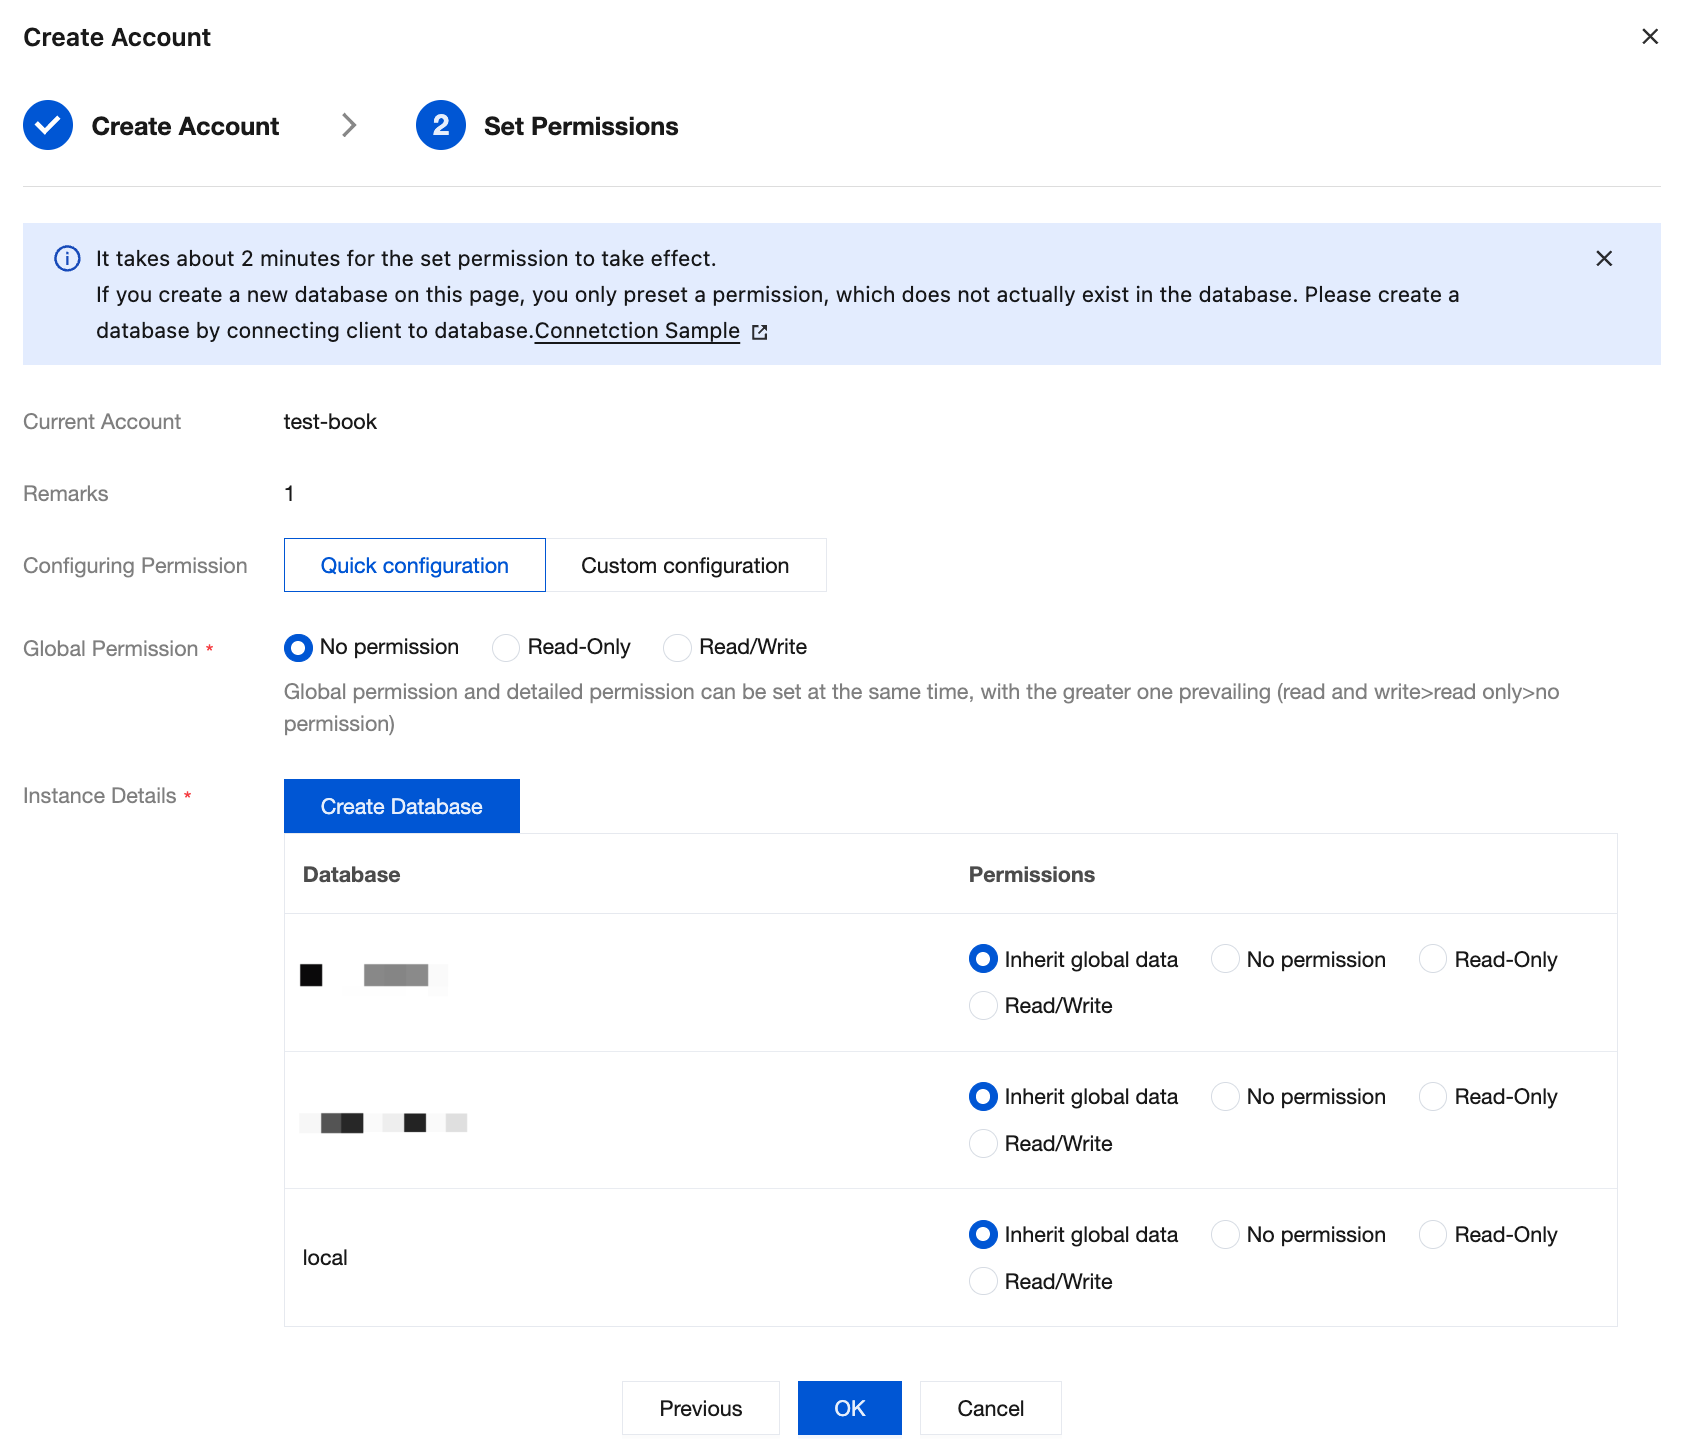
Mode | Applicable Scenarios | Capability Scope |
Quick configuration | Conventional scenarios for granting read/write permissions to all databases or a single database at once. | Configure global permissions (No Access / Read-Only / Read-Write) and database-specific permissions (Inherit Global / No Access / Read-Only / Read-Write). |
Custom configuration | Scenarios requiring authorization by role category and fine-grained authorization at the database and table level, down to the collection level. | Select a database role, global role, or custom role, specify permissions down to the database and collection level, and support adding multiple authorization entries at once. |
Attention:
The switching rules between the two modes are as follows:
Quick configuration → Custom configuration: Authorizations already set in Quick configuration are automatically synchronized to Custom configuration and their display status is retained.
Custom configuration → Quick configuration: The system displays a pop-up message stating that "Permissions configured in Custom configuration will be cleared after the switch to Quick configuration is performed." The switch is executed only after a secondary confirmation.
Step 4: Grant Permission Using Quick Configuration (Scenario A)
1. In the Global Permission section, select the account's default permissions for all databases from the dropdown list.
Option | Description |
No permission | Has no read or write permissions on any database. |
Read-only | Has read permissions on all databases, which is equivalent to binding the readAnyDatabase role. |
Read/write | Has read and write permissions on all databases, which is equivalent to binding the readWriteAnyDatabase role. |
2. In the Instance Details section, refine permissions for individual databases.
Option | Description |
Inherit global data | Inherits the settings of global permissions. |
No permission | Has no read or write permissions on this database. |
Read-Only | Has read permissions on this database, which is equivalent to binding the read role on this database. |
Read/Write | Has read and write permissions on this database, which is equivalent to binding the readWrite role on this database. |
3. (Optional) Click Create Database to add a new record to the database list. Enter the database name in the input box, click OK to save, and then set the access permissions for this database.
Note:
The "Create Database" operation here only pre-configures the access permissions for the database in the console and does not immediately create a physical database in MongoDB. The physical database is automatically created by MongoDB when data is first written to it.
4. Click OK to complete the creation. After waiting 2 minutes for the system configuration to take effect, you can use this account for database access.
Step 5: Grant Permissions Using Custom Configuration (Scenario B)
This applies to database/collection-level fine-grained authorization scenarios that involve "authorization by role category, down to the collection level." On the Set Permissions page, switch to the Custom Configuration tab and add authorizations by following the procedure below.
1. In the dropdown list of Role Configuration, select the role type and role, as well as the database to be authorized.
Each authorization record can only be assigned one or more roles from a single role category.
Click Add to create a new authorization record. Configure roles for each record.
Role Category | Select a role or action (Multiple Selection Supported) | Select Database | Select Collection |
Database Role | read,readWrite,dbOwner,userAdmin,dbAdmin,enableSharding | Supports single selection, multiple selection, and select all. | Grayed out and unselectable |
Global Role | readAnyDatabase, readWriteAnyDatabase, userAdminAnyDatabase, dbAdminAnyDatabase, clusterManager, clusterAdmin, clusterMonitor, hostManager, enableSharding, backup, restore, and so on | Grayed out and unselectable | Grayed out and unselectable |
Custom Role | Custom roles created in Role Management | Grayed out and unselectable | Grayed out and unselectable |
Note:
Role categories are mutually exclusive within a single authorization record. However, you can grant multiple categories of authorization to the same account by adding additional records. For example: In the first record, select "Database role readWrite + Database order"; in the second record, select "Custom role audit_role".
Global roles apply to all databases within an instance and cannot be restricted to specific databases or collections. Therefore, the database and collection selection options are grayed out.
The scope of a database role is limited to all collections under a specified database and cannot be restricted to specific collections. To achieve collection-level precision, you must create a custom role (see Role Management).
2. Click Preview to view the command line that will be generated by this authorization in the Permission Change Preview window.
Note:
The permission preview lists commands such as `db.grantRolesToUser` and `db.createUser` that the system will issue to MongoDB, allowing you to verify the authorization scope before creation. This preview is for display purposes only and will not be executed immediately.
3. After verifying that everything is correct, click OK to complete the creation. After waiting 2 minutes for the system configuration to take effect, you can use this account for database access.
Attention:
When selecting a global role, assess its business impact. High-privilege roles such as root and __system can perform any operation on an instance. It is recommended to grant these roles only for short periods in specific scenarios such as Ops or migration. They are not recommended for long-term assignment to business accounts.
Related APIs
API | Description |
Creating an Account | |
Querying all accounts of the current instance. | |
Setting account permissions for the instance. | |
Modifying the account password |
피드백